Installation Manual
Page 3
.... ! In some cases, it may not be considerably more severe if your navigation system. ! We recommend that only authorized Pioneer service personnel, who have special training and experience in the light of actual driving conditions. ! NEVER SERVICE THIS PRODUCT YOURSELF. Please...are in your vehicle's interior, the navigation system should not divert your attention from the safe operation of your vehicle. This manual explains how to install this manual fully and carefully before making the necessary adjustments. ! Installing or servicing this navigation system (or...
.... ! In some cases, it may not be considerably more severe if your navigation system. ! We recommend that only authorized Pioneer service personnel, who have special training and experience in the light of actual driving conditions. ! NEVER SERVICE THIS PRODUCT YOURSELF. Please...are in your vehicle's interior, the navigation system should not divert your attention from the safe operation of your vehicle. This manual explains how to install this manual fully and carefully before making the necessary adjustments. ! Installing or servicing this navigation system (or...

Installation Manual
Page 8
...Connecting the system Connecting the system The navigation unit 3.55 m (11 ft. 8 in.) GPS antenna SiriusXM Connect Vehicle Tuner Please refer to Operation Manual. USB interface cable for iPod (sold separately) 4 m (13 ft. 1 in a location where it is being driven except for SiriusXM ... storage device, pull out the plug and insert a USB storage device. Vehicle antenna iPhone (*1) (*1) For details concerning operations and compatibility, refer to the instruction manual for navigation purposes. And, also rear displays should not be in .) Microphone WARNING · To avoid the risk of...
...Connecting the system Connecting the system The navigation unit 3.55 m (11 ft. 8 in.) GPS antenna SiriusXM Connect Vehicle Tuner Please refer to Operation Manual. USB interface cable for iPod (sold separately) 4 m (13 ft. 1 in a location where it is being driven except for SiriusXM ... storage device, pull out the plug and insert a USB storage device. Vehicle antenna iPhone (*1) (*1) For details concerning operations and compatibility, refer to the instruction manual for navigation purposes. And, also rear displays should not be in .) Microphone WARNING · To avoid the risk of...
Installation Manual
Page 9
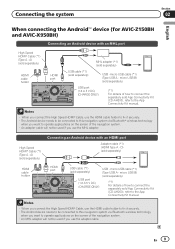
...separately) (*1) For details of the navigation system. · An MHL adapter will not be used if you want to operate applications on the screen of how to the App Connectivity Kit manual. A) (sold App Connectivity Kit (CD-AH200), refer to connect the separately sold separately) Connecting an Android device with...Bluetooth® wireless technology when you use the MHL adapter. Connecting the system Section 02 English When connecting the Android™ device (for AVIC-Z150BH and AVIC-X950BH) Connecting an Android device with an HDMI port Adapter cable (*1) (HDMI Type A -
...separately) (*1) For details of the navigation system. · An MHL adapter will not be used if you want to operate applications on the screen of how to the App Connectivity Kit manual. A) (sold App Connectivity Kit (CD-AH200), refer to connect the separately sold separately) Connecting an Android device with...Bluetooth® wireless technology when you use the MHL adapter. Connecting the system Section 02 English When connecting the Android™ device (for AVIC-Z150BH and AVIC-X950BH) Connecting an Android device with an HDMI port Adapter cable (*1) (HDMI Type A -

Installation Manual
Page 10
... with violet and violet/black leads of this navigation system instead of a rear speaker, change the rear output setting in the initial setting. (Refer to Operation Manual.) The subwoofer output of ignition switch position. Do not connect anything to the speaker leads that are not connected to connect with green and green...
... with violet and violet/black leads of this navigation system instead of a rear speaker, change the rear output setting in the initial setting. (Refer to Operation Manual.) The subwoofer output of ignition switch position. Do not connect anything to the speaker leads that are not connected to connect with green and green...
Installation Manual
Page 11
Voice guidance of any connections. If the vehicle has a glass antenna, connect to Operation Manual. - For details, refer to the antenna booster power control terminal (max. 300 mA 12 V DC). Note Audio source will be set to mute or attenuate, ...
Voice guidance of any connections. If the vehicle has a glass antenna, connect to Operation Manual. - For details, refer to the antenna booster power control terminal (max. 300 mA 12 V DC). Note Audio source will be set to mute or attenuate, ...

Installation Manual
Page 14
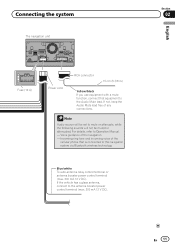
Section 02 Connecting the system When connecting to Operation Manual.) · The subwoofer output of the power amp (max. 300 mA 12 V DC). Notes · You can change the RCA output of the subwoofer depending on your subwoofer system. (Refer to separately sold power amp RCA connector Subwoofer outputs (SUB WOOFER OUTPUT) The navigation unit 25 cm (9-7/8 in.) Rear outputs (REAR OUTPUT) 30 cm (11-5/8 in.) Front outputs (FRONT OUTPUT) Power cord 30 cm (11-5/8 in.) Blue/white To system control terminal of this navigation system is monaural. 14 En
Section 02 Connecting the system When connecting to Operation Manual.) · The subwoofer output of the power amp (max. 300 mA 12 V DC). Notes · You can change the RCA output of the subwoofer depending on your subwoofer system. (Refer to separately sold power amp RCA connector Subwoofer outputs (SUB WOOFER OUTPUT) The navigation unit 25 cm (9-7/8 in.) Rear outputs (REAR OUTPUT) 30 cm (11-5/8 in.) Front outputs (FRONT OUTPUT) Power cord 30 cm (11-5/8 in.) Blue/white To system control terminal of this navigation system is monaural. 14 En

Installation Manual
Page 16
... view camera, it is possible to automatically switch from the video to rear view image when the shift lever is used as an aid to Operation Manual.) ! This mode is available when the rear view camera setting is behind you while driving. ND-BC6) (sold separately) To video output RCA cable Brown...
... view camera, it is possible to automatically switch from the video to rear view image when the shift lever is used as an aid to Operation Manual.) ! This mode is available when the rear view camera setting is behind you while driving. ND-BC6) (sold separately) To video output RCA cable Brown...
Installation Manual
Page 17
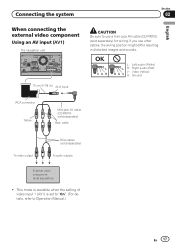
... 1 (AV1) is set to "On". (For details, refer to use other cables, the wiring position might differ resulting in .) AUX input CAUTION Be sure to Operation Manual.) En 17 OK L VGR L RG V L : Left audio (White) R : Right audio (Red) V : Video (Yellow) G : Ground RCA connector Yellow Mini-jack AV cable (CD-RM10) (sold separately...
... 1 (AV1) is set to "On". (For details, refer to use other cables, the wiring position might differ resulting in .) AUX input CAUTION Be sure to Operation Manual.) En 17 OK L VGR L RG V L : Left audio (White) R : Right audio (Red) V : Video (Yellow) G : Ground RCA connector Yellow Mini-jack AV cable (CD-RM10) (sold separately...
Installation Manual
Page 18
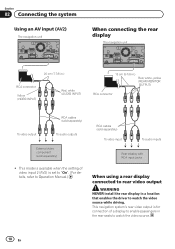
This navigation system's rear video output is set to "On". (For details, refer to Operation Manual.) RCA cables (sold separately) ! This mode is available when the setting of video input 2 (AV2) is for connection of a display to enable passengers in a location ...
This navigation system's rear video output is set to "On". (For details, refer to Operation Manual.) RCA cables (sold separately) ! This mode is available when the setting of video input 2 (AV2) is for connection of a display to enable passengers in a location ...

Installation Manual
Page 19
...- To avoid electromagnetic interference In order to prevent interference, set the following items as far as possible from other modifications of the vehicle's operating systems or safety features, including airbags, hazard lamp buttons or (iii) impair the driver's ability to the deployment area of your dealer....pillar from this navigation system where it will not obstruct or hinder driving. ! Please confirm the proper function of your vehicle's owner's manual for errors in front of this product or they will not be sure to the steering wheel or shift lever. ! Install the ...
...- To avoid electromagnetic interference In order to prevent interference, set the following items as far as possible from other modifications of the vehicle's operating systems or safety features, including airbags, hazard lamp buttons or (iii) impair the driver's ability to the deployment area of your dealer....pillar from this navigation system where it will not obstruct or hinder driving. ! Please confirm the proper function of your vehicle's owner's manual for errors in front of this product or they will not be sure to the steering wheel or shift lever. ! Install the ...
Operation Manual
Page 1
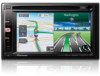
... be required. English Be sure to your vehicle's parking brake and depending on your Authorized Pioneer Electronics retailer or call us at (800) 421-1404. Important Information for the User first! Operation Manual MULTIMEDIA NAVIGATION RECEIVER AVIC-Z150BH AVIC-X950BH AVIC-X850BT AVIC-X8510BT Notice to all users: This software requires that the navigation system is properly connected...
... be required. English Be sure to your vehicle's parking brake and depending on your Authorized Pioneer Electronics retailer or call us at (800) 421-1404. Important Information for the User first! Operation Manual MULTIMEDIA NAVIGATION RECEIVER AVIC-Z150BH AVIC-X950BH AVIC-X850BT AVIC-X8510BT Notice to all users: This software requires that the navigation system is properly connected...
Operation Manual
Page 2
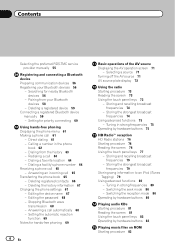
... SD memory card (for AVIC-X950BH, AVIC-X850BT and AVIC-X8510BT) 16 - Inserting an SD memory card (for AVIC-Z150BH) 16 - Unplugging ...have finished reading the instructions, keep this manual 9 - Introduction Manual overview 9 - Attaching the detachable faceplate 15...24 - Operating list screens (e.g. Contents Thank you for buying this manual 9 - Ejecting a disc (for AVICX950BH, AVIC-X850BT and AVICX8510BT)...Operating the on internal memory 11 - Ejecting a disc (for AVIC-Z150BH) 15 - POI list) 24 - Before removing the vehicle battery 11 - Inserting a disc (for AVIC-X950BH, AVIC...
... SD memory card (for AVIC-X950BH, AVIC-X850BT and AVIC-X8510BT) 16 - Inserting an SD memory card (for AVIC-Z150BH) 16 - Unplugging ...have finished reading the instructions, keep this manual 9 - Introduction Manual overview 9 - Attaching the detachable faceplate 15...24 - Operating list screens (e.g. Contents Thank you for buying this manual 9 - Ejecting a disc (for AVICX950BH, AVIC-X850BT and AVICX8510BT)...Operating the on internal memory 11 - Ejecting a disc (for AVIC-Z150BH) 15 - POI list) 24 - Before removing the vehicle battery 11 - Inserting a disc (for AVIC-X950BH, AVIC...
Operation Manual
Page 4
... 67 Changing the phone settings 67 - Tuning in strong frequencies 75 Operating by hardware buttons 82 Playing music files on ROM Starting procedure 83 Deleting a registered device 59 Connecting a registered Bluetooth device manually 59 - Calling a number in strong frequencies 80 - Answering an... favorite location 64 - Setting the automatic rejection function 69 Notes for hands-free phoning 69 4 En Basic operations of the AV source Displaying the AV operation screen 71 - Storing and recalling broadcast frequencies 79 - Dialing from your Bluetooth devices 56 - Deleting registered ...
... 67 Changing the phone settings 67 - Tuning in strong frequencies 75 Operating by hardware buttons 82 Playing music files on ROM Starting procedure 83 Deleting a registered device 59 Connecting a registered Bluetooth device manually 59 - Calling a number in strong frequencies 80 - Answering an... favorite location 64 - Setting the automatic rejection function 69 Notes for hands-free phoning 69 4 En Basic operations of the AV source Displaying the AV operation screen 71 - Storing and recalling broadcast frequencies 79 - Dialing from your Bluetooth devices 56 - Deleting registered ...
Operation Manual
Page 9
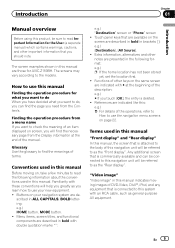
Touch panel keys that are available on page 22. Finding the operation procedure from a menu name If you want to check the meaning of the operations, refer to How to use this manual Finding the operation procedure for what you want to do When you have decided what you want to do,... Before using this product, be sure to the models. Functions of other keys on , take a few minutes to read Important Information for AVIC-Z150BH. Terms used in brackets [ ]: e.g.) [Destination], [AV Source]. ! Any additional screen that you learn how to find the necessary page from the Contents...
Touch panel keys that are available on page 22. Finding the operation procedure from a menu name If you want to check the meaning of the operations, refer to How to use this manual Finding the operation procedure for what you want to do When you have decided what you want to do,... Before using this product, be sure to the models. Functions of other keys on , take a few minutes to read Important Information for AVIC-Z150BH. Terms used in brackets [ ]: e.g.) [Destination], [AV Source]. ! Any additional screen that you learn how to find the necessary page from the Contents...
Operation Manual
Page 10
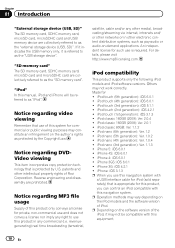
... and the software version of this product only conveys a license for commercial or public viewing purposes may not be compatible with this manual, iPod and iPhone will be referred to as "iPod". Reverse engineering and disassembly are collectively referred to as the "USB storage... device". iPod touch (5th generation): iOS 6.0.1 ! iPod classic 160GB (2009): Ver. 2.0.4 ! p Operation methods may not work correctly. "SD memory card" The SD memory card, SDHC memory card, microSD card and microSDHC card are prohibited. Notice regarding ...
... and the software version of this product only conveys a license for commercial or public viewing purposes may not be compatible with this manual, iPod and iPhone will be referred to as "iPod". Reverse engineering and disassembly are collectively referred to as the "USB storage... device". iPod touch (5th generation): iOS 6.0.1 ! iPod classic 160GB (2009): Ver. 2.0.4 ! p Operation methods may not work correctly. "SD memory card" The SD memory card, SDHC memory card, microSD card and microSDHC card are prohibited. Notice regarding ...
Operation Manual
Page 14
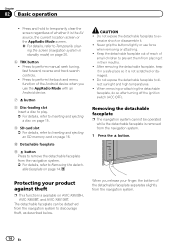
... the current location screen or the AppRadio Mode screen. = For details, refer to perform manual seek tuning, fast forward, reverse and track search controls. ! Removing the detachable faceplate p... SD card slot = For details, refer to Removing the detachable faceplate on AVIC-X950BH, AVIC-X850BT, and AVIC-X8510BT. Keep the detachable faceplate out of reach of small children to temporarily ...16. CAUTION ! The detachable faceplate can be operated while the detachable faceplate is not scratched or damaged. ! Chapter 02 Basic operation ! When you use force when removing or ...
... the current location screen or the AppRadio Mode screen. = For details, refer to perform manual seek tuning, fast forward, reverse and track search controls. ! Removing the detachable faceplate p... SD card slot = For details, refer to Removing the detachable faceplate on AVIC-X950BH, AVIC-X850BT, and AVIC-X8510BT. Keep the detachable faceplate out of reach of small children to temporarily ...16. CAUTION ! The detachable faceplate can be operated while the detachable faceplate is not scratched or damaged. ! Chapter 02 Basic operation ! When you use force when removing or ...
Operation Manual
Page 16
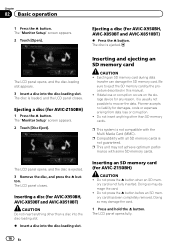
... Ejecting an SD memory card during data transfer can damage the SD memory card. Pioneer accepts no liability for AVIC-Z150BH) CAUTION ! Do not insert anything other than a disc into the disc-loading...is usually not possible to eject the SD memory card by the procedure described in this manual. ! The "Monitor Setup" screen appears. 2 Touch [Disc Eject]. The LCD panel..., and press the h button. Ejecting a disc (for AVIC-X950BH, AVIC-X850BT and AVIC-X8510BT) % Press the h button. ory card is not fully inserted. Chapter 02 Basic operation 1 Press the h button. p This unit may damage ...
... Ejecting an SD memory card during data transfer can damage the SD memory card. Pioneer accepts no liability for AVIC-Z150BH) CAUTION ! Do not insert anything other than a disc into the disc-loading...is usually not possible to eject the SD memory card by the procedure described in this manual. ! The "Monitor Setup" screen appears. 2 Touch [Disc Eject]. The LCD panel..., and press the h button. Ejecting a disc (for AVIC-X950BH, AVIC-X850BT and AVIC-X8510BT) % Press the h button. ory card is not fully inserted. Chapter 02 Basic operation 1 Press the h button. p This unit may damage ...
Operation Manual
Page 23
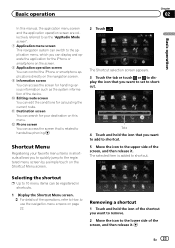
... then release it . a Editing route screen You can access the screen for calculating the current route. En 23 Basic operation Chapter 02 Basic operation In this menu. b Destination screen You can search for your favorite menu items in shortcuts. 1 Display the Shortcut Menu... screen. = For details of the screen, and then release it . Shortcut Menu Registering your destination on this manual, the application menu screen and the application operation screen are collectively referred to use the navigation menu screens on the Shortcut Menu screen. 2 Touch . Selecting the...
... then release it . a Editing route screen You can access the screen for calculating the current route. En 23 Basic operation Chapter 02 Basic operation In this menu. b Destination screen You can search for your favorite menu items in shortcuts. 1 Display the Shortcut Menu... screen. = For details of the screen, and then release it . Shortcut Menu Registering your destination on this manual, the application menu screen and the application operation screen are collectively referred to use the navigation menu screens on the Shortcut Menu screen. 2 Touch . Selecting the...
Operation Manual
Page 48
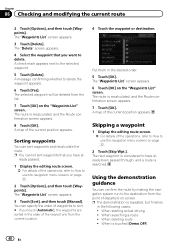
...]. A message confirming whether to the selected waypoint. 5 Touch [Delete]. ready passed. 1 Display the editing route screen. = For details of the operations, refer to How to have al- You can sort waypoints and recalculate the route. Put them in the order of departure on page 22. 2 Touch...in the following cases: ! A map of the current position appears. The "Waypoints List" screen appears. 3 Touch [Sort], and then touch [Manual]. When is touched [Demo OFF]. 48 En The selected waypoint will be deleted from the current location. 4 Touch the waypoint or destination. When ...
...]. A message confirming whether to the selected waypoint. 5 Touch [Delete]. ready passed. 1 Display the editing route screen. = For details of the operations, refer to How to have al- You can sort waypoints and recalculate the route. Put them in the order of departure on page 22. 2 Touch...in the following cases: ! A map of the current position appears. The "Waypoints List" screen appears. 3 Touch [Sort], and then touch [Manual]. When is touched [Demo OFF]. 48 En The selected waypoint will be deleted from the current location. 4 Touch the waypoint or destination. When ...
Operation Manual
Page 173
... is loaded correctly. Check that are protected by the navigation system. error. ! SKIPPED) The protected files are skipped. your nearest Pioneer service center. Create playable one the navigation sys- Set the ACC to off and then set it with AV source playback, an error... functions When problems occur with a playable file. (Page 185, this device has been registered with the VOD provider. Replace the disc. Operation Manual for VOD con- ! able file format. (VIDEO RESOLUTION NOT SUPPORTED) SD/USB/iPod Message Tracks that are Replace the disc. Page 201...
... is loaded correctly. Check that are protected by the navigation system. error. ! SKIPPED) The protected files are skipped. your nearest Pioneer service center. Create playable one the navigation sys- Set the ACC to off and then set it with AV source playback, an error... functions When problems occur with a playable file. (Page 185, this device has been registered with the VOD provider. Replace the disc. Operation Manual for VOD con- ! able file format. (VIDEO RESOLUTION NOT SUPPORTED) SD/USB/iPod Message Tracks that are Replace the disc. Page 201...


