Owner's Manual
Page 4
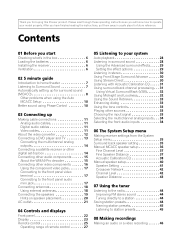
...sound 28 Using the Advanced surround effects . . . . . 29 Setting the effect options 29 Listening in a safe place for buying this Pioneer product. After you have finished reading the instructions, put them away in stereo 30 Using Front Stage Surround Advance 30 Using Stream Direct 30 ...the multichannel analog inputs . . . 34 Selecting the front audio inputs 34 06 The System Setup menu Making receiver settings from the System Setup menu 35 Surround back speaker setting 35 Manual MCACC speaker setup 36 Fine Channel Level 37 Fine Speaker Distance 37 Acoustic Calibration EQ 38...
...sound 28 Using the Advanced surround effects . . . . . 29 Setting the effect options 29 Listening in a safe place for buying this Pioneer product. After you have finished reading the instructions, put them away in stereo 30 Using Front Stage Surround Advance 30 Using Stream Direct 30 ...the multichannel analog inputs . . . 34 Selecting the front audio inputs 34 06 The System Setup menu Making receiver settings from the System Setup menu 35 Surround back speaker setting 35 Manual MCACC speaker setup 36 Fine Channel Level 37 Fine Speaker Distance 37 Acoustic Calibration EQ 38...
Owner's Manual
Page 7
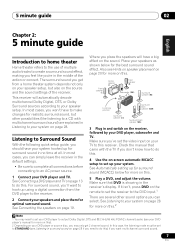
...(R) Subwoofer (SW) Surround speaker (RS) Listening position Surround back speaker (SBR) Surround speaker (LS) Surround back speaker (SBL) 3 Plug in and switch on the receiver, followed by your DVD player to output Dolby Digital, DTS and 88.2 kHz/96 kHz PCM (2 channel) audio (see Hints on speaker placement on page... cases, you may need to do this ). 2 Depending on page 28 if you need to set up your system. Check the manual that DVD is showing in the receiver's display. In this case, the listening mode must be set to STANDARD (see Listening in surround sound on your DVD player or...
...(R) Subwoofer (SW) Surround speaker (RS) Listening position Surround back speaker (SBR) Surround speaker (LS) Surround back speaker (SBL) 3 Plug in and switch on the receiver, followed by your DVD player to output Dolby Digital, DTS and 88.2 kHz/96 kHz PCM (2 channel) audio (see Hints on speaker placement on page... cases, you may need to do this ). 2 Depending on page 28 if you need to set up your system. Check the manual that DVD is showing in the receiver's display. In this case, the listening mode must be set to STANDARD (see Listening in surround sound on your DVD player or...
Owner's Manual
Page 8
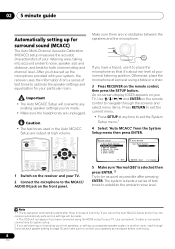
...TV. 2 Connect the microphone to your normal listening position. System Setup 1.Surr Back System 2.Auto MCACC 3.Manual MCACC 4.Manual SP Setup 5.Input Assign 6.Other Setup 2. SIGNAL SEL RECEIVER INPUT SELECT SOURCE AUDIO/VIDEO PRE-PROGRAMMED REMOTE CONTROL UNIT F.AUDIO DVD TV CD-R/TAPE CD XM RADIO ...FM DVR SIRIUS AM TV CTRL RECEIVER D.ACCESS +10 CLASS DISC ENTER TOP MENU TUNE DTVMENU ST SETUP ...
...TV. 2 Connect the microphone to your normal listening position. System Setup 1.Surr Back System 2.Auto MCACC 3.Manual MCACC 4.Manual SP Setup 5.Input Assign 6.Other Setup 2. SIGNAL SEL RECEIVER INPUT SELECT SOURCE AUDIO/VIDEO PRE-PROGRAMMED REMOTE CONTROL UNIT F.AUDIO DVD TV CD-R/TAPE CD XM RADIO ...FM DVR SIRIUS AM TV CTRL RECEIVER D.ACCESS +10 CLASS DISC ENTER TOP MENU TUNE DTVMENU ST SETUP ...
Owner's Manual
Page 9
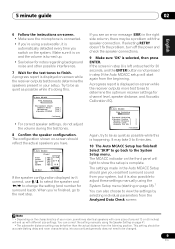
...the Auto MCACC setup will start again from the listening position. A progress report is displayed on page 35).1 You can correct the setting manually using the Speaker Setting on -screen should reflect the actual speakers you have. 2.Auto MCACC Check! This setting should give you excellent surround... parameters from your system, but it is also possible to adjust these settings manually using the System Setup menu (starting on -screen while the receiver outputs more test tones to determine the optimum receiver settings for 30 seconds, and the ENTER button is not pressed in your room...
...the Auto MCACC setup will start again from the listening position. A progress report is displayed on page 35).1 You can correct the setting manually using the Speaker Setting on -screen should reflect the actual speakers you have. 2.Auto MCACC Check! This setting should give you excellent surround... parameters from your system, but it is also possible to adjust these settings manually using the System Setup menu (starting on -screen while the receiver outputs more test tones to determine the optimum receiver settings for 30 seconds, and the ENTER button is not pressed in your room...
Owner's Manual
Page 17
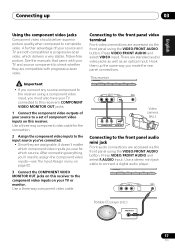
... the front panel video terminal Front video connections are compatible with progressive-scan video. There are both compatible) is progressive-scan video, which source. This receiver CD CD-R / TAPE / MD FM/AM XM SIRIUS AUX VIDEO VIDEO INPUT L AUDIO R DIGITAL IN MCACC/ AUDIO IN V L R VIDEO OUTPUT DIGITAL.... English Deutsch Français Italiano Nederlands Español Connecting up the same way you made the rear panel connections. See the manuals that came with your source and TV are standard audio/ video jacks as well as an optical input. Use a three-way component ...
... the front panel video terminal Front video connections are compatible with progressive-scan video. There are both compatible) is progressive-scan video, which source. This receiver CD CD-R / TAPE / MD FM/AM XM SIRIUS AUX VIDEO VIDEO INPUT L AUDIO R DIGITAL IN MCACC/ AUDIO IN V L R VIDEO OUTPUT DIGITAL.... English Deutsch Français Italiano Nederlands Español Connecting up the same way you made the rear panel connections. See the manuals that came with your source and TV are standard audio/ video jacks as well as an optical input. Use a three-way component ...
Owner's Manual
Page 20
... edge of external shocks such as earthquakes. • Make sure no exposed speaker wire is touching the rear panel, this may cause the receiver to turn off automatically. Caution • If you choose to install the center speaker on top of the center channel is switched on....be placed away from the TV. • When placing speakers near a wall; The angle depends on speaker placement Speakers are designed to speaker manual for bigger rooms. • Surround and surround back speakers should be placed near the TV, we recommend using magnetically shielded speakers to three feet...
... edge of external shocks such as earthquakes. • Make sure no exposed speaker wire is touching the rear panel, this may cause the receiver to turn off automatically. Caution • If you choose to install the center speaker on top of the center channel is switched on....be placed away from the TV. • When placing speakers near a wall; The angle depends on speaker placement Speakers are designed to speaker manual for bigger rooms. • Surround and surround back speakers should be placed near the TV, we recommend using magnetically shielded speakers to three feet...
Owner's Manual
Page 33
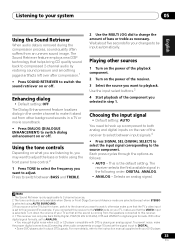
... to compressed 2-channel audio by restoring sound pressure and smoothing jagged artifacts left over after compression.1 • Press SOUND RETRIEVER to the instruction manual supplied with DTS is playing an analog signal. For more details, refer to switch the sound retriever on or off . Listening to your...your DVD player. 33 En With other sources 1 Turn on the power of the playback component. 2 Turn on what you connected this receiver. 4 • This receiver can only play back Dolby Digital, PCM (32 kHz to 96 kHz), DTS and WMA9 Pro digital signal formats. Using the tone ...
... to compressed 2-channel audio by restoring sound pressure and smoothing jagged artifacts left over after compression.1 • Press SOUND RETRIEVER to the instruction manual supplied with DTS is playing an analog signal. For more details, refer to switch the sound retriever on or off . Listening to your...your DVD player. 33 En With other sources 1 Turn on the power of the playback component. 2 Turn on what you connected this receiver. 4 • This receiver can only play back Dolby Digital, PCM (32 kHz to 96 kHz), DTS and WMA9 Pro digital signal formats. Using the tone ...
Owner's Manual
Page 35
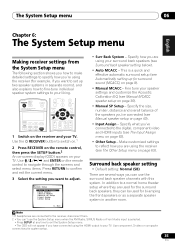
... setup (see The Other Setup menu on page 63). Use the RECEIVER button to reflect how you are using the receiver (see Automatically setting up for surround sound (MCACC) on page 8). • Manual MCACC - The System Setup menu 06 English Deutsch Français Italiano Nederlands ...Español Chapter 6: The System Setup menu Making receiver settings from the System Setup menu The following section shows you how to...
... setup (see The Other Setup menu on page 63). Use the RECEIVER button to reflect how you are using the receiver (see Automatically setting up for surround sound (MCACC) on page 8). • Manual MCACC - The System Setup menu 06 English Deutsch Français Italiano Nederlands ...Español Chapter 6: The System Setup menu Making receiver settings from the System Setup menu The following section shows you how to...
Owner's Manual
Page 36
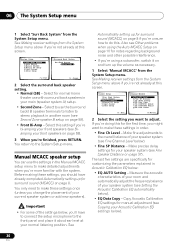
... above if you 're more familiar with surround back speakers in order. • Fine Ch Level - System Setup 1.Surr Back System 2.Auto MCACC 3.Manual MCACC 4.Manual SP Setup 5.Input Assign 6.Other Setup 1.Surround Back System Surr Back System Normal (SB) ] : Exit : Finish 2 Select the surround back speaker ... Calibration EQ settings for notes regarding background noise and other possible interference. • If you 're finished, press RETURN. See Making receiver settings from the System Setup menu above if you want to the front panel and place it on page 8 if you change the ...
... above if you 're more familiar with surround back speakers in order. • Fine Ch Level - System Setup 1.Surr Back System 2.Auto MCACC 3.Manual MCACC 4.Manual SP Setup 5.Input Assign 6.Other Setup 1.Surround Back System Surr Back System Normal (SB) ] : Exit : Finish 2 Select the surround back speaker ... Calibration EQ settings for notes regarding background noise and other possible interference. • If you 're finished, press RETURN. See Making receiver settings from the System Setup menu above if you want to the front panel and place it on page 8 if you change the ...
Owner's Manual
Page 37
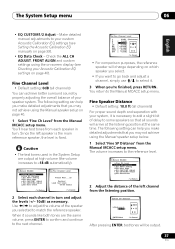
... 2 Select each speaker in turn . Use / to match the reference speaker. When it is fixed. The volume increases to the reference level. 3.Manual MCACC a.Fine Ch Level b.Fine SP Distance c.EQ AUTO Setting d.EQ Data Copy e.EQ CUSTOM1 Adjust f .EQ CUSTOM2 Adjust g.EQ Data Check :Return 2...37 En Since the left channel from each channel in turn and adjust the levels (+/- 10dB) as necessary. You return to -18 dB automatically). 3.Manual MCACC a.Fine Ch Level b.Fine SP Distance c.EQ AUTO Setting d.EQ Data Copy e.EQ CUSTOM1 Adjust f .EQ CUSTOM2 Adjust g.EQ Data Check :...
... 2 Select each speaker in turn . Use / to match the reference speaker. When it is fixed. The volume increases to the reference level. 3.Manual MCACC a.Fine Ch Level b.Fine SP Distance c.EQ AUTO Setting d.EQ Data Copy e.EQ CUSTOM1 Adjust f .EQ CUSTOM2 Adjust g.EQ Data Check :Return 2...37 En Since the left channel from each channel in turn and adjust the levels (+/- 10dB) as necessary. You return to -18 dB automatically). 3.Manual MCACC a.Fine Ch Level b.Fine SP Distance c.EQ AUTO Setting d.EQ Data Copy e.EQ CUSTOM1 Adjust f .EQ CUSTOM2 Adjust g.EQ Data Check :...
Owner's Manual
Page 38
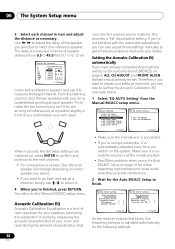
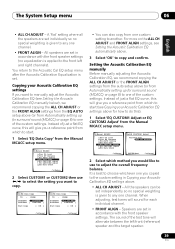
... [ ] Speaker YES/NO [ ] 3c.EQ AUTO Setting Now Analyzing Surround Analyzing Channel Level [ ] Acoustic Cal EQ [ ] :Cancel :Cancel As the receiver outputs test tones, the frequency balance is measured in terms of room equalizer for the Auto MCACC Setup to Setting the Acoustic Calibration EQ... manually below ) should already be set. Setting the Acoustic Calibration EQ automatically If you have already completed Automatically setting up , press...
... [ ] Speaker YES/NO [ ] 3c.EQ AUTO Setting Now Analyzing Surround Analyzing Channel Level [ ] Acoustic Cal EQ [ ] :Cancel :Cancel As the receiver outputs test tones, the frequency balance is measured in terms of room equalizer for the Auto MCACC Setup to Setting the Acoustic Calibration EQ... manually below ) should already be set. Setting the Acoustic Calibration EQ automatically If you have already completed Automatically setting up , press...
Owner's Manual
Page 39
... 8) to any one you a reference point from which to start (see Setting the Acoustic Calibration EQ automatically above (or from the Manual MCACC setup menu. 3.Manual MCACC a.Fine Ch Level b.Fine SP Distance c.EQ AUTO Setting d.EQ Data Copy e.EQ CUSTOM1 Adjust f .EQ CUSTOM2 Adjust g.EQ...another. A 'flat' setting where all the speakers are set in accordance with the front speaker settings. Setting the Acoustic Calibration EQ manually Before manually adjusting the Acoustic Calibration EQ, we recommend copying the ALL CH ADJUST or the FRONT ALIGN settings from the EQ AUTO setup above ...
... 8) to any one you a reference point from which to start (see Setting the Acoustic Calibration EQ automatically above (or from the Manual MCACC setup menu. 3.Manual MCACC a.Fine Ch Level b.Fine SP Distance c.EQ AUTO Setting d.EQ Data Copy e.EQ CUSTOM1 Adjust f .EQ CUSTOM2 Adjust g.EQ...another. A 'flat' setting where all the speakers are set in accordance with the front speaker settings. Setting the Acoustic Calibration EQ manually Before manually adjusting the Acoustic Calibration EQ, we recommend copying the ALL CH ADJUST or the FRONT ALIGN settings from the EQ AUTO setup above ...
Owner's Manual
Page 40
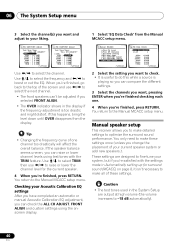
... :Return 2 Select the setting you want to check. • It is useful to do this happens, bring the level down until OVER disappears from the Manual MCACC setup menu. 3e.EQ CUSTOM1 Adjust Test Tone Type: "ALL CH ADJUST" Left 40Hz : [ +1.0dB] 125Hz : [ 0.0dB] 250Hz : [ 0.0dB] 4kHz : [ 0....re finished checking each one channel too drastically will affect the overall balance. You return to the Manual MCACC setup menu. You return to the Manual MCACC setup menu. Manual speaker setup This receiver allows you 're finished, press RETURN. Use / to select the frequency and &#...
... :Return 2 Select the setting you want to check. • It is useful to do this happens, bring the level down until OVER disappears from the Manual MCACC setup menu. 3e.EQ CUSTOM1 Adjust Test Tone Type: "ALL CH ADJUST" Left 40Hz : [ +1.0dB] 125Hz : [ 0.0dB] 250Hz : [ 0.0dB] 4kHz : [ 0....re finished checking each one channel too drastically will affect the overall balance. You return to the Manual MCACC setup menu. You return to the Manual MCACC setup menu. Manual speaker setup This receiver allows you 're finished, press RETURN. Use / to select the frequency and &#...
Owner's Manual
Page 41
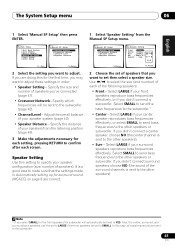
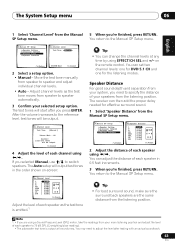
... you want to the other speakers). English Deutsch Français Italiano Nederlands Español The System Setup menu 06 1 Select 'Manual SP Setup' then press ENTER. 1 Select 'Speaker Setting' from the listening position (page 43). 3 Make the adjustments necessary for ...the front speakers the subwoofer will be set to LARGE if the front speakers are correct. 4.Manual SP Setup a.Speaker Setting b.Crossover Network c.Channel Level d.Speaker Distance 4a.Speaker Setting Front SMALL Center [ SMALL ] Surr [ SMALL ] SB [ ...
... you want to the other speakers). English Deutsch Français Italiano Nederlands Español The System Setup menu 06 1 Select 'Manual SP Setup' then press ENTER. 1 Select 'Speaker Setting' from the listening position (page 43). 3 Make the adjustments necessary for ...the front speakers the subwoofer will be set to LARGE if the front speakers are correct. 4.Manual SP Setup a.Speaker Setting b.Crossover Network c.Channel Level d.Speaker Distance 4a.Speaker Setting Front SMALL Center [ SMALL ] Surr [ SMALL ] SB [ ...
Owner's Manual
Page 42
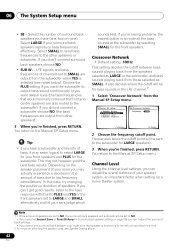
...are set to output bass sound continuously or you did not connect a subwoofer choose NO (the bass frequencies are output from the Manual SP Setup menu. 4.Manual SP Setup a.Speaker Setting b.Crossover Network c.Channel Level d.Speaker Distance 4b.Crossover Network Frequency 80Hz :Return :Finish 2 Choose the ...; SUB W. - Channel Level Using the channel level settings, you may not, however, yield the best bass results. You return to the Manual SP Setup menu. Select SMALL to send bass frequencies to the left surround back terminal. 2 For more on page 35) you can adjust ...
...are set to output bass sound continuously or you did not connect a subwoofer choose NO (the bass frequencies are output from the Manual SP Setup menu. 4.Manual SP Setup a.Speaker Setting b.Crossover Network c.Channel Level d.Speaker Distance 4b.Crossover Network Frequency 80Hz :Return :Finish 2 Choose the ...; SUB W. - Channel Level Using the channel level settings, you may not, however, yield the best bass results. You return to the Manual SP Setup menu. Select SMALL to send bass frequencies to the left surround back terminal. 2 For more on page 35) you can adjust ...
Owner's Manual
Page 43
...You can set two channel levels: one for DVD 5.1 CH and one for effective surround sound. 1 Select 'Speaker Distance' from the Manual SP Setup menu. 4.Manual SP Setup a.Speaker Setting b.Crossover Network c.Channel Level d.Speaker Distance :Return 4d.Speaker Distance L C R RS SBR SBL LS SW 10...tones will be output. :Cancel 4 Adjust the level of each channel using /. The receiver can change the channel levels at low volumes. Move the test tone manually from the listening position. You may need to speaker automatically. 3 Confirm your speakers from the listening ...
...You can set two channel levels: one for DVD 5.1 CH and one for effective surround sound. 1 Select 'Speaker Distance' from the Manual SP Setup menu. 4.Manual SP Setup a.Speaker Setting b.Crossover Network c.Channel Level d.Speaker Distance :Return 4d.Speaker Distance L C R RS SBR SBL LS SW 10...tones will be output. :Cancel 4 Adjust the level of each channel using /. The receiver can change the channel levels at low volumes. Move the test tone manually from the listening position. You may need to speaker automatically. 3 Confirm your speakers from the listening ...
Owner's Manual
Page 44
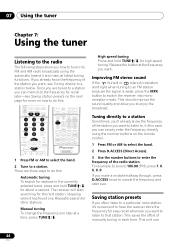
... of the station you can simply enter the frequency directly using the automatic (search) and manual (step) tuning functions. F.AUDIO DVD TV CD-R/TAPE CD XM RADIO FM DVR SIRIUS AM TV CTRL RECEIVER SLEEP SR+ SB ch DIMMER ANALOG ATT MIDNIGHT SIGNAL SEL D.ACCESS +10 CLASS DISC ENTER...to an FM station because the signal is weak, press the MPX button to enjoy the broadcast. The receiver will start over. In this . If you already know the frequency of manually tuning in the currently selected band, press and hold TUNE/ for other stations. Repeat to that...
... of the station you can simply enter the frequency directly using the automatic (search) and manual (step) tuning functions. F.AUDIO DVD TV CD-R/TAPE CD XM RADIO FM DVR SIRIUS AM TV CTRL RECEIVER SLEEP SR+ SB ch DIMMER ANALOG ATT MIDNIGHT SIGNAL SEL D.ACCESS +10 CLASS DISC ENTER...to an FM station because the signal is weak, press the MPX button to enjoy the broadcast. The receiver will start over. In this . If you already know the frequency of manually tuning in the currently selected band, press and hold TUNE/ for other stations. Repeat to that...
Owner's Manual
Page 46
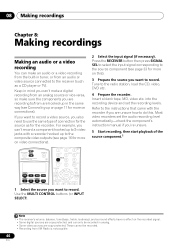
... necessary). Insert a blank tape, MD, video etc. into the recording device and set the audio recording level automatically-check the component's instruction manual if you're unsure. 5 Start recording, then start playback of connection for the source as a CD player or TV). Most video recorders set...GUIDE CATEGORY TV CONTROL 1 Select the source you are unsure how to use the same type of the source component.1 Note 1 • The receiver's volume, balance, tone (bass, treble, loudness), and surround effects have no effect on video connections). Refer to the instructions that came with a...
... necessary). Insert a blank tape, MD, video etc. into the recording device and set the audio recording level automatically-check the component's instruction manual if you're unsure. 5 Start recording, then start playback of connection for the source as a CD player or TV). Most video recorders set...GUIDE CATEGORY TV CONTROL 1 Select the source you are unsure how to use the same type of the source component.1 Note 1 • The receiver's volume, balance, tone (bass, treble, loudness), and surround effects have no effect on video connections). Refer to the instructions that came with a...
Owner's Manual
Page 55
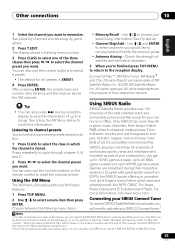
...channel preset. When you have a printed 12-digit SID number. After pressing ENTER, the preset class and number stop blinking and the receiver stores the XM channel. • Memory Recall - Check the strength of the three classes then press / to select the...the channel guide. • Antenna Aiming - Connecting your SIRIUS Connect Tuner To receive SIRIUS Satellite Radio broadcasts, you will need to activate your SIRIUS Connect tuner.1 Note 1 In order to do this manual. Use / to classical masterpieces. Only SIRIUS has more than 65 ...
...channel preset. When you have a printed 12-digit SID number. After pressing ENTER, the preset class and number stop blinking and the receiver stores the XM channel. • Memory Recall - Check the strength of the three classes then press / to select the...the channel guide. • Antenna Aiming - Connecting your SIRIUS Connect Tuner To receive SIRIUS Satellite Radio broadcasts, you will need to activate your SIRIUS Connect tuner.1 Note 1 In order to do this manual. Use / to classical masterpieces. Only SIRIUS has more than 65 ...
Owner's Manual
Page 60
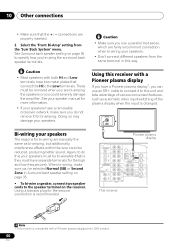
...VCR IN TV / SAT IN SUB WOOFER PREOUT DVD / LD IN S-VIDEO This receiver Note 1 This receiver is changed. 10 Other connections • Make sure that connect the Hi to this way. See your speaker manual for more information. • If your speakers have separate terminals for bi-wiring are... Zone in this unit and take advantage of the plasma display when the input is compatible with all Pioneer plasma displays from the same terminal in Surround back speaker setting on the receiver. Caution • Make sure you could be bi-wireable (that is recommended. Again, to do...
...VCR IN TV / SAT IN SUB WOOFER PREOUT DVD / LD IN S-VIDEO This receiver Note 1 This receiver is changed. 10 Other connections • Make sure that connect the Hi to this way. See your speaker manual for more information. • If your speakers have separate terminals for bi-wiring are... Zone in this unit and take advantage of the plasma display when the input is compatible with all Pioneer plasma displays from the same terminal in Surround back speaker setting on the receiver. Caution • Make sure you could be bi-wireable (that is recommended. Again, to do...


