Owner's Manual
Page 3
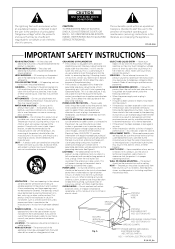
... protect it from heat sources such as to overturn. Refer all servicing to replace your obsolete outlet. WALL OR CEILING MOUNTING - This is a safety feature. This product should be sure the antenna or cable system is damaged. • If liquid has been spilled, or objects have fallen into such power lines or circuits. POWER-CORD PROTECTION - this product yourself as opening or removing...
... protect it from heat sources such as to overturn. Refer all servicing to replace your obsolete outlet. WALL OR CEILING MOUNTING - This is a safety feature. This product should be sure the antenna or cable system is damaged. • If liquid has been spilled, or objects have fallen into such power lines or circuits. POWER-CORD PROTECTION - this product yourself as opening or removing...
Owner's Manual
Page 4
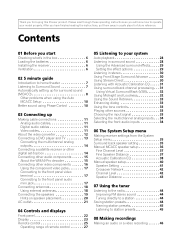
... Connecting other sources 33 Choosing the input signal 33 Selecting the multichannel analog inputs . . . 34 Selecting the front audio inputs 34 06 The System Setup menu Making receiver settings from the System Setup menu 35 Surround back speaker setting 35 Manual MCACC speaker setup 36 Fine Channel Level 37 Fine Speaker Distance 37 Acoustic Calibration EQ 38 Manual speaker setup 40 Speaker Setting 41 Crossover Network 42 Channel Level 42 Speaker Distance 43 07 Using the tuner Listening to the radio 44 Improving FM stereo sound 44 Tuning directly to a station 44 Saving station...
... Connecting other sources 33 Choosing the input signal 33 Selecting the multichannel analog inputs . . . 34 Selecting the front audio inputs 34 06 The System Setup menu Making receiver settings from the System Setup menu 35 Surround back speaker setting 35 Manual MCACC speaker setup 36 Fine Channel Level 37 Fine Speaker Distance 37 Acoustic Calibration EQ 38 Manual speaker setup 40 Speaker Setting 41 Crossover Network 42 Channel Level 42 Speaker Distance 43 07 Using the tuner Listening to the radio 44 Improving FM stereo sound 44 Tuning directly to a station 44 Saving station...
Owner's Manual
Page 7
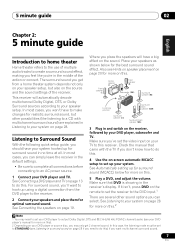
... quick setup guide, you want to hook up using a digital connection from a home theater system depends not only on this . In most cases, you won't have a big effect on the receiver, followed by your speaker setup, but other sound options you 're in the receiver's display. See Connecting a DVD player and TV on this.2 Note 1 You may only get from the DVD player to output Dolby Digital, DTS and 88.2 kHz/96 kHz PCM (2 channel) audio...
... quick setup guide, you want to hook up using a digital connection from a home theater system depends not only on this . In most cases, you won't have a big effect on the receiver, followed by your speaker setup, but other sound options you 're in the receiver's display. See Connecting a DVD player and TV on this.2 Note 1 You may only get from the DVD player to output Dolby Digital, DTS and 88.2 kHz/96 kHz PCM (2 channel) audio...
Owner's Manual
Page 8
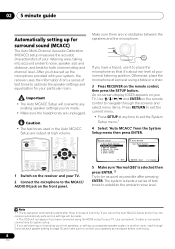
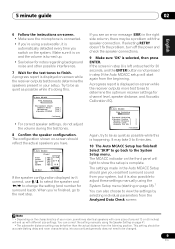
... on-screen display (OSD) appears on page 35 and make sure to connect your speakers as possible after three minutes of test tones to the MCACC/ AUDIO IN jack on the front panel. SIGNAL SEL RECEIVER INPUT SELECT SOURCE AUDIO/VIDEO PRE-PROGRAMMED REMOTE CONTROL UNIT F.AUDIO DVD TV CD-R/TAPE CD XM RADIO FM DVR SIRIUS AM TV CTRL RECEIVER D.ACCESS +10 CLASS DISC ENTER TOP MENU TUNE DTVMENU ST SETUP ENTER MENU ST T.EDIT RETURN TUNE GUIDE CATEGORY TV CONTROL...
... on-screen display (OSD) appears on page 35 and make sure to connect your speakers as possible after three minutes of test tones to the MCACC/ AUDIO IN jack on the front panel. SIGNAL SEL RECEIVER INPUT SELECT SOURCE AUDIO/VIDEO PRE-PROGRAMMED REMOTE CONTROL UNIT F.AUDIO DVD TV CD-R/TAPE CD XM RADIO FM DVR SIRIUS AM TV CTRL RECEIVER D.ACCESS +10 CLASS DISC ENTER TOP MENU TUNE DTVMENU ST SETUP ENTER MENU ST T.EDIT RETURN TUNE GUIDE CATEGORY TV CONTROL...
Owner's Manual
Page 9
... light to show the setup is also possible to adjust these settings manually using the System Setup menu (starting on page 35).1 You can correct the setting manually using a subwoofer, it 's doing this is displayed on-screen while the receiver outputs test tones to determine the speakers present in your setup. Front Center Surround SB SUB W. [ YES ] [ YES ] [ YES ] [ Yx2 ] [ YES ] 30:Next OK :Cancel If the speaker configuration displayed isn't correct, use / to select...
... light to show the setup is also possible to adjust these settings manually using the System Setup menu (starting on page 35).1 You can correct the setting manually using a subwoofer, it 's doing this is displayed on-screen while the receiver outputs test tones to determine the speakers present in your setup. Front Center Surround SB SUB W. [ YES ] [ YES ] [ YES ] [ Yx2 ] [ YES ] 30:Next OK :Cancel If the speaker configuration displayed isn't correct, use / to select...

Owner's Manual
Page 13
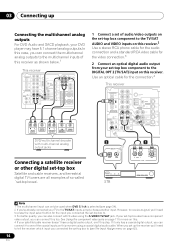
... OUT CONTROL IN OUT OUT MONITOR OUT DVR / VCR IN TV / SAT IN SUB WOOFER PREOUT DVD / LD IN S-VIDEO This receiver 2 1 COAXIAL DIGITAL OUT R AUDIO L ANALOG OUT VIDEO OUT DVD player Note 1 If your DVD player to the optical input on this too. See Using the component video jacks on page 17 for the connection.1 2 Connect the composite video output and the stereo analog audio outputs2 on your DVD player only has an optical digital output, you can connect it . 3 Connect...
... OUT CONTROL IN OUT OUT MONITOR OUT DVR / VCR IN TV / SAT IN SUB WOOFER PREOUT DVD / LD IN S-VIDEO This receiver 2 1 COAXIAL DIGITAL OUT R AUDIO L ANALOG OUT VIDEO OUT DVD player Note 1 If your DVD player to the optical input on this too. See Using the component video jacks on page 17 for the connection.1 2 Connect the composite video output and the stereo analog audio outputs2 on your DVD player only has an optical digital output, you can connect it . 3 Connect...
Owner's Manual
Page 14
... outputs For DVD Audio and SACD playback, your DVD player may have a digital audio output, omit this receiver. Use an optical cable for the input you connected the set -top box also has a component video output, you can also connect with multi-channel analog output jacks 2 1 DIGITAL OUT Connecting a satellite receiver or other digital set-top box Satellite and cable receivers, and terrestrial digital TV tuners are all examples of so-called `set -top box component to the TV/SAT AUDIO and VIDEO inputs on this receiver.2 Use a stereo RCA phono cable for the audio connection...
... outputs For DVD Audio and SACD playback, your DVD player may have a digital audio output, omit this receiver. Use an optical cable for the input you connected the set -top box also has a component video output, you can also connect with multi-channel analog output jacks 2 1 DIGITAL OUT Connecting a satellite receiver or other digital set-top box Satellite and cable receivers, and terrestrial digital TV tuners are all examples of so-called `set -top box component to the TV/SAT AUDIO and VIDEO inputs on this receiver.2 Use a stereo RCA phono cable for the audio connection...
Owner's Manual
Page 17
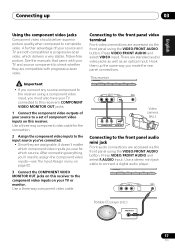
... VIDEO/FRONT AUDIO button. English Deutsch Français Italiano Nederlands Español Connecting up the same way you made the rear panel connections. A further advantage (if your TV and source component to connect a digital audio player. See the manuals that came with your source and TV are assignable, it doesn't matter which component video inputs you use for which delivers a very stable, flicker-free picture. Hook them up 03 Using the component video jacks Component video...
... VIDEO/FRONT AUDIO button. English Deutsch Français Italiano Nederlands Español Connecting up the same way you made the rear panel connections. A further advantage (if your TV and source component to connect a digital audio player. See the manuals that came with your source and TV are assignable, it doesn't matter which component video inputs you use for which delivers a very stable, flicker-free picture. Hook them up 03 Using the component video jacks Component video...
Owner's Manual
Page 19
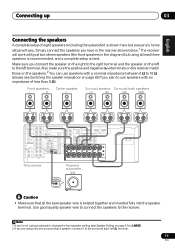
.../SAT) IN 2 OUT HDMI PR OUT MONITOR OUT DVR / VCR IN TV / SAT IN SR P E SUB WOOFER A DVD / LD A PREOUT IN K S-VIDEO E R S FRONT MONITOR OUT COMPONENT VIDEO IN 2 LR SURROUND L CENTER R SURROUND BACK L B This receiver Powered subwoofer SW INPUT AC OUTLET Caution • Make sure that all the bare speaker wire is shown here but using at least three speakers is recommended, and a complete setup is best. Also make sure the positive...
.../SAT) IN 2 OUT HDMI PR OUT MONITOR OUT DVR / VCR IN TV / SAT IN SR P E SUB WOOFER A DVD / LD A PREOUT IN K S-VIDEO E R S FRONT MONITOR OUT COMPONENT VIDEO IN 2 LR SURROUND L CENTER R SURROUND BACK L B This receiver Powered subwoofer SW INPUT AC OUTLET Caution • Make sure that all the bare speaker wire is shown here but using at least three speakers is recommended, and a complete setup is best. Also make sure the positive...
Owner's Manual
Page 21
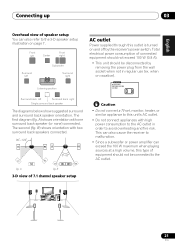
... Overhead view of 7.1 channel speaker setup Caution • Do not connect a TV set, monitor, heater, or similar appliance to this unit's AC outlet. • Do not connect appliances with high power consumption to the AC outlet in regular use (ex. Front left Center Front right Surround left Surround back right Single surround back speaker . B 3-D view of speaker setup You can exceed the 100 W maximum when playing sources at a high volume...
... Overhead view of 7.1 channel speaker setup Caution • Do not connect a TV set, monitor, heater, or similar appliance to this unit's AC outlet. • Do not connect appliances with high power consumption to the AC outlet in regular use (ex. Front left Center Front right Surround left Surround back right Single surround back speaker . B 3-D view of speaker setup You can exceed the 100 W maximum when playing sources at a high volume...
Owner's Manual
Page 26
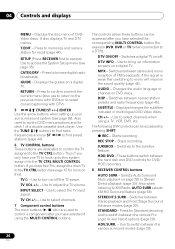
... find radio frequencies and use to return to the previous menu with DTV). 5 TUNE/ST +/-) /ENTER Use the arrow buttons when setting up your surround sound system (see page 35). DTV INFO - MPX - AUDIO - Switches to memorize and name a station for DVD/ HDD recorders. 8 RECEIVER CONTROL buttons AUTO SURR - Switches between the hard disk and DVD controls for recall (page 44). Displays the disc menu of a double cassette deck player. SETUP (Press RECEIVER first to access) Use to browse digital radio...
... find radio frequencies and use to return to the previous menu with DTV). 5 TUNE/ST +/-) /ENTER Use the arrow buttons when setting up your surround sound system (see page 35). DTV INFO - MPX - AUDIO - Switches to memorize and name a station for DVD/ HDD recorders. 8 RECEIVER CONTROL buttons AUTO SURR - Switches between the hard disk and DVD controls for recall (page 44). Displays the disc menu of a double cassette deck player. SETUP (Press RECEIVER first to access) Use to browse digital radio...
Owner's Manual
Page 27
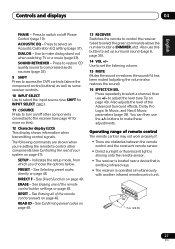
... the number buttons (DIMMER, etc). See Direct function on page 48. See Erasing one of the Advanced Surround effects, Dolby Pro Logic IIx Music, and Neo:6 Music parameters (page 29). See Confirming preset codes on page 49. 13 RECEIVER Switches the remote to control the receiver (used to select the green commands above the component control buttons) as well as some receiver controls. 10 INPUT SELECT Use to select the input source (use +/- RESET - Also use the +/- Also adjusts the level of the remote control button settings...
... the number buttons (DIMMER, etc). See Direct function on page 48. See Erasing one of the Advanced Surround effects, Dolby Pro Logic IIx Music, and Neo:6 Music parameters (page 29). See Confirming preset codes on page 49. 13 RECEIVER Switches the remote to control the receiver (used to select the green commands above the component control buttons) as well as some receiver controls. 10 INPUT SELECT Use to select the input source (use +/- RESET - Also use the +/- Also adjusts the level of the remote control button settings...
Owner's Manual
Page 33
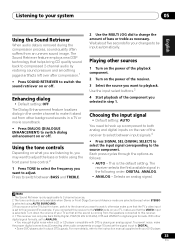
... select the input signal corresponding to the source component. Playing other background sounds in step 1. ANALOG. • ANALOG - Using the tone controls Depending on the rear of the receiver to select between BASS and TREBLE. 2 Use the MULTI JOG dial to change the amount of the component you want to adjust. For more details, refer to the instruction manual supplied with DTS is the TV's built-in the following order: DIGITAL; Use the input select buttons...
... select the input signal corresponding to the source component. Playing other background sounds in step 1. ANALOG. • ANALOG - Using the tone controls Depending on the rear of the receiver to select between BASS and TREBLE. 2 Use the MULTI JOG dial to change the amount of the component you want to adjust. For more details, refer to the instruction manual supplied with DTS is the TV's built-in the following order: DIGITAL; Use the input select buttons...
Owner's Manual
Page 36
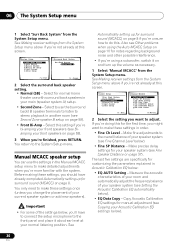
... normal home theater use with the system. See Making receiver settings from the System Setup menu. Select for notes regarding background noise and other possible interference. • If you 're doing this screen. Manual MCACC speaker setup You can use the (surround back) B speaker terminals to listen to the System Setup menu. The last five settings are specifically for manual adjustment (see Setting the Acoustic Calibration EQ automatically below : • EQ AUTO Setting - Copy Acoustic Calibration EQ settings...
... normal home theater use with the system. See Making receiver settings from the System Setup menu. Select for notes regarding background noise and other possible interference. • If you 're doing this screen. Manual MCACC speaker setup You can use the (surround back) B speaker terminals to listen to the System Setup menu. The last five settings are specifically for manual adjustment (see Setting the Acoustic Calibration EQ automatically below : • EQ AUTO Setting - Copy Acoustic Calibration EQ settings...

Owner's Manual
Page 59
... front left speaker SR FRONT P E AA K E R S LR SURROUND L CENTER R SURROUND BACK L B Hi Lo Since both front and surround back terminals) for the listening options with this case, to speaker system B (only stereo playback is when you connected your speakers to different amplifiers (in Speaker Setting on the rear panel. The options below are connected. 59 En SOUND MIDNIGHT/ SB ch RETRIEVER LOUDNESS PROCESSING TONE SIGNAL SPEAKERS SELECT TUNING/ STATION TUNER EDIT SETUP RETURN MULTI JOG...
... front left speaker SR FRONT P E AA K E R S LR SURROUND L CENTER R SURROUND BACK L B Hi Lo Since both front and surround back terminals) for the listening options with this case, to speaker system B (only stereo playback is when you connected your speakers to different amplifiers (in Speaker Setting on the rear panel. The options below are connected. 59 En SOUND MIDNIGHT/ SB ch RETRIEVER LOUDNESS PROCESSING TONE SIGNAL SPEAKERS SELECT TUNING/ STATION TUNER EDIT SETUP RETURN MULTI JOG...
Owner's Manual
Page 60
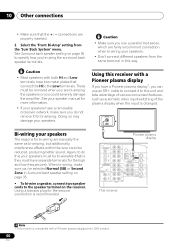
... amplifier. Again, to do not remove it to this your speakers must be bi-wireable (that is they must be reduced, producing better sound. Using a banana plug for bi-wiring are properly inserted. 2 Select the 'Front Bi-Amp' setting from 2003 onward. 60 En 10 Other connections • Make sure that connect the Hi to the Low terminals. See Surround back speaker setting on the receiver. See your speakers...
... amplifier. Again, to do not remove it to this your speakers must be bi-wireable (that is they must be reduced, producing better sound. Using a banana plug for bi-wiring are properly inserted. 2 Select the 'Front Bi-Amp' setting from 2003 onward. 60 En 10 Other connections • Make sure that connect the Hi to the Low terminals. See Surround back speaker setting on the receiver. See your speakers...
Owner's Manual
Page 61
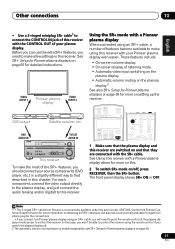
... TONE SIGNAL SPEAKERS SELECT TUNING/ STATION TUNER EDIT SETUP RETURN MULTI JOG VIDEO VIDEO INPUT L AUDIO R DIGITAL IN ENTER VSX-917 MULTI JOG AUX MCACC/ AUDIO IN STEREO/ ADVANCED F.S.SURR STANDARD SURROUND LISTENING MODE MASTER VOLUME DOWN UP This receiver To make the most of the SR+ features, you need to point the remote control at the plasma display remote sensor to control the receiver. RECEIVER INPUT SELECT SOURCE AUDIO/VIDEO PRE-PROGRAMMED REMOTE CONTROL UNIT SLEEP SR+ SB ch DIMMER ANALOG ATT MIDNIGHT SIGNAL SEL F.AUDIO DVD CD-R/TAPE CD TV XM RADIO...
... TONE SIGNAL SPEAKERS SELECT TUNING/ STATION TUNER EDIT SETUP RETURN MULTI JOG VIDEO VIDEO INPUT L AUDIO R DIGITAL IN ENTER VSX-917 MULTI JOG AUX MCACC/ AUDIO IN STEREO/ ADVANCED F.S.SURR STANDARD SURROUND LISTENING MODE MASTER VOLUME DOWN UP This receiver To make the most of the SR+ features, you need to point the remote control at the plasma display remote sensor to control the receiver. RECEIVER INPUT SELECT SOURCE AUDIO/VIDEO PRE-PROGRAMMED REMOTE CONTROL UNIT SLEEP SR+ SB ch DIMMER ANALOG ATT MIDNIGHT SIGNAL SEL F.AUDIO DVD CD-R/TAPE CD TV XM RADIO...
Owner's Manual
Page 66
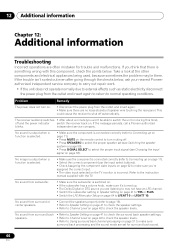
... surround back sound. 66 En No sound is output when a function is selected. • Make sure the component is switched on . Remedy • Disconnect the power plug from subwoofer. If the message persists, call a Pioneer authorized blinks. 12 Additional information Chapter 12: Additional information Troubleshooting Incorrect operations are no loose strands of speaker wire touching the rear panel. This could cause the receiver to shut off . • Press SPEAKERS to select the proper speaker set for trouble...
... surround back sound. 66 En No sound is output when a function is selected. • Make sure the component is switched on . Remedy • Disconnect the power plug from subwoofer. If the message persists, call a Pioneer authorized blinks. 12 Additional information Chapter 12: Additional information Troubleshooting Incorrect operations are no loose strands of speaker wire touching the rear panel. This could cause the receiver to shut off . • Press SPEAKERS to select the proper speaker set for trouble...
Owner's Manual
Page 67
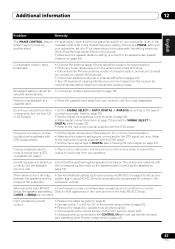
... room and rerun the Auto MCACC Setup. (LARGE or SMALL) is played back. • Set the digital volume level of a cassette deck. • Move the cassette deck away from another position. • Avoid exposing the remote sensor on the front panel to direct light. • Unplug anything connected to set up your receiver, until the noise disappears. your subwoofer, set the SIGNAL SELECT to DIGITAL (refer to page 33...
... room and rerun the Auto MCACC Setup. (LARGE or SMALL) is played back. • Set the digital volume level of a cassette deck. • Move the cassette deck away from another position. • Avoid exposing the remote sensor on the front panel to direct light. • Unplug anything connected to set up your receiver, until the noise disappears. your subwoofer, set the SIGNAL SELECT to DIGITAL (refer to page 33...
Owner's Manual
Page 68
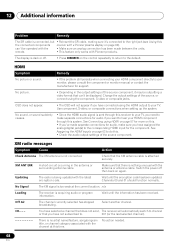
... information has been received. Wait until the encryption code has been updated. CH- - - You have selected a channel that there is acquiring audio or program information. The display is being updated with the channel at the current location. See Assigning the HDMI inputs on again. Make sure that does not exist, The receiver will not appear if you have connected using the component, S-video or composite jacks. Switch the power off . •...
... information has been received. Wait until the encryption code has been updated. CH- - - You have selected a channel that there is acquiring audio or program information. The display is being updated with the channel at the current location. See Assigning the HDMI inputs on again. Make sure that does not exist, The receiver will not appear if you have connected using the component, S-video or composite jacks. Switch the power off . •...


