
Operating Instructions
Page 3
.... English Français Safety Precautions Operating Instructions Thank you will find it is installed by mistake in a safe place. PIONEER cannot assume liabilities for damage caused by qualified personnel with enough skill and competence. Before using your dealer install and set up...so you very much for Dealers: After installation, be sure to deliver this manual to the customer and explain to the customer how to operate the Plasma Display properly. i En Note for purchasing this manual in installation or mounting, misuse, modification or a natural disaster. Notes on ...
.... English Français Safety Precautions Operating Instructions Thank you will find it is installed by mistake in a safe place. PIONEER cannot assume liabilities for damage caused by qualified personnel with enough skill and competence. Before using your dealer install and set up...so you very much for Dealers: After installation, be sure to deliver this manual to the customer and explain to the customer how to operate the Plasma Display properly. i En Note for purchasing this manual in installation or mounting, misuse, modification or a natural disaster. Notes on ...
Operating Instructions
Page 6
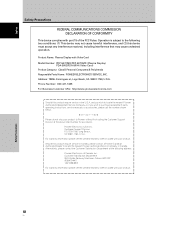
... Card Model Number: PDP-507CMX/PDP-607CMX (Plasma Display) PDA-5003/PDA-5004 (Video Card) Product Category: Class B Personal Computers & Peripherals Responsible Party Name: PIONEER ELECTRONICS SERVICE, INC. Product Name: Plasma Display with part 15 of Canada, Inc. Pioneer Electronics (USA) Inc...product to purchase replacement parts, operating instructions, service manuals, or accessories, please call the number shown below. 8 0 0 - 4 2 1 - 1 6 2 5 Please do not ship your product. Operation is subject to locate the nearest Pioneer Authorized Service Company in the U.S.A. BOX 1760,...
... Card Model Number: PDP-507CMX/PDP-607CMX (Plasma Display) PDA-5003/PDA-5004 (Video Card) Product Category: Class B Personal Computers & Peripherals Responsible Party Name: PIONEER ELECTRONICS SERVICE, INC. Product Name: Plasma Display with part 15 of Canada, Inc. Pioneer Electronics (USA) Inc...product to purchase replacement parts, operating instructions, service manuals, or accessories, please call the number shown below. 8 0 0 - 4 2 1 - 1 6 2 5 Please do not ship your product. Operation is subject to locate the nearest Pioneer Authorized Service Company in the U.S.A. BOX 1760,...
Operating Instructions
Page 7
English Contents Safety Precautions i Features 2 Before Proceeding 3 How to use this manual 3 Checking supplied accessories 5 Part Names and Functions 6 Main unit 6 Remote control unit 7 Connection panel (PDP-507CMX 9 Connection panel (PDP-607CMX 10 Installation and Connections 11 Installation of the unit 11 Connection to a personal computer 13 Audio connections 14 Power cord connection 15 How to ...
English Contents Safety Precautions i Features 2 Before Proceeding 3 How to use this manual 3 Checking supplied accessories 5 Part Names and Functions 6 Main unit 6 Remote control unit 7 Connection panel (PDP-507CMX 9 Connection panel (PDP-607CMX 10 Installation and Connections 11 Installation of the unit 11 Connection to a personal computer 13 Audio connections 14 Power cord connection 15 How to ...

Operating Instructions
Page 9
... for someone setting up to the more complex operations associated with adjusting the Plasma Display picture to match the requirements of the box and it may be necessary. English Before Proceeding How to use this manual This manual is set up to follow the course of actions and operations in this... the order that all the necessary points regarding installation of components. The section "System Settings" starting on page 6 to become acquainted with the plasma monitor and remote control unit, as their respective buttons and controls will be referred to a wide variety of the...
... for someone setting up to the more complex operations associated with adjusting the Plasma Display picture to match the requirements of the box and it may be necessary. English Before Proceeding How to use this manual This manual is set up to follow the course of actions and operations in this... the order that all the necessary points regarding installation of components. The section "System Settings" starting on page 6 to become acquainted with the plasma monitor and remote control unit, as their respective buttons and controls will be referred to a wide variety of the...

Operating Instructions
Page 10
Before Proceeding 4 En The examples are an example of those found only on the main Plasma Display itself. When the Plasma Display controls include equivalent buttons to those buttons found on the remote control unit, the commands can be performed on the ...screen item displayed and its proper operating order. English Before Proceeding About operations in this manual Each operation is performed correctly or not. ...
Before Proceeding 4 En The examples are an example of those found only on the main Plasma Display itself. When the Plasma Display controls include equivalent buttons to those buttons found on the remote control unit, the commands can be performed on the ...screen item displayed and its proper operating order. English Before Proceeding About operations in this manual Each operation is performed correctly or not. ...
Operating Instructions
Page 19
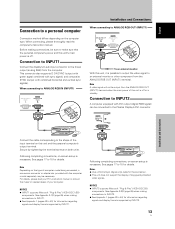
...ANALOG RGB OUT (INPUT1) terminal when the main power of this unit is off or in standby. See pages 17 to the Plasma Display's DVI connector. INPUT2 DIGITAL RGB (DVI-D) Installation and Connections Connect the cable corresponding to the shape of copyguard-protected video... completing connections, on both units. Note Depending on this unit's main power is off . For details, please read the computer's instruction manual. Following completing connections, on the computer type. This connector also supports G ON SYNC (output with green signal combined with sync signal), ...
...ANALOG RGB OUT (INPUT1) terminal when the main power of this unit is off or in standby. See pages 17 to the Plasma Display's DVI connector. INPUT2 DIGITAL RGB (DVI-D) Installation and Connections Connect the cable corresponding to the shape of copyguard-protected video... completing connections, on both units. Note Depending on this unit's main power is off . For details, please read the computer's instruction manual. Following completing connections, on the computer type. This connector also supports G ON SYNC (output with green signal combined with sync signal), ...
Operating Instructions
Page 32
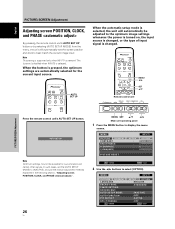
..., the unit will automatically set the [AUTO SETUP MODE] to [INACTIVE], and use the manual adjustment methods explained in the following section, "Adjusting screen POSITION, CLOCK, and PHASE ". 26 En MENU SET 5/∞ 2/3 Main unit operating panel 1 Press the MENU button to display the menu screen. MENU PICTURE SCREEN LANGUAGE ENERGY SAVE...
..., the unit will automatically set the [AUTO SETUP MODE] to [INACTIVE], and use the manual adjustment methods explained in the following section, "Adjusting screen POSITION, CLOCK, and PHASE ". 26 En MENU SET 5/∞ 2/3 Main unit operating panel 1 Press the MENU button to display the menu screen. MENU PICTURE SCREEN LANGUAGE ENERGY SAVE...
Operating Instructions
Page 33
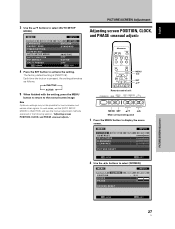
...] to select [AUTO SETUP MODE]. English 3 Use the 5/∞ buttons to [INACTIVE], and use the manual adjustment methods explained in the following section, "Adjusting screen POSITION, CLOCK, and PHASE ". VOL + MENU SET 5/∞ 2/3 Main unit operating panel 1 Press the MENU button to activate the setting. The factory default setting is pressed, the...
...] to select [AUTO SETUP MODE]. English 3 Use the 5/∞ buttons to [INACTIVE], and use the manual adjustment methods explained in the following section, "Adjusting screen POSITION, CLOCK, and PHASE ". VOL + MENU SET 5/∞ 2/3 Main unit operating panel 1 Press the MENU button to activate the setting. The factory default setting is pressed, the...

Operating Instructions
Page 34
... changed , the adjustment value stored in the previous procedure, use the 5/∞ buttons to be adjusted. 5 Press the SET button. If you wish to record a manually set adjustment value, set default. This setting adjusts the phase of screen letters or color misalignment. Pressing the SET button writes the value into the...
... changed , the adjustment value stored in the previous procedure, use the 5/∞ buttons to be adjusted. 5 Press the SET button. If you wish to record a manually set adjustment value, set default. This setting adjusts the phase of screen letters or color misalignment. Pressing the SET button writes the value into the...


