Operating Instructions
Page 1
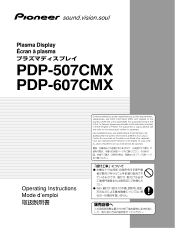
...;cran à plasma PDP-507CMX PDP-607CMX Operating Instructions Mode d'emploi Contents related to system specifications, power requirements, accessories, and other information differ with respect to the instructions written in the U.S.A. ...
...;cran à plasma PDP-507CMX PDP-607CMX Operating Instructions Mode d'emploi Contents related to system specifications, power requirements, accessories, and other information differ with respect to the instructions written in the U.S.A. ...

Operating Instructions
Page 3
.... Keep this manual in the future. Before using your dealer install and set up the product. Always have an installation specialist or your Plasma Display, please read the "Safety Precautions" and these "Operating Instructions" carefully so you very much for Dealers: After installation, be sure... to deliver this manual to the customer and explain to the customer how to operate the Plasma Display properly. PIONEER cannot assume liabilities for damage caused by qualified personnel with enough skill and competence. Notes on Installation Work: This product is...
.... Keep this manual in the future. Before using your dealer install and set up the product. Always have an installation specialist or your Plasma Display, please read the "Safety Precautions" and these "Operating Instructions" carefully so you very much for Dealers: After installation, be sure... to deliver this manual to the customer and explain to the customer how to operate the Plasma Display properly. PIONEER cannot assume liabilities for damage caused by qualified personnel with enough skill and competence. Notes on Installation Work: This product is...
Operating Instructions
Page 6
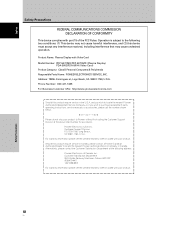
... sheet included with your product to locate the nearest Pioneer Authorized Service Company in the U.S.A. Product Name: Plasma Display with part 15 of Canada, Inc. English Safety Precautions FEDERAL COMMUNICATIONS COMMISSION DECLARATION OF CONFORMITY This device complies with Video Card Model Number: PDP-507CMX/PDP-607CMX (Plasma Display) PDA-5003/PDA-5004 (Video Card) Product Category...
... sheet included with your product to locate the nearest Pioneer Authorized Service Company in the U.S.A. Product Name: Plasma Display with part 15 of Canada, Inc. English Safety Precautions FEDERAL COMMUNICATIONS COMMISSION DECLARATION OF CONFORMITY This device complies with Video Card Model Number: PDP-507CMX/PDP-607CMX (Plasma Display) PDA-5003/PDA-5004 (Video Card) Product Category...
Operating Instructions
Page 8
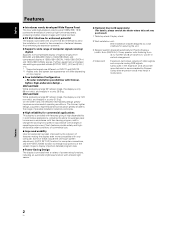
...features provide safety and highendurance under conditions of commercial use. ¶ Improved usability User convenience has been improved by Pioneer. PDP-507CMX: While producing a large 50" screen image, the display is only 122 mm thick, and weighs in operating environment. Features 2 En On ... in at only 35.5 kg. English Features ¶ Introduces newly developed Wide Plasma Panel The new wide high-precision plasma panel (1365x768 / 16:9) pushes the envelope of previous high-luminance panels, producing brighter, clearer images with higher contrast. ¶ ES Slot interface for...
...features provide safety and highendurance under conditions of commercial use. ¶ Improved usability User convenience has been improved by Pioneer. PDP-507CMX: While producing a large 50" screen image, the display is only 122 mm thick, and weighs in operating environment. Features 2 En On ... in at only 35.5 kg. English Features ¶ Introduces newly developed Wide Plasma Panel The new wide high-precision plasma panel (1365x768 / 16:9) pushes the envelope of previous high-luminance panels, producing brighter, clearer images with higher contrast. ¶ ES Slot interface for...

Operating Instructions
Page 9
... display examples MENU PICTURE SCREEN CONTRAST BRIGHTNESS H.ENHANCE V. The remainder of the sections in the order that all the necessary points regarding installation of the Plasma Display and connections to a wide variety of components. E N H A N C E PICTURE RESET SETUP : : : : INPUT1 OPTION 0 0 0 0 SET ENTER... is dedicated to the basic operations associated with selecting a source component up to the more complex operations associated with the plasma monitor and remote control unit, as their respective buttons and controls will be referred to throughout this manual. The section ...
... display examples MENU PICTURE SCREEN CONTRAST BRIGHTNESS H.ENHANCE V. The remainder of the sections in the order that all the necessary points regarding installation of the Plasma Display and connections to a wide variety of components. E N H A N C E PICTURE RESET SETUP : : : : INPUT1 OPTION 0 0 0 0 SET ENTER... is dedicated to the basic operations associated with selecting a source component up to the more complex operations associated with the plasma monitor and remote control unit, as their respective buttons and controls will be referred to throughout this manual. The section ...

Operating Instructions
Page 10
...well. some difference will refer to the operating controls found on the remote control unit, the commands can be performed on the main Plasma Display itself. The examples are an example of those found on the screen item displayed and its proper operating order. When the... Plasma Display controls include equivalent buttons to confirm whether the operation is described in these Operating Instructions should be seen in practice, depending on...
...well. some difference will refer to the operating controls found on the remote control unit, the commands can be performed on the main Plasma Display itself. The examples are an example of those found on the screen item displayed and its proper operating order. When the... Plasma Display controls include equivalent buttons to confirm whether the operation is described in these Operating Instructions should be seen in practice, depending on...
Operating Instructions
Page 14
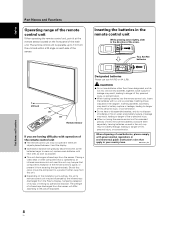
... receiving the signal entirely. The remote control unit is operated by the infrared rays discharged from the unit and within a 30 angle on the front panel of the main unit. Designated batteries Please use batteries other component that is operable up to a position further away from this unit. ¶ Depending on... batteries and store them separately. CAUTION ¶ Do not use size AA (R6) or AA (LR6). Should this occur, move the component to 7 m from the Plasma Display, hampering reception of the arrow.
... receiving the signal entirely. The remote control unit is operated by the infrared rays discharged from the unit and within a 30 angle on the front panel of the main unit. Designated batteries Please use batteries other component that is operable up to a position further away from this unit. ¶ Depending on... batteries and store them separately. CAUTION ¶ Do not use size AA (R6) or AA (LR6). Should this occur, move the component to 7 m from the Plasma Display, hampering reception of the arrow.
Operating Instructions
Page 15
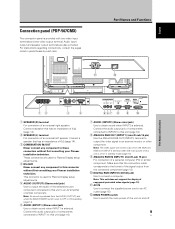
... (page 13). 0 DIGITAL RGB (INPUT2) (DVI-D jack) Use to output the audio of this connector without first consulting your Pioneer installation technician. For instructions regarding connections, consult the pages noted in standby mode.(page 13) 9 ANALOG RGB IN (INPUT1) (mini... panel (PDP-507CMX) The connection panel is provided with two video input terminals and one video output terminal. Audio input/ output and speaker output terminals are used for Plasma Display setup adjustments. 4 RS-232C Never connect any component to these connectors without first consulting your Pioneer ...
... (page 13). 0 DIGITAL RGB (INPUT2) (DVI-D jack) Use to output the audio of this connector without first consulting your Pioneer installation technician. For instructions regarding connections, consult the pages noted in standby mode.(page 13) 9 ANALOG RGB IN (INPUT1) (mini... panel (PDP-507CMX) The connection panel is provided with two video input terminals and one video output terminal. Audio input/ output and speaker output terminals are used for Plasma Display setup adjustments. 4 RS-232C Never connect any component to these connectors without first consulting your Pioneer ...
Operating Instructions
Page 16
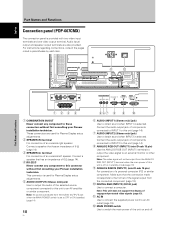
...right speaker. Connect a speaker that has an impedance of this connector without first consulting your Pioneer installation technician. Note: The video signal will not be output from the ANALOG RGB OUT... AUDIO (INPUT2) (Stereo mini jack) Use to obtain sound when INPUT2 is used for Plasma Display setup adjustments. 5 AUDIO (OUTPUT) (Stereo mini jack) Use to output the audio...-protected video signals (page 13). - English Part Names and Functions Connection panel (PDP-607CMX) The connection panel is provided with two video input terminals and one video output terminal. Connect...
...right speaker. Connect a speaker that has an impedance of this connector without first consulting your Pioneer installation technician. Note: The video signal will not be output from the ANALOG RGB OUT... AUDIO (INPUT2) (Stereo mini jack) Use to obtain sound when INPUT2 is used for Plasma Display setup adjustments. 5 AUDIO (OUTPUT) (Stereo mini jack) Use to output the audio...-protected video signals (page 13). - English Part Names and Functions Connection panel (PDP-607CMX) The connection panel is provided with two video input terminals and one video output terminal. Connect...
Operating Instructions
Page 17
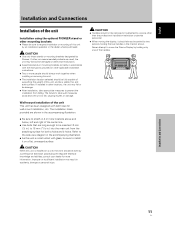
...by two persons holding only one of the handles. CAUTION When this unit is constructed with glass, be sure to move the Plasma Display by holding the rear handles in .) into the main unit from falling. If other non-recommended products are long enough... technician possessing the requisite technical knowledge and abilities; English Français Installation and Connections Installation of the unit Installation using the optional PIONEER stand or other than the professional installation technician or service personnel. ÷ When moving the display, it on a wall, the ...
...by two persons holding only one of the handles. CAUTION When this unit is constructed with glass, be sure to move the Plasma Display by holding the rear handles in .) into the main unit from falling. If other non-recommended products are long enough... technician possessing the requisite technical knowledge and abilities; English Français Installation and Connections Installation of the unit Installation using the optional PIONEER stand or other than the professional installation technician or service personnel. ÷ When moving the display, it on a wall, the ...
Operating Instructions
Page 19
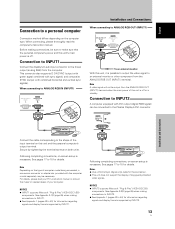
... display formats supported by INPUT2. 13 En NOTICE ¶ INPUT2 supports Microsoft "Plug & Play" (VESA DDC 2B) components. Before making connections, be connected to the Plasma Display's DVI connector. Note Depending on both units. For details, please read the computer's instruction manual. English Français Connection to a personal computer Connection...
... display formats supported by INPUT2. 13 En NOTICE ¶ INPUT2 supports Microsoft "Plug & Play" (VESA DDC 2B) components. Before making connections, be connected to the Plasma Display's DVI connector. Note Depending on both units. For details, please read the computer's instruction manual. English Français Connection to a personal computer Connection...

Operating Instructions
Page 20
...cords to confirm that the audio component's power and the unit's main power is output from the component connected to INPUT2, to the Plasma Display's AUDIO (INPUT2) stereo mini jack (L/R). Refer to the illustrations below when making connections, be used to connect the audio output... from the component connected to INPUT1, to the Plasma Display's AUDIO (INPUT1) stereo mini jack (L/R). OUTPUT INPUT1 INPUT2 AUDIO AUDIO AUDIO Video input INPUT1 INPUT2 Audio input jacks Stereo mini jack ...
...cords to confirm that the audio component's power and the unit's main power is output from the component connected to INPUT2, to the Plasma Display's AUDIO (INPUT2) stereo mini jack (L/R). Refer to the illustrations below when making connections, be used to connect the audio output... from the component connected to INPUT1, to the Plasma Display's AUDIO (INPUT1) stereo mini jack (L/R). OUTPUT INPUT1 INPUT2 AUDIO AUDIO AUDIO Video input INPUT1 INPUT2 Audio input jacks Stereo mini jack ...
Operating Instructions
Page 21
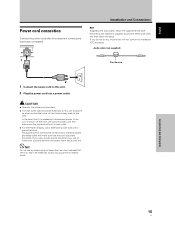
... as this unit should be sure to connect the power cord to a three-pronged grounded outlet and make sure that indicated (AC 100 V to 120 V, 50 Hz/60 Hz) as possible to the unit, first turn off the main unit's power switch, and then disconnect the power cord from its wall... outlet. ÷ For the Plasma Display, use a power supply voltage other than that the cord is properly grounded. Installation and Connections 15 En AC IN Installation and Connections Note Regarding...
... as this unit should be sure to connect the power cord to a three-pronged grounded outlet and make sure that indicated (AC 100 V to 120 V, 50 Hz/60 Hz) as possible to the unit, first turn off the main unit's power switch, and then disconnect the power cord from its wall... outlet. ÷ For the Plasma Display, use a power supply voltage other than that the cord is properly grounded. Installation and Connections 15 En AC IN Installation and Connections Note Regarding...
Operating Instructions
Page 28
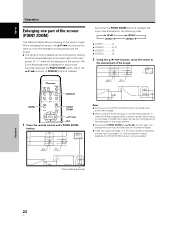
... displayed for about three seconds whenever the POINT ZOOM button, one part of the screen (POINT ZOOM) This Plasma Display allows enlarging of the screen image. x1 ÷ LEVEL2 .......... x3 2 Using the 5/∞/2/3 buttons... use of the POINT ZOOM function, the screen size cannot be changed. ¶ When using the Plasma Display in a profit-making activity, or when exhibiting images publicly, using the screen size function to compress...; LEVEL3 .......... English Operation 10 22.1 84.3 10 22.1 10 50 Operation Enlarging one of the 5/∞/2/3 buttons, or DISPLAY button is pressed.
... displayed for about three seconds whenever the POINT ZOOM button, one part of the screen (POINT ZOOM) This Plasma Display allows enlarging of the screen image. x1 ÷ LEVEL2 .......... x3 2 Using the 5/∞/2/3 buttons... use of the POINT ZOOM function, the screen size cannot be changed. ¶ When using the Plasma Display in a profit-making activity, or when exhibiting images publicly, using the screen size function to compress...; LEVEL3 .......... English Operation 10 22.1 84.3 10 22.1 10 50 Operation Enlarging one of the 5/∞/2/3 buttons, or DISPLAY button is pressed.
Operating Instructions
Page 29
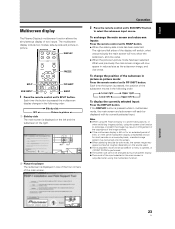
... screen image will each be changed during multiscreen display. ¶ The sound of two inputs. Notes ¶ When using the Plasma Display in the main screen is performed. ¶ The screen size cannot be displayed with its currently selected input. DISPLAY FREEZE SPLIT... PIP SHIFT SUB INPUT SWAP 1 Press the remote control unit's SPLIT button. English Multiscreen display The Plasma Display's multiscreen function allows the simultaneous display of the input selected in a profit-making activity, or when exhibiting images publicly, using ...
... screen image will each be changed during multiscreen display. ¶ The sound of two inputs. Notes ¶ When using the Plasma Display in the main screen is performed. ¶ The screen size cannot be displayed with its currently selected input. DISPLAY FREEZE SPLIT... PIP SHIFT SUB INPUT SWAP 1 Press the remote control unit's SPLIT button. English Multiscreen display The Plasma Display's multiscreen function allows the simultaneous display of the input selected in a profit-making activity, or when exhibiting images publicly, using ...
Operating Instructions
Page 30
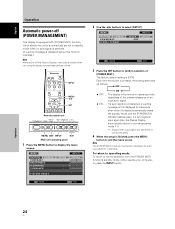
Each time the button is input again later, the Plasma Display automatically returns to normal operating mode (*1). *1. If a sync signal is pressed, the setting alternates...no sync signal is detected. (A warning message is displayed before this function operates.) Note Always turn off the Plasma Display's main power switch when not using the display for 8 seconds, after which the display automatically enters the... 4 When the setup is [OFF]. VOL + MENU SET INPUT 2/3 Main unit operating panel 1 Press the MENU button to confirm selection of an input sync signal. ÷ ON .......
Each time the button is input again later, the Plasma Display automatically returns to normal operating mode (*1). *1. If a sync signal is pressed, the setting alternates...no sync signal is detected. (A warning message is displayed before this function operates.) Note Always turn off the Plasma Display's main power switch when not using the display for 8 seconds, after which the display automatically enters the... 4 When the setup is [OFF]. VOL + MENU SET INPUT 2/3 Main unit operating panel 1 Press the MENU button to confirm selection of an input sync signal. ÷ ON .......
Operating Instructions
Page 44
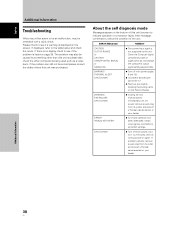
...the Computer signal compatibility table on the bottom of the unit. Immediately turn off power, remove power plug from its outlet, and consult a Pioneer service center or your dealer. The problem may be remedied with a quick check. ERROR MESSAGE REMEDY CAUTION OUT OF RANGE or CAUTION UNSUPPORTED ...this unit so please also check the other settings. If there is no display check to 2 minutes, then try turning power on the Plasma Display. Please check to the table below and check the mode. ERROR INVALID KEY ENTRY ¶ An invalid operation has been attempted. Check...
...the Computer signal compatibility table on the bottom of the unit. Immediately turn off power, remove power plug from its outlet, and consult a Pioneer service center or your dealer. The problem may be remedied with a quick check. ERROR MESSAGE REMEDY CAUTION OUT OF RANGE or CAUTION UNSUPPORTED ...this unit so please also check the other settings. If there is no display check to 2 minutes, then try turning power on the Plasma Display. Please check to the table below and check the mode. ERROR INVALID KEY ENTRY ¶ An invalid operation has been attempted. Check...

Operating Instructions
Page 45
... sometimes heard from the cabinet. Not a malfunction. • Fan speed changes automatically in sound being heard from the cabinet. • Bright portions of the Plasma Display panel. Check the Computer signal compatibility table (pages 42 to 14) • Has setup been done correctly after first turning the MAIN POWER off . • No...
... sometimes heard from the cabinet. Not a malfunction. • Fan speed changes automatically in sound being heard from the cabinet. • Bright portions of the Plasma Display panel. Check the Computer signal compatibility table (pages 42 to 14) • Has setup been done correctly after first turning the MAIN POWER off . • No...
Operating Instructions
Page 46
... to the remaining electric load. When using the monitor in wireless headphones. the function is indicated. This is an inevitable by the Plasma Display's protection function which the monitor is provided with slight movement and automatically adjusts brightness to [ON]? (page 24). 2 The...29) and [ENERGY SAVE] function (page 31) can also be heard in such applications, consult your nearest sales outlet. • The Plasma Display panel of about three minutes; Before using this unit as a surveillance monitor or in cases where violation of the [POWER MGT.] function, this ...
... to the remaining electric load. When using the monitor in wireless headphones. the function is indicated. This is an inevitable by the Plasma Display's protection function which the monitor is provided with slight movement and automatically adjusts brightness to [ON]? (page 24). 2 The...29) and [ENERGY SAVE] function (page 31) can also be heard in such applications, consult your nearest sales outlet. • The Plasma Display panel of about three minutes; Before using this unit as a surveillance monitor or in cases where violation of the [POWER MGT.] function, this ...
Operating Instructions
Page 47
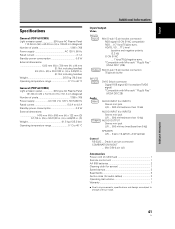
... 15 pin (socket connector) RGB signal (G ON SYNC compatible) RGB ... 0.7 Vp-p/75 Ω/no sync. English Specifications General (PDP-507CMX) Light emission panel 50V type AC Plasma Panel 110.36 cm (W) x 62.09 cm (H) x 126.63 cm (diagonal) Number of pixels 1365 x 768 Power supply AC ...) Light emission panel 60V type AC Plasma Panel 131.86 cm (W) x 74.19 cm (H) x 151.3 cm (diagonal) Number of pixels 1365 x 768 Power supply AC 100 V to 120 V, 50 Hz/60 Hz Rated current 5.8 A to 4.8 A Standby power consumption 0.8 W External dimensions 1470 mm (W) x 880 mm (H) x 122 mm (D) 57-7/8 in. (W)...
... 15 pin (socket connector) RGB signal (G ON SYNC compatible) RGB ... 0.7 Vp-p/75 Ω/no sync. English Specifications General (PDP-507CMX) Light emission panel 50V type AC Plasma Panel 110.36 cm (W) x 62.09 cm (H) x 126.63 cm (diagonal) Number of pixels 1365 x 768 Power supply AC ...) Light emission panel 60V type AC Plasma Panel 131.86 cm (W) x 74.19 cm (H) x 151.3 cm (diagonal) Number of pixels 1365 x 768 Power supply AC 100 V to 120 V, 50 Hz/60 Hz Rated current 5.8 A to 4.8 A Standby power consumption 0.8 W External dimensions 1470 mm (W) x 880 mm (H) x 122 mm (D) 57-7/8 in. (W)...


