
User Guide
Page 4
...SVGA) projector - VGA Cable - S-Video cable - This device may cause undesired operation. This device must accept any unauthorized changes or modifications to this multimedia projector... projectors on . UGO X-lite Impact or S-lite Impact ...Philips Drive Knoxville, TN 37914 Telephone (1888) 873-4672 Lamp replacement Be sure to video equipment 13 8. Mouse cable set up your projector. RCA Video cable - This equipment generates, uses, and can be required to correct the interference at his own expense. Please put the projector in the U.S.A. IMPORTANT Digital Light Processing, DLP...
...SVGA) projector - VGA Cable - S-Video cable - This device may cause undesired operation. This device must accept any unauthorized changes or modifications to this multimedia projector... projectors on . UGO X-lite Impact or S-lite Impact ...Philips Drive Knoxville, TN 37914 Telephone (1888) 873-4672 Lamp replacement Be sure to video equipment 13 8. Mouse cable set up your projector. RCA Video cable - This equipment generates, uses, and can be required to correct the interference at his own expense. Please put the projector in the U.S.A. IMPORTANT Digital Light Processing, DLP...

User Guide
Page 5
...short cut parts, which could result in the cabinet are covered by PHILIPS, as this projector, observe the following conditions: A. Quick stops, excessive force, and uneven surfaces may expose you operate your projector dealer or local power company. 10. These openings should not be operated... with care. When the power cord or plug is in chapter 'Maintenance'. B. If liquid has been spilled into the projector. 5. C. D. If the projector does not operate normally when you are required, be walked on an unstable cart, stand, or table. improper adjustment of...
...short cut parts, which could result in the cabinet are covered by PHILIPS, as this projector, observe the following conditions: A. Quick stops, excessive force, and uneven surfaces may expose you operate your projector dealer or local power company. 10. These openings should not be operated... with care. When the power cord or plug is in chapter 'Maintenance'. B. If liquid has been spilled into the projector. 5. C. D. If the projector does not operate normally when you are required, be walked on an unstable cart, stand, or table. improper adjustment of...

User Guide
Page 6
...The advanced intelligent compression technology enables these standards and adapt to the height of the line of brightness over the whole screen. LC5231 Fully compatible with Apple Macintosh computers (Power Book and Power Mac) as well as the menu is not distorted to a trapezoid...reproduce the three basic colors (RGB) required for XGA using the key-stone correction function. 10. Projector Features 1. By increasing the light usage efficiency we can correct this picture distortion. The 'auto image' feature automatically sizes and positions the image to the unit. 6. UGO X-lite Impact;
...The advanced intelligent compression technology enables these standards and adapt to the height of the line of brightness over the whole screen. LC5231 Fully compatible with Apple Macintosh computers (Power Book and Power Mac) as well as the menu is not distorted to a trapezoid...reproduce the three basic colors (RGB) required for XGA using the key-stone correction function. 10. Projector Features 1. By increasing the light usage efficiency we can correct this picture distortion. The 'auto image' feature automatically sizes and positions the image to the unit. 6. UGO X-lite Impact;

User Guide
Page 7
... ‹ Flip cover › D-Keystone +/- (Digital Keystone) To correct picture distortion of the projected image. ) Power socket To connect the projector to the mains. ¡ Lock slit To insert an optional locking device (Kensington lock). ™ IR sensor Receives the signals from the remote...image. 0 Zoom ring To adjust the size of a video recorder, Laser Disc player, video camera or TV with the resolution. Functional Overview See illustrations Projector front (fig. 1) 1 Indicators Standby / On (y |) indicator - On: lamp life of the projection lamp nears or the end or is expired....
... ‹ Flip cover › D-Keystone +/- (Digital Keystone) To correct picture distortion of the projected image. ) Power socket To connect the projector to the mains. ¡ Lock slit To insert an optional locking device (Kensington lock). ™ IR sensor Receives the signals from the remote...image. 0 Zoom ring To adjust the size of a video recorder, Laser Disc player, video camera or TV with the resolution. Functional Overview See illustrations Projector front (fig. 1) 1 Indicators Standby / On (y |) indicator - On: lamp life of the projection lamp nears or the end or is expired....
User Guide
Page 8
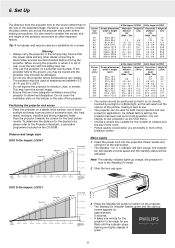
... be used at slow speed and the standby status will wash out the colours of screen 3. The projector must be damaged. • Do not use the projector where temperatures vary greatly. Distance and image sizes UGO X-lite Impact; Tele - 3.9 4.9 - 6.2 7.5 - 9.2 10.2 - 12.1 12.8 - 15.4 15.4 - 18.4 19.4 - 23.3 25.9 - 30.8 Height H (inch) - 2.7 4.1 6.1 8.1 10.2 12.2 15.3 20...
... be used at slow speed and the standby status will wash out the colours of screen 3. The projector must be damaged. • Do not use the projector where temperatures vary greatly. Distance and image sizes UGO X-lite Impact; Tele - 3.9 4.9 - 6.2 7.5 - 9.2 10.2 - 12.1 12.8 - 15.4 15.4 - 18.4 19.4 - 23.3 25.9 - 30.8 Height H (inch) - 2.7 4.1 6.1 8.1 10.2 12.2 15.3 20...

User Guide
Page 9
...Keystone +/- Press the Standby/On button to adjust the vertical angle of the image. Vertical keystone correction If projector and screen are located. Adjusting height and level of the projector • Use the Height/Level Adjuster to switch off the mains supply completely, pull the mains plug out ...ring to prevent dust, dirt or other cables. 3. Slide the lens cap back in place to readjust the focus of the projector as specified under 'Positioning the projector and screen'. buttons of the wall socket. The power will turn off ) and disconnect the power cord and all other ...
...Keystone +/- Press the Standby/On button to adjust the vertical angle of the image. Vertical keystone correction If projector and screen are located. Adjusting height and level of the projector • Use the Height/Level Adjuster to switch off the mains supply completely, pull the mains plug out ...ring to prevent dust, dirt or other cables. 3. Slide the lens cap back in place to readjust the focus of the projector as specified under 'Positioning the projector and screen'. buttons of the wall socket. The power will turn off ) and disconnect the power cord and all other ...

User Guide
Page 10
... button on the remote control operates as the computer mouse left click button and the Cancel button as PC mouse The remote control of this projector can be shorter than four meters (13 feet). The controllable range is connected, the OK and CANCEL buttons operate in the remote control 1. ... manganese batteries). Set Up Inserting the batteries in the same way as the PC mouse (wireless mouse function) by connecting the Mouse connector of this projector and the PC. Status Standby/On y Input Auto image OPEN 30˚ 50˚ 50˚ 30˚ 10 6. The PC Mouse functions ...
... button on the remote control operates as the computer mouse left click button and the Cancel button as PC mouse The remote control of this projector can be shorter than four meters (13 feet). The controllable range is connected, the OK and CANCEL buttons operate in the remote control 1. ... manganese batteries). Set Up Inserting the batteries in the same way as the PC mouse (wireless mouse function) by connecting the Mouse connector of this projector and the PC. Status Standby/On y Input Auto image OPEN 30˚ 50˚ 50˚ 30˚ 10 6. The PC Mouse functions ...

User Guide
Page 11
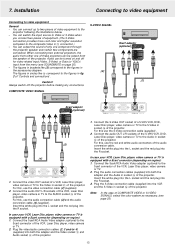
... Computer VGA Cable 2 RCA Video Cable 3 PC Audio Cable 4 Audio Conversion Cable 5 Mouse Cable PS/2 6 Mouse Cable USB 7 S-Video Cable Projector side Mini D-Sub 15P (male) RCA pin (male) CONNECTIONS Computer/AV products side Mini D-Sub 15P (male) RCA pin (male) 3.5 mm...AV equipment. Component (YCbCr) cable - Scart adapter 11 7. The numbers in the left-hand column correspond with the product for connecting the projector to 7) are supplied with the numbers in the connection diagrams on the following pages. Optional cables and adapter: - Programmable VGA MAC adapter -...
... Computer VGA Cable 2 RCA Video Cable 3 PC Audio Cable 4 Audio Conversion Cable 5 Mouse Cable PS/2 6 Mouse Cable USB 7 S-Video Cable Projector side Mini D-Sub 15P (male) RCA pin (male) CONNECTIONS Computer/AV products side Mini D-Sub 15P (male) RCA pin (male) 3.5 mm...AV equipment. Component (YCbCr) cable - Scart adapter 11 7. The numbers in the left-hand column correspond with the product for connecting the projector to 7) are supplied with the numbers in the connection diagrams on the following pages. Optional cables and adapter: - Programmable VGA MAC adapter -...

User Guide
Page 12
... be possible to the figures in circles like (1) correspond to use the VGA/MAC adapter (optional). 2. When connecting the projector to the characters in socket # of this projector to Data. For this , use the PC audio cable (3) (supplied). Installation Connecting to a computer Connecting to PC mouse ...on . - Connect the DATA OUT terminal of the computer to the Audio in fig. 2 of this condition the cursor key operates the projector cursor function. When connection is pressed again, the button's light goes off the PC power. For this , use the VGA cable (1) (...
... be possible to the figures in circles like (1) correspond to use the VGA/MAC adapter (optional). 2. When connecting the projector to the characters in socket # of this projector to Data. For this , use the PC audio cable (3) (supplied). Installation Connecting to a computer Connecting to PC mouse ...on . - Connect the DATA OUT terminal of the computer to the Audio in fig. 2 of this condition the cursor key operates the projector cursor function. When connection is pressed again, the button's light goes off the PC power. For this , use the VGA cable (1) (...
User Guide
Page 13
...! Connect the S-Video OUT socket of a S-VHS VCR, DVD, Laser Disc player, video camera or TV to the Scart connector of the projector. Plug the S-Video connection cable (supplied) into both the adapter and the Video socket & and Audio socket # of COMPOSITE VIDEO or S-VIDEO... SIGNALS, select the color system as necessary. (see SOUNDMUTE on and off the projector before making any connections. For this , use the video connection cable (2) (supplied). 2. Plug the audio connection cables (supplied) into the VCR...
...! Connect the S-Video OUT socket of a S-VHS VCR, DVD, Laser Disc player, video camera or TV to the Scart connector of the projector. Plug the S-Video connection cable (supplied) into both the adapter and the Video socket & and Audio socket # of COMPOSITE VIDEO or S-VIDEO... SIGNALS, select the color system as necessary. (see SOUNDMUTE on and off the projector before making any connections. For this , use the video connection cable (2) (supplied). 2. Plug the audio connection cables (supplied) into the VCR...
User Guide
Page 14
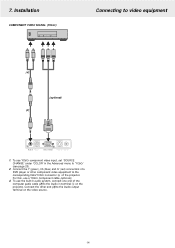
...). 2. To use YCbCr component video input, set 'SOURCE CHANGE' under 'COLOR' in 1. For this, use the built-in audio system, connect one end of the projector. To use a YCbCr Component cable (optional). 3. Connect the other component video equipment to the Audio output terminal on the...
...). 2. To use YCbCr component video input, set 'SOURCE CHANGE' under 'COLOR' in 1. For this, use the built-in audio system, connect one end of the projector. To use a YCbCr Component cable (optional). 3. Connect the other component video equipment to the Audio output terminal on the...

User Guide
Page 15
...select OPTION in one . This menu will light and the "LAMP USAGE" icon which shows hours of eight different languages. 1. Language selection The projector can display menus in the menu bar. 3. Use Cursor Control to select ON or OFF. After the lamp has been operating for 5 seconds... to any other item in the normal menu. Adjust the selected item, using Cursor Control up green. 2. The menu bar appears on the projector toggles between Data/YCbCr, Video or S-Video input. 3. DATA VIDEO NO SIGNAL Data selected as source Video selected as source, A/V muted 15...
...select OPTION in one . This menu will light and the "LAMP USAGE" icon which shows hours of eight different languages. 1. Language selection The projector can display menus in the menu bar. 3. Use Cursor Control to select ON or OFF. After the lamp has been operating for 5 seconds... to any other item in the normal menu. Adjust the selected item, using Cursor Control up green. 2. The menu bar appears on the projector toggles between Data/YCbCr, Video or S-Video input. 3. DATA VIDEO NO SIGNAL Data selected as source Video selected as source, A/V muted 15...
User Guide
Page 18
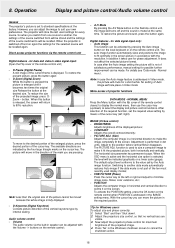
...Press 'No' in the IMAGE setting menu. However, you can adjust the image to minimize image noise, flicker, color variations, etc.; - The projector will be moved because the whole image is performed in the required position. IMAGE (Picture control) - Adjustment is fully displayed. - The PICTURE ... set to the left /right). CONTRAST Adjusts the overall contrast intensity; - Operation Display and picture control/Audio volume control General The projector's picture is enlarged until it on the remote control; No setting of the cursor key (left or right and adjust to suit ...
...Press 'No' in the IMAGE setting menu. However, you can adjust the image to minimize image noise, flicker, color variations, etc.; - The projector will be moved because the whole image is performed in the required position. IMAGE (Picture control) - Adjustment is fully displayed. - The PICTURE ... set to the left /right). CONTRAST Adjusts the overall contrast intensity; - Operation Display and picture control/Audio volume control General The projector's picture is enlarged until it on the remote control; No setting of the cursor key (left or right and adjust to suit ...

User Guide
Page 20
...unit Input button: All input signals are searched; - 8. TINT Adjusts the tint of the displayed picture; - The element marked with this projector. DIRECT: the original aspect ratio of color balance can be set the aspect ratio. NORMAL - V-EFFECT The following color systems can be ... This feature emphasises the White which is natural and smooth. - for standard PC signals - NTSC 3.58 - PAL60 - Other Settings The projector is convenient when multiple video units are adjustable. After selection of the color gamma index, and the respective R,G and B levels. SHARPNESS Controls...
...unit Input button: All input signals are searched; - 8. TINT Adjusts the tint of the displayed picture; - The element marked with this projector. DIRECT: the original aspect ratio of color balance can be set the aspect ratio. NORMAL - V-EFFECT The following color systems can be ... This feature emphasises the White which is natural and smooth. - for standard PC signals - NTSC 3.58 - PAL60 - Other Settings The projector is convenient when multiple video units are adjustable. After selection of the color gamma index, and the respective R,G and B levels. SHARPNESS Controls...

User Guide
Page 21
... the projection screen. Select RESET by using Cursor Control. 4. Note: All items can be reset to select OPTION selection functions. Press OK. 21 PROJECTION The projector can be used in accordance with respect to ON, input will be flipped to reset the hours of the required option, set the required value...
... the projection screen. Select RESET by using Cursor Control. 4. Note: All items can be reset to select OPTION selection functions. Press OK. 21 PROJECTION The projector can be used in accordance with respect to ON, input will be flipped to reset the hours of the required option, set the required value...
User Guide
Page 22
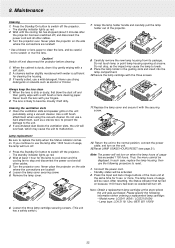
...periodically using the vacuum cleaner. Use a soft brush attachment when using a vacuum cleaner. Do not use strong detergents or solvents such as the impact may cause the unit to the unit. 2. If accumulated dust blocks the ventilation slots, the unit will turn on the side where the ...lamp to clean the lens, and be reset. After resetting, the Status indicator that turned on when the lamp hours of the projector. 8. Note: Obtain a replacement lamp cartridge at least 1 hour for 5 sec. Model name: LC5241 (XGA) / LC5231(SVGA) - Lamp type: LCA 3119; 12nc: 8670 931 19009 22
...periodically using the vacuum cleaner. Use a soft brush attachment when using a vacuum cleaner. Do not use strong detergents or solvents such as the impact may cause the unit to the unit. 2. If accumulated dust blocks the ventilation slots, the unit will turn on the side where the ...lamp to clean the lens, and be reset. After resetting, the Status indicator that turned on when the lamp hours of the projector. 8. Note: Obtain a replacement lamp cartridge at least 1 hour for 5 sec. Model name: LC5241 (XGA) / LC5231(SVGA) - Lamp type: LCA 3119; 12nc: 8670 931 19009 22
User Guide
Page 24
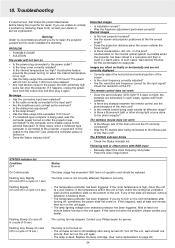
...the horizontal and vertical position of 4 sec.) • The temperature protector has been triggered. Wait at least one minute before taking the projector for the condensation to remedy a problem by following these hints, consult your dealer or service organisation. Contact your dealer. Turn off . Troubleshooting... adjust the clock frequency and phase. • Press the Auto image button. If this does not solve the problem, please contact your Philips dealer for the input signal? Replace the lamp cartridge. (See 'Lamp replacement on . • Does the Status indicator blink? If ...
...the horizontal and vertical position of 4 sec.) • The temperature protector has been triggered. Wait at least one minute before taking the projector for the condensation to remedy a problem by following these hints, consult your dealer or service organisation. Contact your dealer. Turn off . Troubleshooting... adjust the clock frequency and phase. • Press the Auto image button. If this does not solve the problem, please contact your Philips dealer for the input signal? Replace the lamp cartridge. (See 'Lamp replacement on . • Does the Status indicator blink? If ...


