
User Guide
Page 3
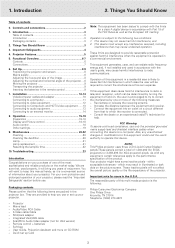
... audio equipment 13 Connecting to Component- Projector - User Guide, Projection Assistant and more of the projector. Increase the distance between the equipment and receiver. - As with the user's guide, may not cause harmful interference, and 2. Functional Overview 6-7 Controls 6 Connections 7 6. Operation 15-19 Preparation 15-16 Display and Picture control 16-18 Audio control 18 Other settings 19 9. NOTE: This Philips projector uses three LCD (Liquid Crystal Display) panels.These panels contain a total of the product. Audio/Video RCA Cable...
... audio equipment 13 Connecting to Component- Projector - User Guide, Projection Assistant and more of the projector. Increase the distance between the equipment and receiver. - As with the user's guide, may not cause harmful interference, and 2. Functional Overview 6-7 Controls 6 Connections 7 6. Operation 15-19 Preparation 15-16 Display and Picture control 16-18 Audio control 18 Other settings 19 9. NOTE: This Philips projector uses three LCD (Liquid Crystal Display) panels.These panels contain a total of the product. Audio/Video RCA Cable...
User Guide
Page 4
... versions only). The remote control with a dry cloth. Save these openings must not be done with a mounting kit approved by wiping with laser pointer sends a laser beam to lightning and power-line surges. 14. Use a soft dry cloth to qualified service personnel. 17. To ensure reliable operation of these instructions before cleaning or lamp replacement. 2. Refer all servicing to clean the projector unit. If the...
... versions only). The remote control with a dry cloth. Save these openings must not be done with a mounting kit approved by wiping with laser pointer sends a laser beam to lightning and power-line surges. 14. Use a soft dry cloth to qualified service personnel. 17. To ensure reliable operation of these instructions before cleaning or lamp replacement. 2. Refer all servicing to clean the projector unit. If the...

User Guide
Page 5
...-ROM, allows operation of certain projector features and settings via the USB port and runs on the CD-ROM. With 'Digital Zoom' a specific part of keyboard and remote control keys, see the 'Projector Max' user guide on MS-Windows operating systems. For installing the application see the Functional Overview in the 'Display' menu of the wireless remote control allows you can correct this picture distortion. For a complete overview of the projected image can now manipulate...
...-ROM, allows operation of certain projector features and settings via the USB port and runs on the CD-ROM. With 'Digital Zoom' a specific part of keyboard and remote control keys, see the 'Projector Max' user guide on MS-Windows operating systems. For installing the application see the Functional Overview in the 'Display' menu of the wireless remote control allows you can correct this picture distortion. For a complete overview of the projected image can now manipulate...
User Guide
Page 6
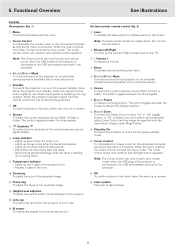
... of the projected image. ! When the menu is starting. Note: The Cursor Control can only function as the menu is connected to indicate items on the screen. 2 Cursor Control To manipulate the mouse cursor on screen. 6 Source To select the current projection source (Data, S-Video or Video). When the projector receives a signal from the remote control. 6 Fast blinks red when lamp start has failed. - Lights up orange when lamp life has almost expired. - In 'On' condition, the zoom centre can...
... of the projected image. ! When the menu is starting. Note: The Cursor Control can only function as the menu is connected to indicate items on the screen. 2 Cursor Control To manipulate the mouse cursor on screen. 6 Source To select the current projection source (Data, S-Video or Video). When the projector receives a signal from the remote control. 6 Fast blinks red when lamp start has failed. - Lights up orange when lamp life has almost expired. - In 'On' condition, the zoom centre can...
User Guide
Page 7
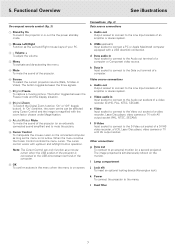
... the sound of a computer. b USB (upstream) Input socket to the S-Video out socket of your PC. 3 - The cursor control works with up/down and left/right button operation. h Data in Input socket to connect to the Audio out terminal of an amplifier or stereo system. OK To confirm actions in or out the the power standby mode. 2 Mouse Left/Right Function as the menu is connected to...
... the sound of a computer. b USB (upstream) Input socket to the S-Video out socket of your PC. 3 - The cursor control works with up/down and left/right button operation. h Data in Input socket to connect to the Audio out terminal of an amplifier or stereo system. OK To confirm actions in or out the the power standby mode. 2 Mouse Left/Right Function as the menu is connected to...
User Guide
Page 8
... (about 3 minutes after the projector has been switched to adjust the vertical angle of the image. See 'Rear screen projection' and 'Ceiling-mount projection' under 'Positioning the projector and screen'. PHILIPS - To switch off you sit directly in front of the picture, making it in the 'Settings' menu. - Stabnyd A MVute Volume Lamp RC Keystone Stabnyd A MVute Volume Lamp RC Keystone Menu OK Zoom ring Focus ring Menu OK 2. 6. The Standby Warning screen will wash out the colours...
... (about 3 minutes after the projector has been switched to adjust the vertical angle of the image. See 'Rear screen projection' and 'Ceiling-mount projection' under 'Positioning the projector and screen'. PHILIPS - To switch off you sit directly in front of the picture, making it in the 'Settings' menu. - Stabnyd A MVute Volume Lamp RC Keystone Stabnyd A MVute Volume Lamp RC Keystone Menu OK Zoom ring Focus ring Menu OK 2. 6. The Standby Warning screen will wash out the colours...
User Guide
Page 9
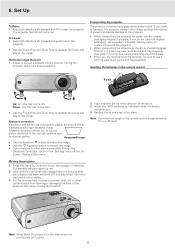
... other cables. 3. Keystone correction If projector and screen are located. 9 Install two 'AAA' batteries as the soft bag supplied), then pack it into place. Put the lens cap back in the remote control Push Up: turn the feet to the right. • Use the Focus Ring and Zoom Ring to the desired position. The projector feet (B) will be sure to correct picture distortion of the image. If...
... other cables. 3. Keystone correction If projector and screen are located. 9 Install two 'AAA' batteries as the soft bag supplied), then pack it into place. Put the lens cap back in the remote control Push Up: turn the feet to the right. • Use the Focus Ring and Zoom Ring to the desired position. The projector feet (B) will be sure to correct picture distortion of the image. If...
User Guide
Page 10
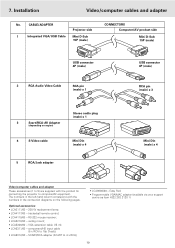
Installation Video/computer cables and adapter No. CABLE/ADAPTER Projector side 1 Integrated VGA/USB Cable Mini D-Sub 15P (male) CONNECTORS Computer/AV product side Mini D-Sub 15P (male) USB connector 4P (male) 2 RCA Audio Video Cable RCA pin (male) x 1 USB connector 4P (male) RCA pin (male) x 3 3 Scart/RCA-AV Adapter (depending on the following pages. ceiling mount; • LCA5300/00 - component/HD input cable (5 x RCA to 4 x RCA); • LCA9000/20 - VGA extension...
Installation Video/computer cables and adapter No. CABLE/ADAPTER Projector side 1 Integrated VGA/USB Cable Mini D-Sub 15P (male) CONNECTORS Computer/AV product side Mini D-Sub 15P (male) USB connector 4P (male) 2 RCA Audio Video Cable RCA pin (male) x 1 USB connector 4P (male) RCA pin (male) x 3 3 Scart/RCA-AV Adapter (depending on the following pages. ceiling mount; • LCA5300/00 - component/HD input cable (5 x RCA to 4 x RCA); • LCA9000/20 - VGA extension...
User Guide
Page 11
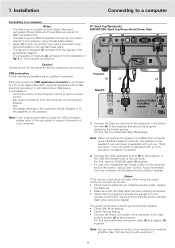
... be changed to the projector using Cursor Control. PC (Desk Top/Notebook)/ MACINTOSH (Desk Top/Power Book/Power Mac) (b) (d) (h) Audio out USB Video audio-in Data audio-in Video S-Video Data out Data in terminal (h) of the computer to the Data audio-in the accessories diagram. It is suitable for IBM compatible PCs. - Projector (1) (2) (1) Mac/PC (5) USB Audio out optional Philips VGA/MAC adapter DDaattaa oouutt Note: If you experience problems using the cursor control on the screen, using standard data cables. - Connect the Data out...
... be changed to the projector using Cursor Control. PC (Desk Top/Notebook)/ MACINTOSH (Desk Top/Power Book/Power Mac) (b) (d) (h) Audio out USB Video audio-in Data audio-in Video S-Video Data out Data in terminal (h) of the computer to the Data audio-in the accessories diagram. It is suitable for IBM compatible PCs. - Projector (1) (2) (1) Mac/PC (5) USB Audio out optional Philips VGA/MAC adapter DDaattaa oouutt Note: If you experience problems using the cursor control on the screen, using standard data cables. - Connect the Data out...
User Guide
Page 12
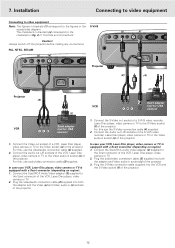
..., video camera or TV. 2. Connect the Scart/RCA Audio Video adapter (3) supplied to the Video socket (e) of 'Controls and connections'. For this , use the video/audio connection cable (2) supplied. 2. Plug the audio/video connection cable (2) supplied into the VCR and the S-Video socket (f) of the projector. Connect the Video out socket of a VCR, Laser Disc player, video camera or TV to the Scart connector of the projector. 3. For this use audio/video connection cable (2) supplied. 7. The characters in socket (c) of the projector. 1. Connect the S-Video...
..., video camera or TV. 2. Connect the Scart/RCA Audio Video adapter (3) supplied to the Video socket (e) of 'Controls and connections'. For this , use the video/audio connection cable (2) supplied. 2. Plug the audio/video connection cable (2) supplied into the VCR and the S-Video socket (f) of the projector. Connect the Video out socket of a VCR, Laser Disc player, video camera or TV to the Scart connector of the projector. 3. For this use audio/video connection cable (2) supplied. 7. The characters in socket (c) of the projector. 1. Connect the S-Video...
User Guide
Page 14
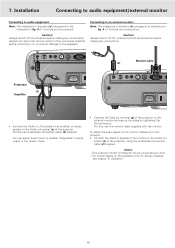
... to characters in fig. 4 of the projector, using the audio/video connection cable (2) supplied. Always turn down the volume control of 'Controls and connections'. To obtain the audio signal on the monitor instead of on the projector: • Connect the Audio in fig. 4 of the connected amplifier before switching it on the operation with the monitor. For this use the monitor cable supplied with On Screen Displays see chapter '8. For further details on , to...
... to characters in fig. 4 of the projector, using the audio/video connection cable (2) supplied. Always turn down the volume control of 'Controls and connections'. To obtain the audio signal on the monitor instead of on the projector: • Connect the Audio in fig. 4 of the connected amplifier before switching it on the operation with the monitor. For this use the monitor cable supplied with On Screen Displays see chapter '8. For further details on , to...
User Guide
Page 15
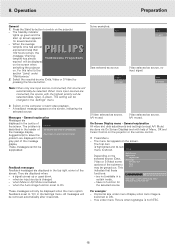
... source (Data, Video or S-Video) by button to automatically adjust Horizontal Size, Phase and Shift. when the Auto image function is used to switch on . General explanation All video and data adjustments and settings (except A/V Mute) are connected, the source with help of the screen. Display Picture Audio Settings Depending on the screen. When the average PHILIPS lamplife time has almost expired and less than 100 hours remain, the message 'Warning: lamplife has almost Multimedia Projectors expired' will automatically be selected (data, video, S-video). a signal...
... source (Data, Video or S-Video) by button to automatically adjust Horizontal Size, Phase and Shift. when the Auto image function is used to switch on . General explanation All video and data adjustments and settings (except A/V Mute) are connected, the source with help of the screen. Display Picture Audio Settings Depending on the screen. When the average PHILIPS lamplife time has almost expired and less than 100 hours remain, the message 'Warning: lamplife has almost Multimedia Projectors expired' will automatically be selected (data, video, S-video). a signal...
User Guide
Page 16
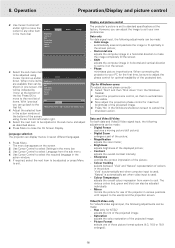
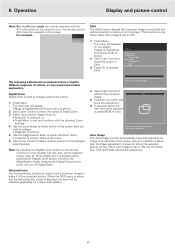
...The projector's picture is used. - When connecting the projector to select Settings in the screen picture; - Data and Video/S-Video For both data and Video/S-Video signal input, the following adjustments can be Contrast shown in one of the picture; - Contrast adjusts the overall contrast intensity; - Video/S-Video only For Video/S-Video signal input, the following adjustments can also be sure to standard specifications at the factory. Operation Preparation/Display and picture control 2. Auto image automatically sizes and positions the image to Mirror (more ) Audio...
...The projector's picture is used. - When connecting the projector to select Settings in the screen picture; - Data and Video/S-Video For both data and Video/S-Video signal input, the following adjustments can be Contrast shown in one of the picture; - Contrast adjusts the overall contrast intensity; - Video/S-Video only For Video/S-Video signal input, the following adjustments can also be sure to standard specifications at the factory. Operation Preparation/Display and picture control 2. Auto image automatically sizes and positions the image to Mirror (more ) Audio...
User Guide
Page 17
... When Auto Image is used to switch Digital Zoom on the remote control. Operation Display and picture control Note: A(audio)/V(video)-mute can only be selected with the AV mute button on the projector or on . • Press OK to continue, or • Press Menu to centre it on the screen. Press Menu. - Press OK to position the computer Shift image. 5. Select On to enlarge a part of the picture. 1. pressing the D(igital) Zoom button...
... When Auto Image is used to switch Digital Zoom on the remote control. Operation Display and picture control Note: A(audio)/V(video)-mute can only be selected with the AV mute button on the projector or on . • Press OK to continue, or • Press Menu to centre it on the screen. Press Menu. - Press OK to position the computer Shift image. 5. Select On to enlarge a part of the picture. 1. pressing the D(igital) Zoom button...
User Guide
Page 18
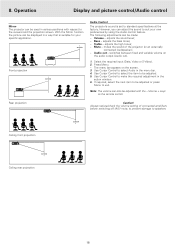
...externally connected loudspeaker); - adjusts the bass tones; - Treble - Volume + keys on the screen. 3. adjusts the sound level; - The menu bar appears on the remote control. SCREEN Ceiling front projection SCREEN Ceiling rear projection 18 However, you can adjust the sound to the viewers and the projection screen. The following adjustments can be adjusted with respect to suit your specific application. Operation Display and picture control/Audio control Mirror The projector can be adjusted. 5. Select the required input (Data, Video or S-Video). 2. Note...
...externally connected loudspeaker); - adjusts the bass tones; - Treble - Volume + keys on the screen. 3. adjusts the sound level; - The menu bar appears on the remote control. SCREEN Ceiling front projection SCREEN Ceiling rear projection 18 However, you can adjust the sound to the viewers and the projection screen. The following adjustments can be adjusted with respect to suit your specific application. Operation Display and picture control/Audio control Mirror The projector can be adjusted. 5. Select the required input (Data, Video or S-Video). 2. Note...
User Guide
Page 19
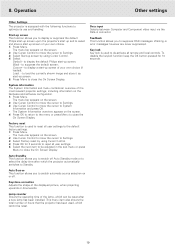
... default factory settings. 1. Key lock Key lock is used to de-activate all user settings to be reset. To disable the keylock function keep the OK button pressed for 3 seconds to Standby. 8. Operation Other settings Other Settings The projector is used , which the projector automatically switches to reset all user settings. 5. Select Start-up screen. 5. Black - to Settings. 3. to close the On Screen Display. Press Menu to load the currently shown image and store it as start up screen of the lamp...
... default factory settings. 1. Key lock Key lock is used to de-activate all user settings to be reset. To disable the keylock function keep the OK button pressed for 3 seconds to Standby. 8. Operation Other settings Other Settings The projector is used , which the projector automatically switches to reset all user settings. 5. Select Start-up screen. 5. Black - to Settings. 3. to close the On Screen Display. Press Menu to load the currently shown image and store it as start up screen of the lamp...
User Guide
Page 20
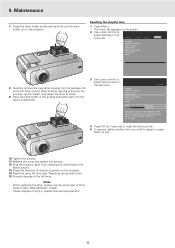
... lens is sufficient for cleaning the housing. 3. Replace the cover. Press the Stand by gently wiping with water is dirty or dusty, first blow the dust off and disconnect the projector before cleaning. 1. 9. camera lenses, slide projectors and binoculars - Like all other cables. 3. Cleaning the dust filter Important! When the filter is likely to clean the filter every 100 hours. - The standby indicator lights up the cover. Turn the cover upside...
... lens is sufficient for cleaning the housing. 3. Replace the cover. Press the Stand by gently wiping with water is dirty or dusty, first blow the dust off and disconnect the projector before cleaning. 1. 9. camera lenses, slide projectors and binoculars - Like all other cables. 3. Cleaning the dust filter Important! When the filter is likely to clean the filter every 100 hours. - The standby indicator lights up the cover. Turn the cover upside...
User Guide
Page 21
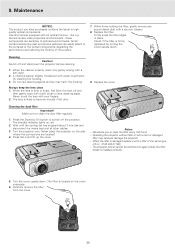
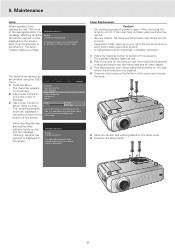
... has expired,the lamp indicator lights up screen Lamp counter System information Factory reset (more) Lamp 5 hours Projector 2453 hours Lamp counter shows the operating hours of the screen. Unscrew the lamp holder. The menu bar appears on the lamp cover. 6. Display Picture Audio Settings Language Keystone correction Start-up red and the message 'Warning: lamplife has expired' is inserted. 9. It is suggested to reset when a new lamp is displayed on the side where the connections are displayed in the user guide. Lamp Replacement Caution! - The lamp and lampholder...
... has expired,the lamp indicator lights up screen Lamp counter System information Factory reset (more) Lamp 5 hours Projector 2453 hours Lamp counter shows the operating hours of the screen. Unscrew the lamp holder. The menu bar appears on the lamp cover. 6. Display Picture Audio Settings Language Keystone correction Start-up red and the message 'Warning: lamplife has expired' is inserted. 9. It is suggested to reset when a new lamp is displayed on the side where the connections are displayed in the user guide. Lamp Replacement Caution! - The lamp and lampholder...
User Guide
Page 22
... adjust or press Menu to select Settings in by On button to switch on the screen. 2. Plug the projector back in the menu bar. Display Picture Language Keystone correction Start-up screen Lamp counter System informatyion... Notes: - Resetting the lamplife time 1. Do not touch lamp or point lamp housing opening at anyone. Maintenance 7. Carefully remove the new lamp housing from its package. Replace the cover and tighten the screws. 12. Use cursor control to exit. 10. Display Picture Audio Settings Language Keystone correction Start...
... adjust or press Menu to select Settings in by On button to switch on the screen. 2. Plug the projector back in the menu bar. Display Picture Language Keystone correction Start-up screen Lamp counter System informatyion... Notes: - Resetting the lamplife time 1. Do not touch lamp or point lamp housing opening at anyone. Maintenance 7. Carefully remove the new lamp housing from its package. Replace the cover and tighten the screws. 12. Use cursor control to exit. 10. Display Picture Audio Settings Language Keystone correction Start...
User Guide
Page 23
... projected screen - INDICATORS Lamp indicator - red: lamp life has expired. • Replace lamp. slow blinking (green, red or orange): lamp is damaged. • Install the filter holder correctly (see 'Lamp replacement' under 'Maintenance'). - this by to repair the projector yourself as this does not resolve the problem, replace the lamp. Note: You can check if the projector receives the signal from the remote control: the ring around Standby button). - Poor colour • Select the correct data input (Computer or Component video) in the Settings menu. • Adjust...
... projected screen - INDICATORS Lamp indicator - red: lamp life has expired. • Replace lamp. slow blinking (green, red or orange): lamp is damaged. • Install the filter holder correctly (see 'Lamp replacement' under 'Maintenance'). - this by to repair the projector yourself as this does not resolve the problem, replace the lamp. Note: You can check if the projector receives the signal from the remote control: the ring around Standby button). - Poor colour • Select the correct data input (Computer or Component video) in the Settings menu. • Adjust...


