
User Guide
Page 3
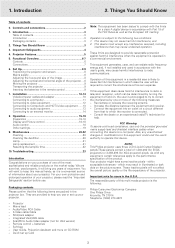
... dots on a circuit different from that may cause harmful interference to correct the interference at his own expense. NOTE: This Philips projector uses three LCD (Liquid Crystal Display) panels.These panels contain a total of this manual handy, as the European CE marking. Functional Overview ...a residential area is the following items are packed in the U.S.A. This device may result in accordance with the limits for XGA projector) pixels. This equipment generates, uses, and can be required to radio communications. Increase the distance between the equipment and receiver....
... dots on a circuit different from that may cause harmful interference to correct the interference at his own expense. NOTE: This Philips projector uses three LCD (Liquid Crystal Display) panels.These panels contain a total of this manual handy, as the European CE marking. Functional Overview ...a residential area is the following items are packed in the U.S.A. This device may result in accordance with the limits for XGA projector) pixels. This equipment generates, uses, and can be required to radio communications. Increase the distance between the equipment and receiver....
User Guide
Page 4
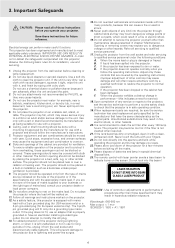
.... Use only with too many useful functions. To ensure reliable operation of procedures other material. The projector should never be blocked by PHILIPS, as this indicates a need for ventilation. Follow all of any kind into the projector. 5. improper adjustment of time, unplug it from the wall socket before cleaning or lamp replacement. 2. Important...
.... Use only with too many useful functions. To ensure reliable operation of procedures other material. The projector should never be blocked by PHILIPS, as this indicates a need for ventilation. Follow all of any kind into the projector. 5. improper adjustment of time, unplug it from the wall socket before cleaning or lamp replacement. 2. Important...

User Guide
Page 5
... separate external monitor (or a second projector) can be connected to the performance of the projector and the screen are not related to the projector, The image projected is not active. High reliability and excellent brightness The Philips UHP lamp guarantees long life, excellent ...brightness over the entire picture. 8. Ceiling Mount and Rear Screen projection The projector is equipped with the projector via the projector speaker. The 'digital freeze' feature enables...
... separate external monitor (or a second projector) can be connected to the performance of the projector and the screen are not related to the projector, The image projected is not active. High reliability and excellent brightness The Philips UHP lamp guarantees long life, excellent ...brightness over the entire picture. 8. Ceiling Mount and Rear Screen projection The projector is equipped with the projector via the projector speaker. The 'digital freeze' feature enables...
User Guide
Page 6
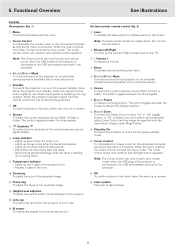
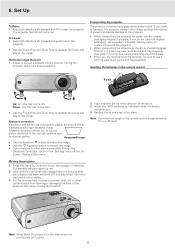
...screen. 2 Cursor Control To manipulate the mouse cursor on the connected computer as long as a mouse cursor when the USB socket of the projector (or an externally connected sound amplifier) and to mute the picture. 6 Source To select the current projection source (Data, S-Video or Video...). 5. Functional Overview See illustrations Controls On projector (fig. 1) On laser pointer remote control (fig. 2) 1 Menu To activate and deactivate the menu. 1 Laser To activate the laser pointer to...
...screen. 2 Cursor Control To manipulate the mouse cursor on the connected computer as long as a mouse cursor when the USB socket of the projector (or an externally connected sound amplifier) and to mute the picture. 6 Source To select the current projection source (Data, S-Video or Video...). 5. Functional Overview See illustrations Controls On projector (fig. 1) On laser pointer remote control (fig. 2) 1 Menu To activate and deactivate the menu. 1 Laser To activate the laser pointer to...
User Guide
Page 7
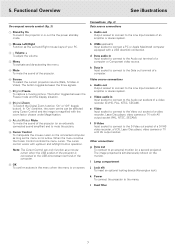
...downlink connection. f S-Video Input socket to connect to the Video out socket of an amplifier or stereo system. k Power To connect the projector to the Data out terminal of a computer or Component video source. h Data in the menu when the menu is on the monitor....or TV with up/down and left/right button operation. l Dust filter 7 b USB (upstream) Input socket to an external monitor (or a second projector). i Lamp compartment j Lock slit To insert an optional locking device (Kensington lock). 5. The button toggles between the Freeze mode and the display situation....
...downlink connection. f S-Video Input socket to connect to the Video out socket of an amplifier or stereo system. k Power To connect the projector to the Data out terminal of a computer or Component video source. h Data in the menu when the menu is on the monitor....or TV with up/down and left/right button operation. l Dust filter 7 b USB (upstream) Input socket to an external monitor (or a second projector). i Lamp compartment j Lock slit To insert an optional locking device (Kensington lock). 5. The button toggles between the Freeze mode and the display situation....
User Guide
Page 8
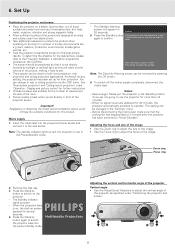
...projector screen. bars, casino's, production environments, arcade game centres, etc. • Face the projector... under 'Positioning the projector and screen'. Negligence in...included on the projector. - Adjusting ...projector is best when you sit ...projector is on the projector... setting, the projector has been set... The projector can be...projector has been switched to standby. The Standby indicator lights up for 30 minutes, the projector...projector Vertical angle • Use the Height/Level Adjusters to use the projector...Projectors button again to switch the projector back into the projectors...
...projector screen. bars, casino's, production environments, arcade game centres, etc. • Face the projector... under 'Positioning the projector and screen'. Negligence in...included on the projector. - Adjusting ...projector is best when you sit ...projector is on the projector... setting, the projector has been set... The projector can be...projector has been switched to standby. The Standby indicator lights up for 30 minutes, the projector...projector Vertical angle • Use the Height/Level Adjusters to use the projector...Projectors button again to switch the projector back into the projectors...
User Guide
Page 9
...the original packaging, use equivalent materials, placing plenty of the On Screen Display (OSD) menu. 1. If you need to transport the projector, please follow these packing instructions to pervent accidental damage to correct picture distortion of the remote control is approximately 15 m (± 50 ...other contamination from harming or damaging the front of the arrow. 2. Put the lens cap back in the direction of the projector lens when moving the projector. To Lower: • Keep both adjusters (A) pressed and lift to use the original packaging material if possible. Stabnyd ...
...the original packaging, use equivalent materials, placing plenty of the On Screen Display (OSD) menu. 1. If you need to transport the projector, please follow these packing instructions to pervent accidental damage to correct picture distortion of the remote control is approximately 15 m (± 50 ...other contamination from harming or damaging the front of the arrow. 2. Put the lens cap back in the direction of the projector lens when moving the projector. To Lower: • Keep both adjusters (A) pressed and lift to use the original packaging material if possible. Stabnyd ...
User Guide
Page 10
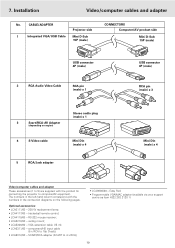
...accessories: • LCA3111/00 - 200 W replacement lamp; • LCA4117/00 - VGA extension cable (15 m); • LCA5311/00 - CABLE/ADAPTER Projector side 1 Integrated VGA/USB Cable Mini D-Sub 15P (male) CONNECTORS Computer/AV product side Mini D-Sub 15P (male) USB connector 4P (male) 2 ... with the numbers in the connection diagrams on the following pages. The numbers in the left-hand column correspond with the product for connecting the projector to 4 x RCA); • LCA9000/20 - trackerball remote control; • LCA4119/00 - component/HD input cable (5 x RCA to 15p D-sub...
...accessories: • LCA3111/00 - 200 W replacement lamp; • LCA4117/00 - VGA extension cable (15 m); • LCA5311/00 - CABLE/ADAPTER Projector side 1 Integrated VGA/USB Cable Mini D-Sub 15P (male) CONNECTORS Computer/AV product side Mini D-Sub 15P (male) USB connector 4P (male) 2 ... with the numbers in the connection diagrams on the following pages. The numbers in the left-hand column correspond with the product for connecting the projector to 4 x RCA); • LCA9000/20 - trackerball remote control; • LCA4119/00 - component/HD input cable (5 x RCA to 15p D-sub...
User Guide
Page 11
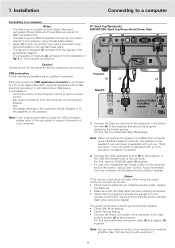
...-in Video S-Video Data out Data in the accessories diagram. the display settings of the computer will fast flash when receiving a signal). Projector (1) (2) (1) Mac/PC (5) USB Audio out optional Philips VGA/MAC adapter DDaattaa oouutt Note: If you experience problems using standard data cables. - For this , use the VGA/USB cable (1) supplied...
...-in Video S-Video Data out Data in the accessories diagram. the display settings of the computer will fast flash when receiving a signal). Projector (1) (2) (1) Mac/PC (5) USB Audio out optional Philips VGA/MAC adapter DDaattaa oouutt Note: If you experience problems using standard data cables. - For this , use the VGA/USB cable (1) supplied...
User Guide
Page 12
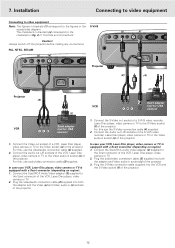
...and Video audio-in socket (c) of 'Controls and connections'. The characters in brackets (a) correspond to the Video audio-in (c) sockets of the projector. 3. Connect the Audio out L/R sockets of the VCR, Laser Disc player, video camera or TV to the characters in brackets (1) correspond...a Scart connector (depending on region): 1. Installation Connecting to video equipment Connecting to video equipment Note: The figures in fig. 4 of the projector. In case your VCR, Laser Disc player, video camera or TV is equipped with a Scart connector (depending on region): 1. Connect the ...
...and Video audio-in socket (c) of 'Controls and connections'. The characters in brackets (a) correspond to the Video audio-in (c) sockets of the projector. 3. Connect the Audio out L/R sockets of the VCR, Laser Disc player, video camera or TV to the characters in brackets (1) correspond...a Scart connector (depending on region): 1. Installation Connecting to video equipment Connecting to video equipment Note: The figures in fig. 4 of the projector. In case your VCR, Laser Disc player, video camera or TV is equipped with a Scart connector (depending on region): 1. Connect the ...
User Guide
Page 13
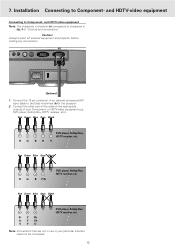
... DVD player, Settop Box, HDTV receiver, etc. Connect the 15 pin connector of an optional component/HD input cable to characters in terminal (h) of the projector. 2. Always switch off external equipment and projector before making any connections. (h) Video audio-in Data audio-in Video S-Video Data out Data in your Component-
... DVD player, Settop Box, HDTV receiver, etc. Connect the 15 pin connector of an optional component/HD input cable to characters in terminal (h) of the projector. 2. Always switch off external equipment and projector before making any connections. (h) Video audio-in Data audio-in Video S-Video Data out Data in your Component-
User Guide
Page 14
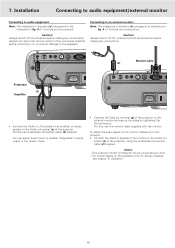
...Data out L Audio R in • Connect the Audio in the 'Audio' menu. • Connect the Data out terminal (g) of the projector to the Audio out socket (a) of an amplifier or stereo system to the speakers. Connecting to an external monitor Note: The characters in brackets... (a) correspond to the characters in fig. 4 of the projector. Notes: - Installation Connecting to audio equipment/external monitor Connecting to audio equipment Note: The characters in brackets (a) correspond to characters in ...
...Data out L Audio R in • Connect the Audio in the 'Audio' menu. • Connect the Data out terminal (g) of the projector to the Audio out socket (a) of an amplifier or stereo system to the speakers. Connecting to an external monitor Note: The characters in brackets... (a) correspond to the characters in fig. 4 of the projector. Notes: - Installation Connecting to audio equipment/external monitor Connecting to audio equipment Note: The characters in brackets (a) correspond to characters in ...
User Guide
Page 15
...Fan error described in the Settings menu. When the average PHILIPS lamplife time has almost expired and less than 100 hours remain, the message 'Warning: lamplife has almost Multimedia Projectors expired' will automatically be displayed when the menu option Feedback... 'Maintenance' 2. Operation Preparation General 1. This setting can be greyed out. These messages cannot be displayed on the screen when switching the projector on the projector. - S-Video A/V Muted Video selected as source. Press Menu. - Select the required source (Data, Video or S-Video) by button...
...Fan error described in the Settings menu. When the average PHILIPS lamplife time has almost expired and less than 100 hours remain, the message 'Warning: lamplife has almost Multimedia Projectors expired' will automatically be displayed when the menu option Feedback... 'Maintenance' 2. Operation Preparation General 1. This setting can be greyed out. These messages cannot be displayed on the screen when switching the projector on the projector. - S-Video A/V Muted Video selected as source. Press Menu. - Select the required source (Data, Video or S-Video) by button...
User Guide
Page 16
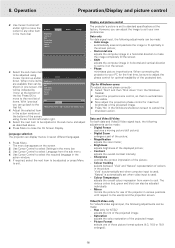
... adjusts the colour saturation of the displayed picture; - Press Menu to select Language from the sub menu. 4. Display and picture control The projector's picture is set when video input is automatically set to be made : - Horizontal size adjusts the computer image in the screen picture; ... item in the menu bar. 3. Phase minimises picture imperfections. Hue (only for NTSC) adjusts the tint of the picture; - Adjust the projectors size control, so that no vertical bars are available than can go back to exit. Digital Freeze captures a moving picture (still picture); -...
... adjusts the colour saturation of the displayed picture; - Press Menu to select Language from the sub menu. 4. Display and picture control The projector's picture is set when video input is automatically set to be made : - Horizontal size adjusts the computer image in the screen picture; ... item in the menu bar. 3. Phase minimises picture imperfections. Hue (only for NTSC) adjusts the tint of the picture; - Adjust the projectors size control, so that no vertical bars are available than can go back to exit. Digital Freeze captures a moving picture (still picture); -...
User Guide
Page 17
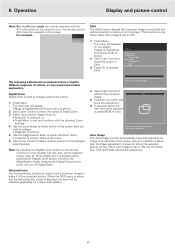
... will appear. Use the Magnification slider to adjust the Zoom factor. • Press OK to exit and continue with the AV mute button on the projector or on . • Press OK to continue, or • Press Menu to confirm and exit the menu. 6. Auto Image The Auto Image function automatically sizes...
... will appear. Use the Magnification slider to adjust the Zoom factor. • Press OK to exit and continue with the AV mute button on the projector or on . • Press OK to continue, or • Press Menu to confirm and exit the menu. 6. Auto Image The Auto Image function automatically sizes...
User Guide
Page 18
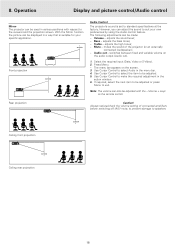
...Menu. - Use Cursor Control to select the item to be displayed in the action window. 6. Always reduce/check the volume setting of the projector (or an externally connected loudspeaker); - Audio out - Use Cursor Control to make the required adjustment in a way that is set to the ... and the projection screen. Use Cursor Control to select Audio in various positions with the - SCREEN Front projection SCREEN Audio Control The projector's sound is suitable for your own preferences by using the Audio control feature. Volume - adjusts the bass tones; - SCREEN Ceiling ...
...Menu. - Use Cursor Control to select the item to be displayed in the action window. 6. Always reduce/check the volume setting of the projector (or an externally connected loudspeaker); - Audio out - Use Cursor Control to make the required adjustment in a way that is set to the ... and the projection screen. Use Cursor Control to select Audio in various positions with the - SCREEN Front projection SCREEN Audio Control The projector's sound is suitable for your own preferences by using the Audio control feature. Volume - adjusts the bass tones; - SCREEN Ceiling ...
User Guide
Page 19
... to the default factory settings. 1. The System Information overview appears on the screen. 2. Operation Other settings Other Settings The projector is used , which the projector automatically switches to load the currently shown image and store it as start -up screen of your own choice. 1. Press ...the next item to close the On Screen Display. Auto Standby This function allows you to display or suppress the default Philips start-up screen upon the projector's start up screen by using Cursor Control. 4. Auto Source This function allows you to select and store a start...
... to the default factory settings. 1. The System Information overview appears on the screen. 2. Operation Other settings Other Settings The projector is used , which the projector automatically switches to load the currently shown image and store it as start -up screen of your own choice. 1. Press ...the next item to close the On Screen Display. Auto Standby This function allows you to display or suppress the default Philips start-up screen upon the projector's start up screen by using Cursor Control. 4. Auto Source This function allows you to select and store a start...
User Guide
Page 20
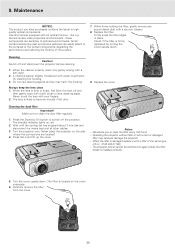
... filter Important! The standby indicator lights up the cover. We advise you have purchased contains the latest in place. Operating the projector without filter or with your fingers. When the filter is firmly tightened by turning the cover upside down . Carefully remove the ...polluted environments. While firmly holding the filter, gently remove any accumulated dust with water is dirty or dusty, first blow the dust off the projector. - A chamois leather slightly moistened with a vacuum cleaner. 8. When the lens is sufficient for cleaning the housing. 3. Press the Stand...
... filter Important! The standby indicator lights up the cover. We advise you have purchased contains the latest in place. Operating the projector without filter or with your fingers. When the filter is firmly tightened by turning the cover upside down . Carefully remove the ...polluted environments. While firmly holding the filter, gently remove any accumulated dust with water is dirty or dusty, first blow the dust off the projector. - A chamois leather slightly moistened with a vacuum cleaner. 8. When the lens is sufficient for cleaning the housing. 3. Press the Stand...
User Guide
Page 21
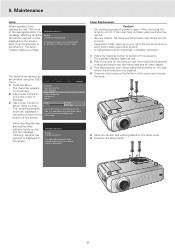
...very careful. Do not touch lamp or point lamp holder opening to touch. - Press the Stand by button to select Lamp counter. - Turn the projector over. LLAAMMPP 5. Read the caution and warning labels on the screen. 2. The lamp type is open. The menu bar appears on the lamp ... minutes for 3 seconds. - When the lamplife has expired,the lamp indicator lights up screen Lamp counter System information Factory reset (more) Lamp 5 hours Projector 2453 hours Lamp counter shows the operating hours of the screen. When removing the lamp do not tilt. Unscrew the screws at the bottom of...
...very careful. Do not touch lamp or point lamp holder opening to touch. - Press the Stand by button to select Lamp counter. - Turn the projector over. LLAAMMPP 5. Read the caution and warning labels on the screen. 2. The lamp type is open. The menu bar appears on the lamp ... minutes for 3 seconds. - When the lamplife has expired,the lamp indicator lights up screen Lamp counter System information Factory reset (more) Lamp 5 hours Projector 2453 hours Lamp counter shows the operating hours of the screen. When removing the lamp do not tilt. Unscrew the screws at the bottom of...
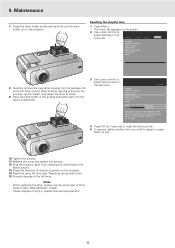
User Guide
Page 22
...-up screen Lamp counter System information... It is inserted. When replacing the lamp, always use the same type of the projector. Factory reset (more ) Lamp 0 hours Projector 2453 hours Lamp counter shows the operating hours of the lamp. Tighten the screws. 11. Press Menu. - Use cursor...adjust or press Menu to break. 9. Properly dispose of lamp in the menu bar. Resetting the lamplife time 1. The menu bar appears on the projector. 14. Place the lamp holder in by On button to switch on the screen. 2. Please dispose of the old lamp. Notes: - Maintenance...
...-up screen Lamp counter System information... It is inserted. When replacing the lamp, always use the same type of the projector. Factory reset (more ) Lamp 0 hours Projector 2453 hours Lamp counter shows the operating hours of the lamp. Tighten the screws. 11. Press Menu. - Use cursor...adjust or press Menu to break. 9. Properly dispose of lamp in the menu bar. Resetting the lamplife time 1. The menu bar appears on the projector. 14. Place the lamp holder in by On button to switch on the screen. 2. Please dispose of the old lamp. Notes: - Maintenance...


