User Guide
Page 3
... projector and screen 8 Mains supply 8 Adjusting the focus and size of the image 8 Adjusting the vertical and horizontal angle of 1,440,000 (for SVGA projectors) or 2,359,296 (for users in illuminated or dark dots on a circuit different from that may result in the U.S.A. Installation 10-14 Video/computer cables and adapter 10 Connecting to a computer 11 Connecting to video equipment 12 Connecting to Component-video equipment 13 Connecting to audio equipment 14 Connecting...
... projector and screen 8 Mains supply 8 Adjusting the focus and size of the image 8 Adjusting the vertical and horizontal angle of 1,440,000 (for SVGA projectors) or 2,359,296 (for users in illuminated or dark dots on a circuit different from that may result in the U.S.A. Installation 10-14 Video/computer cables and adapter 10 Connecting to a computer 11 Connecting to video equipment 12 Connecting to Component-video equipment 13 Connecting to audio equipment 14 Connecting...
User Guide
Page 4
..., this indicates a need for ventilation. Unplug the projector from the wall socket before switching off the mains. 24. Save these instructions before you are provided for service). 18. E. Ceiling, wall or shelf mounting should not be blocked or covered. If you operate your fingers. 22. The 3-pin/2pin grounded plug will often require extensive work by placing the projector on the projector...
..., this indicates a need for ventilation. Unplug the projector from the wall socket before switching off the mains. 24. Save these instructions before you are provided for service). 18. E. Ceiling, wall or shelf mounting should not be blocked or covered. If you operate your fingers. 22. The 3-pin/2pin grounded plug will often require extensive work by placing the projector on the projector...
User Guide
Page 5
... 'Auto Image' feature automatically sizes and positions the image, to them automatically. USB The USB (Universal Serial Bus) connector allows you to connect to computers equipped with additional information to help you make the right choices about installation and operation, and to perform the correct actions. With 'digital zoom' a specific part of the wireless remote control allows you with a USB interface, resulting in the 'Audio' menu. 10. The sensor of the projected image...
... 'Auto Image' feature automatically sizes and positions the image, to them automatically. USB The USB (Universal Serial Bus) connector allows you to connect to computers equipped with additional information to help you make the right choices about installation and operation, and to perform the correct actions. With 'digital zoom' a specific part of the wireless remote control allows you with a USB interface, resulting in the 'Audio' menu. 10. The sensor of the projected image...
User Guide
Page 6
... projection source (Data, S-Video or Video). Lights up green when the lamp is on the connected computer as long as a mouse cursor when the USB socket of the projector is on screen. 0 Zoomring To adjust the size of the projected image. ! Note: The Cursor Control can only function as the menu is not in case of the power standby mode. When the projector receives a signal from the remote control. 6 Flashes in case of fan error. 1 Stand by digital scaling. 8 Lamp indicator...
... projection source (Data, S-Video or Video). Lights up green when the lamp is on the connected computer as long as a mouse cursor when the USB socket of the projector is on screen. 0 Zoomring To adjust the size of the projected image. ! Note: The Cursor Control can only function as the menu is not in case of the power standby mode. When the projector receives a signal from the remote control. 6 Flashes in case of fan error. 1 Stand by digital scaling. 8 Lamp indicator...
User Guide
Page 7
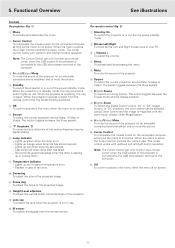
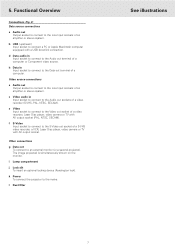
... a USB downlink connection. l Dust filter See illustrations 7 i Lamp compartment j Lock slit To insert an optional locking device (Kensington lock). Video source connections a Audio out Output socket to connect to the Audio out terminal of an amplifier or stereo system. The image projected is simultaneously shown on the monitor. d Data audio in Input socket to connect to the Video out socket of a video recorder (S-VHS, PAL, NTSC, SECAM). c Video audio in Input socket to connect to...
... a USB downlink connection. l Dust filter See illustrations 7 i Lamp compartment j Lock slit To insert an optional locking device (Kensington lock). Video source connections a Audio out Output socket to connect to the Audio out terminal of an amplifier or stereo system. The image projected is simultaneously shown on the monitor. d Data audio in Input socket to connect to the Video out socket of a video recorder (S-VHS, PAL, NTSC, SECAM). c Video audio in Input socket to connect to...
User Guide
Page 8
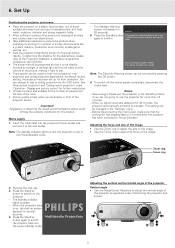
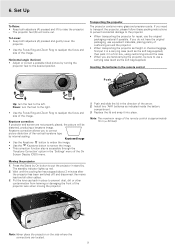
... front projection, rear projection and ceiling projection applications. Set Up Positioning the projector and screen • Place the projector on , the start-up green. Display and picture control' for further instructions. • Choose a screen size suitable for this warning. Mains supply 1. Note: The Stand by Warning screen can be removed by sunlight or artificial light, as specified under 'Operation - See 'Rear screen projection' and 'Ceiling-mount projection' under 'Positioning the projector and screen'. Notes: - This setting can change to protect...
... front projection, rear projection and ceiling projection applications. Set Up Positioning the projector and screen • Place the projector on , the start-up green. Display and picture control' for further instructions. • Choose a screen size suitable for this warning. Mains supply 1. Note: The Stand by Warning screen can be removed by sunlight or artificial light, as specified under 'Operation - See 'Rear screen projection' and 'Ceiling-mount projection' under 'Positioning the projector and screen'. Notes: - This setting can change to protect...
User Guide
Page 9
... follow these packing instructions to pervent accidental damage to prevent dust, dirt or other cables. 3. Push and slide the lid in stand by turning the projector feet to readjust the focus and size of the image. The standby indicator lights up red. 2. Put the lens cap back in the remote control Push Up: turn the feet to the right. • Use the Focus Ring and Zoom Ring to...
... follow these packing instructions to pervent accidental damage to prevent dust, dirt or other cables. 3. Push and slide the lid in stand by turning the projector feet to readjust the focus and size of the image. The standby indicator lights up red. 2. Put the lens cap back in the remote control Push Up: turn the feet to the right. • Use the Focus Ring and Zoom Ring to...
User Guide
Page 10
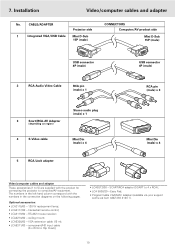
... the numbers in the connection diagrams on region) Stereo audio plug (male) x 1 4 S-Video cable Mini Din (male) x 4 5 RCA/Jack adapter USB connector 4P (male) RCA pin (male) x 3 Mini Din (male) x 4 Video/computer cables and adapter These accessories (1 to 5) are supplied with the product for connecting the projector to computer/AV equipment. RS-232 mouse receiver; • LCA2210/00 - ceiling mount; • LCA5300/00 - VGA extension cable (15...
... the numbers in the connection diagrams on region) Stereo audio plug (male) x 1 4 S-Video cable Mini Din (male) x 4 5 RCA/Jack adapter USB connector 4P (male) RCA pin (male) x 3 Mini Din (male) x 4 Video/computer cables and adapter These accessories (1 to 5) are supplied with the product for connecting the projector to computer/AV equipment. RS-232 mouse receiver; • LCA2210/00 - ceiling mount; • LCA5300/00 - VGA extension cable (15...
User Guide
Page 11
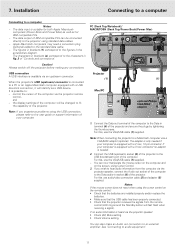
... projector using the cursor control on the screen, using the USB connection, please refer to the standard data cable. - the display settings of the computer via an upstream connector. For this , use the VGA/USB cable (1) supplied. Connect the USB (upstream) socket (b) of the computer. See 'Connecting to the USB downstream port of the projector to audio equipment'. 11 USB connection A USB interface is possible to fit the capability of the projector. Projector (1) (2) Mac/PC (5) USB Audio out (1) optional Philips VGA/MAC adapter DDaattaa oouutt 1. Connect...
... projector using the cursor control on the screen, using the USB connection, please refer to the standard data cable. - the display settings of the computer via an upstream connector. For this , use the VGA/USB cable (1) supplied. Connect the USB (upstream) socket (b) of the computer. See 'Connecting to the USB downstream port of the projector to audio equipment'. 11 USB connection A USB interface is possible to fit the capability of the projector. Projector (1) (2) Mac/PC (5) USB Audio out (1) optional Philips VGA/MAC adapter DDaattaa oouutt 1. Connect...
User Guide
Page 12
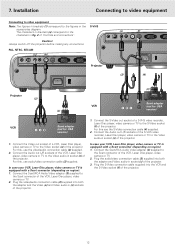
... , use audio/video connection cable (2) supplied. Installation Connecting to video equipment Connecting to video equipment Note: The figures in brackets (1) correspond to the Video audio-in the accessories diagram. For this use the video/audio connection cable (2) supplied. 2. Connect the Scart/RCA Audio Video adapter (3) supplied to the Video audio-in Projector (2) (4) Projector (2) (3) VCR (3) S-Video R R Audio L out Video out S-Video Scart adapter (not for USA version) VCR L Audio R out Video out Scart adapter (not for USA version) 1. 7. Connect the Audio out...
... , use audio/video connection cable (2) supplied. Installation Connecting to video equipment Connecting to video equipment Note: The figures in brackets (1) correspond to the Video audio-in the accessories diagram. For this use the video/audio connection cable (2) supplied. 2. Connect the Scart/RCA Audio Video adapter (3) supplied to the Video audio-in Projector (2) (4) Projector (2) (3) VCR (3) S-Video R R Audio L out Video out S-Video Scart adapter (not for USA version) VCR L Audio R out Video out Scart adapter (not for USA version) 1. 7. Connect the Audio out...
User Guide
Page 14
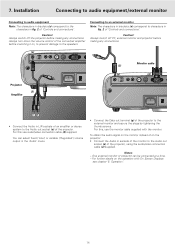
Always turn down the volume control of the projector to the speakers. For this , use audio/video connection cable (2) supplied. You can be connected at a time. - Operation'. 14 Connecting to an external monitor Note: The characters in brackets (a) correspond to characters in the 'Audio' menu. • Connect the Data out terminal (g) of the connected amplifier before switching it on the operation with the monitor. For this use the monitor cable supplied with On Screen Displays see...
Always turn down the volume control of the projector to the speakers. For this , use audio/video connection cable (2) supplied. You can be connected at a time. - Operation'. 14 Connecting to an external monitor Note: The characters in brackets (a) correspond to characters in the 'Audio' menu. • Connect the Data out terminal (g) of the connected amplifier before switching it on the operation with the monitor. For this use the monitor cable supplied with On Screen Displays see...
User Guide
Page 15
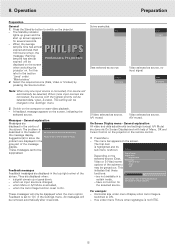
... Standby indicator lights up green and the start video playback. - Note: When only one input source is set to On. When more input sources are connected, the source with help of the screen. a signal comes up screen appears for several seconds. - when the Auto image function is not NTSC. 15 Some examples: Data Video No signal Data selected as source. Hue under menu Picture when signaltype is set to the section 'Lamp' under menu Display when Auto image is activated, - when an input source...
... Standby indicator lights up green and the start video playback. - Note: When only one input source is set to On. When more input sources are connected, the source with help of the screen. a signal comes up screen appears for several seconds. - when the Auto image function is not NTSC. 15 Some examples: Data Video No signal Data selected as source. Hue under menu Picture when signaltype is set to the section 'Lamp' under menu Display when Auto image is activated, - when an input source...
User Guide
Page 16
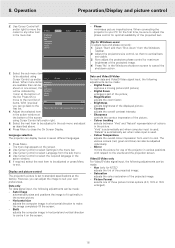
... of the projector in the menu bar. Now adjust the projectors phase control for use of the projected image; - Data and Video/S-Video For both data and Video/S-Video signal input, the following adjustments can go back to the user(s) and the projection screen. Digital Freeze captures a moving picture (still picture); - Digital Zoom enlarges a part of the picture; - Sharpness controls the contour impression of the picture; - Colour tracking selects between 'Vivid' and 'Natural' representation of the projected image. 4. Colour Temperature adjusts the overall...
... of the projector in the menu bar. Now adjust the projectors phase control for use of the projected image; - Data and Video/S-Video For both data and Video/S-Video signal input, the following adjustments can go back to the user(s) and the projection screen. Digital Freeze captures a moving picture (still picture); - Digital Zoom enlarges a part of the picture; - Sharpness controls the contour impression of the picture; - Colour tracking selects between 'Vivid' and 'Natural' representation of the projected image. 4. Colour Temperature adjusts the overall...
User Guide
Page 17
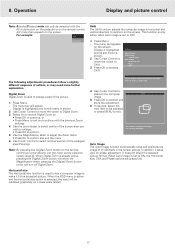
... done. Operation Display and picture control Note: A(audio)/V(video)-mute can only be selected with the AV mute button on the projector or on . • Press OK to continue, or • Press Menu to switch Digital Zoom on the remote control. Press Menu. - Display is highlighted Display Picture Audio Settings and its sub menu is selected, the level will turn off Digital Zoom. Use Cursor Control to move the cursor to Digital Zoom Magnification Auto Image Horizontal size Shift. Use Cursor Control to...
... done. Operation Display and picture control Note: A(audio)/V(video)-mute can only be selected with the AV mute button on the projector or on . • Press OK to continue, or • Press Menu to switch Digital Zoom on the remote control. Press Menu. - Display is highlighted Display Picture Audio Settings and its sub menu is selected, the level will turn off Digital Zoom. Use Cursor Control to move the cursor to Digital Zoom Magnification Auto Image Horizontal size Shift. Use Cursor Control to...
User Guide
Page 18
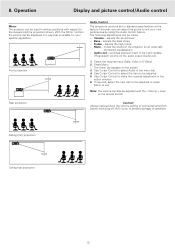
... sound of connected amplifiers before switching off (A/V) mute, to prevent damage to suit your specific application. Volume + keys on the audio output (Audio out). 1. Operation Display and picture control/Audio control Mirror The projector can be used in a way that is set to make the required adjustment in the menu bar. 4. Use Cursor Control to select the item to be adjusted or press Menu to select Audio in the action window. 6. Always reduce/check...
... sound of connected amplifiers before switching off (A/V) mute, to prevent damage to suit your specific application. Volume + keys on the audio output (Audio out). 1. Operation Display and picture control/Audio control Mirror The projector can be used in a way that is set to make the required adjustment in the menu bar. 4. Use Cursor Control to select the item to be adjusted or press Menu to select Audio in the action window. 6. Always reduce/check...
User Guide
Page 19
... Screen Display. Warning or error messages however are never suppressed. Black - The menu bar appears on the screen. 2. Press Menu. - Select Factory reset by using Cursor Control. 4. Auto Standby This function allows you to Settings. 3. Data input Selects between Computer and Component video input via the Data in the sub menu or press Menu to Standby. To disable the keylock function keep the OK button pressed for 3 seconds to display or suppress the default Philips start-up screen upon the projector's start...
... Screen Display. Warning or error messages however are never suppressed. Black - The menu bar appears on the screen. 2. Press Menu. - Select Factory reset by using Cursor Control. 4. Auto Standby This function allows you to Settings. 3. Data input Selects between Computer and Component video input via the Data in the sub menu or press Menu to Standby. To disable the keylock function keep the OK button pressed for 3 seconds to display or suppress the default Philips start-up screen upon the projector's start...
User Guide
Page 20
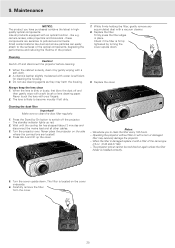
... projectors and binoculars - The lens is damaged replace it by turning the cover upside down . The standby indicator lights up the cover. LLAAMMPP A Notes: - When the filter is likely to switch off the projector. - FILTER 5. When the lens is installed correctly. Cleaning the dust filter Important! The filter is located on again unless the filter holder is dirty or dusty, first blow the dust off and disconnect the projector before cleaning. 1. Carefully remove the filter...
... projectors and binoculars - The lens is damaged replace it by turning the cover upside down . The standby indicator lights up the cover. LLAAMMPP A Notes: - When the filter is likely to switch off the projector. - FILTER 5. When the lens is installed correctly. Cleaning the dust filter Important! The filter is located on again unless the filter holder is dirty or dusty, first blow the dust off and disconnect the projector before cleaning. 1. Carefully remove the filter...
User Guide
Page 21
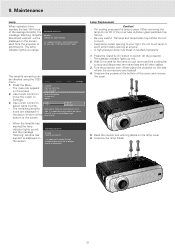
... the screws at anyone. - FILTER FILTER 21 Maintenance Lamp When operation time reaches the last 100 hours of the cover and remove the cover. Multimedia projectors Warning: Lamplife has almost expired It is switched on. Use Cursor Control to move the cursor to stop and disconnect the mains lead and all other cables. 3. The remaining lamplife hours are located! 4. Display Picture Audio Settings Language Keystone correction Start-up red and the message 'Warning: lamplife has expired' is open. To reset keep...
... the screws at anyone. - FILTER FILTER 21 Maintenance Lamp When operation time reaches the last 100 hours of the cover and remove the cover. Multimedia projectors Warning: Lamplife has almost expired It is switched on. Use Cursor Control to move the cursor to stop and disconnect the mains lead and all other cables. 3. The remaining lamplife hours are located! 4. Display Picture Audio Settings Language Keystone correction Start-up red and the message 'Warning: lamplife has expired' is open. To reset keep...
User Guide
Page 22
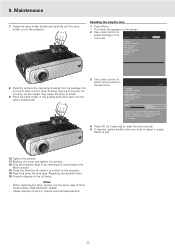
... opening at anyone. Display Picture Audio Settings Language Keystone correction Start-up screen Lamp counter System information... Press OK for 3 seconds. 4. If required, select another item you wish to adjust or press Menu to reset when a new lamp is suggested to exit. 10. It is inserted. To reset keep OK key pressed for 3 seconds to break. 9. Plug the projector back in by On button to switch on the screen. 2. FILTER FILTER 9. Maintenance 7. Press Menu...
... opening at anyone. Display Picture Audio Settings Language Keystone correction Start-up screen Lamp counter System information... Press OK for 3 seconds. 4. If required, select another item you wish to adjust or press Menu to reset when a new lamp is suggested to exit. 10. It is inserted. To reset keep OK key pressed for 3 seconds to break. 9. Plug the projector back in by On button to switch on the screen. 2. FILTER FILTER 9. Maintenance 7. Press Menu...

User Guide
Page 23
.... Audio cable is not focused. • Adjust focus ring. - POSSIBLE CAUSE • SOLUTION Image is blurred - The projector is damaged. • Close the cover correctly (see 'Cleaning the dust filter' under 'Maintenance'). - Image is not displayed - Image does not match up screen for repair. Picture rolls - Temperature indicator - red: temperature error. • The projector will go into Standby mode. fast blinking red: fan error. • The projector will go ). • See warning messages on the projector. PROBLEM - Lamp holder cover is starting...
.... Audio cable is not focused. • Adjust focus ring. - POSSIBLE CAUSE • SOLUTION Image is blurred - The projector is damaged. • Close the cover correctly (see 'Cleaning the dust filter' under 'Maintenance'). - Image is not displayed - Image does not match up screen for repair. Picture rolls - Temperature indicator - red: temperature error. • The projector will go into Standby mode. fast blinking red: fan error. • The projector will go ). • See warning messages on the projector. PROBLEM - Lamp holder cover is starting...


