
User Manual
Page 2
... Scart connection (RGBS) 17 Philips Multimedia Projector 2 English User guide bSure1 / bSure 2 Introduction 4-5 Packaging contents 4 Optional accessories 5 Service accessories 5 2. Set up 10-11 Positioning the projector and screen 10 Switching on the projector 10 Adjusting the focus and size of the image 11 Adjusting the vertical angle of the projector 11 Keystone correction 11 Moving/transporting the projector 11 Preparation 11 Moving/transporting the projector 11 Inserting the batteries in the remote control 11...
... Scart connection (RGBS) 17 Philips Multimedia Projector 2 English User guide bSure1 / bSure 2 Introduction 4-5 Packaging contents 4 Optional accessories 5 Service accessories 5 2. Set up 10-11 Positioning the projector and screen 10 Switching on the projector 10 Adjusting the focus and size of the image 11 Adjusting the vertical angle of the projector 11 Keystone correction 11 Moving/transporting the projector 11 Preparation 11 Moving/transporting the projector 11 Inserting the batteries in the remote control 11...
User Manual
Page 3
... 22 Digital Zoom/Magnification 22 Auto image 22 Horizontal size 22 Shift 23 Picture adjustments 23 Video/S-Video adjustments 24 Display adjustments 24 Picture adjustments 24 General adjustments 25 Audio adjustments 25 General settings 25-27 Loading your own personal start-up screen Resetting the projector 27 26-27 6. Index < 5. Maintenance 28-30 Cleaning 28 Cleaning the cabinet 28 Cleaning the lens 28 Cleaning the dust filter 28 Lamp 29 Lamp replacement 29-30 Resetting the lamplife time 30 7.Troubleshooting 31-34 Philips Multimedia Projector 3 English User guide bSure1 / bSure 2
... 22 Digital Zoom/Magnification 22 Auto image 22 Horizontal size 22 Shift 23 Picture adjustments 23 Video/S-Video adjustments 24 Display adjustments 24 Picture adjustments 24 General adjustments 25 Audio adjustments 25 General settings 25-27 Loading your own personal start-up screen Resetting the projector 27 26-27 6. Index < 5. Maintenance 28-30 Cleaning 28 Cleaning the cabinet 28 Cleaning the lens 28 Cleaning the dust filter 28 Lamp 29 Lamp replacement 29-30 Resetting the lamplife time 30 7.Troubleshooting 31-34 Philips Multimedia Projector 3 English User guide bSure1 / bSure 2
User Manual
Page 6
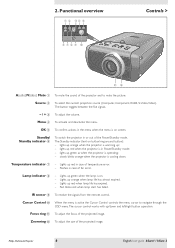
... picture. Lights up /down . Lights up orange when lamp life has almost expired. - Fast blinks red when lamp start has failed. IR sensor 9 To receive the signals from the remote control. Lights up red when lamp life has expired. - Zoomring @ To adjust the size of the projected image. Functional overview 1 2 34 5 AV Mute Stand by Source Lamp Temp Menu OK 6789 0 Controls > !@ A(udio)/V(ideo) Mute 1 To mute the sound of the Power/Standby mode. Temperature indicator 7 - Philips Multimedia Projector 6 English User guide bSure1 / bSure 2 Flashes in Power/Standby mode...
... picture. Lights up /down . Lights up orange when lamp life has almost expired. - Fast blinks red when lamp start has failed. IR sensor 9 To receive the signals from the remote control. Lights up red when lamp life has expired. - Zoomring @ To adjust the size of the projected image. Functional overview 1 2 34 5 AV Mute Stand by Source Lamp Temp Menu OK 6789 0 Controls > !@ A(udio)/V(ideo) Mute 1 To mute the sound of the Power/Standby mode. Temperature indicator 7 - Philips Multimedia Projector 6 English User guide bSure1 / bSure 2 Flashes in Power/Standby mode...
User Manual
Page 8
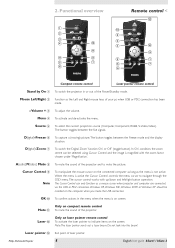
.... Laser pointer # Exit point of the Power/Standby mode. Menu 4 To activate and de-activate the menu. D(igital)-Freeze 6 To capture a (moving) picture.The button toggles between the five signals. Laser @ Only on the screen. Windows 98, Windows ME, Windows 2000 or Windows XP should be selected using Cursor Control and the image is on the computer when you make the USB connection. Functional overview 1 2 3 4 ! 5 6 Stand by On...
.... Laser pointer # Exit point of the Power/Standby mode. Menu 4 To activate and de-activate the menu. D(igital)-Freeze 6 To capture a (moving) picture.The button toggles between the five signals. Laser @ Only on the screen. Windows 98, Windows ME, Windows 2000 or Windows XP should be selected using Cursor Control and the image is on the computer when you make the USB connection. Functional overview 1 2 3 4 ! 5 6 Stand by On...
User Manual
Page 10
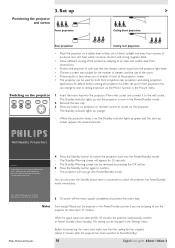
... Power/Standby mode. - Notes Save energy! When no signal inputs are not going to remove this warning. 6 To switch off you have to wait 1 minute before switching on the projector again to allow adequate time for more than 15 minutes. Philips Multimedia Projector 10 English User guide bSure1 / bSure 2 Switching on , the Standby indicator lights up green and the start-up orange. - When the projection lamp is switched off the mains supply completely, disconnect the mains lead. The Standby Warning screen...
... Power/Standby mode. - Notes Save energy! When no signal inputs are not going to remove this warning. 6 To switch off you have to wait 1 minute before switching on the projector again to allow adequate time for more than 15 minutes. Philips Multimedia Projector 10 English User guide bSure1 / bSure 2 Switching on , the Standby indicator lights up green and the start-up orange. - When the projection lamp is switched off the mains supply completely, disconnect the mains lead. The Standby Warning screen...
User Manual
Page 12
... screen, using standard data cables.When connecting the projector to move the selected item.Then release Mouse Left. - Theft deterrence The SecurityMax™ application, supplied on a 4:3 screen. Drag and drop facility: Drag and drop via the remote control works slightly different than via the projector speaker. Philips Multimedia Projector 12 English User guide bSure1 / bSure 2 4. Notes - Based on the remote control function as for example, set your projector via the Universal Serial Bus. Installation...
... screen, using standard data cables.When connecting the projector to move the selected item.Then release Mouse Left. - Theft deterrence The SecurityMax™ application, supplied on a 4:3 screen. Drag and drop facility: Drag and drop via the remote control works slightly different than via the projector speaker. Philips Multimedia Projector 12 English User guide bSure1 / bSure 2 4. Notes - Based on the remote control function as for example, set your projector via the Universal Serial Bus. Installation...
User Manual
Page 14
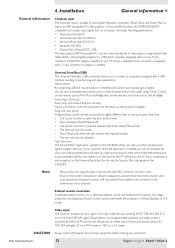
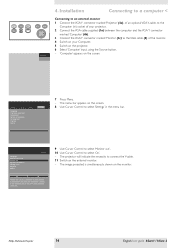
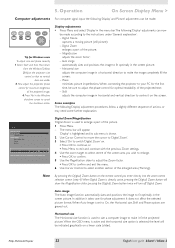
... external monitor. - Installation Connecting to a computer < Connecting to an external monitor 1 Connect the VGA Y connector marked 'Projector' (4a), of the monitor. 4 Switch on your Computer. 5 Switch on the projector. 6 Select 'Computer' input, using the Source button. - 'Computer' appears on the screen. Display Picture Language Keystone correction Monitor out System information... Display Picture Language Kestone correction Monitor out System information... AV Mute Stand by Source Lamp Temp Menu OK Computer 4. Factory reset Key lock (more ) Audio Settings Off On...
... external monitor. - Installation Connecting to a computer < Connecting to an external monitor 1 Connect the VGA Y connector marked 'Projector' (4a), of the monitor. 4 Switch on your Computer. 5 Switch on the projector. 6 Select 'Computer' input, using the Source button. - 'Computer' appears on the screen. Display Picture Language Keystone correction Monitor out System information... Display Picture Language Kestone correction Monitor out System information... AV Mute Stand by Source Lamp Temp Menu OK Computer 4. Factory reset Key lock (more ) Audio Settings Off On...
User Manual
Page 18
... as source Philips Multimedia Projector Video selected as source, no input signal 18 S-Video selected as source, A/V muted Component selected as source A/V muted English User guide bSure1 / bSure 2 Operation General 1 Press the Standby button to 'On' in the centre of the message display. Messages Fan error The projector will be suppressed. A feedback message appears on , the Standby indicator lights up screen (when enabled) appears for repair. PHILIPS Multimedia Projectors Note 2 Select the required source (Computer, Component, RGBS, S-Video,Video) by Source Lamp Temp...
... as source Philips Multimedia Projector Video selected as source, no input signal 18 S-Video selected as source, A/V muted Component selected as source A/V muted English User guide bSure1 / bSure 2 Operation General 1 Press the Standby button to 'On' in the centre of the message display. Messages Fan error The projector will be suppressed. A feedback message appears on , the Standby indicator lights up screen (when enabled) appears for repair. PHILIPS Multimedia Projectors Note 2 Select the required source (Computer, Component, RGBS, S-Video,Video) by Source Lamp Temp...
User Manual
Page 19
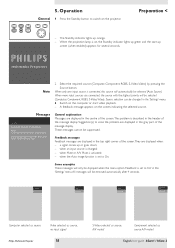
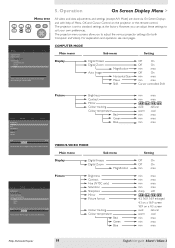
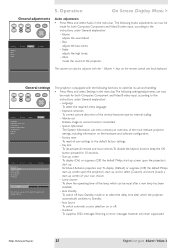
...remote control. Operation On Screen Display Menu > AV Mute Stand by Source Lamp Temp Menu tree Menu OK All video and data adjustments and settings (except A/V Mute) are done via On Screen Displays and with help of the image. Press OK key to adjust the various projector settings (for both Computer and Video). Display Picture Digital Freeze Digital Zoom Magnification Auto Image Horizontal size Phase Shift . . . 5. Audio Settings Shift is set to adjust the contrast level. Display Picture (previous) Picture format Colour tracking Colour temperature Red Green Blue...
...remote control. Operation On Screen Display Menu > AV Mute Stand by Source Lamp Temp Menu tree Menu OK All video and data adjustments and settings (except A/V Mute) are done via On Screen Displays and with help of the image. Press OK key to adjust the various projector settings (for both Computer and Video). Display Picture Digital Freeze Digital Zoom Magnification Auto Image Horizontal size Phase Shift . . . 5. Audio Settings Shift is set to adjust the contrast level. Display Picture (previous) Picture format Colour tracking Colour temperature Red Green Blue...
User Manual
Page 20
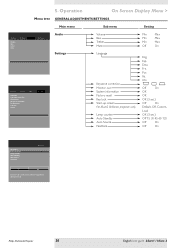
... Factory reset Key lock Start-up . Fra. Chi. Philips Multimedia Projector 20 English User guide bSure1 / bSure 2 Deu. Ita. 5. Off On OK OK OK (3 sec.) Off On Default, Off, Custom, Load OK (3 sec.) Off 15 30 45 60 120 Off On Off On Display Picture (previous) Start-up screen Lamp counter Auto Standby Auto Source Feedback Audio Settings Off On The Start-up screen can be shown or suppressed during start-up screen For bSure2 Brilliance projectors only Lamp counter Auto Standby Auto Source...
... Factory reset Key lock Start-up . Fra. Chi. Philips Multimedia Projector 20 English User guide bSure1 / bSure 2 Deu. Ita. 5. Off On OK OK OK (3 sec.) Off On Default, Off, Custom, Load OK (3 sec.) Off 15 30 45 60 120 Off On Off On Display Picture (previous) Start-up screen Lamp counter Auto Standby Auto Source Feedback Audio Settings Off On The Start-up screen can be shown or suppressed during start-up screen For bSure2 Brilliance projectors only Lamp counter Auto Standby Auto Source...
User Manual
Page 21
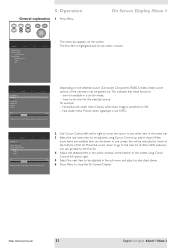
... action window at the bottom of the submenu may be shown in a certain mode, - Horizontal size under menu 'Picture' when signaltype is shown. Hue under menu 'Display' when Auto image is switched to adjust the contrast level. Philips Multimedia Projector 21 English User guide bSure1 / bSure 2 Display Picture (previous) Picture format Colour tracking Colour temperature Red Green Blue Audio Settings min max Move pointer left or right to adjust the Red level. 2 Use Cursor Control left or right to ON. - Audio Settings...
... action window at the bottom of the submenu may be shown in a certain mode, - Horizontal size under menu 'Picture' when signaltype is shown. Hue under menu 'Display' when Auto image is switched to adjust the contrast level. Philips Multimedia Projector 21 English User guide bSure1 / bSure 2 Display Picture (previous) Picture format Colour tracking Colour temperature Red Green Blue Audio Settings min max Move pointer left or right to adjust the Red level. 2 Use Cursor Control left or right to ON. - Audio Settings...
User Manual
Page 22
... used to the instructions under 'General explanation': - Horizontal size The Horizontal size function is already active, pressing the D(igital) Zoom button will be made according to enlarge a part of the picture; - Some examples The following 'Display' adjustments can be indicated graphically on the screen. Digital Freeze captures a moving picture (still picture); - In addition it on a linear scale (slider). Philips Multimedia Projector 22 English User guide bSure1 / bSure 2 5. Digital Zoom enlarges a part of the picture. 1 Press Menu. - Auto image...
... used to the instructions under 'General explanation': - Horizontal size The Horizontal size function is already active, pressing the D(igital) Zoom button will be made according to enlarge a part of the picture; - Some examples The following 'Display' adjustments can be indicated graphically on the screen. Digital Freeze captures a moving picture (still picture); - In addition it on a linear scale (slider). Philips Multimedia Projector 22 English User guide bSure1 / bSure 2 5. Digital Zoom enlarges a part of the picture. 1 Press Menu. - Auto image...
User Manual
Page 25
... delay time after a new lamp has been installed; - Feedback To suppress OSD messages. 5. For bSure2 Brilliance projectors only: To display (Default) or suppress (Off) the default Philips start-up screen upon the projector's start up . Philips Multimedia Projector 25 English User guide bSure1 / bSure 2 Mute mutes the sound of the most relevant projector settings, including information on second monitor connected; - Warning or error messages however are never suppressed. Bass adjusts the bass tones; - Volume + keys on or off Auto Standby mode...
... delay time after a new lamp has been installed; - Feedback To suppress OSD messages. 5. For bSure2 Brilliance projectors only: To display (Default) or suppress (Off) the default Philips start-up screen upon the projector's start up . Philips Multimedia Projector 25 English User guide bSure1 / bSure 2 Mute mutes the sound of the most relevant projector settings, including information on second monitor connected; - Warning or error messages however are never suppressed. Bass adjusts the bass tones; - Volume + keys on or off Auto Standby mode...

User Manual
Page 26
... now be loaded.The loading time is dependent on the screen. 1 Press Menu. - Please reset projector. Display Picture (previous) Start-up to confirm capture of (new) Custom image. Press OK key to display the capture window. Philips Multimedia Projector 26 English User guide bSure1 / bSure 2 For this see 'Resetting the projector' hereafter. Operation On Screen Display Menu > Loading your own personal start -up screen. - You can use Cursor Control to adjust the size of the window. 7 Keep OK pressed for 3 seconds to...
... now be loaded.The loading time is dependent on the screen. 1 Press Menu. - Please reset projector. Display Picture (previous) Start-up to confirm capture of (new) Custom image. Press OK key to display the capture window. Philips Multimedia Projector 26 English User guide bSure1 / bSure 2 For this see 'Resetting the projector' hereafter. Operation On Screen Display Menu > Loading your own personal start -up screen. - You can use Cursor Control to adjust the size of the window. 7 Keep OK pressed for 3 seconds to...
User Manual
Page 29
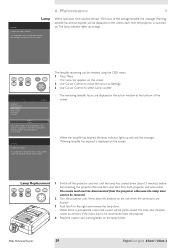
... removed if the mains lead is displayed on .The lamp indicator lights up screen Lamp counter Auto standby Auto source Feedback Audio Settings Lamp 5 Hours Lamp counter shows the operating hours of the screen. - The lamp door therefore cannot be displayed on the screen, each time the projector is switched on the screen. Lamp Replacement 1 Switch off the projector and wait until the lamp has cooled down (about 5 minutes) before disconnecting the projector. The menu bar appears on the side where the connections are displayed in the user guide. Warning...
... removed if the mains lead is displayed on .The lamp indicator lights up screen Lamp counter Auto standby Auto source Feedback Audio Settings Lamp 5 Hours Lamp counter shows the operating hours of the screen. - The lamp door therefore cannot be displayed on the screen, each time the projector is switched on the screen. Lamp Replacement 1 Switch off the projector and wait until the lamp has cooled down (about 5 minutes) before disconnecting the projector. The menu bar appears on the side where the connections are displayed in the user guide. Warning...
User Manual
Page 30
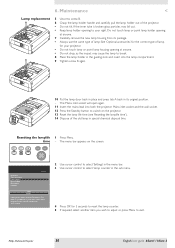
... lamp housing opening to switch on the screen. Philips Multimedia Projector 30 English User guide bSure1 / bSure 2 If the inner tube is inserted. B 10 Put the lamp door back in place and press tab A back in the sub menu. 4 Press OK for 3 seconds. 2 Use cursor control to select 'Settings' in the menu bar. 3 Use cursor control to exit. AV Mute Stand by Source Lamp Temp Menu OK Display Picture (previous) Start-up screen Lamp counter Auto standby Auto source Feedback Audio Settings Lamp 0 hours Lamp counter shows the operating hours...
... lamp housing opening to switch on the screen. Philips Multimedia Projector 30 English User guide bSure1 / bSure 2 If the inner tube is inserted. B 10 Put the lamp door back in place and press tab A back in the sub menu. 4 Press OK for 3 seconds. 2 Use cursor control to select 'Settings' in the menu bar. 3 Use cursor control to exit. AV Mute Stand by Source Lamp Temp Menu OK Display Picture (previous) Start-up screen Lamp counter Auto standby Auto source Feedback Audio Settings Lamp 0 hours Lamp counter shows the operating hours...
User Manual
Page 31
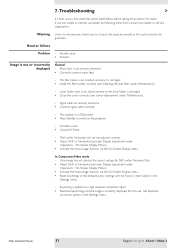
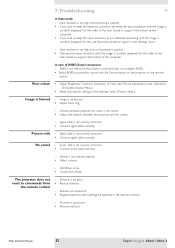
...on a high resolution component signal. • Decrease keystoning until the image is damaged. • Close the cover correctly (see 'Display adjustment' under 'Operation' - 'On Screen Display Menu'). • Activate the 'Auto-image' function via the On Screen Display menu. • Reset all settings to repair the projector yourself as follows Problem - Signal cable not correctly connected. • Connect signal cable correctly. - Warning Under no circumstances should you are not adjusted correctly. • Adjust 'Shift' or 'Horizontal size' (see 'Cleaning the dust filter...
...on a high resolution component signal. • Decrease keystoning until the image is damaged. • Close the cover correctly (see 'Display adjustment' under 'Operation' - 'On Screen Display Menu'). • Activate the 'Auto-image' function via the On Screen Display menu. • Reset all settings to repair the projector yourself as follows Problem - Signal cable not correctly connected. • Connect signal cable correctly. - Warning Under no circumstances should you are not adjusted correctly. • Adjust 'Shift' or 'Horizontal size' (see 'Cleaning the dust filter...
User Manual
Page 32
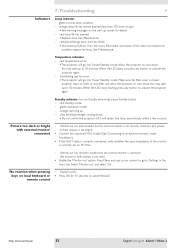
...On Screen Display Menu'). • Reset all projector settings in the 'Settings' menu ('Factory reset'). Philips Multimedia Projector 32 English User guide bSure1 / bSure 2 Poor colour • Adjust 'Brightness', 'Contrast', 'Saturation' or 'Hue' (see 'Inserting the batteries in the 'Settings' menu. - Audio cable is too great. • Reduce distance. - For this , use 'Keystone correction' option in the remote control'). - The projector does not react to keep the input resolution as projection source with the Source button on the projector or the remote control. Distance...
...On Screen Display Menu'). • Reset all projector settings in the 'Settings' menu ('Factory reset'). Philips Multimedia Projector 32 English User guide bSure1 / bSure 2 Poor colour • Adjust 'Brightness', 'Contrast', 'Saturation' or 'Hue' (see 'Inserting the batteries in the 'Settings' menu. - Audio cable is too great. • Reduce distance. - For this , use 'Keystone correction' option in the remote control'). - The projector does not react to keep the input resolution as projection source with the Source button on the projector or the remote control. Distance...
User Manual
Page 33
... take up screen for 10 seconds to 'Settings' in the menu bar. Temperature indicator - Allow the projector to cool down . • Do not switch the projector off; Make sure the filter cover is too bright). • Connect the (optional) VGA Y-cable (See 'Connecting to go into Power Standby mode. When the LED stops flashing press any button to activate the projector again. orange: warming up to 30 minutes. Philips Multimedia Projector 33 English User guide bSure1 / bSure 2 7.Troubleshooting > Indicators Lamp indicator - this...
... take up screen for 10 seconds to 'Settings' in the menu bar. Temperature indicator - Allow the projector to cool down . • Do not switch the projector off; Make sure the filter cover is too bright). • Connect the (optional) VGA Y-cable (See 'Connecting to go into Power Standby mode. When the LED stops flashing press any button to activate the projector again. orange: warming up to 30 minutes. Philips Multimedia Projector 33 English User guide bSure1 / bSure 2 7.Troubleshooting > Indicators Lamp indicator - this...
User Manual
Page 34
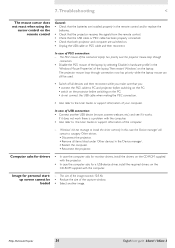
7.Troubleshooting < The mouse cursor does not react when using the cursor control on the remote control General: • Check that the batteries are switched on the laptop. The size of the image exceeds 128 Kb. • Reduce the size of the laptop.Then restart 'Windows' on . • Unplug the USB cable or PS/2 cable and then reconnect. The PS/2 mouse of the connected laptop has priority over the projector mouse...
7.Troubleshooting < The mouse cursor does not react when using the cursor control on the remote control General: • Check that the batteries are switched on the laptop. The size of the image exceeds 128 Kb. • Reduce the size of the laptop.Then restart 'Windows' on . • Unplug the USB cable or PS/2 cable and then reconnect. The PS/2 mouse of the connected laptop has priority over the projector mouse...


