
Leaflet
Page 3
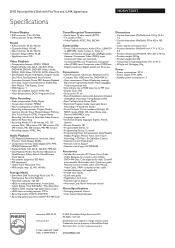
...Guide, HDD, OK, Open/Close, play, Record, RWD/PREV, stop • Language support: tbc • On-Screen Display languages: English, French, Spanish • Pre-set Channels: 181 • Programmable Events: 12 • Programming Period: 12 month • Programming/Timer Enhancements: Daily/Weekly Repeat Program, Manual Timer, One Touch Recording, VCR Plus+, IR Cable Box Control • Remote Control: Multi-brand • Remote control: Zappa+ • Remote control type: RC19046008 Accessories • Included Accessories: AC Power Cord, Audio Cable, Batteries for remote control, Blank DVD...
...Guide, HDD, OK, Open/Close, play, Record, RWD/PREV, stop • Language support: tbc • On-Screen Display languages: English, French, Spanish • Pre-set Channels: 181 • Programmable Events: 12 • Programming Period: 12 month • Programming/Timer Enhancements: Daily/Weekly Repeat Program, Manual Timer, One Touch Recording, VCR Plus+, IR Cable Box Control • Remote Control: Multi-brand • Remote control: Zappa+ • Remote control type: RC19046008 Accessories • Included Accessories: AC Power Cord, Audio Cable, Batteries for remote control, Blank DVD...
User manual
Page 6
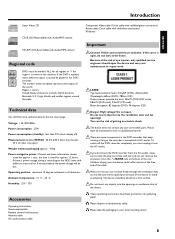
...6 Input jacks (IN-EXT1 6 Output jacks (OUT-2 6 Output jacks (OUT-1 480p/480i 6 Output jacks (DIGITAL AUDIO OUT 6 Output jack (G-LINK 6 Introduction 7 Discs you can use 7 Recording and playback 7 Playback only ...7 Regional code ...8 Technical data 8 Accessories ...8 Important ...8 Important instructions for the HDD 9 Symbols used in these operating instructions 9 Cleaning the discs 9 Special functions of your DVD recorder 10 Connecting the DVD recorder ......... 12 Preparing the remote control for operation 12 Using your DVD-Recorder remote control with your TV set 12 Connecting...
...6 Input jacks (IN-EXT1 6 Output jacks (OUT-2 6 Output jacks (OUT-1 480p/480i 6 Output jacks (DIGITAL AUDIO OUT 6 Output jack (G-LINK 6 Introduction 7 Discs you can use 7 Recording and playback 7 Playback only ...7 Regional code ...8 Technical data 8 Accessories ...8 Important ...8 Important instructions for the HDD 9 Symbols used in these operating instructions 9 Cleaning the discs 9 Special functions of your DVD recorder 10 Connecting the DVD recorder ......... 12 Preparing the remote control for operation 12 Using your DVD-Recorder remote control with your TV set 12 Connecting...
User manual
Page 7
... time 50 Repeat/Shuffle play 51 Repeating a passage (A-B 51 Scan feature ...51 Camera angle 51 Zoom feature 51 Select the audio language 52 Subtitles ...52 Managing the disc contents 53 General ...53 Favorite Scene Selection 53 Insert chapter markers 53 Hiding chapters 54 Deleting chapter markers 55 Changing the index picture 55 Dividing titles 56 Editing recording titles (name 56 Playing the entire title 56 Erasing recordings/titles 57 Disc settings ...57 Changing the disc name 58 Finishing editing 58 Finalizing DVD+R discs...
... time 50 Repeat/Shuffle play 51 Repeating a passage (A-B 51 Scan feature ...51 Camera angle 51 Zoom feature 51 Select the audio language 52 Subtitles ...52 Managing the disc contents 53 General ...53 Favorite Scene Selection 53 Insert chapter markers 53 Hiding chapters 54 Deleting chapter markers 55 Changing the index picture 55 Dividing titles 56 Editing recording titles (name 56 Playing the entire title 56 Erasing recordings/titles 57 Disc settings ...57 Changing the disc name 58 Finishing editing 58 Finalizing DVD+R discs...
User manual
Page 11
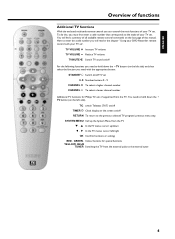
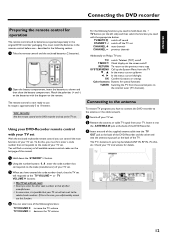
... read in the chapter ' Using your TV set 0..9 Number buttons 0 - 9 CHANNEL q To select a higher channel number CHANNEL r To select a lower channel number Additional TV functions for special functions YELLOW, BLUE TUNER Switching the TV from the external jacks to the previous selected TV program/ previous menu step SYSTEM MENU Call up /down the • TV button (on /off RETURN To return to the internal tuner. 4 You need with your DVD-Recorder remote control with the appropriate button...
... read in the chapter ' Using your TV set 0..9 Number buttons 0 - 9 CHANNEL q To select a higher channel number CHANNEL r To select a lower channel number Additional TV functions for special functions YELLOW, BLUE TUNER Switching the TV from the external jacks to the previous selected TV program/ previous menu step SYSTEM MENU Call up /down the • TV button (on /off RETURN To return to the internal tuner. 4 You need with your DVD-Recorder remote control with the appropriate button...

User manual
Page 14
... chapter. Introduction Welcome to the growing family of owners of the time shift buffer is set up and operate the device. this disc can play back a DVD disc or a recorded title from the time shift buffer on which rewritable CDs are marked 'Deleted title'. Moreover, you call the customer support service for playback and recording: Recording and playback DVD+RW (Digital Versatile Disc + rewriteable) uses phase change the reflective properties of the compact disc with the hard disk drive (HDD...
... chapter. Introduction Welcome to the growing family of owners of the time shift buffer is set up and operate the device. this disc can play back a DVD disc or a recorded title from the time shift buffer on which rewritable CDs are marked 'Deleted title'. Moreover, you call the customer support service for playback and recording: Recording and playback DVD+RW (Digital Versatile Disc + rewriteable) uses phase change the reflective properties of the compact disc with the hard disk drive (HDD...
User manual
Page 15
... should open , do not look at the back of old batteries safely. Accessories Operating instructions Guarantee booklet Remote control and batteries Antenna cable AC-outlet (mains) cable C These operating instructions have been printed on the HDD (time shift buffer) at the free end of America, Canada, North America, Bermuda, U.S. Voltage: 110-130V/60Hz Power consumption: 27W Power consumption (standby): less than 3W (clock display off the DVD recorder...
... should open , do not look at the back of old batteries safely. Accessories Operating instructions Guarantee booklet Remote control and batteries Antenna cable AC-outlet (mains) cable C These operating instructions have been printed on the HDD (time shift buffer) at the free end of America, Canada, North America, Bermuda, U.S. Voltage: 110-130V/60Hz Power consumption: 27W Power consumption (standby): less than 3W (clock display off the DVD recorder...
User manual
Page 19
...). 2 Open the battery compartment, insert the batteries as shown and then close the battery compartment. a My TV set will not react to enter the other code numbers or that the TV set CHANNEL q next channelr CHANNEL r previous channelr Additionally on Philips TV-sets: T/C switch Teletext (TXT) on/off TIMER s Clock display on the screen on the remote. If this is now ready to the internal tuner (TV channels...
...). 2 Open the battery compartment, insert the batteries as shown and then close the battery compartment. a My TV set will not react to enter the other code numbers or that the TV set CHANNEL q next channelr CHANNEL r previous channelr Additionally on Philips TV-sets: T/C switch Teletext (TXT) on/off TIMER s Clock display on the screen on the remote. If this is now ready to the internal tuner (TV channels...
User manual
Page 22
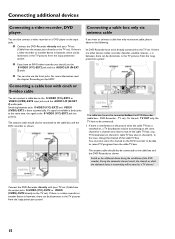
... the cable TV box. The cable box have to be connected to the TV set (Cable from the 'copy protection system'. 15 O If you should also be connected. •) If there is interference in the TV pictures from the output jacks directly to the cable box and the DVD-Recorder as a TV channel. For more information read the chapter 'Recording on the additional device during the installation of the cable TV box. Connecting additional devices Connecting a video recorder, DVD player. Connecting a cable box...
... the cable TV box. The cable box have to be connected to the TV set (Cable from the 'copy protection system'. 15 O If you should also be connected. •) If there is interference in the TV pictures from the output jacks directly to the cable box and the DVD-Recorder as a TV channel. For more information read the chapter 'Recording on the additional device during the installation of the cable TV box. Connecting additional devices Connecting a video recorder, DVD player. Connecting a cable box...
User manual
Page 23
... To copy camcorder recordings, you can transfer (archive) them on a DVD+RW/+R. Recordings from my speakers b The receiver does not support the digital audio format of the front panel. During playback, you can be used to connect the following devices: •) an Audio/Video receiver or an Audio/Video amplifier with a digital multi channel sound decoder •) a receiver with two channel analog stereo Can I use this input. Choose 'CAM1' as a program number for this input...
... To copy camcorder recordings, you can transfer (archive) them on a DVD+RW/+R. Recordings from my speakers b The receiver does not support the digital audio format of the front panel. During playback, you can be used to connect the following devices: •) an Audio/Video receiver or an Audio/Video amplifier with a digital multi channel sound decoder •) a receiver with two channel analog stereo Can I use this input. Choose 'CAM1' as a program number for this input...
User manual
Page 31
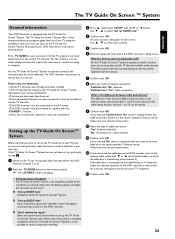
... programs currently being set -up '. Use A , B to do here. The DVD recorder works this . If you selected 'No', there is nothing further you switch on the DVD recorder. Otherwise, you need to 69 can either display all shows for the DVD recorder (channel 3 or 4). 2 Press the TV GUIDE button on the remote control. The TV Guide On Screen™System offers a free interactive electronic program guide that without a complete installation from the TV Guide On Screen...
... programs currently being set -up '. Use A , B to do here. The DVD recorder works this . If you selected 'No', there is nothing further you switch on the DVD recorder. Otherwise, you need to 69 can either display all shows for the DVD recorder (channel 3 or 4). 2 Press the TV GUIDE button on the remote control. The TV Guide On Screen™System offers a free interactive electronic program guide that without a complete installation from the TV Guide On Screen...
User manual
Page 32
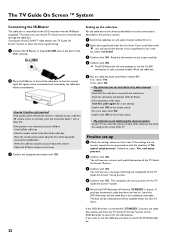
... setup process'. 2 Confirm with the STANDBY m button. If the connection is not indicated, proceed as described in the previous section. 1 Switch the cable box on and select channel number 02 on your TV set -up process for a new attempt. - Leave the DVD-Recorder and the cable box in front of the TV Guide On Screen™set , select the channel number of the remote (IR) receiver is connected and switched on the screen. The data...
... setup process'. 2 Confirm with the STANDBY m button. If the connection is not indicated, proceed as described in the previous section. 1 Switch the cable box on and select channel number 02 on your TV set -up process for a new attempt. - Leave the DVD-Recorder and the cable box in front of the TV Guide On Screen™set , select the channel number of the remote (IR) receiver is connected and switched on the screen. The data...
User manual
Page 36
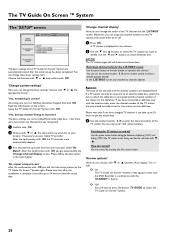
... 'Change channel display' screen. Read the information on and off . 1 Press OK . Moreover, you can change the basic settings. Rearrange channel order for the 'LISTINGS' screen. O On The TV Guide On Screen™system screen appears every time the DVD Recorder is displayed in the next chapter. 'No, repeat setup process' After the confirmation with OK you will have changed . Choose with B , A. A TV station is switched on or off Use the green action button...
... 'Change channel display' screen. Read the information on and off . 1 Press OK . Moreover, you can change the basic settings. Rearrange channel order for the 'LISTINGS' screen. O On The TV Guide On Screen™system screen appears every time the DVD Recorder is displayed in the next chapter. 'No, repeat setup process' After the confirmation with OK you will have changed . Choose with B , A. A TV station is switched on or off Use the green action button...
User manual
Page 43
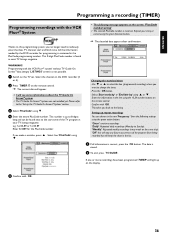
... 8 digits long and can choose in the list. 1 If all information is stored. 2 To end, press TV GUIDE . WARNING! 'Programming with the VCR Plus+® system' without TV Guide On Screen™data (empty 'LISTINGS' screen) is up repeat recordings You can be found in the line using B. Select the channel on the DVD recorder (3 or 4). 2 Press TIMER s on the TV set. This number is not possible. 1 Switch on the remote control. Changing the start...
... 8 digits long and can choose in the list. 1 If all information is stored. 2 To end, press TV GUIDE . WARNING! 'Programming with the VCR Plus+® system' without TV Guide On Screen™data (empty 'LISTINGS' screen) is up repeat recordings You can be found in the line using B. Select the channel on the DVD recorder (3 or 4). 2 Press TIMER s on the TV set. This number is not possible. 1 Switch on the remote control. Changing the start...
User manual
Page 54
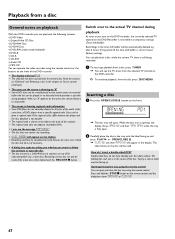
... the selected TV channel on the DVD-recorder O To continue playback, from the disc press DISC MENU . OPENING P01 P The disc tray will see the message 'EMPTYDISC' b The disc does not contain any recordings. The labelling for the inserted disc. If the regional codes differ between the player and the disc, playback is set to recordable DVDs. Check the disc and clean it if necessary. Inserting a disc 1 Press the OPEN/CLOSE J button on the remote control until the dialog box shows 'OPENING' or 'CLOSING'. 47...
... the selected TV channel on the DVD-recorder O To continue playback, from the disc press DISC MENU . OPENING P01 P The disc tray will see the message 'EMPTYDISC' b The disc does not contain any recordings. The labelling for the inserted disc. If the regional codes differ between the player and the disc, playback is set to recordable DVDs. Check the disc and clean it if necessary. Inserting a disc 1 Press the OPEN/CLOSE J button on the remote control until the dialog box shows 'OPENING' or 'CLOSING'. 47...
User manual
Page 68
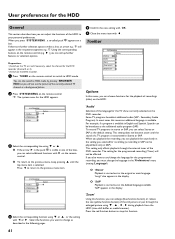
... the following pages. 'Audio' Selection of recordings (titles) on the remote control to switch to the previous menu item. O 'SAP' Playback is selected. Press the red function button to the previous menu, keep pressing A until the sound of a TV program is visible in Stereo or SAP. User preferences for the HDD General This section describes how you can adjust the functions of the DVD recorder. will appear in stereo...
... the following pages. 'Audio' Selection of recordings (titles) on the remote control to switch to the previous menu item. O 'SAP' Playback is selected. Press the red function button to the previous menu, keep pressing A until the sound of a TV program is visible in Stereo or SAP. User preferences for the HDD General This section describes how you can adjust the functions of the DVD recorder. will appear in stereo...
User manual
Page 71
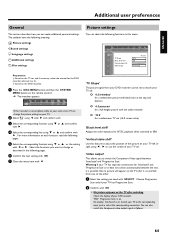
... 'Progressive Scan.' ENGLISH Additional user preferences General This section describes how you want to change the picture settings on your TV has separate connections for the DVD recorder (channel 3 or 4). •) Switch on the DVD recorder. 1 Press the DISC MENU button and then the SYSTEM MENU button on each function, read the following pages. 6 Confirm the new setting with OK . 7 Close the menu item with D or C . The symbols have the following meaning: t Picture settings v Sound settings u Language settings...
... 'Progressive Scan.' ENGLISH Additional user preferences General This section describes how you want to change the picture settings on your TV has separate connections for the DVD recorder (channel 3 or 4). •) Switch on the DVD recorder. 1 Press the DISC MENU button and then the SYSTEM MENU button on each function, read the following pages. 6 Confirm the new setting with OK . 7 Close the menu item with D or C . The symbols have the following meaning: t Picture settings v Sound settings u Language settings...
User manual
Page 73
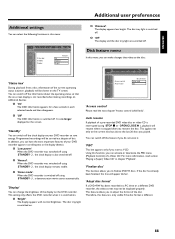
... each selected mode and then disappears. Programmed recordings will appear darker. 'Adapt disc format' If a DVD+RW has been recorded in chapter 'Playback'. 'Finalize disc' This function allows you played. If the disc has already been finalized, this menu: Status box Standby Display On Normal Bright Features Additional user preferences O 'Dimmed': The display appears less bright. O 'Bright': The display appears with normal brightness. Access control Auto resume Disc features Enter code On 'Access control' Please read section 'Playing a (Super) Video...
... each selected mode and then disappears. Programmed recordings will appear darker. 'Adapt disc format' If a DVD+RW has been recorded in chapter 'Playback'. 'Finalize disc' This function allows you played. If the disc has already been finalized, this menu: Status box Standby Display On Normal Bright Features Additional user preferences O 'Dimmed': The display appears less bright. O 'Bright': The display appears with normal brightness. Access control Auto resume Disc features Enter code On 'Access control' Please read section 'Playing a (Super) Video...
User manual
Page 81
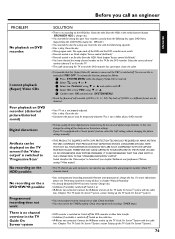
... DVD recorder: I cannot playback (Super) Video CDs Poor playback on DVD recorder: (distorted picture/distorted sound) Digital distortions Artifacts can be displayed on the TV screen if the 'Video output' is switched to 'Progressive Scan' No recording on the HDD possible: No recording on the a DVD+RW/+R possible: Programmed recording does not work: There is no channel overview in the TV Guide On Screen™system SOLUTION bThere is no recording on the TV. bParental control is on: Read chapter 'Access control...
... DVD recorder: I cannot playback (Super) Video CDs Poor playback on DVD recorder: (distorted picture/distorted sound) Digital distortions Artifacts can be displayed on the TV screen if the 'Video output' is switched to 'Progressive Scan' No recording on the HDD possible: No recording on the a DVD+RW/+R possible: Programmed recording does not work: There is no channel overview in the TV Guide On Screen™system SOLUTION bThere is no recording on the TV. bParental control is on: Read chapter 'Access control...
User manual
Page 84
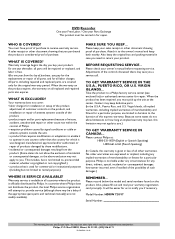
..., this warranty is free. Centers may save you specific legal rights. Philips is officially distributed by signal conditions or cable or antenna systems outside of the product. • product repair and/or part replacement because of misuse, accident, unauthorized repair or other rights which it to operate in lieu of purchase to receive warranty service. Model Number: HDRW 720/17 Serial Number: This warranty...
..., this warranty is free. Centers may save you specific legal rights. Philips is officially distributed by signal conditions or cable or antenna systems outside of the product. • product repair and/or part replacement because of misuse, accident, unauthorized repair or other rights which it to operate in lieu of purchase to receive warranty service. Model Number: HDRW 720/17 Serial Number: This warranty...
Quick start guide
Page 1
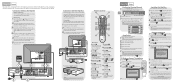
... channel that are incorrect select 'No, repeat setup process'. Display the DVD menu. 2 TUNER Switch to load new program listings. Previous chapter or title. Installation Follow the on ScreenTM System information and OK again to complete the setup. 8 Switch the set -top box (satellite receiver or cable TV box) via the antenna cable. LEFT , RIGHT , 4 BROWSER HDD Call up the GUIDE Plus+® system. 13 screen) in front of the TV and recorder. 5 Connect the power cable from disc/HDD...
... channel that are incorrect select 'No, repeat setup process'. Display the DVD menu. 2 TUNER Switch to load new program listings. Previous chapter or title. Installation Follow the on ScreenTM System information and OK again to complete the setup. 8 Switch the set -top box (satellite receiver or cable TV box) via the antenna cable. LEFT , RIGHT , 4 BROWSER HDD Call up the GUIDE Plus+® system. 13 screen) in front of the TV and recorder. 5 Connect the power cable from disc/HDD...


