
Leaflet
Page 1
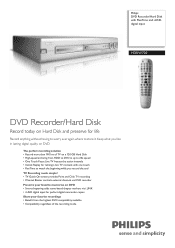
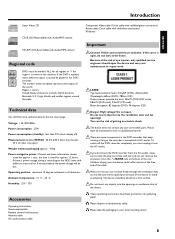
...via i.LINK • i.LINK digital input for perfect digital camcorder copies Share your favorite recordings • Benefit from HDD to DVD at up to store it. Philips DVD Recorder/Hard Disk with one touch • FlexTime to watch the beginning while you like in lasting digital quality...One Touch Pause Live TV freezes the action instantly • Instant Replay for reliving a live TV moment with FlexTime and i.LINK digital input HDRW720 DVD Recorder/Hard Disk Record today on a 120 GB Hard Disk • High-speed archiving from the highest DVD compatibility available • ...
...via i.LINK • i.LINK digital input for perfect digital camcorder copies Share your favorite recordings • Benefit from HDD to DVD at up to store it. Philips DVD Recorder/Hard Disk with one touch • FlexTime to watch the beginning while you like in lasting digital quality...One Touch Pause Live TV freezes the action instantly • Instant Replay for reliving a live TV moment with FlexTime and i.LINK digital input HDRW720 DVD Recorder/Hard Disk Record today on a 120 GB Hard Disk • High-speed archiving from the highest DVD compatibility available • ...
Leaflet
Page 2
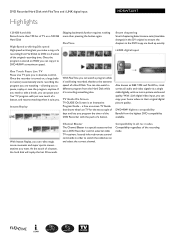
... watching when it to switch the cable box on and select the correct channel. DVD Recorder/Hard Disk with FlexTime and i.LINK digital input Highlights HDRW720/17 120 GB hard disk Record more than 190 hrs of TV on a 120 GB Hard Disk High-Speed archiving:20x speed High speed archiving... recorded, thanks to pause, replay or save the program, anytime. TV Guide On Screen TV GUIDE On Screen is a special accessory that shows what's on HDD you can also watch a program while it 's recording something else. With i.Link digital video input, you to the extreme speed of a button, the hard ...
... watching when it to switch the cable box on and select the correct channel. DVD Recorder/Hard Disk with FlexTime and i.LINK digital input Highlights HDRW720/17 120 GB hard disk Record more than 190 hrs of TV on a 120 GB Hard Disk High-Speed archiving:20x speed High speed archiving... recorded, thanks to pause, replay or save the program, anytime. TV Guide On Screen TV GUIDE On Screen is a special accessory that shows what's on HDD you can also watch a program while it 's recording something else. With i.Link digital video input, you to the extreme speed of a button, the hard ...
Leaflet
Page 3
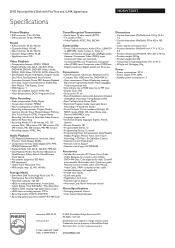
...DVD Recorder/Hard Disk with FlexTime and i.LINK digital input Specifications HDRW720/17 Picture/Display • A/D converter: 9 bit, 27 ... out, IR mouse Convenience • Child Protection: Child Lock, Parental Control • Compass GUI: HDD part Yes, DVD+RW no • User convenience: Closed Captioning (analog), Electronic Programming Guide, Menu...000 kg • Product weight (lb): 000 • Temperature range (operation): 0°C to change without notice. www.philips.com All Rights reserved. or their respective owners. Packaging: 8 kg Power • Power consumption: 30 W •...
...DVD Recorder/Hard Disk with FlexTime and i.LINK digital input Specifications HDRW720/17 Picture/Display • A/D converter: 9 bit, 27 ... out, IR mouse Convenience • Child Protection: Child Lock, Parental Control • Compass GUI: HDD part Yes, DVD+RW no • User convenience: Closed Captioning (analog), Electronic Programming Guide, Menu...000 kg • Product weight (lb): 000 • Temperature range (operation): 0°C to change without notice. www.philips.com All Rights reserved. or their respective owners. Packaging: 8 kg Power • Power consumption: 30 W •...
User manual
Page 6
...7 Discs you can use 7 Recording and playback 7 Playback only ...7 Regional code ...8 Technical data 8 Accessories ...8 Important ...8 Important instructions for the HDD 9 Symbols used in these operating instructions 9 Cleaning the discs 9 Special functions of your DVD recorder 10 Connecting the DVD recorder ......... 12 Preparing the...41 Edit title ...42 'Video edit' ...42 Editing recorded titles (name 43 Divide title ...43 Delete titles/recordings from the HDD 44 Insert/remove chapter markers 44 Hide chapters (sections 45 Recording on a DVD+RW/+R 46 Archiving (storing) titles on a ...
...7 Discs you can use 7 Recording and playback 7 Playback only ...7 Regional code ...8 Technical data 8 Accessories ...8 Important ...8 Important instructions for the HDD 9 Symbols used in these operating instructions 9 Cleaning the discs 9 Special functions of your DVD recorder 10 Connecting the DVD recorder ......... 12 Preparing the...41 Edit title ...42 'Video edit' ...42 Editing recorded titles (name 43 Divide title ...43 Delete titles/recordings from the HDD 44 Insert/remove chapter markers 44 Hide chapters (sections 45 Recording on a DVD+RW/+R 46 Archiving (storing) titles on a ...
User manual
Page 7
... the Disc Manager 59 Searching for a title in the Disc Manager 60 Searching discs 60 Recording ...62 'Record mode 62 'Camera mode 62 'Chapters' ...62 'HDD buffer' ...62 'Language' ...62 'Filter' ...63 'Set up' ...63 'System' ...63 'Auto delete' ...63 'Jump forward 63 'Jump back' ...63 'Installation... symbols 70 Operating mode symbols 70 The symbols on your DVD recorder display 71 Messages in the DVD recorder display 71 User preferences for the HDD ......... 61 General ...61 Toolbar ...61 Options ...61 'Audio' ...61 'Zoom' ...61 'Time search 62 'Subpictures' ...62 Preferences ...62 ...
... the Disc Manager 59 Searching for a title in the Disc Manager 60 Searching discs 60 Recording ...62 'Record mode 62 'Camera mode 62 'Chapters' ...62 'HDD buffer' ...62 'Language' ...62 'Filter' ...63 'Set up' ...63 'System' ...63 'Auto delete' ...63 'Jump forward 63 'Jump back' ...63 'Installation... symbols 70 Operating mode symbols 70 The symbols on your DVD recorder display 71 Messages in the DVD recorder display 71 User preferences for the HDD ......... 61 General ...61 Toolbar ...61 Options ...61 'Audio' ...61 'Zoom' ...61 'Time search 62 'Subpictures' ...62 Preferences ...62 ...
User manual
Page 8
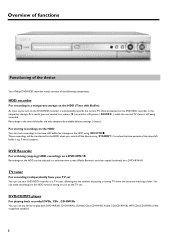
...shift buffer for storage on the DVD/HDD recorder in this device to the HDD when you switch off the device using REC/OTR n . Overview of functions Functioning of the device Your Philips DVD/HDD recorder mainly consists of the following components: HDD recorder For recording in a temporary ...storage on the HDD (Time shift Buffer) As soon as a TV tuner, allowing you the comfort of the time...
...shift buffer for storage on the DVD/HDD recorder in this device to the HDD when you switch off the device using REC/OTR n . Overview of functions Functioning of the device Your Philips DVD/HDD recorder mainly consists of the following components: HDD recorder For recording in a temporary ...storage on the HDD (Time shift Buffer) As soon as a TV tuner, allowing you the comfort of the time...
User manual
Page 9
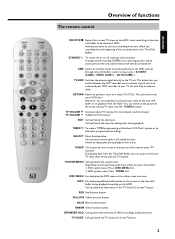
... the previous scene of the time shift buffer or to input jacks (' S-VIDEO (CAM1) / VIDEO (CAM1) ', ' DV IN (CAM2) '). Depending on the HDD and not through time shift buffer), switch to playback from a disc. Call up /Cancel the edit menu. CAM Switch to 'Camera mode' (recording directly on... Switch on repeat play back from which you can jump to the picture of the internal tuner (TV channel). STANDBY m To switch set on HDD. For more details read the chapter TV VOLUME r 'Additional TV functions' EDIT Call up additional information in the Time Shift Buffer). You can ...
... the previous scene of the time shift buffer or to input jacks (' S-VIDEO (CAM1) / VIDEO (CAM1) ', ' DV IN (CAM2) '). Depending on the HDD and not through time shift buffer), switch to playback from a disc. Call up /Cancel the edit menu. CAM Switch to 'Camera mode' (recording directly on... Switch on repeat play back from which you can jump to the picture of the internal tuner (TV channel). STANDBY m To switch set on HDD. For more details read the chapter TV VOLUME r 'Additional TV functions' EDIT Call up additional information in the Time Shift Buffer). You can ...
User manual
Page 10
...shown or an introductory film will be played. The speed will see a still picture. STOP h Stop playback Hold down in the settings of the HDD. 0..9 For entering numbers or characters at the corresponding entry fields. CHANNEL q Next channel CHANNEL r Previous channel JUMP BACK To jump back a ...and chapter for selection using N , O . If 'INFO' appears in the display, the index menu from the begining in the settings of the HDD. Previous or next position during playback from the HDD (media browser or time shift buffer). You will increase automatically. OK Confirming of a title from...
...shown or an introductory film will be played. The speed will see a still picture. STOP h Stop playback Hold down in the settings of the HDD. 0..9 For entering numbers or characters at the corresponding entry fields. CHANNEL q Next channel CHANNEL r Previous channel JUMP BACK To jump back a ...and chapter for selection using N , O . If 'INFO' appears in the display, the index menu from the begining in the settings of the HDD. Previous or next position during playback from the HDD (media browser or time shift buffer). You will increase automatically. OK Confirming of a title from...

User manual
Page 12
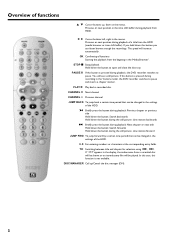
...(overview of the device STANDBY-ON m : To switch device off / on, interrupt a function. Red light around the disc tray indicates recording on the HDD In the TV Guide On Screen ™System: OK-button. TRAY LED : Red light around the n button indicates: •) a recording on a DVD...+RW/+R (archiving of titles) •) storing of a title from HDD. HDD : Call up blue. If you change the jack (unplug), you must re-select the jack. (Button CHANNEL r and then CHANNEL q ) 5 GUIDE : Call up ...
...(overview of the device STANDBY-ON m : To switch device off / on, interrupt a function. Red light around the disc tray indicates recording on the HDD In the TV Guide On Screen ™System: OK-button. TRAY LED : Red light around the n button indicates: •) a recording on a DVD...+RW/+R (archiving of titles) •) storing of a title from HDD. HDD : Call up blue. If you change the jack (unplug), you must re-select the jack. (Button CHANNEL r and then CHANNEL q ) 5 GUIDE : Call up ...

User manual
Page 14
...read this process is being recorded. If this process can store recordings from the HDD while the current TV channel is complete, no longer be played back if the recording was made in your Philips DVD Recorder /Hard Disk is set up and operate the device. Audio CD ... will enjoy your new DVD Recorder / Hard Disk, your DVD Recorder. after a recording, further recordings can also visit the website 'http://www.p4c.philips.com' . Introduction Welcome to 3 hours (factory setting). The deleted recordings (titles) are based. Time-shift TV viewing is possible with the latest...
...read this process is being recorded. If this process can store recordings from the HDD while the current TV channel is complete, no longer be played back if the recording was made in your Philips DVD Recorder /Hard Disk is set up and operate the device. Audio CD ... will enjoy your new DVD Recorder / Hard Disk, your DVD Recorder. after a recording, further recordings can also visit the website 'http://www.p4c.philips.com' . Introduction Welcome to 3 hours (factory setting). The deleted recordings (titles) are based. Time-shift TV viewing is possible with the latest...
User manual
Page 15
... the AC-outlet. Do not open , do not look at most the last 5 minutes before the power outage will find more technical data on the HDD (time shift buffer) at the beam. C Please dispose of the world. The number within the globe represents the region of old batteries safely. AIf you...
... the AC-outlet. Do not open , do not look at most the last 5 minutes before the power outage will find more technical data on the HDD (time shift buffer) at the beam. C Please dispose of the world. The number within the globe represents the region of old batteries safely. AIf you...
User manual
Page 16
...5 cm (2 inch) around the recorder to enable air to a recycling centre. • Philips will find additional information in these operating instructions. 1 Step(s) for damage or loss of the HDD on a DVD+RW/+R. BMake sure that can be recycled. If you should clean your discs ... • Before bringing the device to shocks, temperature fluctuations, and vibrations. See 'The archive function'. BWhen installing the recorder in HDD of extreme humidity. Cleaning the discs Some malfunctions (frozen or distorted picture and broken sound for repair, store all important data of ...
...5 cm (2 inch) around the recorder to enable air to a recycling centre. • Philips will find additional information in these operating instructions. 1 Step(s) for damage or loss of the HDD on a DVD+RW/+R. BMake sure that can be recycled. If you should clean your discs ... • Before bringing the device to shocks, temperature fluctuations, and vibrations. See 'The archive function'. BWhen installing the recorder in HDD of extreme humidity. Cleaning the discs Some malfunctions (frozen or distorted picture and broken sound for repair, store all important data of ...
User manual
Page 22
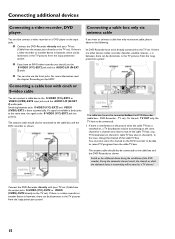
... output jacks S-VIDEO (Y/C)-OUT2 or VIDEO (CVBS)-OUT2 directly to the TV set ). O If you have to the TV set ). TV set . Switch on the HDD'. If there is switched on which the additional device is a video recorder or another device in between jacks S-VIDEO (Y/C)-EXT2 and VIDEO (CVBS)-EXT2 is...
... output jacks S-VIDEO (Y/C)-OUT2 or VIDEO (CVBS)-OUT2 directly to the TV set ). O If you have to the TV set ). TV set . Switch on the HDD'. If there is switched on which the additional device is a video recorder or another device in between jacks S-VIDEO (Y/C)-EXT2 and VIDEO (CVBS)-EXT2 is...
User manual
Page 23
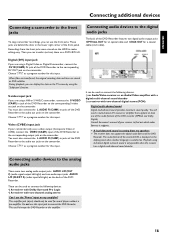
... the DVD Recorder to the corresponding DV OUT jack on the camcorder. a A loud distorted sound is coming from the front jacks were stored on the HDD to find out which audio formats it supports. The audio format of the DVD Recorder to the audio out jacks on the camcorder. These can...
... the DVD Recorder to the corresponding DV OUT jack on the camcorder. a A loud distorted sound is coming from the front jacks were stored on the HDD to find out which audio formats it supports. The audio format of the DVD Recorder to the audio out jacks on the camcorder. These can...

User manual
Page 25
... automatic TV channel search starts. This setting is not available on the disc the fist language on the HDD you select, provided this channel? Read therefor the section 'Delete titles/recordings from the HDD' in the media browser. Select 'Low power' or 'Normal' using OK . This offers a free ... the basic settings right to switch manually. If it off the Dealer Demo If you TV screen. If not, check the cable connection from the HDD'. a The DVD Recorder finds very few/no button in your area. O '4:3 panscan' for this language is connected securely to the TV programs...
... automatic TV channel search starts. This setting is not available on the disc the fist language on the HDD you select, provided this channel? Read therefor the section 'Delete titles/recordings from the HDD' in the media browser. Select 'Low power' or 'Normal' using OK . This offers a free ... the basic settings right to switch manually. If it off the Dealer Demo If you TV screen. If not, check the cable connection from the HDD'. a The DVD Recorder finds very few/no button in your area. O '4:3 panscan' for this language is connected securely to the TV programs...

User manual
Page 26
... connected to change the setting in the chapter 'Setting up the TV Guide On Screen™system' you can switch only between playback from the HDD/disc or the Picture from the cable box. Attention! If you do not use the cable box anymore, you have to the VIDEO (CVBS)-EXT2...
... connected to change the setting in the chapter 'Setting up the TV Guide On Screen™system' you can switch only between playback from the HDD/disc or the Picture from the cable box. Attention! If you do not use the cable box anymore, you have to the VIDEO (CVBS)-EXT2...
User manual
Page 27
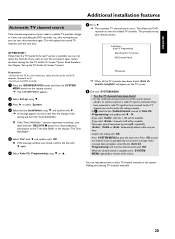
... on the TV set, and if necessary, select the channel for the DVD recorder (channel 3 or 4). •) Switch on the DVD recorder. 1 Press the BROWSER HDD button and then the SYSTEM MENU button on -screen message. Press OK to select 'System'. 4 Select the line 'Installation' using B or A . 7 Press C . You can start...
... on the TV set, and if necessary, select the channel for the DVD recorder (channel 3 or 4). •) Switch on the DVD recorder. 1 Press the BROWSER HDD button and then the SYSTEM MENU button on -screen message. Press OK to select 'System'. 4 Select the line 'Installation' using B or A . 7 Press C . You can start...

User manual
Page 28
... on the TV set , and if necessary, select the channel for the DVD recorder (channel 3 or 4). •) Switch on the DVD recorder. 1 Press the BROWSER HDD button and then the SYSTEM MENU button on the screen that with some DVDs the audio language and/or subtitle language can be skipped when... on the TV set , and if necessary, select the channel for the DVD recorder (channel 3 or 4). •) Switch on the DVD recorder. 1 Press the BROWSER HDD button and then the SYSTEM MENU button on or off the Recorder with the number buttons 0..9 . Press TV GUIDE . Press repeatedly A to the 'Time Shift...
... on the TV set , and if necessary, select the channel for the DVD recorder (channel 3 or 4). •) Switch on the DVD recorder. 1 Press the BROWSER HDD button and then the SYSTEM MENU button on the screen that with some DVDs the audio language and/or subtitle language can be skipped when... on the TV set , and if necessary, select the channel for the DVD recorder (channel 3 or 4). •) Switch on the DVD recorder. 1 Press the BROWSER HDD button and then the SYSTEM MENU button on or off the Recorder with the number buttons 0..9 . Press TV GUIDE . Press repeatedly A to the 'Time Shift...

User manual
Page 29
...;system. O Playback audio The DVD will flush the 'Time Shift Buffer'. Therefore you have the option of setting one of this function. 1 Press the BROWSER HDD button and then the SYSTEM MENU button on the screen that transmits the time and date information and confirm with C . If an incorrect PBS channel...
...;system. O Playback audio The DVD will flush the 'Time Shift Buffer'. Therefore you have the option of setting one of this function. 1 Press the BROWSER HDD button and then the SYSTEM MENU button on the screen that transmits the time and date information and confirm with C . If an incorrect PBS channel...

User manual
Page 30
...' using B and confirm with OK . Read additional information to a weak or faulty TV signal. In this case, switch off the automatic setting. 1 Press the BROWSER HDD button and then the SYSTEM MENU button on the TV screen b The time/date will flush the 'Time Shift Buffer'. If required, make changes using...
...' using B and confirm with OK . Read additional information to a weak or faulty TV signal. In this case, switch off the automatic setting. 1 Press the BROWSER HDD button and then the SYSTEM MENU button on the TV screen b The time/date will flush the 'Time Shift Buffer'. If required, make changes using...


