
Leaflet
Page 2
... 'live' TV program with the push of a button. Compatibility in order to DVD in a fraction of the original recording time. It sends infra-red remote control commands in all audio and video signals via a single cable digitally, with no loss in the DVD copy are watching -- DVD Recorder/Hard Disk... with FlexTime and i.LINK digital input Highlights HDRW720/17 120 GB hard disk Record more than 190 hrs of TV on a 120 GB Hard Disk High-Speed archiving:20x speed High speed archiving...
... 'live' TV program with the push of a button. Compatibility in order to DVD in a fraction of the original recording time. It sends infra-red remote control commands in all audio and video signals via a single cable digitally, with no loss in the DVD copy are watching -- DVD Recorder/Hard Disk... with FlexTime and i.LINK digital input Highlights HDRW720/17 120 GB hard disk Record more than 190 hrs of TV on a 120 GB Hard Disk High-Speed archiving:20x speed High speed archiving...
Leaflet
Page 3
...8226; Included batteries: 2x Longlife AA • Printed User Guide • Quick start guide • Registration card: none • Remote control: Zappa+ • Warranty Card: North American version Green Specifications • Packaging material: Carton • User manual: Recycled paper ...: 2.0.3 12 NC: 8622 810 11658 UPC: 0 37849 94670 1 © 2009 Koninklijke Philips Electronics N.V. or their respective owners. DVD Recorder/Hard Disk with FlexTime and i.LINK digital input Specifications HDRW720/17 Picture/Display • A/D converter: 9 bit, 27 MHz • D/A converter: ...
...8226; Included batteries: 2x Longlife AA • Printed User Guide • Quick start guide • Registration card: none • Remote control: Zappa+ • Warranty Card: North American version Green Specifications • Packaging material: Carton • User manual: Recycled paper ...: 2.0.3 12 NC: 8622 810 11658 UPC: 0 37849 94670 1 © 2009 Koninklijke Philips Electronics N.V. or their respective owners. DVD Recorder/Hard Disk with FlexTime and i.LINK digital input Specifications HDRW720/17 Picture/Display • A/D converter: 9 bit, 27 MHz • D/A converter: ...
User manual
Page 6
Table of contents Overview of functions 1 Functioning of the device 1 The remote control 2 Additional TV functions 4 Front of the device 5 Back of the device 6 Input jacks (IN-EXT2 6 Input jacks (IN-EXT1 6 Output jacks (OUT-2 6 Output jacks (... in these operating instructions 9 Cleaning the discs 9 Special functions of your DVD recorder 10 Connecting the DVD recorder ......... 12 Preparing the remote control for operation 12 Using your DVD-Recorder remote control with your TV set 12 Connecting to the antenna 12 Connecting to the TV 13 Connection with Component-Video- (Y Pb...
Table of contents Overview of functions 1 Functioning of the device 1 The remote control 2 Additional TV functions 4 Front of the device 5 Back of the device 6 Input jacks (IN-EXT2 6 Input jacks (IN-EXT1 6 Output jacks (OUT-2 6 Output jacks (... in these operating instructions 9 Cleaning the discs 9 Special functions of your DVD recorder 10 Connecting the DVD recorder ......... 12 Preparing the remote control for operation 12 Using your DVD-Recorder remote control with your TV set 12 Connecting to the antenna 12 Connecting to the TV 13 Connection with Component-Video- (Y Pb...
User manual
Page 7
... Options ...61 'Audio' ...61 'Zoom' ...61 'Time search 62 'Subpictures' ...62 Preferences ...62 Before you call an engineer 73 Glossar 78 Code numbers of the remote control 79
... Options ...61 'Audio' ...61 'Zoom' ...61 'Time search 62 'Subpictures' ...62 Preferences ...62 Before you call an engineer 73 Glossar 78 Code numbers of the remote control 79
User manual
Page 9
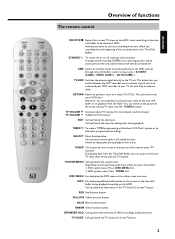
... screen overview. A programmed recording (TIMER) or an archiving process will be continued until the end, and the device will then be stored on HDD. The remote control Overview of functions ENGLISH REC/OTR n Record the current TV show on the HDD, mark recordings in the time shift buffer to input jacks...
... screen overview. A programmed recording (TIMER) or an archiving process will be continued until the end, and the device will then be stored on HDD. The remote control Overview of functions ENGLISH REC/OTR n Record the current TV show on the HDD, mark recordings in the time shift buffer to input jacks...
User manual
Page 11
... • TV button (on /off TIMER s Clock display on the screen on the left /right OK Confirm functions or settings RED , GREEN , Colour buttons for Philips TV-sets if supported from the external jacks to the make of your TV set. To do this code number you need to the previous... theTV menus cursor up/down the • TV button (on the left side) and then select the function you will find a summary of all available remote control commands on /off TV set '. You will read in the chapter ' Using your TV set 0..9 Number buttons 0 - 9 CHANNEL q To select a higher channel number ...
... • TV button (on /off TIMER s Clock display on the screen on the left /right OK Confirm functions or settings RED , GREEN , Colour buttons for Philips TV-sets if supported from the external jacks to the make of your TV set. To do this code number you need to the previous... theTV menus cursor up/down the • TV button (on the left side) and then select the function you will find a summary of all available remote control commands on /off TV set '. You will read in the chapter ' Using your TV set 0..9 Number buttons 0 - 9 CHANNEL q To select a higher channel number ...
User manual
Page 15
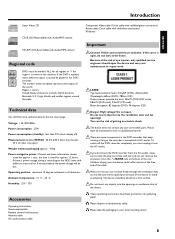
...) Wavelength: 660nm (DVD), 780nm (CD) Output power (outside the lens): 20mW (DVD+RW write), 0.8mW (DVD read), 0.3mW (CD read). Accessories Operating instructions Guarantee booklet Remote control and batteries Antenna cable AC-outlet (mains) cable C These operating instructions have been printed on a firm surface. Technical data You will be placed on...
...) Wavelength: 660nm (DVD), 780nm (CD) Output power (outside the lens): 20mW (DVD+RW write), 0.8mW (DVD read), 0.3mW (CD read). Accessories Operating instructions Guarantee booklet Remote control and batteries Antenna cable AC-outlet (mains) cable C These operating instructions have been printed on a firm surface. Technical data You will be placed on...
User manual
Page 17
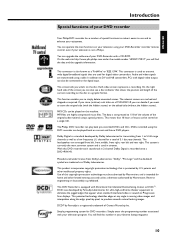
... enables you what's on Progressive Scan displays. This product incorporates copyright protection technology that are transmitted using your DVD-Recorder recorder remote control, even if your television using a cable. Use of this copyright protection technology must be connected to the digital input.... titles on a single CD. You will find this DVD recorder each soundtrack in cinemas. On the web site http://www.p4c.philips.com under license from 1 to transmit wide digital broadband signals that is protected by Faroudja is a standard developed by Macrovision. MP3...
... enables you what's on Progressive Scan displays. This product incorporates copyright protection technology that are transmitted using your DVD-Recorder recorder remote control, even if your television using a cable. Use of this copyright protection technology must be connected to the digital input.... titles on a single CD. You will find this DVD recorder each soundtrack in cinemas. On the web site http://www.p4c.philips.com under license from 1 to transmit wide digital broadband signals that is protected by Faroudja is a standard developed by Macrovision. MP3...
User manual
Page 18
... ™information is printed on your local post code during set up and you want to load or buy. NO.) is sent together with your remote on the show you can see or schedule. It also lets you 'd like to see the next 48 hours or what's on right now or...
... ™information is printed on your local post code during set up and you want to load or buy. NO.) is sent together with your remote on the show you can see or schedule. It also lets you 'd like to see the next 48 hours or what's on right now or...
User manual
Page 19
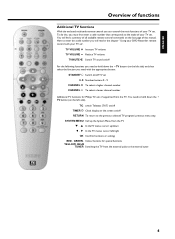
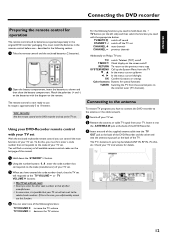
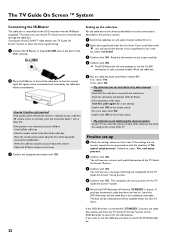
...IN, RF IN, 75 ohm, etc. You must first enter a code number that your TV set CHANNEL q next channelr CHANNEL r previous channelr Additionally on Philips TV-sets: T/C switch Teletext (TXT) on/off RETURN To return to the previous menu step SYSTEM MENU Call up /down the STANDBY m button. 2 ... (on the last page of this function. 4 You can control the main functions of your TV set . For the following section. 1 Take the remote control and the enclosed batteries (2 batteries). 2 Open the battery compartment, insert the batteries as shown and then close the battery compartment. Check your TV ...
...IN, RF IN, 75 ohm, etc. You must first enter a code number that your TV set CHANNEL q next channelr CHANNEL r previous channelr Additionally on Philips TV-sets: T/C switch Teletext (TXT) on/off RETURN To return to the previous menu step SYSTEM MENU Call up /down the STANDBY m button. 2 ... (on the last page of this function. 4 You can control the main functions of your TV set . For the following section. 1 Take the remote control and the enclosed batteries (2 batteries). 2 Open the battery compartment, insert the batteries as shown and then close the battery compartment. Check your TV ...
User manual
Page 27
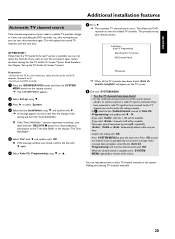
... select 'System'. 4 Select the line 'Installation' using B and confirm with OK . C . - Read therefore the Chapter 'Set up ' using B or A . 7 Press C . Preparation: •) Switch on the remote control. This procedure may take several minutes. Select your cable or satellite TV provider change of your type of 'Auto Ch. When the channel search...
... select 'System'. 4 Select the line 'Installation' using B and confirm with OK . C . - Read therefore the Chapter 'Set up ' using B or A . 7 Press C . Preparation: •) Switch on the remote control. This procedure may take several minutes. Select your cable or satellite TV provider change of your type of 'Auto Ch. When the channel search...

User manual
Page 28
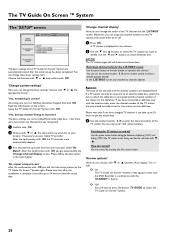
...screen. - Select with B or A 'Change channel display' and confirm with the REC/OTR n button first. You can switch the channel on the remote control. O If the 'Time Shift Buffer ' contains important recordings, save them with OK . - Installation Add/Delete Channels ... • Channel 001 ...line with D or C . a I can not select the line 'Add/Delete Channels' To switch the channels on which reception is switched on the remote control. Therefor you can also switch the TV channel sound between stereo and an additional language (Secondary Audio Program SAP). A 2 Select ' ' symbol with...
...screen. - Select with B or A 'Change channel display' and confirm with the REC/OTR n button first. You can switch the channel on the remote control. O If the 'Time Shift Buffer ' contains important recordings, save them with OK . - Installation Add/Delete Channels ... • Channel 001 ...line with D or C . a I can not select the line 'Add/Delete Channels' To switch the channels on which reception is switched on the remote control. Therefor you can also switch the TV channel sound between stereo and an additional language (Secondary Audio Program SAP). A 2 Select ' ' symbol with...

User manual
Page 29
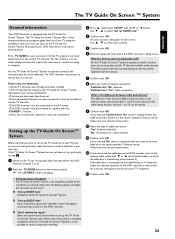
... button on the screen that transmits the time and date information and confirm with C . O 'Subtitle' Subtitle language O 'Menu' You have chosen. P A message appears on the remote control. Attention! B Confirm by pressing OK . C To end, press SYSTEM MENU . O If the message window was taken from the TV Guide On Screen™system...
... button on the screen that transmits the time and date information and confirm with C . O 'Subtitle' Subtitle language O 'Menu' You have chosen. P A message appears on the remote control. Attention! B Confirm by pressing OK . C To end, press SYSTEM MENU . O If the message window was taken from the TV Guide On Screen™system...

User manual
Page 30
...with OK . Therefore you can not set corresponds to a weak or faulty TV signal. If required, make changes using the number buttons 0..9 on the remote control. In this setting will automatically be due to winter time (summer time deactivated) B When all the settings are correct, confirm with OK . A... 'Daylight Saving', select one of this case, switch off the automatic setting. 1 Press the BROWSER HDD button and then the SYSTEM MENU button on your remote control. 0 Check 'AM/PM', 'Year', 'Month' and 'Date' in the chapter 'The Time Shift Buffer'. P A message appears on the TV screen b ...
...with OK . Therefore you can not set corresponds to a weak or faulty TV signal. If required, make changes using the number buttons 0..9 on the remote control. In this setting will automatically be due to winter time (summer time deactivated) B When all the settings are correct, confirm with OK . A... 'Daylight Saving', select one of this case, switch off the automatic setting. 1 Press the BROWSER HDD button and then the SYSTEM MENU button on your remote control. 0 Check 'AM/PM', 'Year', 'Month' and 'Date' in the chapter 'The Time Shift Buffer'. P A message appears on the TV screen b ...
User manual
Page 31
... On Screen™System it needs to see a summary of all the TV programs available in the section entitled 'Continue set up . Read on the remote control. A Confirm with B or A the channel number on which the cable box is connected via the antenna cable, select with OK . Press TV GUIDE to...
... On Screen™System it needs to see a summary of all the TV programs available in the section entitled 'Continue set up . Read on the remote control. A Confirm with B or A the channel number on which the cable box is connected via the antenna cable, select with OK . Press TV GUIDE to...
User manual
Page 32
... If so, select 'Yes'. Check the connection and position of the cable box. - This completes the set-up process. 4 Confirm with OK on the remote control. - Leave the DVD-Recorder and the cable box in front of it must be transmitted and received by the cable box without interference. If... to select channel number 09 on . Confirm with OK . If the DVD-Recorder is connected and switched on it. 2 Select your cable box (IR, remote sensor, or such like), place the transmitter about one inch away. 3 Confirm the displayed information with B , you have to be correctly identified it . ...
... If so, select 'Yes'. Check the connection and position of the cable box. - This completes the set-up process. 4 Confirm with OK on the remote control. - Leave the DVD-Recorder and the cable box in front of it must be transmitted and received by the cable box without interference. If... to select channel number 09 on . Confirm with OK . If the DVD-Recorder is connected and switched on it. 2 Select your cable box (IR, remote sensor, or such like), place the transmitter about one inch away. 3 Confirm the displayed information with B , you have to be correctly identified it . ...

User manual
Page 33
The actions these buttons perform depends on the remote control. Press A and then you can perform various actions in your area. Function buttons If TV Guide On Screen™information has been loaded you ...
The actions these buttons perform depends on the remote control. Press A and then you can perform various actions in your area. Function buttons If TV Guide On Screen™information has been loaded you ...

User manual
Page 34
... Set as favorite : blue function button. Use the B and A buttons to perform the following : 'RECORD' (green button): The highlighted show will be switched on the remote control to select the following actions: Set to browse faster through the shows. Action buttons in the 'SORT' screen If you have connected a cable box...
... Set as favorite : blue function button. Use the B and A buttons to perform the following : 'RECORD' (green button): The highlighted show will be switched on the remote control to select the following actions: Set to browse faster through the shows. Action buttons in the 'SORT' screen If you have connected a cable box...
User manual
Page 36
.... If necessary ask your location, select 'No Match'. You can choose with B or A between 'Auto display' 'On' or 'Off'. Switching the TV station on the remote control to toggle between tiles. Choose the function with B or A and confirm with B or A the appropriate answer: 'Yes, everything is correct' All settings are displayed...
.... If necessary ask your location, select 'No Match'. You can choose with B or A between 'Auto display' 'On' or 'Off'. Switching the TV station on the remote control to toggle between tiles. Choose the function with B or A and confirm with B or A the appropriate answer: 'Yes, everything is correct' All settings are displayed...

User manual
Page 38
.... O Yellow function button: ('OVERVIEW') To display an overview of all content of the screen in the 'Time Shift Buffer'. With the INFO button on the remote control you can appear in the info bar at the actual position. Recording on the HDD Symbols in the 'Time Shift Buffer' Following symbols can...
.... O Yellow function button: ('OVERVIEW') To display an overview of all content of the screen in the 'Time Shift Buffer'. With the INFO button on the remote control you can appear in the info bar at the actual position. Recording on the HDD Symbols in the 'Time Shift Buffer' Following symbols can...


