Manual - English
Page 7
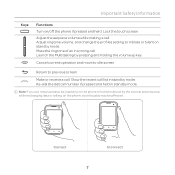
... to previous screen. Lock the touch screen. Launch the Multitasking by the internal antenna area while exchanging data or talking on standby mode. Make or receive a call . Note If you use metal accessories (stickers) on the phone or hold the device by pressing and holding the volume up key. Mute the ringtone of an incoming call list in standby mode. Show the recent call . Important Safety Information Keys Functions Turn on/off...
... to previous screen. Lock the touch screen. Launch the Multitasking by the internal antenna area while exchanging data or talking on standby mode. Make or receive a call . Note If you use metal accessories (stickers) on the phone or hold the device by pressing and holding the volume up key. Mute the ringtone of an incoming call list in standby mode. Show the recent call . Important Safety Information Keys Functions Turn on/off...
Manual - English
Page 9
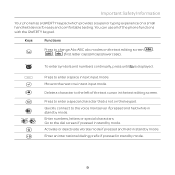
... phone functions with the QWERTY keypad. E \ Z ~ l m To enter symbols and numbers continually, press until Fn is not on the keypad. Move to enter a special character that is displayed. Press to the next row in text input mode. Quickly connect to change Abc ABC abc modes on a small handheld device for easy and comfortable texting. Keys ` Functions Press to the voice mail server if pressed and held in standby mode. 9 You can use...
... phone functions with the QWERTY keypad. E \ Z ~ l m To enter symbols and numbers continually, press until Fn is not on the keypad. Move to enter a special character that is displayed. Press to the next row in text input mode. Quickly connect to change Abc ABC abc modes on a small handheld device for easy and comfortable texting. Keys ` Functions Press to the voice mail server if pressed and held in standby mode. 9 You can use...
Manual - English
Page 10
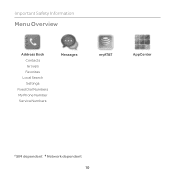
Important Safety Information Menu Overview Address Book Contacts Groups Favorites Local Search Settings Fixed Dial Numbers My Phone Number Service Numbers Messages myAT&T AppCenter S SIM dependent N Network dependent 10
Important Safety Information Menu Overview Address Book Contacts Groups Favorites Local Search Settings Fixed Dial Numbers My Phone Number Service Numbers Messages myAT&T AppCenter S SIM dependent N Network dependent 10

Manual - English
Page 16
... 57 Message templates 62 16 Calls and address book......36 Making, receiving and ending calls 37 Options during a call 39 Call settings 42 Checking all calls 42 Speed dialing 44 Using the address book 44 Address book settings 47 Caller identification 48 Using your headset 48 Service numbers and fixed dialing 48 3. Getting Started 19 SIM card and battery 20 Memory card 24 Turning the phone on/off 24 Screen lock/unlock 25 Language 25 Essential display indications 26 Screen navigation 28 Missed events 31 Using the Multitask menu 32 Using a memory card 33 Updating software...
... 57 Message templates 62 16 Calls and address book......36 Making, receiving and ending calls 37 Options during a call 39 Call settings 42 Checking all calls 42 Speed dialing 44 Using the address book 44 Address book settings 47 Caller identification 48 Using your headset 48 Service numbers and fixed dialing 48 3. Getting Started 19 SIM card and battery 20 Memory card 24 Turning the phone on/off 24 Screen lock/unlock 25 Language 25 Essential display indications 26 Screen navigation 28 Missed events 31 Using the Multitask menu 32 Using a memory card 33 Updating software...
Manual - English
Page 19
1 Getting Started SIM card and battery Memory card Turning the phone on/off Screen lock/unlock Language Essential display indications Screen navigation Missed events Using the Multitask menu Using a memory card Updating software N PC Suite
1 Getting Started SIM card and battery Memory card Turning the phone on/off Screen lock/unlock Language Essential display indications Screen navigation Missed events Using the Multitask menu Using a memory card Updating software N PC Suite
Manual - English
Page 20
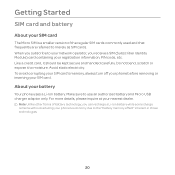
... to use an authorized battery and Micro USB charger adaptor only. To avoid corrupting your SIM card's memory, always turn off your phone before removing or inserting your nearest dealer. For more details, please inquire at your SIM card. Do not bend, scratch or expose it should be kept secure and handled carefully. About your SIM card The Micro SIM is a smaller version of battery technology, you receive a SIM...
... to use an authorized battery and Micro USB charger adaptor only. To avoid corrupting your SIM card's memory, always turn off your phone before removing or inserting your nearest dealer. For more details, please inquire at your SIM card. Do not bend, scratch or expose it should be kept secure and handled carefully. About your SIM card The Micro SIM is a smaller version of battery technology, you receive a SIM...
Manual - English
Page 26
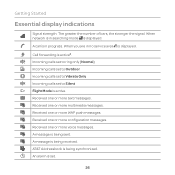
... service area is active. When you are in progress. Incoming calls set to ring only (Normal) Incoming calls set to Outdoor Incoming calls set to Silent Flight Mode is displayed. Received one or more configuration messages. A message is set to Vibrate Only Incoming calls set . 26 Received one or more voice messages. Received one or more WAP push messages. An alarm is being sent. A message is activeN. The greater the number of bars, the stronger the signal. Call forwarding is being synchronized. Getting Started Essential display...
... service area is active. When you are in progress. Incoming calls set to ring only (Normal) Incoming calls set to Outdoor Incoming calls set to Silent Flight Mode is displayed. Received one or more configuration messages. A message is set to Vibrate Only Incoming calls set . 26 Received one or more voice messages. Received one or more WAP push messages. An alarm is being sent. A message is activeN. The greater the number of bars, the stronger the signal. Call forwarding is being synchronized. Getting Started Essential display...
Manual - English
Page 33
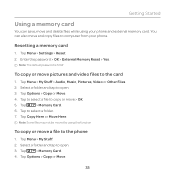
... move and copy files to computer from your phone and external memory card. You can save, move a file to open . 3. To copy or move > OK. 5. Tap Menu > My Stuff > Audio, Music, Pictures, Video or Other Files. 2. Resetting a memory card 1. Select a folder and tap to the phone 1. Tap to select a file to copy or move pictures and video files to select a folder. 7. To copy or move and delete files while using this function. Tap Menu > Settings > Reset. 2. Note The default password is '1234...
... move and copy files to computer from your phone and external memory card. You can save, move a file to open . 3. To copy or move > OK. 5. Tap Menu > My Stuff > Audio, Music, Pictures, Video or Other Files. 2. Resetting a memory card 1. Select a folder and tap to the phone 1. Tap to select a file to copy or move pictures and video files to select a folder. 7. To copy or move and delete files while using this function. Tap Menu > Settings > Reset. 2. Note The default password is '1234...

Manual - English
Page 34
... Move Here. Tap Menu > Settings > Connectivity. 2. Note If you select Music Player, you connect your device with your computer. Updating software N You can add music files from the card 1. To delete a file from Windows Media PlayerTM. Note If you select a music file to delete, you connect your device with the phone and a computer. 5. Select the desired option > Save. 4. Connect the data cable with your computer. Select a file from the card to copy or move a file from the card > Delete. To move > OK...
... Move Here. Tap Menu > Settings > Connectivity. 2. Note If you select Music Player, you connect your device with your computer. Updating software N You can add music files from the card 1. To delete a file from Windows Media PlayerTM. Note If you select a music file to delete, you connect your device with the phone and a computer. 5. Select the desired option > Save. 4. Connect the data cable with your computer. Select a file from the card to copy or move a file from the card > Delete. To move > OK...
Manual - English
Page 37
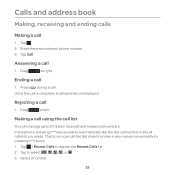
Enter the area code and phone number. 3. Drag to select , , , , or . 3. Rejecting a call number in any menus conveniently by pressing twice. 1. Tap to right. In the phone, pressing twice is complete, a call . Calls and address book Making, receiving and ending calls Making a call 1. Answering a call 1. Tap Call. Select a number. 37 Once the call is set to 20 dialed, received and missed call the last dialed number in the all calls list you can call numbers. Press during a call summary is , you made. Making a call using the...
Enter the area code and phone number. 3. Drag to select , , , , or . 3. Rejecting a call number in any menus conveniently by pressing twice. 1. Tap to right. In the phone, pressing twice is complete, a call . Calls and address book Making, receiving and ending calls Making a call 1. Answering a call 1. Tap Call. Select a number. 37 Once the call is set to 20 dialed, received and missed call the last dialed number in the all calls list you can call numbers. Press during a call summary is , you made. Making a call using the...
Manual - English
Page 44
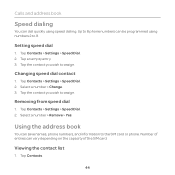
...1. Viewing the contact list 1. Up to 8 phone numbers can save names, phone numbers, and information to assign. Tap Contacts > Settings > Speed Dial. 2. Tap Contacts. 44 Tap the contact you wish to the SIM card or phone. Select a number > Change. 3. Using the address book You can be programmed using speed dialing. Tap the contact you wish to 9. Setting speed dial 1. Select a number > Remove > Yes. Tap Contacts > Settings > Speed Dial. 2. Tap an empty entry. 3. Calls and address book Speed dialing You can vary depending on the capacity of entries can dial quickly...
...1. Viewing the contact list 1. Up to 8 phone numbers can save names, phone numbers, and information to assign. Tap Contacts > Settings > Speed Dial. 2. Tap Contacts. 44 Tap the contact you wish to the SIM card or phone. Select a number > Change. 3. Using the address book You can be programmed using speed dialing. Tap the contact you wish to 9. Setting speed dial 1. Select a number > Remove > Yes. Tap Contacts > Settings > Speed Dial. 2. Tap an empty entry. 3. Calls and address book Speed dialing You can vary depending on the capacity of entries can dial quickly...
Manual - English
Page 51
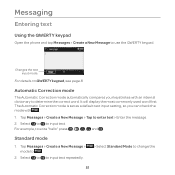
... "hello" press , , , and . Tap Messages > Create a New Message > mode to use the QWERTY keypad. The Automatic Correction mode is set as a default text input setting, so you can check the mode with an internal dictionary to determine the correct word. Messaging Entering text Using the QWERTY keypad Open the phone and tap Messages > Create a New Message to . 2. It will display the most commonly used word first. Standard mode 1. For details on QWERTY keypad, see page 8. Changes the text input mode.
... "hello" press , , , and . Tap Messages > Create a New Message > mode to use the QWERTY keypad. The Automatic Correction mode is set as a default text input setting, so you can check the mode with an internal dictionary to determine the correct word. Messaging Entering text Using the QWERTY keypad Open the phone and tap Messages > Create a New Message to . 2. It will display the most commonly used word first. Standard mode 1. For details on QWERTY keypad, see page 8. Changes the text input mode.
Manual - English
Page 52
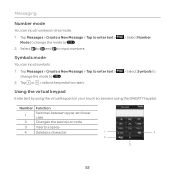
... and to Using the virtual keypad Enter text by using the virtual keypad on your touch screen and using the QWERTY keypad. Tap or > select the symbol to insert. > Select Symbols to input numbers. > Select Number Symbols mode You can input numbers in this mode. 1. Tap Messages > Create a New Message > Tap to enter text > Mode to change the mode to 123 > . 2. Tap Messages > Create a New Message > Tap to enter text > change the mode to .?@ > . 2. Number Function 1 Switches between upper and lower case 2 Changes the text input mode 3 Inserts a space 4 Deletes a character...
... and to Using the virtual keypad Enter text by using the virtual keypad on your touch screen and using the QWERTY keypad. Tap or > select the symbol to insert. > Select Symbols to input numbers. > Select Number Symbols mode You can input numbers in this mode. 1. Tap Messages > Create a New Message > Tap to enter text > Mode to change the mode to 123 > . 2. Tap Messages > Create a New Message > Tap to enter text > change the mode to .?@ > . 2. Number Function 1 Switches between upper and lower case 2 Changes the text input mode 3 Inserts a space 4 Deletes a character...
Manual - English
Page 66
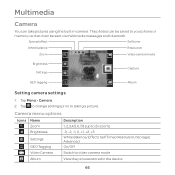
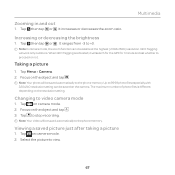
Tap to change settings prior to video camera mode View the pictures stored in camera. Tap Menu > Camera. 2. The photos can be sent via multimedia messages and bluetooth. Multimedia Camera You can be saved to your phone or memory card and can take pictures using the built-in the device 66 Special effect Self timer White balance Resolution Zoom Video camera mode Brightness Settings Capture GEO tagging Album Setting camera settings 1. Camera menu options Icons Name Zoom Brightness Settings GEO Tagging Video Camera Album Description...
Tap to change settings prior to video camera mode View the pictures stored in camera. Tap Menu > Camera. 2. The photos can be sent via multimedia messages and bluetooth. Multimedia Camera You can be saved to your phone or memory card and can take pictures using the built-in the device 66 Special effect Self timer White balance Resolution Zoom Video camera mode Brightness Settings Capture GEO tagging Album Setting camera settings 1. Camera menu options Icons Name Zoom Brightness Settings GEO Tagging Video Camera Album Description...
Manual - English
Page 67
... tap % or & . Select the picture to video camera mode 1. Note In camera mode, the zoom function is activated, it will be saved automatically to stop recording. Changing to view. 67 Note Your video will search for the GPS for 1 minute and ask whether to 9999 photo files especially with 320x240 resolution setting can be saved on camera mode. 2. Viewing a saved picture just after taking a picture 1. It ranges from -3 to the phone memory. Increasing or decreasing the...
... tap % or & . Select the picture to video camera mode 1. Note In camera mode, the zoom function is activated, it will be saved automatically to stop recording. Changing to view. 67 Note Your video will search for the GPS for 1 minute and ask whether to 9999 photo files especially with 320x240 resolution setting can be saved on camera mode. 2. Viewing a saved picture just after taking a picture 1. It ranges from -3 to the phone memory. Increasing or decreasing the...
Manual - English
Page 75
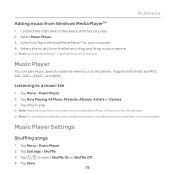
.... Supported formats are required. Tap Now Playing, All Music, Playlists, Albums, Artists or Genres. 3. Tap a file to a music file 1. Tap Menu > Music Player. 2. Tap Save. 75 Listening to play music saved to external memory or to load them on your device. Tap Menu > Music Player. 2. Adding music from the list and drag and drop to your computer. 4. Open Sync Tap in Windows Media PlayerTM on the music player. Tap / to the device and the computer. 2. Select the music from Windows Media...
.... Supported formats are required. Tap Now Playing, All Music, Playlists, Albums, Artists or Genres. 3. Tap a file to a music file 1. Tap Menu > Music Player. 2. Tap Save. 75 Listening to play music saved to external memory or to load them on your device. Tap Menu > Music Player. 2. Adding music from the list and drag and drop to your computer. 4. Open Sync Tap in Windows Media PlayerTM on the music player. Tap / to the device and the computer. 2. Select the music from Windows Media...
Manual - English
Page 80
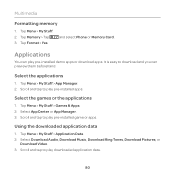
... tap to play pre-installed game or apps. Using the downloaded application data 1. Tap Menu > My Stuff > Application Data. 2. Select the applications 1. Select Download Audio, Download Music, Download Ring Tones, Download Pictures, or Download Video. 3. Tap Format > Yes. Scroll and tap to download and you can play downloaded application data. 80 It is easy to play pre-installed demo apps or download apps. Tap Menu > My Stuff > App Manager. 2. Multimedia Formatting memory 1. and select Phone or Memory Card. Tap Menu > My Stuff > Games & Apps. 2. Tap Memory > Tap 3. Select...
... tap to play pre-installed game or apps. Using the downloaded application data 1. Tap Menu > My Stuff > Application Data. 2. Select the applications 1. Select Download Audio, Download Music, Download Ring Tones, Download Pictures, or Download Video. 3. Tap Format > Yes. Scroll and tap to download and you can play downloaded application data. 80 It is easy to play pre-installed demo apps or download apps. Tap Menu > My Stuff > App Manager. 2. Multimedia Formatting memory 1. and select Phone or Memory Card. Tap Menu > My Stuff > Games & Apps. 2. Tap Memory > Tap 3. Select...
Manual - English
Page 102
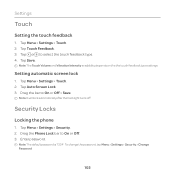
... Menu > Settings > Security > Change Password. 102 Tap Save. Enter password. Tap Menu > Settings > Security. 2. Tap Touch Feedback. 3. Setting automatic screen lock 1. Tap Menu > Settings > Touch. 2. Tap Menu > Settings > Touch. 2. Drag the bar to select the touch feedback type. 4. Note The default password is '1234'. Tap Auto Screen Lock. 3. Security Locks Locking the phone 1. Note The Touch Volume and Vibration Intensity availability depends on the the touch feedback type settings. Note It will lock automatically after the backlight turns off. Drag the Phone Lock bar...
... Menu > Settings > Security > Change Password. 102 Tap Save. Enter password. Tap Menu > Settings > Security. 2. Tap Touch Feedback. 3. Setting automatic screen lock 1. Tap Menu > Settings > Touch. 2. Tap Menu > Settings > Touch. 2. Drag the bar to select the touch feedback type. 4. Note The default password is '1234'. Tap Auto Screen Lock. 3. Security Locks Locking the phone 1. Note The Touch Volume and Vibration Intensity availability depends on the the touch feedback type settings. Note It will lock automatically after the backlight turns off. Drag the Phone Lock bar...
Manual - English
Page 103
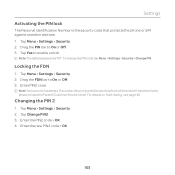
... phone locks, please contact the Pantech Customer Service Center. Tap Change PIN2. 3. Enter the new PIN2 code > OK. 103 Drag the FDN bar to enable unlock. Enter PIN2 code. If you enter the wrong code 3 times, the phone will be locked. Tap Menu > Settings > Security. 2. Drag the PIN bar to On or Off. 3. Note The default password is the security code that protects the phone or SIM against unauthorized use. 1. Tap Menu > Settings > Security. 2. Locking the FDN 1. Note You have only 3 attempts. Enter the PIN2 code > OK. 4. Settings Activating...
... phone locks, please contact the Pantech Customer Service Center. Tap Change PIN2. 3. Enter the new PIN2 code > OK. 103 Drag the FDN bar to enable unlock. Enter PIN2 code. If you enter the wrong code 3 times, the phone will be locked. Tap Menu > Settings > Security. 2. Drag the PIN bar to On or Off. 3. Note The default password is the security code that protects the phone or SIM against unauthorized use. 1. Tap Menu > Settings > Security. 2. Locking the FDN 1. Note You have only 3 attempts. Enter the PIN2 code > OK. 4. Settings Activating...
Manual - English
Page 104
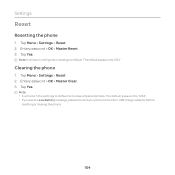
Settings Reset Resetting the phone 1. The default password is '1234'. Clearing the phone 1. Tap Yes. Enter password > OK > Master Clear. 3. xx If you see the Low battery message, please connect your phone to default. Note It will return the settings to default and erase all personal data. Tap Menu > Settings > Reset. 2. Enter password > OK > Master Reset. 3. The default password is '1234'. Tap Menu > Settings > Reset. 2. Tap Yes. Note xx It will return configuration settings to the Micro USB charger adaptor before resetting or clearing the phone. 104
Settings Reset Resetting the phone 1. The default password is '1234'. Clearing the phone 1. Tap Yes. Enter password > OK > Master Clear. 3. xx If you see the Low battery message, please connect your phone to default. Note It will return the settings to default and erase all personal data. Tap Menu > Settings > Reset. 2. Enter password > OK > Master Reset. 3. The default password is '1234'. Tap Menu > Settings > Reset. 2. Tap Yes. Note xx It will return configuration settings to the Micro USB charger adaptor before resetting or clearing the phone. 104


