
PVD4761 User Guide
Page 2
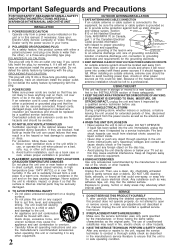
... direct sunlight, inside . • Never drop or push any other equipment. 2 OUTDOOR ANTENNA INSTALLATION 1 SAFE ANTENNA AND CABLE CONNECTION If an outside antenna system should be taken to avoid touching power lines, circuits or other soft surface. Quick stops, excessive force, and uneven surfaces may adversely affect internal parts. Then, use , or operate the unit when placed on any support...
... direct sunlight, inside . • Never drop or push any other equipment. 2 OUTDOOR ANTENNA INSTALLATION 1 SAFE ANTENNA AND CABLE CONNECTION If an outside antenna system should be taken to avoid touching power lines, circuits or other soft surface. Quick stops, excessive force, and uneven surfaces may adversely affect internal parts. Then, use , or operate the unit when placed on any support...

PVD4761 User Guide
Page 7
...TV screen. Initial Setup (Connection) Specifications Power Source: Power Consumption: Video Signal: Video Recording System: Audio Track: Tuner: Broadcast Channels: CABLE Channels: Input/Output Terminal: Input Terminal: Output Terminal: Operating Temperature: Operating Humidity: Weight: Dimensions: Discs Played (1) DVD-VIDEO Disc (one layer per side) (2) Compact Disc (CD-DA, VIDEO CD) Digital Audio Output: Pickup: 120 V AC, 60 Hz Power On: Approx. 32 watts, Power Off: Approx. 4 watts EIA Standard NTSC color 4 rotary heads helical scanning system 1 track (Normal), 2 channel (Hi-Fi Audio Sound...
...TV screen. Initial Setup (Connection) Specifications Power Source: Power Consumption: Video Signal: Video Recording System: Audio Track: Tuner: Broadcast Channels: CABLE Channels: Input/Output Terminal: Input Terminal: Output Terminal: Operating Temperature: Operating Humidity: Weight: Dimensions: Discs Played (1) DVD-VIDEO Disc (one layer per side) (2) Compact Disc (CD-DA, VIDEO CD) Digital Audio Output: Pickup: 120 V AC, 60 Hz Power On: Approx. 32 watts, Power Off: Approx. 4 watts EIA Standard NTSC color 4 rotary heads helical scanning system 1 track (Normal), 2 channel (Hi-Fi Audio Sound...

PVD4761 User Guide
Page 12
... COAXIAL CABLE TV VHF/ UHF AUDIO IN VIDEO R L IN b AV CABLE (not supplied) WARNING When using "Nut type" RF coaxial cables, tighten with RF Coaxial Cable. s DSS Receiver DECK TV s DECK TV s Cable Box DECK TV Antenna or Cable DSS Receiver IN IN OUT IN OUT Cable Box DVD/VCR DECK OUT VIDEO L AUDIO R IN 1 IN FROM ANT. Note to CABLE system installer This reminder is not stereo by connecting a stereo amplifier to DECK. • Connect DECK and TV...
... COAXIAL CABLE TV VHF/ UHF AUDIO IN VIDEO R L IN b AV CABLE (not supplied) WARNING When using "Nut type" RF coaxial cables, tighten with RF Coaxial Cable. s DSS Receiver DECK TV s DECK TV s Cable Box DECK TV Antenna or Cable DSS Receiver IN IN OUT IN OUT Cable Box DVD/VCR DECK OUT VIDEO L AUDIO R IN 1 IN FROM ANT. Note to CABLE system installer This reminder is not stereo by connecting a stereo amplifier to DECK. • Connect DECK and TV...

PVD4761 User Guide
Page 13
... connections to your TV to select channels without using S-VIDEO OUT and COMPONENT VIDEO OUTPUT. The VCR and TUNER pictures are not available when using Multi-brand control feature. Initial Setup (Connection) Other Connections You Can You Cannot s DECK Cable Box TV DVD/VCR DECK ANT or CATV OUT IN1 IN FROM ANT. Note • The picture will not be displayed if the SELECT SW is IN OUT R AUDIO L VIDEO VHF/ UHF added. VHF/UHF OUT TO TV Cable Box...
... connections to your TV to select channels without using S-VIDEO OUT and COMPONENT VIDEO OUTPUT. The VCR and TUNER pictures are not available when using Multi-brand control feature. Initial Setup (Connection) Other Connections You Can You Cannot s DECK Cable Box TV DVD/VCR DECK ANT or CATV OUT IN1 IN FROM ANT. Note • The picture will not be displayed if the SELECT SW is IN OUT R AUDIO L VIDEO VHF/ UHF added. VHF/UHF OUT TO TV Cable Box...

PVD4761 User Guide
Page 14
... connection. s DECK Amplifier Speaker DVD/VCR DECK AUDIO OUT2 L R Speaker Amplifier AUDIO IN R L Speaker Enjoying Digital Audio Output from the Digital Audio Output Connector Notes on Audio Output from the Optical Digital Audio Output Connector Disc Sound recording format Optical digital audio output from connector DVD Dolby Digital Dolby Digital bitstream (1-5.1 ch) or OFF (no output)*1 Linear PCM (48/96 KHz 16/20/24bit) Linear PCM (2ch) (48 KHz sampling/16 bit only)*2 or no output*1 dts Bitstream or no output*1 Video CD MPEG 1 CD Linear PCM PCM...
... connection. s DECK Amplifier Speaker DVD/VCR DECK AUDIO OUT2 L R Speaker Amplifier AUDIO IN R L Speaker Enjoying Digital Audio Output from the Digital Audio Output Connector Notes on Audio Output from the Optical Digital Audio Output Connector Disc Sound recording format Optical digital audio output from connector DVD Dolby Digital Dolby Digital bitstream (1-5.1 ch) or OFF (no output)*1 Linear PCM (48/96 KHz 16/20/24bit) Linear PCM (2ch) (48 KHz sampling/16 bit only)*2 or no output*1 dts Bitstream or no output*1 Video CD MPEG 1 CD Linear PCM PCM...

PVD4761 User Guide
Page 16
...) channel in your time zone. • If you use DSS Receiver, it must be turned off. Press CH for English, or Press CH for Spanish, or Press VCR/TV for French, to select language. • When DECK is not Language Display, do "Reset All Memory Functions" steps on p. 17. • If screen does not appear, check connection between DECK and TV. • When you want to change the output channel...
...) channel in your time zone. • If you use DSS Receiver, it must be turned off. Press CH for English, or Press CH for Spanish, or Press VCR/TV for French, to select language. • When DECK is not Language Display, do "Reset All Memory Functions" steps on p. 17. • If screen does not appear, check connection between DECK and TV. • When you want to change the output channel...

PVD4761 User Guide
Page 20
... : consumerproducts@panasonic.com Press EJECT on remote, or STOP/EJECT on p. 6. • After DECK is in SP or SLP mode. • The sound will switch to Stop mode automatically to protect the tape and the video head. 3 Press STOP to play begins. Multi Function Display Press STOP/EJECT to stop a tape. The VCR mode and "VCR" Indicator light up on a Tape Ready Checklist All connections are plugged in Still mode. --> Press PLAY to release. Playback/ Record on Multi Function Display. Still (Freeze) Picture...
... : consumerproducts@panasonic.com Press EJECT on remote, or STOP/EJECT on p. 6. • After DECK is in SP or SLP mode. • The sound will switch to Stop mode automatically to protect the tape and the video head. 3 Press STOP to play begins. Multi Function Display Press STOP/EJECT to stop a tape. The VCR mode and "VCR" Indicator light up on a Tape Ready Checklist All connections are plugged in Still mode. --> Press PLAY to release. Playback/ Record on Multi Function Display. Still (Freeze) Picture...

PVD4761 User Guide
Page 21
... channel. Record using Cable Box or DSS Receiver. • After 5 minutes in progress), --> Press REC repeatedly to stop recording. Multi Function Display Press STOP/EJECT to set the recording length Normal Rec 0:30 1:00 (30 min. ~ 4 hours). 4:00 3:00 2:00 1:30 • DECK shuts off after the preset record length. Remove loose or peeling labels from DVD/ Video CD/ CD to select the record speed (p. 6). *Important: If a remote control button does not work when pressed, press the VCR button on Multi Function Display), --> select channels...
... channel. Record using Cable Box or DSS Receiver. • After 5 minutes in progress), --> Press REC repeatedly to stop recording. Multi Function Display Press STOP/EJECT to set the recording length Normal Rec 0:30 1:00 (30 min. ~ 4 hours). 4:00 3:00 2:00 1:30 • DECK shuts off after the preset record length. Remove loose or peeling labels from DVD/ Video CD/ CD to select the record speed (p. 6). *Important: If a remote control button does not work when pressed, press the VCR button on Multi Function Display), --> select channels...

PVD4761 User Guide
Page 25
... -screen, please reenter the timer programs. • If the start time for Timer Recording must be manually set new programs. SELECT : SET : SET END : PROG BACK : or To Clear program... If "TIMER PROGRAMS WERE LOST DUE TO POWER INTERRUPTION" appears on Multi Function Display.) • Any future daily or weekly recording will not be performed as programed. 4 Press PROG/VCR+ button to end the program. Important notes when using Cable Box, the VCR's channel for Timer Recording comes up during recording and playing...
... -screen, please reenter the timer programs. • If the start time for Timer Recording must be manually set new programs. SELECT : SET : SET END : PROG BACK : or To Clear program... If "TIMER PROGRAMS WERE LOST DUE TO POWER INTERRUPTION" appears on Multi Function Display.) • Any future daily or weekly recording will not be performed as programed. 4 Press PROG/VCR+ button to end the program. Important notes when using Cable Box, the VCR's channel for Timer Recording comes up during recording and playing...
PVD4761 User Guide
Page 26
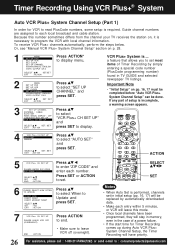
... screen appears. 4 VCR Plus+ CH SET UP AUTO SET MANUAL SELECT : SET : SET EXIT : ACT I ON Press ACTION to end. • Make sure to enter "ZIP CODE" and enter each local broadcast and cable station. Timer Recording Using VCR Plus+ System Auto VCR Plus+ System Channel Setup (Part 1) In order for Timer Recording comes up during Auto VCR Plus+ System Channel Setup, the Timer Recording will have been programmed, they will stay in memory, even in TV GUIDE and selected newspaper TV listings. VCR...
... screen appears. 4 VCR Plus+ CH SET UP AUTO SET MANUAL SELECT : SET : SET EXIT : ACT I ON Press ACTION to end. • Make sure to enter "ZIP CODE" and enter each local broadcast and cable station. Timer Recording Using VCR Plus+ System Auto VCR Plus+ System Channel Setup (Part 1) In order for Timer Recording comes up during Auto VCR Plus+ System Channel Setup, the Timer Recording will have been programmed, they will stay in memory, even in TV GUIDE and selected newspaper TV listings. VCR...
PVD4761 User Guide
Page 27
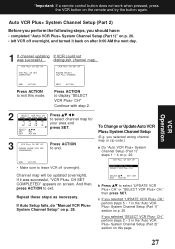
... Repeat these steps as necessary. If you selected "UPDATE VCR Plus+ CH," perform steps 5 ~ 7 in the "Auto VCR Plus+ System Channel Setup (Part 2)" section on p. 26. • left VCR off (overnight). To Change or Update Auto VCR Plus+ System Channel Setup (E.g. you should have: • completed "Auto VCR Plus+ System Channel Setup (Part 1)" on this mode. If Auto Setup fails, do "Manual VCR Plus+ System Channel Setup" on the remote and try the button again. VCR Plus+ CH SET UP UPDATE VCR Plus+ CH SELECT VCR...
... Repeat these steps as necessary. If you selected "UPDATE VCR Plus+ CH," perform steps 5 ~ 7 in the "Auto VCR Plus+ System Channel Setup (Part 2)" section on p. 26. • left VCR off (overnight). To Change or Update Auto VCR Plus+ System Channel Setup (E.g. you should have: • completed "Auto VCR Plus+ System Channel Setup (Part 1)" on this mode. If Auto Setup fails, do "Manual VCR Plus+ System Channel Setup" on the remote and try the button again. VCR Plus+ CH SET UP UPDATE VCR Plus+ CH SELECT VCR...
PVD4761 User Guide
Page 28
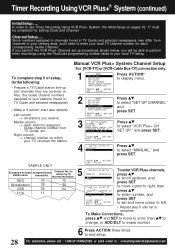
... GUIDE CH RECEIVE CH 01 -- 02 -- To Make Corrections, press and SET to move to error, then to change, or ADD/DLT to erase number. 28 6 Press ACTION three times to select "SET UP CHANNEL" and press SET. Manual VCR Plus+ System Channel Setup For [VCR-TV] or [VCR-Cable Box-TV] connection only. 1 MENU SET UP DVD SET UP VCR SET CLOCK SET UP CHANNEL IDIOMA/LANGUE : ENGLISH VCR'S OUTPUT CH:3 SELECT : SET:SET EXIT : ACTION Press ACTION* to display menu. 2 MENU SET UP DVD SET UP VCR SET CLOCK SET UP CHANNEL IDIOMA/LANGUE : ENGLISH VCR'S OUTPUT CH:3 SELECT : SET : SET...
... GUIDE CH RECEIVE CH 01 -- 02 -- To Make Corrections, press and SET to move to error, then to change, or ADD/DLT to erase number. 28 6 Press ACTION three times to select "SET UP CHANNEL" and press SET. Manual VCR Plus+ System Channel Setup For [VCR-TV] or [VCR-Cable Box-TV] connection only. 1 MENU SET UP DVD SET UP VCR SET CLOCK SET UP CHANNEL IDIOMA/LANGUE : ENGLISH VCR'S OUTPUT CH:3 SELECT : SET:SET EXIT : ACTION Press ACTION* to display menu. 2 MENU SET UP DVD SET UP VCR SET CLOCK SET UP CHANNEL IDIOMA/LANGUE : ENGLISH VCR'S OUTPUT CH:3 SELECT : SET : SET...

PVD4761 User Guide
Page 29
... SELECT : SET : SET END : PROG BACK : Press to step 5. *Important: If a remote control button does not work when pressed, press the VCR button on . When recording via cable or antenna, DSS Receiver must be off or on . NUMBER keys 2 SET PROGRAM Press to select "VCR Plus+ T I MER PROGRAMM I NG VCR Plus+ PROGRAMMING PROGRAMMING" and press SET SELECT : EXIT : PROG SET : SET to display VCR Plus+ screen. 3 VCR Plus+ SYSTEM ENTER PLUSCODE NUMBER 1 USING 0 - 9 KEYS BACKSPACE : Press NUMBER keys to record DSS and Cable Box channels...
... SELECT : SET : SET END : PROG BACK : Press to step 5. *Important: If a remote control button does not work when pressed, press the VCR button on . When recording via cable or antenna, DSS Receiver must be off or on . NUMBER keys 2 SET PROGRAM Press to select "VCR Plus+ T I MER PROGRAMM I NG VCR Plus+ PROGRAMMING PROGRAMMING" and press SET SELECT : EXIT : PROG SET : SET to display VCR Plus+ screen. 3 VCR Plus+ SYSTEM ENTER PLUSCODE NUMBER 1 USING 0 - 9 KEYS BACKSPACE : Press NUMBER keys to record DSS and Cable Box channels...

PVD4761 User Guide
Page 39
.../or copying of Playing VCR, you can use other equipment, such as below .) 3 Press PLAY, then PAUSE/STILL Press REC, then PAUSE/STILL immediately to enter PLAY/PAUSE immediately to the Recording VCR channel (CH 3 or CH 4). 2 Set the VCR/TV Selector on DECK. DECK starts recording. 5 Press STOP to stop dubbing. Simply connect the unit's Audio/Video outputs to VHS tapes using DECK. 39 mode. Note • Dubbing tapes protected with record tab. Display will...
.../or copying of Playing VCR, you can use other equipment, such as below .) 3 Press PLAY, then PAUSE/STILL Press REC, then PAUSE/STILL immediately to enter PLAY/PAUSE immediately to the Recording VCR channel (CH 3 or CH 4). 2 Set the VCR/TV Selector on DECK. DECK starts recording. 5 Press STOP to stop dubbing. Simply connect the unit's Audio/Video outputs to VHS tapes using DECK. 39 mode. Note • Dubbing tapes protected with record tab. Display will...

PVD4761 User Guide
Page 43
... Repeat Play (Video CD/CD) 1 Do operation steps 1 ~ 6 at left on the remote and try the button again. Press previous screen. Program Play (Video CD/CD) You can be programmed. • " " or " " (depending on disc) indicates additional PROGRAM PLAY screen. Video CD or CD is inserted. 2 MENU SET UP DVD SET UP VCR SET CLOCK IDIOMA/LANGUE : ENGLISH VCR'S OUTPUT CH:3 SELECT : SET:SET EXIT : ACTION Press to select "SET UP DVD," and press SET to display DVD screen. 3 DVD MAIN MENU DISC LANGUAGES AUDIO OUTPUT ST I L L MODE : AUTO TV MODE : Pan&Scan 4 : 3 PARENTAL LOCK...
... Repeat Play (Video CD/CD) 1 Do operation steps 1 ~ 6 at left on the remote and try the button again. Press previous screen. Program Play (Video CD/CD) You can be programmed. • " " or " " (depending on disc) indicates additional PROGRAM PLAY screen. Video CD or CD is inserted. 2 MENU SET UP DVD SET UP VCR SET CLOCK IDIOMA/LANGUE : ENGLISH VCR'S OUTPUT CH:3 SELECT : SET:SET EXIT : ACTION Press to select "SET UP DVD," and press SET to display DVD screen. 3 DVD MAIN MENU DISC LANGUAGES AUDIO OUTPUT ST I L L MODE : AUTO TV MODE : Pan&Scan 4 : 3 PARENTAL LOCK...

PVD4761 User Guide
Page 48
... may be entered to view a blocked program or change rating settings. 1 Press ACTION* to display MENU. 2 MENU SET UP DVD SET UP VCR SET CLOCK IDIOMA/LANGUE : ENGLISH VCR'S OUTPUT CH:3 SELECT : SET:SET EXIT : ACTION Press to select "SET UP DVD," and press SET to display DVD screen. 3 DVD MAIN MENU DISC LANGUAGES AUDIO OUTPUT ST I L L MODE : AUTO TV MODE : Pan&Scan 4 : 3 PPAARREENNTTAALL LLOOCCKK :: LLEEVVEELL 88 SELECT SET END : : SET : ACTION Press to select "PARENTAL LOCK," and press SET to enter your secret code. 2) Enter same secret code again for mature audiences...
... may be entered to view a blocked program or change rating settings. 1 Press ACTION* to display MENU. 2 MENU SET UP DVD SET UP VCR SET CLOCK IDIOMA/LANGUE : ENGLISH VCR'S OUTPUT CH:3 SELECT : SET:SET EXIT : ACTION Press to select "SET UP DVD," and press SET to display DVD screen. 3 DVD MAIN MENU DISC LANGUAGES AUDIO OUTPUT ST I L L MODE : AUTO TV MODE : Pan&Scan 4 : 3 PPAARREENNTTAALL LLOOCCKK :: LLEEVVEELL 88 SELECT SET END : : SET : ACTION Press to select "PARENTAL LOCK," and press SET to enter your secret code. 2) Enter same secret code again for mature audiences...

PVD4761 User Guide
Page 50
... be no sound. When playing DVDs recorded in linear PCM of over 48 KHz/20 bit or 96 KHz, no sound. *1 Audio Output 2 from DECK is output. (Factory preset) OFF: No output. Settings for DVD Operation (continued) Audio Output Select the digital output to be output from the optical digital audio output connector of DECK. 1 Do steps 1 and 2 on p. 49. 2 DVD MAIN MENU DISC LANGUAGES AUDIO OUTPUT ST I L L MODE : AUTO TV MODE : Pan&Scan 4 : 3 PARENTAL LOCK :LEVEL 8 SELECT SET END : : SET : ACTION 3 AUDIO OUTPUT LPCM(DVD) Dolby Digital dts DRC SURROUND : OFF : Bitstream...
... be no sound. When playing DVDs recorded in linear PCM of over 48 KHz/20 bit or 96 KHz, no sound. *1 Audio Output 2 from DECK is output. (Factory preset) OFF: No output. Settings for DVD Operation (continued) Audio Output Select the digital output to be output from the optical digital audio output connector of DECK. 1 Do steps 1 and 2 on p. 49. 2 DVD MAIN MENU DISC LANGUAGES AUDIO OUTPUT ST I L L MODE : AUTO TV MODE : Pan&Scan 4 : 3 PARENTAL LOCK :LEVEL 8 SELECT SET END : : SET : ACTION 3 AUDIO OUTPUT LPCM(DVD) Dolby Digital dts DRC SURROUND : OFF : Bitstream...

PVD4761 User Guide
Page 54
... Remote is in proper mode. (p. 32) • Make sure Timer Record is no broadcast signal in TV or Playback mode. Remote Control • Make sure DECK power is on. • Check Remote batteries. • Make sure VCR LOCK is set to current time and date. • Make sure Cable Box/DSS Receiver (if used) is set to "VCR." • Adjust TRACKING control in progress. Power turns itself off... DECK cannot be performed... • Confirm that clock is left on . (pp. 23, 37) Correction TV program...
... Remote is in proper mode. (p. 32) • Make sure Timer Record is no broadcast signal in TV or Playback mode. Remote Control • Make sure DECK power is on. • Check Remote batteries. • Make sure VCR LOCK is set to current time and date. • Make sure Cable Box/DSS Receiver (if used) is set to "VCR." • Adjust TRACKING control in progress. Power turns itself off... DECK cannot be performed... • Confirm that clock is left on . (pp. 23, 37) Correction TV program...
PVD4761 User Guide
Page 55
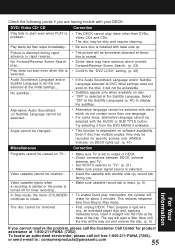
... DVD initial settings does not exist on the disc, it will rotate for specific scenes only (ANGLE Indicator on DECK lights up). (p. 41) Miscellaneous Correction Programs cannot be accessible. • Subtitles appear only when available on disc. • "OFF" is set to Play mode. • First, unplug DECK. In Stop mode, the motor (CYLINDER) continues to : consumerproducts@panasonic.com 55 Video cassette ejects when a recording is started or the power is installed...
... DVD initial settings does not exist on the disc, it will rotate for specific scenes only (ANGLE Indicator on DECK lights up). (p. 41) Miscellaneous Correction Programs cannot be accessible. • Subtitles appear only when available on disc. • "OFF" is set to Play mode. • First, unplug DECK. In Stop mode, the motor (CYLINDER) continues to : consumerproducts@panasonic.com 55 Video cassette ejects when a recording is started or the power is installed...

PVD4761 User Guide
Page 64
... mode 32 V VCR Lock 37 VCR mode 32 VCR Plus+ System Programming 29 VCR/TV 21 VOLUME +/- (TV Volume 32 W Warning and Instruction Displays 53 Warranty 57 Weak Signal Display 37 Z Zero Search 36 Zip Code 26 DVD A ACTION 49 ANGLE (Multiple Angle Viewing 41 AUDIO (Audio Soundtrack Language 40 Audio Output (For Selecting Audio Output) ..... 50 Auto Power Off Function 23 C CLEAR 43, 48 Component Video Output 10, 13 D Disc Languages 49 DISPLAY (To display "On-Screen Display") ..... 45 DVD Menu 42 DVD mode 32 DVD Lock Ratings 48 F Frame by Frame Picture 23 Forwards...
... mode 32 V VCR Lock 37 VCR mode 32 VCR Plus+ System Programming 29 VCR/TV 21 VOLUME +/- (TV Volume 32 W Warning and Instruction Displays 53 Warranty 57 Weak Signal Display 37 Z Zero Search 36 Zip Code 26 DVD A ACTION 49 ANGLE (Multiple Angle Viewing 41 AUDIO (Audio Soundtrack Language 40 Audio Output (For Selecting Audio Output) ..... 50 Auto Power Off Function 23 C CLEAR 43, 48 Component Video Output 10, 13 D Disc Languages 49 DISPLAY (To display "On-Screen Display") ..... 45 DVD Menu 42 DVD mode 32 DVD Lock Ratings 48 F Frame by Frame Picture 23 Forwards...


