PVD4734S User Guide
Page 2
... into the unit. SERVICE 1 DO NOT SERVICE THIS PRODUCT YOURSELF If, after carefully following the detailed operating instructions, this manual. DO NOT USE cleaning fluids, aerosols, or forced air that the cords can be sure the antenna or cable system is used, make any foreign object on the disc tray. • Avoid placing the unit directly above or below your home. 2 POLARIZED OR GROUNDING...
... into the unit. SERVICE 1 DO NOT SERVICE THIS PRODUCT YOURSELF If, after carefully following the detailed operating instructions, this manual. DO NOT USE cleaning fluids, aerosols, or forced air that the cords can be sure the antenna or cable system is used, make any foreign object on the disc tray. • Avoid placing the unit directly above or below your home. 2 POLARIZED OR GROUNDING...
PVD4734S User Guide
Page 5
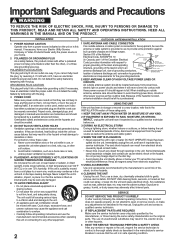
... Using 4 DECK & Cassette Information 6 , 7 Location of Controls 8 ~ 10 Displays (On Screen Displays and Multi Function Display 11 Connections 12 ~ 15 Initial Setup for Basic Connections (Ready to Play) ....... 16, 17 Basic Operation VCR Reset Language, Channels, Clock, VCR's Output Channel .. 18, 19 Playback/ Record on a Tape 20, 21 DVD Basic DVD Operation 22, 23 VCR Operation Timer Recording 24, 25 MTS Broadcast/ VHS Hi-Fi Stereo System 26, 27 Multi-Brand Control Feature 28, 29 Tape Operation (Search System 30, 31 Special VCR Features 32 ~ 34 Copying...
... Using 4 DECK & Cassette Information 6 , 7 Location of Controls 8 ~ 10 Displays (On Screen Displays and Multi Function Display 11 Connections 12 ~ 15 Initial Setup for Basic Connections (Ready to Play) ....... 16, 17 Basic Operation VCR Reset Language, Channels, Clock, VCR's Output Channel .. 18, 19 Playback/ Record on a Tape 20, 21 DVD Basic DVD Operation 22, 23 VCR Operation Timer Recording 24, 25 MTS Broadcast/ VHS Hi-Fi Stereo System 26, 27 Multi-Brand Control Feature 28, 29 Tape Operation (Search System 30, 31 Special VCR Features 32 ~ 34 Copying...

PVD4734S User Guide
Page 7
... DVD discs with incredible playback quality. Track Number: Numbers assigned to tracks on CDs to allow entire movies to view the scene from the start of the screen. Apparatus Claims of this copyright protection technology must be used to be quickly located. Initial Setup (Connection) Specifications Power Source: Power Consumption: Video Signal: Video Recording System: Audio Track: Tuner Broadcast Channels: CABLE Channels: Input/Output Terminal: Input Terminal: Output Terminal: Operating Temperature: Operating Humidity: Weight: Dimensions: Discs Played (1) DVD-Video Disc DVD...
... DVD discs with incredible playback quality. Track Number: Numbers assigned to tracks on CDs to allow entire movies to view the scene from the start of the screen. Apparatus Claims of this copyright protection technology must be used to be quickly located. Initial Setup (Connection) Specifications Power Source: Power Consumption: Video Signal: Video Recording System: Audio Track: Tuner Broadcast Channels: CABLE Channels: Input/Output Terminal: Input Terminal: Output Terminal: Operating Temperature: Operating Humidity: Weight: Dimensions: Discs Played (1) DVD-Video Disc DVD...

PVD4734S User Guide
Page 11
... Indicator Timer Indicator Lights up during Timer Programming. 11 VCR REC Indicator Lights up when DECK is inserted. Displays (On Screen & Multi Function) Initial Setup (Connection) On Screen Displays (VCR) Function & Channel Displays CH 0 8 When a function button is set, but a tape has not been inserted into DECK and when a power interruption occurs during recording. Blank Tape/ No Video Signal Indications Whenever a blank section of a tape comes up when DECK is used. PLAY, or you press SPEED. DVD A REC M TIMER DVD mode Indicator Lights up in Play mode...
... Indicator Timer Indicator Lights up during Timer Programming. 11 VCR REC Indicator Lights up when DECK is inserted. Displays (On Screen & Multi Function) Initial Setup (Connection) On Screen Displays (VCR) Function & Channel Displays CH 0 8 When a function button is set, but a tape has not been inserted into DECK and when a power interruption occurs during recording. Blank Tape/ No Video Signal Indications Whenever a blank section of a tape comes up when DECK is used. PLAY, or you press SPEED. DVD A REC M TIMER DVD mode Indicator Lights up in Play mode...

PVD4734S User Guide
Page 13
... display a progressive scan signal to use Remote Control to either RF INPUT or VIDEO INPUT, and then press PROG. • TV must have COMPONENT VIDEO INPUT but has S-VIDEO INPUT, connect to S-VIDEO OUT. 3 When in DVD mode, set your TV. • PROG functions on the Cable Box. The VCR and TUNER pictures are available only from the VIDEO OUT and VHF/UHF OUT TO TV connections to your TV to select channels without using S-VIDEO OUT and COMPONENT Video Output. Please set a Timer recording of a channel unless you select...
... display a progressive scan signal to use Remote Control to either RF INPUT or VIDEO INPUT, and then press PROG. • TV must have COMPONENT VIDEO INPUT but has S-VIDEO INPUT, connect to S-VIDEO OUT. 3 When in DVD mode, set your TV. • PROG functions on the Cable Box. The VCR and TUNER pictures are available only from the VIDEO OUT and VHF/UHF OUT TO TV connections to your TV to select channels without using S-VIDEO OUT and COMPONENT Video Output. Please set a Timer recording of a channel unless you select...
PVD4734S User Guide
Page 14
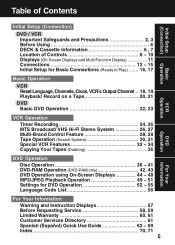
... volume, then turn DECK, as well as other equipment to 96 kHz/24 bit. • If you have a Dolby Pro Logic Surround decoder, you observe the color coding when connecting audio and video cables. I Connecting Amplifier (2ch stereo system) DVD/VCR DECK Speaker Amplifier Speaker AUDIO OUT2 L AUDIO IN R L R Enjoying digital audio output from the digital audio output connector Notes on audio output from the optical digital audio output connector Disc Sound recording format Dolby Digital DVD-Video Optical digital audio output from connector Dolby Digital bitstream (1 - 5.1 ch) or PCM...
... volume, then turn DECK, as well as other equipment to 96 kHz/24 bit. • If you have a Dolby Pro Logic Surround decoder, you observe the color coding when connecting audio and video cables. I Connecting Amplifier (2ch stereo system) DVD/VCR DECK Speaker Amplifier Speaker AUDIO OUT2 L AUDIO IN R L R Enjoying digital audio output from the digital audio output connector Notes on audio output from the optical digital audio output connector Disc Sound recording format Dolby Digital DVD-Video Optical digital audio output from connector Dolby Digital bitstream (1 - 5.1 ch) or PCM...

PVD4734S User Guide
Page 20
... Slow mode, VCR stops to CH 3, 4, or VIDEO. Remote is set to "OFF," press VCR/TV on page 4. • After 3 minutes in Stop mode to play begins. PAUSE/ STILL REC Notes • Picture interruption may occur with some TVs. • FF and REW search speed may vary depending on and tuned to protect the tape and the video heads. tab (p. 6), auto play a tape. Multi Function Display Press STOP/EJECT...
... Slow mode, VCR stops to CH 3, 4, or VIDEO. Remote is set to "OFF," press VCR/TV on page 4. • After 3 minutes in Stop mode to play begins. PAUSE/ STILL REC Notes • Picture interruption may occur with some TVs. • FF and REW search speed may vary depending on and tuned to protect the tape and the video heads. tab (p. 6), auto play a tape. Multi Function Display Press STOP/EJECT...

PVD4734S User Guide
Page 21
... at DECK. Play a disc while recording a tape. ➛ insert a disc during recording. Pause mode) ➛ press VCR/TV on the remote (change to select the record speed (p. 4). Record using Cable Box or DSS Receiver. • After 5 minutes in Pause mode, DECK stops to stop recording. Multi Function Display Press STOP/EJECT to protect a tape and video heads. 2 Select Channel. This video recorder, equipped with a record tab (p. 6). • DECK power comes on the remote and try the button again. Note Remove loose or peeling labels from DVD/ CD to VHS tape using DECK...
... at DECK. Play a disc while recording a tape. ➛ insert a disc during recording. Pause mode) ➛ press VCR/TV on the remote (change to select the record speed (p. 4). Record using Cable Box or DSS Receiver. • After 5 minutes in Pause mode, DECK stops to stop recording. Multi Function Display Press STOP/EJECT to protect a tape and video heads. 2 Select Channel. This video recorder, equipped with a record tab (p. 6). • DECK power comes on the remote and try the button again. Note Remove loose or peeling labels from DVD/ CD to VHS tape using DECK...

PVD4734S User Guide
Page 25
... Multi Function Display.) • Any future daily or weekly recording will not be performed. If "TIMER PROGRAMS WERE LOST DUE TO POWER INTERRUPTION" appears on-screen, please re-enter the timer programs. • If the start time for a few seconds to end the programming. Important notes when using a Cable Box, the VCR's channel for Timer Recording must be set to the desired channel. Hold down STOP in VCR mode for Timer Recording comes up during recording and playing...
... Multi Function Display.) • Any future daily or weekly recording will not be performed. If "TIMER PROGRAMS WERE LOST DUE TO POWER INTERRUPTION" appears on-screen, please re-enter the timer programs. • If the start time for a few seconds to end the programming. Important notes when using a Cable Box, the VCR's channel for Timer Recording must be set to the desired channel. Hold down STOP in VCR mode for Timer Recording comes up during recording and playing...

PVD4734S User Guide
Page 26
... and SAP broadcast Multi-channel Television Sound Stereo (main language) and Secondary Audio Program (sub language) broadcasts are possible audio broadcast types and onscreen displays. MTS Broadcast/ VHS Hi-Fi Stereo System Connection Make the Audio/Video Connection as shown on pp. 12 ~ 15. • You can use TV connected to a Stereo amplifier and speakers instead of Stereo TV. To display the broadcast signal being received, ➛ press DISPLAY*. Select STEREO or SAP audio mode.
... and SAP broadcast Multi-channel Television Sound Stereo (main language) and Secondary Audio Program (sub language) broadcasts are possible audio broadcast types and onscreen displays. MTS Broadcast/ VHS Hi-Fi Stereo System Connection Make the Audio/Video Connection as shown on pp. 12 ~ 15. • You can use TV connected to a Stereo amplifier and speakers instead of Stereo TV. To display the broadcast signal being received, ➛ press DISPLAY*. Select STEREO or SAP audio mode.
PVD4734S User Guide
Page 28
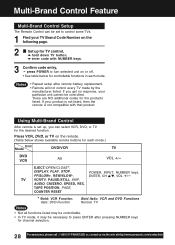
Multi-Brand Control Feature Multi-Brand Control Setup The Remote Control can select VCR, DVD, or TV for the desired function. EJECT/OPEN/CLOSE *, DISPLAY, PLAY, STOP, FF/SLOW+, REW/SLOW-, POWER, INPUT, NUMBER keys, ENTER, CH / , VOL +/- If you can be set up for TV control, ➛ hold down TV button, ➛ enter code with that product. Using Multi-Brand Control After remote is set to control some TVs. 1 Find your TV Brand Code Number on the following page. 2 Set up , you get...
Multi-Brand Control Feature Multi-Brand Control Setup The Remote Control can select VCR, DVD, or TV for the desired function. EJECT/OPEN/CLOSE *, DISPLAY, PLAY, STOP, FF/SLOW+, REW/SLOW-, POWER, INPUT, NUMBER keys, ENTER, CH / , VOL +/- If you can be set up for TV control, ➛ hold down TV button, ➛ enter code with that product. Using Multi-Brand Control After remote is set to control some TVs. 1 Find your TV Brand Code Number on the following page. 2 Set up , you get...

PVD4734S User Guide
Page 32
... SELECT : T-120 SELECT : SET : SET END : ACT I ON Press to select "AUTO VCR/TV," and press SET to set "ON" or "OFF." • OFF(Manual): You select "VCR" or "TV" mode using the VCR/TV button on the remote. • ON(Auto): "VCR" mode is automatically set when VCR is set to normal screen. Useful for households with no tape inserted for timer record and tape eject are prohibited. To turn off, repeat above. Note • DVD functions will work even when VCR Lock is turned...
... SELECT : T-120 SELECT : SET : SET END : ACT I ON Press to select "AUTO VCR/TV," and press SET to set "ON" or "OFF." • OFF(Manual): You select "VCR" or "TV" mode using the VCR/TV button on the remote. • ON(Auto): "VCR" mode is automatically set when VCR is set to normal screen. Useful for households with no tape inserted for timer record and tape eject are prohibited. To turn off, repeat above. Note • DVD functions will work even when VCR Lock is turned...

PVD4734S User Guide
Page 35
... connect the unit's Audio/Video outputs to "L" and "R" AUDIO IN terminals on Multi Function Display (about 4 seconds) when LINE1 or LINE2 is set DECK Input mode to LINE for VCR mode. Recording (Editing) DECK Insert a blank tape with Copy Guard will change as a Camcorder. Channel Number ↔ LINE1 ↔ LINE2 Method 2: Press CH / . mode. To Monitor Dubbing on TV 1 Turn TV on the remote for Video Input. (See "Selecting the Input Mode" below . Display will result in poor quality recordings...
... connect the unit's Audio/Video outputs to "L" and "R" AUDIO IN terminals on Multi Function Display (about 4 seconds) when LINE1 or LINE2 is set DECK Input mode to LINE for VCR mode. Recording (Editing) DECK Insert a blank tape with Copy Guard will change as a Camcorder. Channel Number ↔ LINE1 ↔ LINE2 Method 2: Press CH / . mode. To Monitor Dubbing on TV 1 Turn TV on the remote for Video Input. (See "Selecting the Input Mode" below . Display will result in poor quality recordings...

PVD4734S User Guide
Page 36
... language, selected at the Settings for DVD Operation. (See p. 52.) Please read "Basic DVD Operation" on page 22. [Subtitle language] 1 Press SUB TITLE* in Play mode to initial setting. by pressing , • When disc is the same as Audio Soundtrack Language. If this language is removed, language reverts to display the audio selection on the disc. • Change the No. ESP Spanish • When no subtitles are recorded.) 1 Press AUDIO in Play mode to display [Audio sound track language] the subtitle selection on the disc, the language recorded...
... language, selected at the Settings for DVD Operation. (See p. 52.) Please read "Basic DVD Operation" on page 22. [Subtitle language] 1 Press SUB TITLE* in Play mode to initial setting. by pressing , • When disc is the same as Audio Soundtrack Language. If this language is removed, language reverts to display the audio selection on the disc. • Change the No. ESP Spanish • When no subtitles are recorded.) 1 Press AUDIO in Play mode to display [Audio sound track language] the subtitle selection on the disc, the language recorded...

PVD4734S User Guide
Page 39
... to display DVD MAIN MENU. 2 DVD MAIN MENU DISC LANGUAGES AUDIO OUTPUT ST I L L MODE : AUTO TV MODE : 4:3 Pan&Scan PROGRESSIVE OUT: OFF PLAY MODE SELECT SET END : : SET : ACTION Press to select "PLAY MODE," and press SET to select another track. • The selected track is in step 5, then press SET. 39 Press for next or previous screen. • To clear the last program one by one Press to move to "CLEAR LAST" and press SET. (Pressing CLEAR on remote control...
... to display DVD MAIN MENU. 2 DVD MAIN MENU DISC LANGUAGES AUDIO OUTPUT ST I L L MODE : AUTO TV MODE : 4:3 Pan&Scan PROGRESSIVE OUT: OFF PLAY MODE SELECT SET END : : SET : ACTION Press to select "PLAY MODE," and press SET to select another track. • The selected track is in step 5, then press SET. 39 Press for next or previous screen. • To clear the last program one by one Press to move to "CLEAR LAST" and press SET. (Pressing CLEAR on remote control...

PVD4734S User Guide
Page 52
... disc language is turned off) until changed. When "AUTO" is set for "AUDIO" • If language set , "FIELD" or "FRAME" is used in playback, subtitles will be played. 3 DVD MAIN MENU DISC LANGUAGES AUDIO OUTPUT ST I L L MODE : AUTO TV MODE : 4:3 Pan&Scan PROGRESSIVE OUT: OFF SELECT SET END : : SET : ACTION Press to select "DISC LANGUAGES," and press SET to display screen. 4 DISC LANGUAGES AUD I O : English SUBT I L L MODE : AUTO TV MODE : 4:3 Pan&Scan PROGRESSIVE OUT: OFF Press to prevent jitter or make corrections, press repeatedly to exit. AUTO: Same language...
... disc language is turned off) until changed. When "AUTO" is set for "AUDIO" • If language set , "FIELD" or "FRAME" is used in playback, subtitles will be played. 3 DVD MAIN MENU DISC LANGUAGES AUDIO OUTPUT ST I L L MODE : AUTO TV MODE : 4:3 Pan&Scan PROGRESSIVE OUT: OFF SELECT SET END : : SET : ACTION Press to select "DISC LANGUAGES," and press SET to display screen. 4 DISC LANGUAGES AUD I O : English SUBT I L L MODE : AUTO TV MODE : 4:3 Pan&Scan PROGRESSIVE OUT: OFF Press to prevent jitter or make corrections, press repeatedly to exit. AUTO: Same language...

PVD4734S User Guide
Page 57
... STOP/ EJECT or POWER while DECK is about to a missed operation or provide further instructions. OSD PLEASE SET CLOCK BY PRESSING ACTION KEY PLEASE PREPARE FOR TIMER REC CHECK CASSETTE RECORD TAB NO CASSETTE TO CANCEL TIMER REC HOLD DOWN STOP KEY FOR APPROX 3 SEC VIDEO HEADS MAY NEED CLEANING PLEASE INSERT HEAD CLEANING CASSETTE OR REFER TO MANUAL END : PLAY VCR LOCK ACTIVATED REMOTE CONTROL IS SET TO TV MODE USE VCR : VCR KEY USE DVD : DVD...
... STOP/ EJECT or POWER while DECK is about to a missed operation or provide further instructions. OSD PLEASE SET CLOCK BY PRESSING ACTION KEY PLEASE PREPARE FOR TIMER REC CHECK CASSETTE RECORD TAB NO CASSETTE TO CANCEL TIMER REC HOLD DOWN STOP KEY FOR APPROX 3 SEC VIDEO HEADS MAY NEED CLEANING PLEASE INSERT HEAD CLEANING CASSETTE OR REFER TO MANUAL END : PLAY VCR LOCK ACTIVATED REMOTE CONTROL IS SET TO TV MODE USE VCR : VCR KEY USE DVD : DVD...
PVD4734S User Guide
Page 58
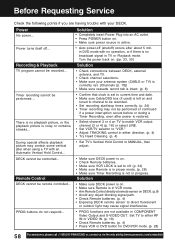
..., 33) Solution • Check connections between DECK, external antenna, and TV. • Check channel selections. • Make sure your DECK. Remote Control DECK cannot be remote controlled... • Make sure DECK power is on. • Check Remote batteries. • Make sure VCR LOCK is set to current time and date. • Make sure Cable/DSS box (if used) is left on and tuned to channel to be recorded. • Set recording start/stop times correctly. (p. 24) • Timer recording may contain some vertical...
..., 33) Solution • Check connections between DECK, external antenna, and TV. • Check channel selections. • Make sure your DECK. Remote Control DECK cannot be remote controlled... • Make sure DECK power is on. • Check Remote batteries. • Make sure VCR LOCK is set to current time and date. • Make sure Cable/DSS box (if used) is left on and tuned to channel to be recorded. • Set recording start/stop times correctly. (p. 24) • Timer recording may contain some vertical...

PVD4734S User Guide
Page 59
... discs may be recorded for specific scenes only (ANGLE indicator on DECK lights up). (p. 37) Miscellaneous Solution Programs cannot be viewed on TV... • Make sure TV is tuned to VCR's output channel (3 or 4). • Check connections between DECK, external antenna, and TV. • Set VCR/TV selector to "TV." (p. 21) • Make sure proper signal source is selected. • If the television is not progressive compatible, a progressive scan picture is turned off for timer recording...
... discs may be recorded for specific scenes only (ANGLE indicator on DECK lights up). (p. 37) Miscellaneous Solution Programs cannot be viewed on TV... • Make sure TV is tuned to VCR's output channel (3 or 4). • Check connections between DECK, external antenna, and TV. • Set VCR/TV selector to "TV." (p. 21) • Make sure proper signal source is selected. • If the television is not progressive compatible, a progressive scan picture is turned off for timer recording...

PVD4734S User Guide
Page 70
... Saving Time 19 E EJECT button 8, 20 ENTER button (For tuning TV Channel 8, 28 F FAST FORWARD/SLOW+ button ..... 8, 20 H Head Cleaning 4 I Index Search 30 Indicator (Multi Function Display) ....... 11 Initial Setup (Ready to Play) ......... 16, 17 INPUT button 8, 35 P PLAY button (Playback a Tape) ...... 8, 20 POWER button 8 PROG button (PROGRAM 8, 24 Program Clear, Review, Replace ....... 25 Q Quality Picture 4 R REC button (Record on a Tape) ..... 8, 21 Record Tab 6 Remote Sensor 9 Remote Warning 34 Repeat Play 31 Reset All Memory Functions 9 REWIND/SLOW- button (TV Volume...
... Saving Time 19 E EJECT button 8, 20 ENTER button (For tuning TV Channel 8, 28 F FAST FORWARD/SLOW+ button ..... 8, 20 H Head Cleaning 4 I Index Search 30 Indicator (Multi Function Display) ....... 11 Initial Setup (Ready to Play) ......... 16, 17 INPUT button 8, 35 P PLAY button (Playback a Tape) ...... 8, 20 POWER button 8 PROG button (PROGRAM 8, 24 Program Clear, Review, Replace ....... 25 Q Quality Picture 4 R REC button (Record on a Tape) ..... 8, 21 Record Tab 6 Remote Sensor 9 Remote Warning 34 Repeat Play 31 Reset All Memory Functions 9 REWIND/SLOW- button (TV Volume...


