

PTDS8500U User Guide
Page 2
..., which will enable you to operate the projector in a manner which is supplied with the projector as an accessory can only be used for future reference. The serial number of your Panasonic DLP™ Based projector. The lightning flash with arrowhead symbol, within... plug. Power Supply: This Projector is designed to operate on the power plug. Germany NOTICE: •• This product has a High Intensity Discharge (HID) lamp that contains mercury. Important Information IImmpporotarnttaSnaftetSy Naofteictey Notice Dear Panasonic Customer: The following information should...
..., which will enable you to operate the projector in a manner which is supplied with the projector as an accessory can only be used for future reference. The serial number of your Panasonic DLP™ Based projector. The lightning flash with arrowhead symbol, within... plug. Power Supply: This Projector is designed to operate on the power plug. Germany NOTICE: •• This product has a High Intensity Discharge (HID) lamp that contains mercury. Important Information IImmpporotarnttaSnaftetSy Naofteictey Notice Dear Panasonic Customer: The following information should...

PTDS8500U User Guide
Page 4
... is about 1.5 times higher. 7 000 lm : PT-D7700U (two lamps LAMP POWER : [HIGH]) 10 600 lm : PT-DZ8700U (two lamps LAMP POWER : [HIGH]) Lengthened lamp replacement cycle The lamp replacement cycle is much less than the existing model. (Æpage 110)... Approx. 1 500 hours : PT-D7700U (two lamps LAMP POWER : [HIGH]) Approx. 3 000 hours : PT-DZ8700U (two lamps LAMP POWER : [HIGH]) JJQuick steps For details, see the corresponding pages. 1. Connect with other devices. (Æpage 34) 4. Set up your projector...
... is about 1.5 times higher. 7 000 lm : PT-D7700U (two lamps LAMP POWER : [HIGH]) 10 600 lm : PT-DZ8700U (two lamps LAMP POWER : [HIGH]) Lengthened lamp replacement cycle The lamp replacement cycle is much less than the existing model. (Æpage 110)... Approx. 1 500 hours : PT-D7700U (two lamps LAMP POWER : [HIGH]) Approx. 3 000 hours : PT-DZ8700U (two lamps LAMP POWER : [HIGH]) JJQuick steps For details, see the corresponding pages. 1. Connect with other devices. (Æpage 34) 4. Set up your projector...
PTDS8500U User Guide
Page 6
.../PT-DS8500 only 73 ON-SCREEN DISPLAY 73 BACK COLOR 74 STARTUP LOGO 74 FREEZE 74 PROJECTOR SETUP menu 75 PROJECTOR ID 75 INSTALLATION 75 HIGH ALTITUDE MODE 75 COOLING CONDITION 76 LAMP SELECT 76 LAMP RELAY 76 LAMP POWER 77 BRIGHTNESS CONTROL 77 STANDBY MODE 81 SCHEDULE 81 RS-232C 82 STATUS 83 NO...
.../PT-DS8500 only 73 ON-SCREEN DISPLAY 73 BACK COLOR 74 STARTUP LOGO 74 FREEZE 74 PROJECTOR SETUP menu 75 PROJECTOR ID 75 INSTALLATION 75 HIGH ALTITUDE MODE 75 COOLING CONDITION 76 LAMP SELECT 76 LAMP RELAY 76 LAMP POWER 77 BRIGHTNESS CONTROL 77 STANDBY MODE 81 SCHEDULE 81 RS-232C 82 STATUS 83 NO...

PTDS8500U User Guide
Page 7
Important Information Preparation Basic Operation Getting Started Network connections 95 Accessing from the Web browser 96 Maintenance Monitor Lamp indicators 107 Managing the indicated problems 107 Replacement 109 Before replacing the unit 109 Replacing the unit 109 Troubleshooting 112 Appendix Technical Information 114 PJLink ...
Important Information Preparation Basic Operation Getting Started Network connections 95 Accessing from the Web browser 96 Maintenance Monitor Lamp indicators 107 Managing the indicated problems 107 Replacement 109 Before replacing the unit 109 Replacing the unit 109 Troubleshooting 112 Appendix Technical Information 114 PJLink ...

PTDS8500U User Guide
Page 9
... or papers, as closets or bookshelves. Never attempt to observe this port. Do not project an image with metallic objects. When replacing the lamp, do so, you are correct when inserting the batteries. terminals of sight. zz Do not use anything other than an authorized ceiling mount ...metallic objects such as ceiling suspension) should only be damaged or deformed. zz Do not insert any metal objects or flammable objects into the projector. Failure to observe this light. zz Store the batteries in damage or injury. zz Do not use a new battery together with an old...
... or papers, as closets or bookshelves. Never attempt to observe this port. Do not project an image with metallic objects. When replacing the lamp, do so, you are correct when inserting the batteries. terminals of sight. zz Do not use anything other than an authorized ceiling mount ...metallic objects such as ceiling suspension) should only be damaged or deformed. zz Do not insert any metal objects or flammable objects into the projector. Failure to observe this light. zz Store the batteries in damage or injury. zz Do not use a new battery together with an old...

PTDS8500U User Guide
Page 10
...contact with clean water and seek medical advice immediately. Rinse with your eyes could result in skin inflammation or injury. Lamp replacement The lamp has high internal pressure. zz When replacing the lamp, allow children to reach the AA/R6 batteries. zz If a baby seems to touch the remote control unit.... infants. zz Keep the remote control unit out of the reach of infants and pets after using it could result in loss of the lamp should be carried out by accident, it with clean water and seek medical advice immediately. ENGLISH zz The battery can easily explode if struck...
...contact with clean water and seek medical advice immediately. Rinse with your eyes could result in skin inflammation or injury. Lamp replacement The lamp has high internal pressure. zz When replacing the lamp, allow children to reach the AA/R6 batteries. zz If a baby seems to touch the remote control unit.... infants. zz Keep the remote control unit out of the reach of infants and pets after using it could result in loss of the lamp should be carried out by accident, it with clean water and seek medical advice immediately. ENGLISH zz The battery can easily explode if struck...

PTDS8500U User Guide
Page 11
...and none of mercury as this could cause injury. „„ ACCESSORIES Do not use the old lamp unit. Do not place the projector in locations exposed to damage. Moving the projector with regard to safety CAUTION „„POWER When disconnecting the power cord, be housed and do...and power connector. ENGLISH - 11 Doing so will result. You could fall or the projector could cause lamp explosion. Please take care to hold them away from vibration and impacts, both the projector and the lens are precision-made and easily susceptible to direct sunlight or near stoves. ...
...and none of mercury as this could cause injury. „„ ACCESSORIES Do not use the old lamp unit. Do not place the projector in locations exposed to damage. Moving the projector with regard to safety CAUTION „„POWER When disconnecting the power cord, be housed and do...and power connector. ENGLISH - 11 Doing so will result. You could fall or the projector could cause lamp explosion. Please take care to hold them away from vibration and impacts, both the projector and the lens are precision-made and easily susceptible to direct sunlight or near stoves. ...
PTDS8500U User Guide
Page 12
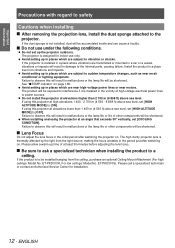
.... Failure to observe this will result in malfunctions or the lamp life will be shortened. „„Lens Focus Do not adjust the lens focus in the period just after switching the projector on . If using the projector at an angle that exceeds 30° vertically, set up... time of high-voltage electrical power lines or power sources. Please allow a warm-up the projector outdoors. If the projector is to the projector. Install the product in places which are subject to interference if it is not installed, dust will be accumulated inside ...
.... Failure to observe this will result in malfunctions or the lamp life will be shortened. „„Lens Focus Do not adjust the lens focus in the period just after switching the projector on . If using the projector at an angle that exceeds 30° vertically, set up... time of high-voltage electrical power lines or power sources. Please allow a warm-up the projector outdoors. If the projector is to the projector. Install the product in places which are subject to interference if it is not installed, dust will be accumulated inside ...
PTDS8500U User Guide
Page 14
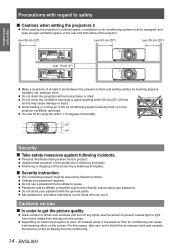
...zz Change your password with regard to shield the air exhaust vents and consider the direction of the projector. Cautions on to prevent outside light or light from indoor lamps from air conditioning can log in confined space, a ventilation or air conditioning system must be equipped,... and keep enough ventilation space on where the projector is simple to guess. zz Avoid heating or cooling air of them . zz Panasonic and its affiliate ...
...zz Change your password with regard to shield the air exhaust vents and consider the direction of the projector. Cautions on to prevent outside light or light from indoor lamps from air conditioning can log in confined space, a ventilation or air conditioning system must be equipped,... and keep enough ventilation space on where the projector is simple to guess. zz Avoid heating or cooling air of them . zz Panasonic and its affiliate ...

PTDS8500U User Guide
Page 15
.... Please discuss with fuzzy or dusty cloths. zz The lamp may burst shortly after the first use solvents such as DLP chips and Polarizing plates in less than 1 year if using the "LAMP RELAY" function. „„Connection to external device When connecting the projector to a computer or external device, use for replacement in...
.... Please discuss with fuzzy or dusty cloths. zz The lamp may burst shortly after the first use solvents such as DLP chips and Polarizing plates in less than 1 year if using the "LAMP RELAY" function. „„Connection to external device When connecting the projector to a computer or external device, use for replacement in...

PTDS8500U User Guide
Page 18
...side Air intake port AC IN terminal Connect the power cord to supply electronic power to adjust the projection angle. Preparation About Your Projector Projector body JJFront view JJSide views Power indicator (STANDBY(R) / ON(G)) Indicates the power supply status. JJRear view Air intake port Auto ... Air intake port Filter (ACF) compartment (Æpage 109) JJBottom view Burglar hook port Û Air intake port Air exhaust port Lamp unit compartment (Æpage 110) Remote control signal receptor Air exhaust port Attention Keep your hands and other objects away from the air...
...side Air intake port AC IN terminal Connect the power cord to supply electronic power to adjust the projection angle. Preparation About Your Projector Projector body JJFront view JJSide views Power indicator (STANDBY(R) / ON(G)) Indicates the power supply status. JJRear view Air intake port Auto ... Air intake port Filter (ACF) compartment (Æpage 109) JJBottom view Burglar hook port Û Air intake port Air exhaust port Lamp unit compartment (Æpage 110) Remote control signal receptor Air exhaust port Attention Keep your hands and other objects away from the air...
PTDS8500U User Guide
Page 39
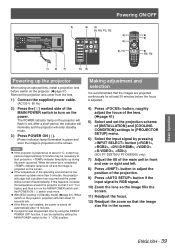
...warm-up period. zzIf the temperature of the operating environment is low and warm-up takes more . indicator lamp lights up during the warm-up period of [INSTALLATION] and [COOLING CONDITION] settings in [PROJECTOR SETUP] menu. 6666 Select the input signal by setting the MAIN POWER switch to the " I " (... scheme of approximately 5 minutes may be turned off automatically. ENGLISH - 39 The POWER indicator lamp on the MAIN POWER switch and the POWER ON ( | ) switch once more than 5 minutes, the projector will judge that a problem has occurred and the power will flash in the screen. If this...
...warm-up period. zzIf the temperature of the operating environment is low and warm-up takes more . indicator lamp lights up during the warm-up period of [INSTALLATION] and [COOLING CONDITION] settings in [PROJECTOR SETUP] menu. 6666 Select the input signal by setting the MAIN POWER switch to the " I " (... scheme of approximately 5 minutes may be turned off automatically. ENGLISH - 39 The POWER indicator lamp on the MAIN POWER switch and the POWER ON ( | ) switch once more than 5 minutes, the projector will judge that a problem has occurred and the power will flash in the screen. If this...
PTDS8500U User Guide
Page 40
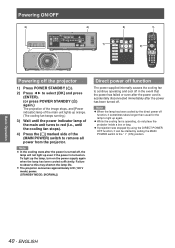
... off in the event that the power has failed or even after the power cord is operating, do not place the projector inside a box or bag. Note zzWhen the lamp has been cooled by the direct power off function, it can be started by using the DIRECT POWER OFF function, it...9668;► to select [OK] and press (ENTER). (or press POWER STANDBY ( ) again.) The projection of the image stops, and [Power indicator] lamp of the (MAIN POWER) switch to remove all power from the projector. ENGLISH zzIf projection was stopped by setting the MAIN POWER switch to the " I " (ON) position. zz The...
... off in the event that the power has failed or even after the power cord is operating, do not place the projector inside a box or bag. Note zzWhen the lamp has been cooled by the direct power off function, it can be started by using the DIRECT POWER OFF function, it...9668;► to select [OK] and press (ENTER). (or press POWER STANDBY ( ) again.) The projection of the image stops, and [Power indicator] lamp of the (MAIN POWER) switch to remove all power from the projector. ENGLISH zzIf projection was stopped by setting the MAIN POWER switch to the " I " (ON) position. zz The...
PTDS8500U User Guide
Page 46
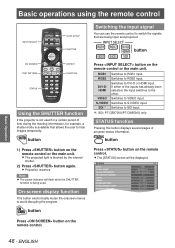
... menus to DVI-D or HDMI input. DVI-D/ HDMI Switches to avoid disrupting the program. SDI Û Switches to RGB1 input. AROUND LAMP TEMP. REMAINING FILTER 46 - button 1111 Press button on the remote control. zzThe [STATUS] screen will flash while the SHUTTER function is... being input and projected. STATUS INPUT SIGNAL NAME SIGNAL FREQUENCY PROJECTOR RUNTIME LAMP1 LAMP2 INTAKE AIR TEMP. RGB1 Switches to SDI input. ½½½ SDI: PT-DZ8700U/PT-DS8500U only STATUS ...
... menus to DVI-D or HDMI input. DVI-D/ HDMI Switches to avoid disrupting the program. SDI Û Switches to RGB1 input. AROUND LAMP TEMP. REMAINING FILTER 46 - button 1111 Press button on the remote control. zzThe [STATUS] screen will flash while the SHUTTER function is... being input and projected. STATUS INPUT SIGNAL NAME SIGNAL FREQUENCY PROJECTOR RUNTIME LAMP1 LAMP2 INTAKE AIR TEMP. RGB1 Switches to SDI input. ½½½ SDI: PT-DZ8700U/PT-DS8500U only STATUS ...
PTDS8500U User Guide
Page 51
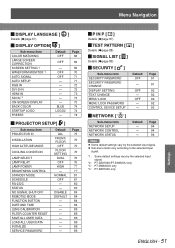
Page 68 69 69 70 71 71 72 72 73 73 73 74 74 74 JJPROJECTOR SETUP[ ] Sub-menu item PROJECTOR ID INSTALLATION HIGH ALTITUDE MODE COOLING CONDITION LAMP SELECT LAMP RELAY LAMP POWER BRIGHTNESS CONTROL STANDBY MODE SCHEDULE RS-232C STATUS NO SIGNAL SHUT-OFF REMOTE2 MODE FUNCTION BUTTON DATE AND TIME LENS CALIBRATION...
Page 68 69 69 70 71 71 72 72 73 73 73 74 74 74 JJPROJECTOR SETUP[ ] Sub-menu item PROJECTOR ID INSTALLATION HIGH ALTITUDE MODE COOLING CONDITION LAMP SELECT LAMP RELAY LAMP POWER BRIGHTNESS CONTROL STANDBY MODE SCHEDULE RS-232C STATUS NO SIGNAL SHUT-OFF REMOTE2 MODE FUNCTION BUTTON DATE AND TIME LENS CALIBRATION...

PTDS8500U User Guide
Page 76
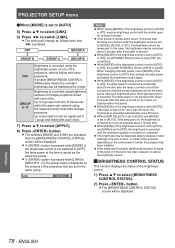
...] is displayed, select [OK] or [CANCEL]. Green→Current setting Yellow→Current setting (when a lamp fails or fails to light) Red→Lamp that are exceeded, the projector will light. Selects a lamp with shorter duration of use ▲▼ to the selected time. If, in the [DUAL] mode, ... has failed to light White→Any other components may result in malfunctions, or the life of the lamp or the other status zzIf the projector is repeatedly used to select cooling condition. 4444 Press button. 5555 When the confirmation message is selected as a result of ...
...] is displayed, select [OK] or [CANCEL]. Green→Current setting Yellow→Current setting (when a lamp fails or fails to light) Red→Lamp that are exceeded, the projector will light. Selects a lamp with shorter duration of use ▲▼ to the selected time. If, in the [DUAL] mode, ... has failed to light White→Any other components may result in malfunctions, or the life of the lamp or the other status zzIf the projector is repeatedly used to select cooling condition. 4444 Press button. 5555 When the confirmation message is selected as a result of ...

PTDS8500U User Guide
Page 77
...; to switch [MODE]. HIGH LOW HIGH LOW Set when high brightness is not performed. BRIGHTNESS CONTROL This projector has a built-in brightness sensor for measuring the lamp power and a function for correcting the screen brightness according to the change as follows each time ◄►...will be displayed. 3333 Press ▲▼ to select [MODE]. 4444 Press ◄► to switch [LAMP POWER]. Nine or more projectors are projected using multiple projectors, or minimize any fluctuations in brightness. zzThe setting time will change as normal once the filter has been replaced ...
...; to switch [MODE]. HIGH LOW HIGH LOW Set when high brightness is not performed. BRIGHTNESS CONTROL This projector has a built-in brightness sensor for measuring the lamp power and a function for correcting the screen brightness according to the change as follows each time ◄►...will be displayed. 3333 Press ▲▼ to select [MODE]. 4444 Press ◄► to switch [LAMP POWER]. Nine or more projectors are projected using multiple projectors, or minimize any fluctuations in brightness. zzThe setting time will change as normal once the filter has been replaced ...
PTDS8500U User Guide
Page 78
...GAIN] value means the constant brightness can be measured. zzIf the shutter is closed within about 8 minutes after the lamp is turned on the environment in which the projector has been installed. ENGLISH LINK GROUP A Note zzWhen setting [MODE] of the brightness control to [OFF], then change... the lens, screen, or inside of the brightness control is set in 1 group and linked with other projectors. zzIf button is pressed while [LINK] is achieved. The lamp power is not measured for more than 25 hours, the brightness is corrected automatically every 25 hours. zzThe ...
...GAIN] value means the constant brightness can be measured. zzIf the shutter is closed within about 8 minutes after the lamp is turned on the environment in which the projector has been installed. ENGLISH LINK GROUP A Note zzWhen setting [MODE] of the brightness control to [OFF], then change... the lens, screen, or inside of the brightness control is set in 1 group and linked with other projectors. zzIf button is pressed while [LINK] is achieved. The lamp power is not measured for more than 25 hours, the brightness is corrected automatically every 25 hours. zzThe ...
PTDS8500U User Guide
Page 80
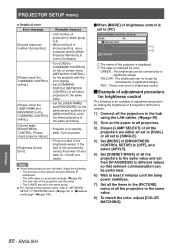
... the hub using the LAN cables. (Æpage 5) 2222 Turn on the power in all projectors. 3333 Ensure [LAMP SELECT] of all the projectors are either all set to [DUAL] or all set to [SINGLE]. 4444 Set [MODE] of [BRIGHTNESS CONTROL SETUP] to [OFF], and select [APPLY]. 5555 Set [... [IP ADDRESS] to different values so that network communication can be performed. 6666 Wait at least 8 minutes until the lamp power stabilizes. 7777 Set all the items in the [PICTURE] menu of the projectors are the same. •• The [LINKS] are not listed, check the following is an example of adjustment...
... the hub using the LAN cables. (Æpage 5) 2222 Turn on the power in all projectors. 3333 Ensure [LAMP SELECT] of all the projectors are either all set to [DUAL] or all set to [SINGLE]. 4444 Set [MODE] of [BRIGHTNESS CONTROL SETUP] to [OFF], and select [APPLY]. 5555 Set [... [IP ADDRESS] to different values so that network communication can be performed. 6666 Wait at least 8 minutes until the lamp power stabilizes. 7777 Set all the items in the [PICTURE] menu of the projectors are the same. •• The [LINKS] are not listed, check the following is an example of adjustment...

PTDS8500U User Guide
Page 81
...menu 9999 Display the internal test pattern [ALL WHITE] on using ◄►. zzThe setting will change as follows each day of all projectors and press button. zzThe setting will start about 10 seconds late. JJHow to No.7. zzYou can set up to 16 commands to each time... ◄► is corrected automatically each day of the week. Note zzThe brightness is pressed. zzIf the brightness fluctuates significantly or the lamp has been replaced, re-adjust the brightness control. STANDBY MODE You can set and press button. 3333 Press ▲▼ to [NORMAL] and...
...menu 9999 Display the internal test pattern [ALL WHITE] on using ◄►. zzThe setting will change as follows each day of all projectors and press button. zzThe setting will start about 10 seconds late. JJHow to No.7. zzYou can set up to 16 commands to each time... ◄► is corrected automatically each day of the week. Note zzThe brightness is pressed. zzIf the brightness fluctuates significantly or the lamp has been replaced, re-adjust the brightness control. STANDBY MODE You can set and press button. 3333 Press ▲▼ to [NORMAL] and...


