Hd Home Cinema Projector
Page 2
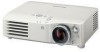
... operate on the power plug. Do not remove 2 - Model number: Serial number: PT-AX100U WARNING: TO REDUCE THE RISK OF FIRE OR ELECTRIC SHOCK, DONOT EXPOSE THIS PRODUCT TO RAIN OR MOISTURE. If you will be found on its bottom. You should note it will help you to use the accessory cord in the literature accompanying the product. Power Supply: This LCD Projector is equipped with your Panasonic LCD projector...
... operate on the power plug. Do not remove 2 - Model number: Serial number: PT-AX100U WARNING: TO REDUCE THE RISK OF FIRE OR ELECTRIC SHOCK, DONOT EXPOSE THIS PRODUCT TO RAIN OR MOISTURE. If you will be found on its bottom. You should note it will help you to use the accessory cord in the literature accompanying the product. Power Supply: This LCD Projector is equipped with your Panasonic LCD projector...
Hd Home Cinema Projector
Page 3
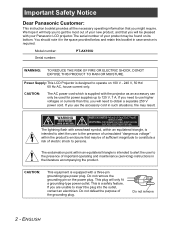
... receiver is encouraged to try to connect PC for the Protection of projector, you use only shielded interface cables when connecting to radio communications. PTV (843 - 9788) This device complies with Part 15 of Conformity Model Number: PT-AX100U Trade Name: Panasonic Responsible party: Panasonic North America Address: One Panasonic Way 4B - 9 Secaucus, New Jersey 07094 Telephone number: 1 - 888 - Any unauthorized changes or modifications to this device...
... receiver is encouraged to try to connect PC for the Protection of projector, you use only shielded interface cables when connecting to radio communications. PTV (843 - 9788) This device complies with Part 15 of Conformity Model Number: PT-AX100U Trade Name: Panasonic Responsible party: Panasonic North America Address: One Panasonic Way 4B - 9 Secaucus, New Jersey 07094 Telephone number: 1 - 888 - Any unauthorized changes or modifications to this device...

Hd Home Cinema Projector
Page 4
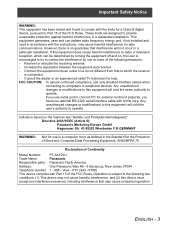
... 6 WARNINGS 6 CAUTIONS 8 Before use 9 Accessories 9 Cautions when transporting 9 Cautions when installing 9 Cautions on use 10 About Your Projector 11 Remote control 11 Projector 12 Getting Started Setting up 14 Screen size and throw distance 14 Projection method 15 Front leg adjuster and throwing angle 15 Lens shift and positioning 16 Connections 18 Before connection to the factory default settings 23 Turning on the button backlight 23 Switching the picture mode 23 Adjusting the image 24 Setting your projector See "Setting up...
... 6 WARNINGS 6 CAUTIONS 8 Before use 9 Accessories 9 Cautions when transporting 9 Cautions when installing 9 Cautions on use 10 About Your Projector 11 Remote control 11 Projector 12 Getting Started Setting up 14 Screen size and throw distance 14 Projection method 15 Front leg adjuster and throwing angle 15 Lens shift and positioning 16 Connections 18 Before connection to the factory default settings 23 Turning on the button backlight 23 Switching the picture mode 23 Adjusting the image 24 Setting your projector See "Setting up...

Hd Home Cinema Projector
Page 5
... 33 KEYSTONE 33 AUTO SETUP 33 OPTION Menu 34 INPUT GUIDE 34 OSD DESIGN 34 OSD POSITION 34 BACK COLOR 34 STARTUP LOGO 34 AUTO SEARCH 34 HDMI SIGNAL LEVEL 34 INSTALLATION 35 SLEEP 35 ALTITUDE 35 LAMP POWER 35 LAMP RUNTIME 35 TEST PATTERN 35 TEMP and LAMP Indicators 36 Controlling alerts 36 Care and Replacement 37 Before cleaning 37 Cleaning your projector 37 Before replacing the Lamp unit 38 When to replace the Lamp...
... 33 KEYSTONE 33 AUTO SETUP 33 OPTION Menu 34 INPUT GUIDE 34 OSD DESIGN 34 OSD POSITION 34 BACK COLOR 34 STARTUP LOGO 34 AUTO SEARCH 34 HDMI SIGNAL LEVEL 34 INSTALLATION 35 SLEEP 35 ALTITUDE 35 LAMP POWER 35 LAMP RUNTIME 35 TEST PATTERN 35 TEMP and LAMP Indicators 36 Controlling alerts 36 Care and Replacement 37 Before cleaning 37 Cleaning your projector 37 Before replacing the Lamp unit 38 When to replace the Lamp...
Hd Home Cinema Projector
Page 9
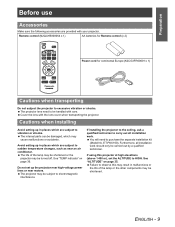
... the lens cover when transporting the projector. Do not set the ALTITUDE to sudden temperature changes, such as near motors. Furthermore, all installation work should only be damaged, which are subject to HIGH. ENGLISH - 9 The projector may be shortened. The life of the lamp or the other components may be turned off. Avoid setting up the projector near high-voltage power lines or near an air conditioner. See "TEMP indicator...
... the lens cover when transporting the projector. Do not set the ALTITUDE to sudden temperature changes, such as near motors. Furthermore, all installation work should only be damaged, which are subject to HIGH. ENGLISH - 9 The projector may be shortened. The life of the lamp or the other components may be turned off. Avoid setting up the projector near high-voltage power lines or near an air conditioner. See "TEMP indicator...
Hd Home Cinema Projector
Page 10
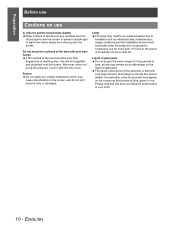
... and projected onto the screen. Preparation Before use Cautions on use In order to get the best picture quality Draw curtains or blinds over any windows and turn off any volatile substances which may appear on the screen as fixed points of blue, green or red. Liquid crystal panel Do not project the same image for more than 10 hours or the power is built with the lens cover...
... and projected onto the screen. Preparation Before use Cautions on use In order to get the best picture quality Draw curtains or blinds over any windows and turn off any volatile substances which may appear on the screen as fixed points of blue, green or red. Liquid crystal panel Do not project the same image for more than 10 hours or the power is built with the lens cover...
Hd Home Cinema Projector
Page 11
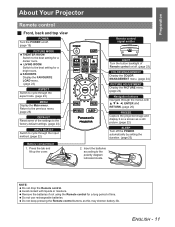
...) PICTURE ADJUSTMENT Display the PICTURE menu. (page 24) Navigation buttons Navigate through the input method. (page 22) Battery compartment 1. Avoid contact with F G H I, ENTER and RETURN. (page 26) FREEZE Capture the projected image and display it on /off the POWER automatically by setting the duration. (page 23) 2. Insert the batteries according to the polarity diagram | { indicated inside. { | NOTE: Do not drop the Remote control. Remote control signal emitter LIGHT Turn the button...
...) PICTURE ADJUSTMENT Display the PICTURE menu. (page 24) Navigation buttons Navigate through the input method. (page 22) Battery compartment 1. Avoid contact with F G H I, ENTER and RETURN. (page 26) FREEZE Capture the projected image and display it on /off the POWER automatically by setting the duration. (page 23) 2. Insert the batteries according to the polarity diagram | { indicated inside. { | NOTE: Do not drop the Remote control. Remote control signal emitter LIGHT Turn the button...
Hd Home Cinema Projector
Page 12
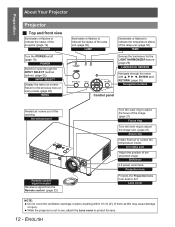
... 2.0 power zoom lens. Projection lens Protects the Projection lens from the Remote control. (page 22) Turn the outer ring to adjust the focus of the projector. (page 19) POWER Turn the POWER on screen. Lens cover NOTE: Do not cover the ventilation openings or place anything within 10 cm (4") of the projected image. Air intake port Adjust the position of them as this opening. While the projector is not in menu mode. (page 26) MENU Illuminates or flashes to indicate the status of the lamp...
... 2.0 power zoom lens. Projection lens Protects the Projection lens from the Remote control. (page 22) Turn the outer ring to adjust the focus of the projector. (page 19) POWER Turn the POWER on screen. Lens cover NOTE: Do not cover the ventilation openings or place anything within 10 cm (4") of the projected image. Air intake port Adjust the position of them as this opening. While the projector is not in menu mode. (page 26) MENU Illuminates or flashes to indicate the status of the lamp...
Hd Home Cinema Projector
Page 13
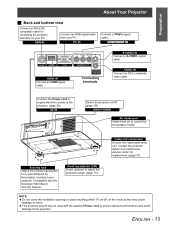
... projector. Connecting terminals VIDEO IN Connect an RCA composite video cable. Lamp unit component Houses the replaceable lamp unit. Connect the Power cord to supply electronic power to the projector. (page 26) AC IN Switch the projector on/off. (page 19) MAIN POWER Air intake port Intake fresh air to protect your projector. Contact the projector dealer or an authorized service center for controlling the projector remotely via your PC. ENGLISH - 13 HDMI IN Connect an HDMI signal cable. PC IN Connect a YPBPR signal cable...
... projector. Connecting terminals VIDEO IN Connect an RCA composite video cable. Lamp unit component Houses the replaceable lamp unit. Connect the Power cord to supply electronic power to the projector. (page 26) AC IN Switch the projector on/off. (page 19) MAIN POWER Air intake port Intake fresh air to protect your projector. Contact the projector dealer or an authorized service center for controlling the projector remotely via your PC. ENGLISH - 13 HDMI IN Connect an HDMI signal cable. PC IN Connect a YPBPR signal cable...
Hd Home Cinema Projector
Page 19
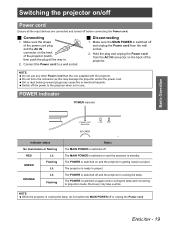
POWER indicator POWER indicator Basic Operation Indicator status No illumination or flashing RED Lit GREEN Flashing Lit ORANGE Lit Flashing Status The MAIN POWER is getting ready to project. The POWER is switched on and the projector is switched off. ENGLISH - 19 Connect the Power cord to projection mode. Hold the plug and unplug the Power cord from the wall socket. 2. Switch off the power to project. The projector is cooling the lamp, do not switch the MAIN POWER off or unplug the Power cord. NOTE: While...
POWER indicator POWER indicator Basic Operation Indicator status No illumination or flashing RED Lit GREEN Flashing Lit ORANGE Lit Flashing Status The MAIN POWER is getting ready to project. The POWER is switched on and the projector is switched off. ENGLISH - 19 Connect the Power cord to projection mode. Hold the plug and unplug the Power cord from the wall socket. 2. Switch off the power to project. The projector is cooling the lamp, do not switch the MAIN POWER off or unplug the Power cord. NOTE: While...
Hd Home Cinema Projector
Page 20
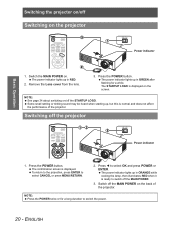
... the projector. The confirmation screen is displayed on the screen. ENGLISH The power indicator lights up in GREEN after flashing for a long duration to switch off the MAIN POWER. 3. Press the POWER button. Press the POWER button. The STARTUP LOGO is displayed. The power indicator lights up , but this is ready to switch the power. 20 - Some small rattling or tinkling sound may be heard when starting up in RED. 2. Remove the Lens cover from the lens. 3. NOTE...
... the projector. The confirmation screen is displayed on the screen. ENGLISH The power indicator lights up in GREEN after flashing for a long duration to switch off the MAIN POWER. 3. Press the POWER button. Press the POWER button. The STARTUP LOGO is displayed. The power indicator lights up , but this is ready to switch the power. 20 - Some small rattling or tinkling sound may be heard when starting up in RED. 2. Remove the Lens cover from the lens. 3. NOTE...
Hd Home Cinema Projector
Page 21
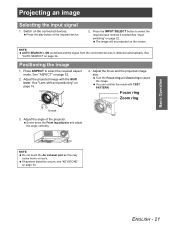
... the Air exhaust port as default and the signal from the connected devices is ON as this may cause burns or injury. ENGLISH - 21 Press the INPUT SELECT button to select the required aspect mode. See "AUTO SEARCH" on the connected devices. Adjust the angle of the required device. 2. Press the play button of the projector. Switch on page 34. Basic Operation Projecting an image Selecting the input signal...
... the Air exhaust port as default and the signal from the connected devices is ON as this may cause burns or injury. ENGLISH - 21 Press the INPUT SELECT button to select the required aspect mode. See "AUTO SEARCH" on the connected devices. Adjust the angle of the required device. 2. Press the play button of the projector. Switch on page 34. Basic Operation Projecting an image Selecting the input signal...

Hd Home Cinema Projector
Page 24
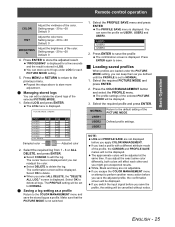
...-SYSTEM J Create a new profile Q Adjusting the selected color Select a color and adjust COLOR, TINT and BRIGHTNESS. 1. Press the COLOR MANAGEMENT button to switch between PICTURE and ADVANCED menu. The menu items are displayed on the left of the PICTURE or ADVANCED menu items by pressing the PICTURE ADJUSTMENT button. Basic Operation Remote control operation Adjusting the image You can adjust a selected color individually and save and retrieve under the PICTURE MODE setting. Setting your own color profile You can display one of...
...-SYSTEM J Create a new profile Q Adjusting the selected color Select a color and adjust COLOR, TINT and BRIGHTNESS. 1. Press the COLOR MANAGEMENT button to switch between PICTURE and ADVANCED menu. The menu items are displayed on the left of the PICTURE or ADVANCED menu items by pressing the PICTURE ADJUSTMENT button. Basic Operation Remote control operation Adjusting the image You can adjust a selected color individually and save and retrieve under the PICTURE MODE setting. Setting your own color profile You can display one of...
Hd Home Cinema Projector
Page 25
... you might get unexpected results. If you switch the input signal before you adjust the exact same color differently, both colors will be displayed. Press MENU or RETURN to return to save . The cursor menu is stored in LOG. Press ENTER to the previous menu. Basic Operation Remote control operation COLOR Adjust the vividness of the selected PICTURE MODE will affect each PICTURE MODE setting. 5. Select LOG and press ENTER. J Loading...
... you might get unexpected results. If you switch the input signal before you adjust the exact same color differently, both colors will be displayed. Press MENU or RETURN to return to save . The cursor menu is stored in LOG. Press ENTER to the previous menu. Basic Operation Remote control operation COLOR Adjust the vividness of the selected PICTURE MODE will affect each PICTURE MODE setting. 5. Select LOG and press ENTER. J Loading...
Hd Home Cinema Projector
Page 29
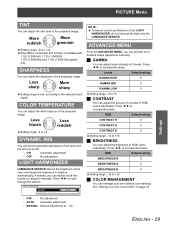
... color settings. Less bluish Less reddish Setting range: -6 to +16 J BRIGHTNESS You can switch automatic adjustment of the lamp and the lens iris on /off . • ON: Automatic adjustment • OFF: No adjustment LIGHT HARMONIZER LUMINANCE SENSOR detects the brightness of the room and keeps the luminance in RGB colors individually. PICTURE Menu TINT You can adjust the white balance of the projected image. Less sharp More sharp Setting...
... color settings. Less bluish Less reddish Setting range: -6 to +16 J BRIGHTNESS You can switch automatic adjustment of the lamp and the lens iris on /off . • ON: Automatic adjustment • OFF: No adjustment LIGHT HARMONIZER LUMINANCE SENSOR detects the brightness of the room and keeps the luminance in RGB colors individually. PICTURE Menu TINT You can adjust the white balance of the projected image. Less sharp More sharp Setting...
Hd Home Cinema Projector
Page 35
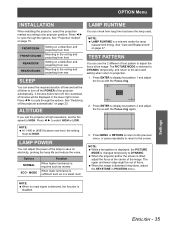
... POWER of minutes will be displayed in POSITION menu. Press ENTER to the projector position. The upper and lower edge might be HIGH. When the image is changed temporarily to the screen. You can check how long time has been the lamp used setting when return to display test pattern 2 and adjust the focus with the Focus ring. OPTION Menu INSTALLATION LAMP RUNTIME When installing the projector, select the projection method according to display...
... POWER of minutes will be displayed in POSITION menu. Press ENTER to the projector position. The upper and lower edge might be HIGH. When the image is changed temporarily to the screen. You can check how long time has been the lamp used setting when return to display test pattern 2 and adjust the focus with the Focus ring. OPTION Menu INSTALLATION LAMP RUNTIME When installing the projector, select the projection method according to display...
Hd Home Cinema Projector
Page 36
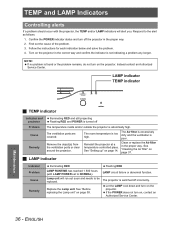
... of the problem. 3. See "Setting up" on page 37. Confirm the POWER indicator status and turn on page 38. See "Cleaning the Air filter" on page 14. See "Before replacing the Lamp unit" on the projector. Reinstall the projector at a temperature controlled place. TEMP and LAMP Indicators Controlling alerts If a problem should occur with LAMP POWER set to NORMAL). J LAMP indicator Indicator Problem Cause Remedy Illuminating RED Flashing RED LAMP RUNTIME has reached 1 800 hours (with the projector, the TEMP and/or LAMP indicators will run...
... of the problem. 3. See "Setting up" on page 37. Confirm the POWER indicator status and turn on page 38. See "Cleaning the Air filter" on page 14. See "Before replacing the Lamp unit" on the projector. Reinstall the projector at a temperature controlled place. TEMP and LAMP Indicators Controlling alerts If a problem should occur with LAMP POWER set to NORMAL). J LAMP indicator Indicator Problem Cause Remedy Illuminating RED Flashing RED LAMP RUNTIME has reached 1 800 hours (with the projector, the TEMP and/or LAMP indicators will run...
Hd Home Cinema Projector
Page 39
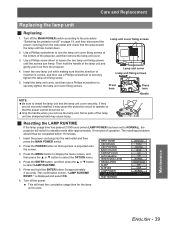
... installed, it out from the wall outlet and check that a picture is projected onto the screen. 3. is correct, and then use a Phillips screwdriver to select the OPTION menu. 4. Then hold the ENTER button for the lamp unit to standby mode after approximately 10 minutes of the projector, and then remove the lamp unit cover. 3. J Resetting the LAMP RUNTIME If the lamp usage time has passed 2 000 hours (when LAMP POWER has been set...
... installed, it out from the wall outlet and check that a picture is projected onto the screen. 3. is correct, and then use a Phillips screwdriver to select the OPTION menu. 4. Then hold the ENTER button for the lamp unit to standby mode after approximately 10 minutes of the projector, and then remove the lamp unit cover. 3. J Resetting the LAMP RUNTIME If the lamp usage time has passed 2 000 hours (when LAMP POWER has been set...
Hd Home Cinema Projector
Page 40
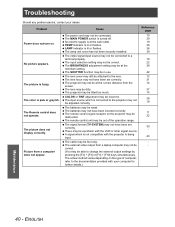
... power cord may not be connected to a terminal properly. LAMP indicator is fuzzy. The video signal input source may not be dirty. The input selection setting may not be connected. The lens may be too long. The batteries may be correct. The cable may be adjusted correctly. Problem Cause Power does not turn on the type of the operation range. Picture from the screen. The input source which is not compatible with the projector...
... power cord may not be connected to a terminal properly. LAMP indicator is fuzzy. The video signal input source may not be dirty. The input selection setting may not be connected. The lens may be too long. The batteries may be correct. The cable may be adjusted correctly. Problem Cause Power does not turn on the type of the operation range. Picture from the screen. The input source which is not compatible with the projector...
Hd Home Cinema Projector
Page 51
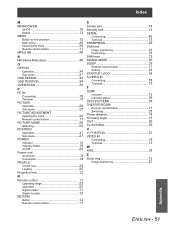
... IN Connecting 18 Terminal 13 PICTURE Operation 28 Sub-menu 27 PICTURE ADJUSTMENT Opening the menu 24 Remote control button 11 PICTURE MODE 28 Switching 23 POSITION Operation 31 Sub-menu 27 POWER Indicator 12 Indicator status 19 On/Off 20 Power cord Accessory 9 Connection 19 PROFILE Create new 24 Loading 25 Projection lens 12 R Remote control 11 Operating range 22 Operation 22 Signal emitter 11 Signal receptor 12 RETURN Button 12 Remote control button 11 S Screen size 14 Security lock 13 SERIAL Connecting 42 Terminal 13 SHARPNESS 29 Shift lens Image positioning...
... IN Connecting 18 Terminal 13 PICTURE Operation 28 Sub-menu 27 PICTURE ADJUSTMENT Opening the menu 24 Remote control button 11 PICTURE MODE 28 Switching 23 POSITION Operation 31 Sub-menu 27 POWER Indicator 12 Indicator status 19 On/Off 20 Power cord Accessory 9 Connection 19 PROFILE Create new 24 Loading 25 Projection lens 12 R Remote control 11 Operating range 22 Operation 22 Signal emitter 11 Signal receptor 12 RETURN Button 12 Remote control button 11 S Screen size 14 Security lock 13 SERIAL Connecting 42 Terminal 13 SHARPNESS 29 Shift lens Image positioning...


