
Operating Instructions
Page 4
... adjust the lens position to use ADVANCED MENU 32 DIGITAL CINEMA REALITY 32 BLANKING 32 INPUT RESOLUTION 32 CLAMP POS 32 4 RASTER POSITION 33 XGA MODE 33 SXGA MODE 33 Changing the display language 33 OPTION1 settings 34 COLOR CORRECTION 34 CONTRAST MODE 34 AUTO SIGNAL 34 BACK COLOR 34 SUB MEMORY LIST 34 DVI EDID 34 OPTION2 settings 35 ID 35 FRONT/REAR 35 DESK/CEILING 35 LAMP SELECT 35 LAMP POWER...
... adjust the lens position to use ADVANCED MENU 32 DIGITAL CINEMA REALITY 32 BLANKING 32 INPUT RESOLUTION 32 CLAMP POS 32 4 RASTER POSITION 33 XGA MODE 33 SXGA MODE 33 Changing the display language 33 OPTION1 settings 34 COLOR CORRECTION 34 CONTRAST MODE 34 AUTO SIGNAL 34 BACK COLOR 34 SUB MEMORY LIST 34 DVI EDID 34 OPTION2 settings 35 ID 35 FRONT/REAR 35 DESK/CEILING 35 LAMP SELECT 35 LAMP POWER...
Operating Instructions
Page 8
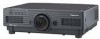
... temperature of burst increases when the lamp is used beyond the replacement time. • If the projector is to be supported only by its bottom panel and by none of this product. When using it may burst shortly after the first lighting. • The possibility of the projector may be magnified and projected on the screen. Precautions on handling Precautions on use To view clear images...
... temperature of burst increases when the lamp is used beyond the replacement time. • If the projector is to be supported only by its bottom panel and by none of this product. When using it may burst shortly after the first lighting. • The possibility of the projector may be magnified and projected on the screen. Precautions on handling Precautions on use To view clear images...
Operating Instructions
Page 9
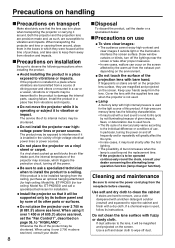
... remote control. LENS button (page 25) Switches to freeze the image temporarily. Operation mode selector (Computer/Numeric, Projector) switch (page 15) Put this button while projecting an image automatically corrects the picture positioning on the screen. POWER ON ( I ) button (page 23) Turns on the power if the MAIN POWER has been put to toggle through the RGB1, RGB2, DVI-D, VIDEO and S-VIDEO input ports. POWER OFF ( ) button (page 24) Turns off the on the menu screen, change setting and adjust the level. Input...
... remote control. LENS button (page 25) Switches to freeze the image temporarily. Operation mode selector (Computer/Numeric, Projector) switch (page 15) Put this button while projecting an image automatically corrects the picture positioning on the screen. POWER ON ( I ) button (page 23) Turns on the power if the MAIN POWER has been put to toggle through the RGB1, RGB2, DVI-D, VIDEO and S-VIDEO input ports. POWER OFF ( ) button (page 24) Turns off the on the menu screen, change setting and adjust the level. Input...
Operating Instructions
Page 11
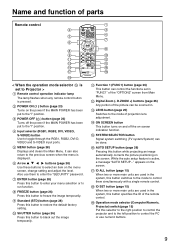
... remote control. conversely, turn it counterclockwise to move the screen to replace lamp unit 1 is reached. Focus ring (page 25) For focus adjustment. LAMP1 monitor (page 41) This lamp lights up when the time to remove the projection lens. It also blinks if something unusual occurs in red when the MAIN POWER switch is turned to adjust the tilt of the internal temperature. Ventilation holes Attention • Do not remove the upper cover (white top panel...
... remote control. conversely, turn it counterclockwise to move the screen to replace lamp unit 1 is reached. Focus ring (page 25) For focus adjustment. LAMP1 monitor (page 41) This lamp lights up when the time to remove the projection lens. It also blinks if something unusual occurs in red when the MAIN POWER switch is turned to adjust the tilt of the internal temperature. Ventilation holes Attention • Do not remove the upper cover (white top panel...
Operating Instructions
Page 12
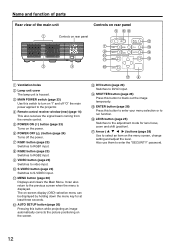
... the menu key for lens focus, zoom and shift (position). Arrow ( ) buttons (page 28) Use to run function. Name and function of parts Rear view of the main unit Controls on rear panel Controls on rear panel Ventilation holes Lamp unit cover The lamp unit is displayed. MAIN POWER switch (page 23) Use this button to enter your menu selection or to select an item on the menu screen, change setting and adjust the level. Remote control receiver window...
... the menu key for lens focus, zoom and shift (position). Arrow ( ) buttons (page 28) Use to run function. Name and function of parts Rear view of the main unit Controls on rear panel Controls on rear panel Ventilation holes Lamp unit cover The lamp unit is displayed. MAIN POWER switch (page 23) Use this button to enter your menu selection or to select an item on the menu screen, change setting and adjust the level. Remote control receiver window...

Operating Instructions
Page 23
....) Remove the lens cover beforehand. The temperature monitor (TEMP) lights during the warm-up the projector. (Refer to display a focus adjustment screen. Select and set the projection scheme. (Refer to page 35.) Select the input signal by pressing the input selector button to toggle through RGB1, RGB2, VIDEO, S-VIDEO and DVI. [on the main unit or the remote control] Fit the image size to adjust the direction of the lens on the lens zoom adjustment menu. Display the zoom adjustment menu again and adjust...
....) Remove the lens cover beforehand. The temperature monitor (TEMP) lights during the warm-up the projector. (Refer to display a focus adjustment screen. Select and set the projection scheme. (Refer to page 35.) Select the input signal by pressing the input selector button to toggle through RGB1, RGB2, VIDEO, S-VIDEO and DVI. [on the main unit or the remote control] Fit the image size to adjust the direction of the lens on the lens zoom adjustment menu. Display the zoom adjustment menu again and adjust...

Operating Instructions
Page 24
... the lamp to red (i.e., until the power indicator of the MAIN POWER switch to continue operating and cool off in red) • If you re-power the projector after a while. 24 Direct power off function The power supplied internally causes the cooling fan to remove all power from the projector. Turning on the power supply with or button and press the ENTER button. (or press the POWER OFF " " button again.) The projection of the image stops...
... the lamp to red (i.e., until the power indicator of the MAIN POWER switch to continue operating and cool off in red) • If you re-power the projector after a while. 24 Direct power off function The power supplied internally causes the cooling fan to remove all power from the projector. Turning on the power supply with or button and press the ENTER button. (or press the POWER OFF " " button again.) The projection of the image stops...

Operating Instructions
Page 26
... 26 digital zoom is recommended to be zoomed in . Avoid supplying images that are clear in digital 42 zoom mode, the projector will exit digital zoom function. • The combined magnification of the remote control or the main unit. D.ZOOM +" button. Change the magnification with blurred edges or dark images are input. With Composite sync and G-SYNC sync signals and some types of the picture on the screen can be used to perform these automatic adjustments. D.ZOOM...
... 26 digital zoom is recommended to be zoomed in . Avoid supplying images that are clear in digital 42 zoom mode, the projector will exit digital zoom function. • The combined magnification of the remote control or the main unit. D.ZOOM +" button. Change the magnification with blurred edges or dark images are input. With Composite sync and G-SYNC sync signals and some types of the picture on the screen can be used to perform these automatic adjustments. D.ZOOM...

Operating Instructions
Page 27
... ID FRONT/REAR DESK/CEILING LAMP SELECT LAMP POWER RS232C SYSTEM INFORMATION FAN CONTROL1 FAN CONTROL2 FUNC1 AUTO POW. WHITE GAIN SHARPNESS NR AI TV-SYSTEM SELECT PICTURE ADJ STANDARD 32 32 32 32 DEFAULT 05 06 ON ON AUTO1 RETRN For DVI signals PICTURE MODE BRIGHT CONTRAST COLOR TEMP. On-screen menus Structure of menu screens Menus are extensively used for configuring, adjusting or reconfiguring the projector. DISABLE RETRN OPTION1...
... ID FRONT/REAR DESK/CEILING LAMP SELECT LAMP POWER RS232C SYSTEM INFORMATION FAN CONTROL1 FAN CONTROL2 FUNC1 AUTO POW. WHITE GAIN SHARPNESS NR AI TV-SYSTEM SELECT PICTURE ADJ STANDARD 32 32 32 32 DEFAULT 05 06 ON ON AUTO1 RETRN For DVI signals PICTURE MODE BRIGHT CONTRAST COLOR TEMP. On-screen menus Structure of menu screens Menus are extensively used for configuring, adjusting or reconfiguring the projector. DISABLE RETRN OPTION1...

Operating Instructions
Page 31
... not match the source video's aspect ratio, you are finished with keystone adjustment, adjust vertical linearity with the or button. CLOCK PHASE (For RGB/YPBPR signals only) Clock phase adjustment allows the user to match that of focus. Note • When projecting signals whose dot clock frequency is 108 MHz or higher, the noise may be changed and the resulting enlarged image displayed. : The enlargement ratio...
... not match the source video's aspect ratio, you are finished with keystone adjustment, adjust vertical linearity with the or button. CLOCK PHASE (For RGB/YPBPR signals only) Clock phase adjustment allows the user to match that of focus. Note • When projecting signals whose dot clock frequency is 108 MHz or higher, the noise may be changed and the resulting enlarged image displayed. : The enlargement ratio...

Operating Instructions
Page 34
... MODE There are input frequently such as when the projector is used at a conference. BLACK: Set screen color to blue. Press the ENTER button. AUTO SIGNAL The position where the screen is displayed can be adjusted automatically without pressing the AUTO SETUP button on the remote control each of the screen when no signal is set to normal and the brightness to OFF. BLUE: Set screen color to black. SUB MEMORY LIST Multiple sets of image adjustment data (PICTURE, POSITION, ADVANCED MENU adjustment...
... MODE There are input frequently such as when the projector is used at a conference. BLACK: Set screen color to blue. Press the ENTER button. AUTO SIGNAL The position where the screen is displayed can be adjusted automatically without pressing the AUTO SETUP button on the remote control each of the screen when no signal is set to normal and the brightness to OFF. BLUE: Set screen color to black. SUB MEMORY LIST Multiple sets of image adjustment data (PICTURE, POSITION, ADVANCED MENU adjustment...

Operating Instructions
Page 35
... the projection lamp can be replaced more projectors either lamps is always used simultaneously. LAMP SELECT "LAMP SELECT" is used to choose from one projector is set when only one status to another Red Lamp that helps the user to be controlled by default. For details on user's needs or viewing conditions. LAMP2 : Lamp Unit 2 is used . LAMP POWER The luminance of the above settings is selected, it is possible to reduce power consumption, reduce operating noise...
... the projection lamp can be replaced more projectors either lamps is always used simultaneously. LAMP SELECT "LAMP SELECT" is used to choose from one projector is set when only one status to another Red Lamp that helps the user to be controlled by default. For details on user's needs or viewing conditions. LAMP2 : Lamp Unit 2 is used . LAMP POWER The luminance of the above settings is selected, it is possible to reduce power consumption, reduce operating noise...
Operating Instructions
Page 37
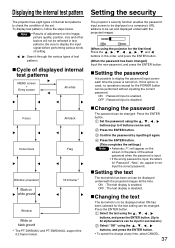
... ENTER button. Changing the password The password can be displayed underneath the projected images all the time. Displaying the internal test pattern The projector has eight types of internal test patterns to check the condition of the set ). Be sure to display the input signal before performing various kinds of setting. : Search through the various types of test patterns Cycle of displayed internal test patterns MENU screen + Entry screen All white Focus...
... ENTER button. Changing the password The password can be displayed underneath the projected images all the time. Displaying the internal test pattern The projector has eight types of internal test patterns to check the condition of the set ). Be sure to display the input signal before performing various kinds of setting. : Search through the various types of test patterns Cycle of displayed internal test patterns MENU screen + Entry screen All white Focus...
Operating Instructions
Page 41
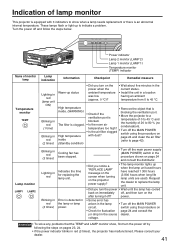
...). (Standby condition) Lamp monitor LAMP1 LAMP2 Blinking in red (3 times) Lighting in red Blinking in red (3 times), the projector has malfunctioned. Attention • To solve any problems that is blocked. • Is the room air temperature too high? • Is the air filter clogged with 3 indicators to 45 °C. These lamps flash or light up to replace the lamp unit. • Did you turn the power off the MAIN POWER switch using the procedure on • Check for replacing the lamp...
...). (Standby condition) Lamp monitor LAMP1 LAMP2 Blinking in red (3 times) Lighting in red Blinking in red (3 times), the projector has malfunctioned. Attention • To solve any problems that is blocked. • Is the room air temperature too high? • Is the air filter clogged with 3 indicators to 45 °C. These lamps flash or light up to replace the lamp unit. • Did you turn the power off the MAIN POWER switch using the procedure on • Check for replacing the lamp...

Operating Instructions
Page 43
... remote control button is operated.) After the time of lamp unit. (The indication on -screen indication will appear for at "HIGH"), power supply will disappear after 1 300 hours 2 (with a new unit. Therefore, it is 3 800 hours when long life lamp units are used for the user to keep a spare bulb. Indication after the replacement time, the lamp may reduce their life affected by the times of the lamp unit have reached 1 300 hours 2, lamp monitor (LAMP1 or LAMP2) light up including standby...
... remote control button is operated.) After the time of lamp unit. (The indication on -screen indication will appear for at "HIGH"), power supply will disappear after 1 300 hours 2 (with a new unit. Therefore, it is 3 800 hours when long life lamp units are used for the user to keep a spare bulb. Indication after the replacement time, the lamp may reduce their life affected by the times of the lamp unit have reached 1 300 hours 2, lamp monitor (LAMP1 or LAMP2) light up including standby...
Operating Instructions
Page 47
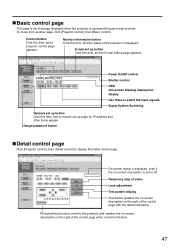
... video Lens adjustment Test pattern display This button updates the on-screen description on the right of the projector is finished. 47 E-mail set up button Click this item, and a projector control page appears. Basic control page This page is the first page displayed when the projector is set up page for IP address and other items appear. Power On/Off control Shutter control OSD (On-screen Display) display/nondisplay Use these buttons controls the projector and updates...
... video Lens adjustment Test pattern display This button updates the on-screen description on the right of the projector is finished. 47 E-mail set up button Click this item, and a projector control page appears. Basic control page This page is the first page displayed when the projector is set up page for IP address and other items appear. Power On/Off control Shutter control OSD (On-screen Display) display/nondisplay Use these buttons controls the projector and updates...
Operating Instructions
Page 49
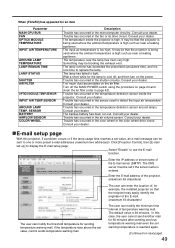
... e-mail message can enter the location of, for example, the installed projector so that the projector is being used to detect the input air temperature. The user can modify the threshold temperature for 60 minutes after sending previous temperature warning mail even the set warning temperature is now time to page 42). When [FAILED] has appeared for the lamp to cool off the MAIN POWER switch using the procedure on the air filter...
... e-mail message can enter the location of, for example, the installed projector so that the projector is being used to detect the input air temperature. The user can modify the threshold temperature for 60 minutes after sending previous temperature warning mail even the set warning temperature is now time to page 42). When [FAILED] has appeared for the lamp to cool off the MAIN POWER switch using the procedure on the air filter...

Operating Instructions
Page 51
... server address Available input characters: Numbers (0 - 9), period (.) (ex. 192.168.0.253) Secondary DNS server address Available input characters: Numbers (0 - 9), period (.) (ex. 192.168.0.254) Button to update settings POP server setup page The POP server is set on this setting only when authentication is connected to be tested. DNS server set up page Click [Network set up], then [DNS server set up] to display the DNS server set up...
... server address Available input characters: Numbers (0 - 9), period (.) (ex. 192.168.0.253) Secondary DNS server address Available input characters: Numbers (0 - 9), period (.) (ex. 192.168.0.254) Button to update settings POP server setup page The POP server is set on this setting only when authentication is connected to be tested. DNS server set up page Click [Network set up], then [DNS server set up] to display the DNS server set up...

Operating Instructions
Page 54
...; Class 1. INFO ? The operations mentioned below . 0 = Error not detected 1 = Warning 2 = Error Parameter First number (digits 1 to lamp error; NAME ? Using the PJLink™ protocol The network functions of the projector are as the password set in the Web Browser Control. one of 0 to 2 3rd byte: Refers to some other countries and regions. Lamp status inquiry INST ? one of 0 to fan error; Input selection list inquiry Projector name inquiry Manufacturer's name...
...; Class 1. INFO ? The operations mentioned below . 0 = Error not detected 1 = Warning 2 = Error Parameter First number (digits 1 to lamp error; NAME ? Using the PJLink™ protocol The network functions of the projector are as the password set in the Web Browser Control. one of 0 to 2 3rd byte: Refers to some other countries and regions. Lamp status inquiry INST ? one of 0 to fan error; Input selection list inquiry Projector name inquiry Manufacturer's name...

Operating Instructions
Page 55
... No image Image is blurred Light color/ bad color tone Remote control does not operate Abnormal image Does not display images from PCs Checks • Is the power cord plug correctly plugged in? • Is the MAIN POWER turned on? • Is electricity running to the power outlet? • Is the temperature monitor (TEMP) indicator on the front of the unit flashing or turned on? (See page 41) • Is the lamp monitor (LAMP) indicator...
... No image Image is blurred Light color/ bad color tone Remote control does not operate Abnormal image Does not display images from PCs Checks • Is the power cord plug correctly plugged in? • Is the MAIN POWER turned on? • Is electricity running to the power outlet? • Is the temperature monitor (TEMP) indicator on the front of the unit flashing or turned on? (See page 41) • Is the lamp monitor (LAMP) indicator...


