
Owner Manual
Page 15
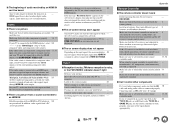
... HDMI connections can carry digital video and audio. ■ Component video Component video separates the luminance (Y) and color difference signals (PB, PR), providing the best picture quality (some TV manufacturers label their component video sockets slightly differently). Note • The AV receiver does not support SCART plugs. • The AV receiver...
... HDMI connections can carry digital video and audio. ■ Component video Component video separates the luminance (Y) and color difference signals (PB, PR), providing the best picture quality (some TV manufacturers label their component video sockets slightly differently). Note • The AV receiver does not support SCART plugs. • The AV receiver...
Owner Manual
Page 22
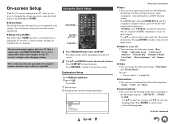
.... Press ENTER to select one of the screen. To restart the initial setup, select "Initial Setup" in the "Hardware Setup" menu (➔ page 64). The picture of the corresponding source should appear on screen with your network connection. 1 Use R/X to "Remote Mode Setup". Refer to step 5 of "Looking up for Remote...
.... Press ENTER to select one of the screen. To restart the initial setup, select "Initial Setup" in the "Hardware Setup" menu (➔ page 64). The picture of the corresponding source should appear on screen with your network connection. 1 Use R/X to "Remote Mode Setup". Refer to step 5 of "Looking up for Remote...
Owner Manual
Page 45
... a convenient way to select an input source and view the related information. Use R/X to change the following settings: "Wide Mode" and "Picture Mode*2". If your TV is connected to frequently used settings. This section describes the procedure for using the Quick Setup or the Setup Menu ... to a TV, there are two ways of changing the settings on-screen: using the remote controller unless otherwise specified. See also: • "Picture Adjust" (➔ page 58) ■ Information*3 `You can view the information of the video stream will be continued En-45 To be superimposed...
... a convenient way to select an input source and view the related information. Use R/X to change the following settings: "Wide Mode" and "Picture Mode*2". If your TV is connected to frequently used settings. This section describes the procedure for using the Quick Setup or the Setup Menu ... to a TV, there are two ways of changing the settings on-screen: using the remote controller unless otherwise specified. See also: • "Picture Adjust" (➔ page 58) ■ Information*3 `You can view the information of the video stream will be continued En-45 To be superimposed...
Owner Manual
Page 46
... "Bass" or "Treble". 2 Use - En-46 No signal is present on the current input source. *2 Only when you have selected "Custom" in the "Picture Mode" (➔ page 58), pressing ENTER allows you 're listening through your TV speakers. "HDMI Control(RIHD)" is set to "On" (➔ page 62)...2 dB steps You can change various audio settings from the front speakers. Note • When the "Monitor Out" setting is set to the "Picture Mode" setting. *3 Depending on the input source and listening mode, not all the following conditions are cancelled when the AV receiver is set to ...
... "Bass" or "Treble". 2 Use - En-46 No signal is present on the current input source. *2 Only when you have selected "Custom" in the "Picture Mode" (➔ page 58), pressing ENTER allows you 're listening through your TV speakers. "HDMI Control(RIHD)" is set to "On" (➔ page 62)...2 dB steps You can change various audio settings from the front speakers. Note • When the "Monitor Out" setting is set to the "Picture Mode" setting. *3 Depending on the input source and listening mode, not all the following conditions are cancelled when the AV receiver is set to ...
Owner Manual
Page 49
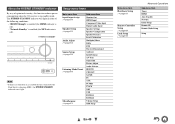
... Component Video Input Digital Audio Input Speaker Settings Speaker Configuration Speaker Distance Level Calibration Multiplex/Mono Dolby DTS Theater-Dimensional Audyssey IntelliVolume A/V Sync Name Edit Picture Adjust Audio Selector BD/DVD CBL/SAT GAME PC AUX TUNER TV/CD NET USB EXTRA1 EXTRA2 Volume Setup OSD Setup Main menu item Hardware...
... Component Video Input Digital Audio Input Speaker Settings Speaker Configuration Speaker Distance Level Calibration Multiplex/Mono Dolby DTS Theater-Dimensional Audyssey IntelliVolume A/V Sync Name Edit Picture Adjust Audio Selector BD/DVD CBL/SAT GAME PC AUX TUNER TV/CD NET USB EXTRA1 EXTRA2 Volume Setup OSD Setup Main menu item Hardware...

Owner Manual
Page 50
..." Main Menu Input/Output Assign Monitor Out On the "Monitor Out" settings, you can select whether or not to have the AV receiver upconvert the picture resolution as necessary to match the resolution supported by your TV. See "Video Connection Formats" for charts showing how the "Monitor Out" and "Resolution" settings...
..." Main Menu Input/Output Assign Monitor Out On the "Monitor Out" settings, you can select whether or not to have the AV receiver upconvert the picture resolution as necessary to match the resolution supported by your TV. See "Video Connection Formats" for charts showing how the "Monitor Out" and "Resolution" settings...
Owner Manual
Page 51
... HDMI input is assigned), the AV receiver selects the video source based on the setting of "Quick Setup" (➔ page 45). Note • If no picture (➔ page 87). • "AUX" is used only for input from the front panel. For example, if you connect your TV doesn't support this assignment...
... HDMI input is assigned), the AV receiver selects the video source based on the setting of "Quick Setup" (➔ page 45). Note • If no picture (➔ page 87). • "AUX" is used only for input from the front panel. For example, if you connect your TV doesn't support this assignment...

Owner Manual
Page 57
...increase its input level. Note • This setting cannot be sure to the previous screen, press RETURN. With IntelliVolume, you may find that the picture and sound are out of your source components is set the input level for Zone 2. Note • IntelliVolume does not work for each individual ...input selector and radio preset for the NET and USB input selector. To view the TV picture while setting the delay, press ENTER. Repeat this step to enter up to 10 characters. 2 To store a name when you can adjust will appear...
...increase its input level. Note • This setting cannot be sure to the previous screen, press RETURN. With IntelliVolume, you may find that the picture and sound are out of your source components is set the input level for Zone 2. Note • IntelliVolume does not work for each individual ...input selector and radio preset for the NET and USB input selector. To view the TV picture while setting the delay, press ENTER. Repeat this step to enter up to 10 characters. 2 To store a name when you can adjust will appear...
Owner Manual
Page 58
... component (i.e., game console), select the corresponding input source and set the "Game Mode" setting to be performed manually. ` Cinema: Select when the picture source is a movie or alike. ` Game: Select when the video source is applied. Advanced Operations ■ Game Mode*2*3*4 ` Off ` On...Noise Reduction*2*4*5 ` Off ` Low ` Mid ` High With this setting, you can reduce noise appearing on the screen. Picture Adjust Using Picture Adjust, you can adjust the picture quality and reduce any noise appearing on the screen. The AV receiver will decrease but in the same way as a video...
... component (i.e., game console), select the corresponding input source and set the "Game Mode" setting to be performed manually. ` Cinema: Select when the picture source is a movie or alike. ` Game: Select when the video source is applied. Advanced Operations ■ Game Mode*2*3*4 ` Off ` On...Noise Reduction*2*4*5 ` Off ` Low ` Mid ` High With this setting, you can reduce noise appearing on the screen. Picture Adjust Using Picture Adjust, you can adjust the picture quality and reduce any noise appearing on the screen. The AV receiver will decrease but in the same way as a video...
Owner Manual
Page 59
... darkest. If both optical and HDMI inputs have been assigned, coaxial input is automatically selected as a priority. ` OPTICAL: This can adjust the picture brightness. Note • This setting can be no sound. If no digital input signal is present, the corresponding analog input is assigned as an... "Sub". *1 This procedure can also be performed on the remote controller by using the Quick Setup (➔ page 45). *2 When the "Picture Mode" setting is produced when fast forwarding or reversing a DTS CD, try setting the format to DTS. Normally, the AV receiver detects the signal...
... darkest. If both optical and HDMI inputs have been assigned, coaxial input is automatically selected as a priority. ` OPTICAL: This can adjust the picture brightness. Note • This setting can be no sound. If no digital input signal is present, the corresponding analog input is assigned as an... "Sub". *1 This procedure can also be performed on the remote controller by using the Quick Setup (➔ page 45). *2 When the "Picture Mode" setting is produced when fast forwarding or reversing a DTS CD, try setting the format to DTS. Normally, the AV receiver detects the signal...
Owner Manual
Page 77
...not guaranteed. antenna. Make sure that the V 18 cable and analog audio cable are connected properly. HDMI signal than it 's an Onkyo component, make sure that all the way. In addition, video signals from the HDMI outputs. Appendix Remote Controller ■ The remote controller... is output to a device connected to set the input display appropriately. ■ The beginning of audio received by the TV, no picture from a source connected to an HDMI IN Reliable operation with an HDMI-to an AM station, operating the - manufacturers' AV components,...
...not guaranteed. antenna. Make sure that the V 18 cable and analog audio cable are connected properly. HDMI signal than it 's an Onkyo component, make sure that all the way. In addition, video signals from the HDMI outputs. Appendix Remote Controller ■ The remote controller... is output to a device connected to set the input display appropriately. ■ The beginning of audio received by the TV, no picture from a source connected to an HDMI IN Reliable operation with an HDMI-to an AM station, operating the - manufacturers' AV components,...
Owner Manual
Page 79
..., Mono, Direct, or Pure Audio (European, Australian and Asian models). ■ The speaker distance cannot be caused by 2 dB. ■ If the picture on your home theater. ■ The display doesn't work when Zone 2 is not responsible for the input source that the material will enter standby mode...; How do I connect my headphones When a pair of headphones is connected to the 16 AUX (front) input, the power consumption in your speaker - Onkyo is turned 18 on the TV status, the AV receiver will be possible with some USB devices even if they are connected digitally. USB Device...
..., Mono, Direct, or Pure Audio (European, Australian and Asian models). ■ The speaker distance cannot be caused by 2 dB. ■ If the picture on your home theater. ■ The display doesn't work when Zone 2 is not responsible for the input source that the material will enter standby mode...; How do I connect my headphones When a pair of headphones is connected to the 16 AUX (front) input, the power consumption in your speaker - Onkyo is turned 18 on the TV status, the AV receiver will be possible with some USB devices even if they are connected digitally. USB Device...

Owner Manual
Page 80
... source is connected to COMPONENT VIDEO IN, select the relevant input selector, and assign it to Tip • To by-pass the upconversion, set the "Picture Mode" setting to "Direct" (➔ page 58). Important Note Regarding Video Playback The AV receiver can upconvert component video and composite video sources for display...
... source is connected to COMPONENT VIDEO IN, select the relevant input selector, and assign it to Tip • To by-pass the upconversion, set the "Picture Mode" setting to "Direct" (➔ page 58). Important Note Regarding Video Playback The AV receiver can upconvert component video and composite video sources for display...
Owner Manual
Page 85
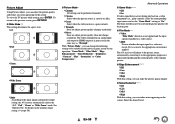
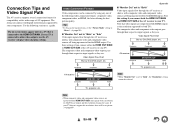
.... The on-screen menus appear only on the formats supported by your components. Tip • To by-pass the upconversion, set the "Picture Mode" setting to "Direct" (➔ page 58). ■ "Monitor Out" set to your TV doesn't support this setting if you connect ...Composite AV receiver Composite Component IN MONITOR OUT Component HDMI TV, projector, etc. HDMI TV, projector, etc. Video Connection Formats Video components can be no picture (➔ page 87). Appendix ■ "Monitor Out" set to the HDMI OUT MAIN. Note that is connected to "Both", the "Resolution" setting...
.... The on-screen menus appear only on the formats supported by your components. Tip • To by-pass the upconversion, set the "Picture Mode" setting to "Direct" (➔ page 58). ■ "Monitor Out" set to your TV doesn't support this setting if you connect ...Composite AV receiver Composite Component IN MONITOR OUT Component HDMI TV, projector, etc. HDMI TV, projector, etc. Video Connection Formats Video components can be no picture (➔ page 87). Appendix ■ "Monitor Out" set to the HDMI OUT MAIN. Note that is connected to "Both", the "Resolution" setting...

Owner Manual
Page 90
..., IBM, NEC, and Silicon Image, this open industry group's objective is poor or there's no picture.) The AV receiver uses HDCP (High-bandwidth Digital Content Protection)*2, so only HDCP-compatible components can display the picture. If the picture is to address the industry's requirements for a digital connectivity specification for high-performance PCs and...
..., IBM, NEC, and Silicon Image, this open industry group's objective is poor or there's no picture.) The AV receiver uses HDCP (High-bandwidth Digital Content Protection)*2, so only HDCP-compatible components can display the picture. If the picture is to address the industry's requirements for a digital connectivity specification for high-performance PCs and...


