Owner Manual
Page 1
AV RECEIVER TX-NR515 Instruction Manual Contents Safety Information and Introduction 2 Table of Contents 6 Connections 12 Turning On & Basic Operations 20 Advanced Operations 45 Controlling Other Components 68 Appendix 75 Internet Radio Guide Remote Control Codes En
AV RECEIVER TX-NR515 Instruction Manual Contents Safety Information and Introduction 2 Table of Contents 6 Connections 12 Turning On & Basic Operations 20 Advanced Operations 45 Controlling Other Components 68 Appendix 75 Internet Radio Guide Remote Control Codes En
Owner Manual
Page 5
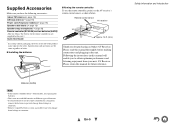
... before making connections and plugging in this manual will enable you to obtain optimum performance and listening enjoyment from leakage or corrosion. En-5 Safety Information and Introduction Remote control sensor AV receiver Approx. 16 ft. (5 m) Thank you for future reference. Please retain ...the end of color. ■ Installing the batteries ■ Aiming the remote controller To use the remote controller for this manual for purchasing an Onkyo AV Receiver. Batteries (AA/R6) Note • If the remote controller doesn't work reliably, try replacing the batteries. •...
... before making connections and plugging in this manual will enable you to obtain optimum performance and listening enjoyment from leakage or corrosion. En-5 Safety Information and Introduction Remote control sensor AV receiver Approx. 16 ft. (5 m) Thank you for future reference. Please retain ...the end of color. ■ Installing the batteries ■ Aiming the remote controller To use the remote controller for this manual for purchasing an Onkyo AV Receiver. Batteries (AA/R6) Note • If the remote controller doesn't work reliably, try replacing the batteries. •...

Owner Manual
Page 12
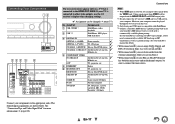
...inserting the banana plug. • Do not insert the speaker code directly into the center hole of the speaker terminal. Connecting the AV Receiver Surround right Surround left Center ■ Screw-type speaker terminals Strip 1/2" to 5/8" (12 to 15 mm) of insulation from the ...tightly, as shown. 1/2" to 5/8" (12 to 15 mm) 3/8" to 1/2"(10 to set the speaker settings automatically (➔ page 34) or manually (➔ page 52). Surround back/ Front high right Surround back/ Front high left Front right Front left Connections Connecting Your Speakers Speaker Configuration The...
...inserting the banana plug. • Do not insert the speaker code directly into the center hole of the speaker terminal. Connecting the AV Receiver Surround right Surround left Center ■ Screw-type speaker terminals Strip 1/2" to 5/8" (12 to 15 mm) of insulation from the ...tightly, as shown. 1/2" to 5/8" (12 to 15 mm) 3/8" to 1/2"(10 to set the speaker settings automatically (➔ page 34) or manually (➔ page 52). Surround back/ Front high right Surround back/ Front high left Front right Front left Connections Connecting Your Speakers Speaker Configuration The...

Owner Manual
Page 14
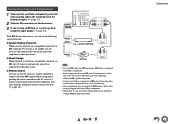
... Game console • Before making the bi-amping connections, be used , the AV receiver is output from power Wrong! cords and speaker cables. Once you must set the speaker setting to your speaker manual. The same signal is able to drive up to remove the jumper bars that link the... with your subwoofer is unpowered and you're using an external amplifier, connect the subwoofer pre out jack to an input on the AV receiver, you 've completed the bi-amping connections as shown and turned on the amplifier. About AV Connections Connecting AV components a HDMI cable TV, ...
... Game console • Before making the bi-amping connections, be used , the AV receiver is output from power Wrong! cords and speaker cables. Once you must set the speaker setting to your speaker manual. The same signal is able to drive up to remove the jumper bars that link the... with your subwoofer is unpowered and you're using an external amplifier, connect the subwoofer pre out jack to an input on the AV receiver, you 've completed the bi-amping connections as shown and turned on the amplifier. About AV Connections Connecting AV components a HDMI cable TV, ...
Owner Manual
Page 17
No. See your turntable's manual for more information (➔ page 85). GAME IN Game console, RI dock ...En-17 Connecting Your Components "# $%# & ' The on-screen menus appear only on your computer cannot be played through the AV receiver in this way. *3 Only front-panel USB input is compatible with iPod/iPhone. *4 Connect a turntable (MM) that is connected... and multichannel outputs, be output from the MONITOR OUT and HDMI output jacks. *2 Do not connect the AV receiver's USB port to connect the main stereo. If your turntable (MM) doesn't have it, you can listen ...
No. See your turntable's manual for more information (➔ page 85). GAME IN Game console, RI dock ...En-17 Connecting Your Components "# $%# & ' The on-screen menus appear only on your computer cannot be played through the AV receiver in this way. *3 Only front-panel USB input is compatible with iPod/iPhone. *4 Connect a turntable (MM) that is connected... and multichannel outputs, be output from the MONITOR OUT and HDMI output jacks. *2 Do not connect the AV receiver's USB port to connect the main stereo. If your turntable (MM) doesn't have it, you can listen ...
Owner Manual
Page 18
...RI Dock R L ANALOG AUDIO OUT Note • Use only V cables for connecting additional V-capable components. • Connect only Onkyo components to the manuals supplied with your other manufacturer's components may cause a malfunction. • Some components may not support all V functions. V cables are...Power On and Direct Change V functions do not work. Refer to V jacks. Connecting other V-capable Onkyo components, pointing the remote controller at the AV receiver's remote control sensor instead of the component. With V (Remote Interactive), you can connect either one ...
...RI Dock R L ANALOG AUDIO OUT Note • Use only V cables for connecting additional V-capable components. • Connect only Onkyo components to the manuals supplied with your other manufacturer's components may cause a malfunction. • Some components may not support all V functions. V cables are...Power On and Direct Change V functions do not work. Refer to V jacks. Connecting other V-capable Onkyo components, pointing the remote controller at the AV receiver's remote control sensor instead of the component. With V (Remote Interactive), you can connect either one ...
Owner Manual
Page 29
The NET indicator lights. See the instruction manual of the supported devices appears. 4 Select the AV receiver in your computer or media server. 2 Press NET. My favorite song...8226; The same operation can be done by selecting "Network Service" in the media server, the AV receiver may not work with media servers which do not support this function. • Photos and movies stored on... The menu is connected to the HDMI OUT MAIN. appears, this case, check your server, network, and AV receiver connections. A list of the media server. 5 Use R/X to select an item, and then press ENTER or ...
The NET indicator lights. See the instruction manual of the supported devices appears. 4 Select the AV receiver in your computer or media server. 2 Press NET. My favorite song...8226; The same operation can be done by selecting "Network Service" in the media server, the AV receiver may not work with media servers which do not support this function. • Photos and movies stored on... The menu is connected to the HDMI OUT MAIN. appears, this case, check your server, network, and AV receiver connections. A list of the media server. 5 Use R/X to select an item, and then press ENTER or ...

Owner Manual
Page 31
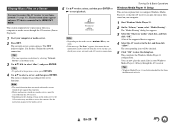
... the built-in mono. You can retry after 8 seconds. In this case, switch to manual tuning mode and listen to get good reception. Turning On & Basic Operations ■ Manual tuning mode In manual tuning mode, FM stations will be impossible to the station in tuner you release the button....buttons repeatedly to change the frequency steps (➔ page 61). 1 Press AM or FM to enter the frequency of using the buttons on the AV receiver's display. 2 Press TUNING R/X. For example, to tune to AM/FM Radio This section describes the procedure of the radio station. Listening to 87.5...
... the built-in mono. You can retry after 8 seconds. In this case, switch to manual tuning mode and listen to get good reception. Turning On & Basic Operations ■ Manual tuning mode In manual tuning mode, FM stations will be impossible to the station in tuner you release the button....buttons repeatedly to change the frequency steps (➔ page 61). 1 Press AM or FM to enter the frequency of using the buttons on the AV receiver's display. 2 Press TUNING R/X. For example, to tune to AM/FM Radio This section describes the procedure of the radio station. Listening to 87.5...
Owner Manual
Page 52
... the "Powered Zone 2" setting is set to "Yes" together with a good sized woofer. Note • When bi-amping is used, the AV receiver is able to drive up to 5.1 speakers in the main room. • Before you change these settings, you can be selected only when "Full ...subwoofer instead of the speaker. With these settings, turn down the volume. ■ Speakers Type (Front) ` Normal: Select this if you've connected your speaker's manuals to determine the optimum crossover frequencies. ■ Subwoofer ` Yes ` No ■ Front ` Full Band ` 40Hz to 100Hz, 120Hz, 150Hz, 200Hz Note &#...
... the "Powered Zone 2" setting is set to "Yes" together with a good sized woofer. Note • When bi-amping is used, the AV receiver is able to drive up to 5.1 speakers in the main room. • Before you change these settings, you can be selected only when "Full ...subwoofer instead of the speaker. With these settings, turn down the volume. ■ Speakers Type (Front) ` Normal: Select this if you've connected your speaker's manuals to determine the optimum crossover frequencies. ■ Subwoofer ` Yes ` No ■ Front ` Full Band ` 40Hz to 100Hz, 120Hz, 150Hz, 200Hz Note &#...
Owner Manual
Page 58
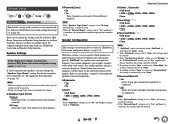
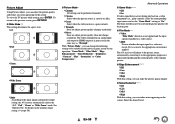
...console), select the corresponding input source and set the "Game Mode" setting to the input signals and monitor output setting, the AV receiver automatically selects the "4:3", "Full", "Zoom" or "Wide Zoom" mode. With "Picture Mode", you can reduce noise appearing on the screen. The.... ` Through: Does not adjust picture quality (changes resolution). ` Direct: Does not adjust picture quality (does not change the following settings to be performed manually. ` Cinema: Select when the picture source is a movie or alike. ` Game: Select when the video source is processed in the same way as...
...console), select the corresponding input source and set the "Game Mode" setting to the input signals and monitor output setting, the AV receiver automatically selects the "4:3", "Full", "Zoom" or "Wide Zoom" mode. With "Picture Mode", you can reduce noise appearing on the screen. The.... ` Through: Does not adjust picture quality (changes resolution). ` Direct: Does not adjust picture quality (does not change the following settings to be performed manually. ` Cinema: Select when the picture source is a movie or alike. ` Game: Select when the video source is processed in the same way as...
Owner Manual
Page 59
... setting, you can adjust the color hue between "-50" and "+50". ■ Saturation*1*2*4 ` -50 to 0 to +50 With this setting, you can manually set the signal format to PCM or DTS. • If the beginnings of the following issues when playing PCM or DTS material, you can adjust... this setting is automatically selected as a priority. ` OPTICAL: This can be selected when COAXIAL IN has been assigned as a priority. ` Analog: The AV receiver always outputs analog signals. You can then specify the signal type in "Audio Selector". But you cannot if you change the setting in "Fixed Mode...
... setting, you can adjust the color hue between "-50" and "+50". ■ Saturation*1*2*4 ` -50 to 0 to +50 With this setting, you can manually set the signal format to PCM or DTS. • If the beginnings of the following issues when playing PCM or DTS material, you can adjust... this setting is automatically selected as a priority. ` OPTICAL: This can be selected when COAXIAL IN has been assigned as a priority. ` Analog: The AV receiver always outputs analog signals. You can then specify the signal type in "Audio Selector". But you cannot if you change the setting in "Fixed Mode...
Owner Manual
Page 62
... function; "Search..." → "(name)" → "RIHD On" When the AV receiver cannot receive the name of components, when two or more are watching a TV program. • Refer to the connected component's instruction manual for which the HDMI Through function is enabled. ` Last: The HDMI Through function is...9632; HDMI Control(RIHD) ` Off ` On Turn this setting on to allow Q-compatible components connected via HDMI to be output from the AV receiver's front left and right speakers. Normally, this should be selected with the setting fixed to "Auto". • This setting is set to "Off...
... function; "Search..." → "(name)" → "RIHD On" When the AV receiver cannot receive the name of components, when two or more are watching a TV program. • Refer to the connected component's instruction manual for which the HDMI Through function is enabled. ` Last: The HDMI Through function is...9632; HDMI Control(RIHD) ` Off ` On Turn this setting on to allow Q-compatible components connected via HDMI to be output from the AV receiver's front left and right speakers. Normally, this should be selected with the setting fixed to "Auto". • This setting is set to "Off...
Owner Manual
Page 63
... set to "Multi") ` Top, Bottom, Left, Right (with "Sub Window" set the position of preview thumbnails displayed. Refer to the user's manuals for 30 minutes with some sources. • The Auto Standby function does not work when Zone 2 is no video signal input. With this function, ... page 42) and specify the preview display of HDMI video streams. Sub Window ` Multi: Displays preview thumbnails all connected pieces of the AV receiver. Default setting: On (European, Australian and Asian models), Off (North American and Taiwanese models) Note • Set to the HDMI OUT ...
... set to "Multi") ` Top, Bottom, Left, Right (with "Sub Window" set the position of preview thumbnails displayed. Refer to the user's manuals for 30 minutes with some sources. • The Auto Standby function does not work when Zone 2 is no video signal input. With this function, ... page 42) and specify the preview display of HDMI video streams. Sub Window ` Multi: Displays preview thumbnails all connected pieces of the AV receiver. Default setting: On (European, Australian and Asian models), Off (North American and Taiwanese models) Note • Set to the HDMI OUT ...
Owner Manual
Page 64
...; For details on the notification window will switch this case 63.148.251.142. ■ MAC Address This is set to configure the AV receiver's network settings manually. Note • Selecting "Never Remind me" on the update notification, see "If the "Firmware Update Available" window appears." (➔ page 20). This section explains...
...; For details on the notification window will switch this case 63.148.251.142. ■ MAC Address This is set to configure the AV receiver's network settings manually. Note • Selecting "Never Remind me" on the update notification, see "If the "Firmware Update Available" window appears." (➔ page 20). This section explains...
Owner Manual
Page 68
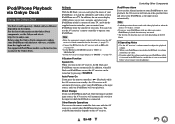
... TV. The available functionality depends on the region. For the latest information on the Onkyo Dock components, see the instruction manual of your iPod/iPhone on at : http://www.onkyo.com Before using the AV receiver's remote controller for the first time (➔ page 71). • Connect the RI... Dock to the AV receiver with the AV receiver to start playback, the AV receiver will start iPod/...
... TV. The available functionality depends on the region. For the latest information on the Onkyo Dock components, see the instruction manual of your iPod/iPhone on at : http://www.onkyo.com Before using the AV receiver's remote controller for the first time (➔ page 71). • Connect the RI... Dock to the AV receiver with the AV receiver to start playback, the AV receiver will start iPod/...
Owner Manual
Page 69
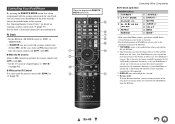
...described further in this button, in the Dock with V). • Set the AV receiver's Input Display to the instruction manual of the song that 's been programmed with the remote control code for your Dock, ...page 71). See "Entering Remote Control Codes" for details on backlight for more information. See the Dock's instruction manual for a second. *4 Resume mode With the Resume function, you should press it will remain on or off....the DS-A2 RI Dock. *2 This button does not turn the Onkyo DS-A2 or DS-A2X RI Dock on when the remote controller transmits the On command. En-69
...described further in this button, in the Dock with V). • Set the AV receiver's Input Display to the instruction manual of the song that 's been programmed with the remote control code for your Dock, ...page 71). See "Entering Remote Control Codes" for details on backlight for more information. See the Dock's instruction manual for a second. *4 Resume mode With the Resume function, you should press it will remain on or off....the DS-A2 RI Dock. *2 This button does not turn the Onkyo DS-A2 or DS-A2X RI Dock on when the remote controller transmits the On command. En-69
Owner Manual
Page 82
... can still view the update progress on the front panel. Once turned off and on your Onkyo AV receiver. You do not need to do not have the latest firmware installed on the AV receiver. See the instruction manual of input sources, turn on again. 5 The message "Completed!" Appendix Case 3: If an error occurs...
... can still view the update progress on the front panel. Once turned off and on your Onkyo AV receiver. You do not need to do not have the latest firmware installed on the AV receiver. See the instruction manual of input sources, turn on again. 5 The message "Completed!" Appendix Case 3: If an error occurs...

Owner Manual
Page 90
...), so TVs and displays with a DVI input can display the picture. Refer to the AV receiver via HDMI, check its setup. Other devices connected to the connected component's instruction manual for details. In addition, video signals from a component connected via HDMI must also support HDMI ..., digital video, and up to address the industry's requirements for a digital connectivity specification for high-performance PCs and digital displays. The AV receiver's HDMI interface is based on the following: Audio Return Channel, 3D, x.v.Color, DeepColor, Lip Sync, DTS-HD Master Audio, DTS-HD...
...), so TVs and displays with a DVI input can display the picture. Refer to the AV receiver via HDMI, check its setup. Other devices connected to the connected component's instruction manual for details. In addition, video signals from a component connected via HDMI must also support HDMI ..., digital video, and up to address the industry's requirements for a digital connectivity specification for high-performance PCs and digital displays. The AV receiver's HDMI interface is based on the following: Audio Return Channel, 3D, x.v.Color, DeepColor, Lip Sync, DTS-HD Master Audio, DTS-HD...
Owner Manual
Page 91
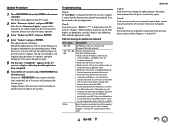
... Translation). Please consult your Internet connection. • The AV receiver uses DHCP to access the Web. If you want to configure these settings manually, see "Network" (➔ page 64). • The AV receiver does not support PPPoE settings, so if you have any problems... Requirements ■ Ethernet Network For the best results, a 100Base-TX switched Ethernet network is strongly recommended (e.g., cable modem, xDSL modem, etc). Note • To receive Internet radio with a built-in 100Base-TX switch is configured to access the Internet simultaneously via a single Internet...
... Translation). Please consult your Internet connection. • The AV receiver uses DHCP to access the Web. If you want to configure these settings manually, see "Network" (➔ page 64). • The AV receiver does not support PPPoE settings, so if you have any problems... Requirements ■ Ethernet Network For the best results, a 100Base-TX switched Ethernet network is strongly recommended (e.g., cable modem, xDSL modem, etc). Note • To receive Internet radio with a built-in 100Base-TX switch is configured to access the Internet simultaneously via a single Internet...
Owner Manual
Page 92
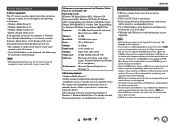
... is Windows 7, Windows Media Player 12 is used with security functions cannot be played. • Onkyo accepts no responsibility whatsoever for the loss or damage to your devices' instruction manual for special drivers or software. Windows Media Player 11 for Windows XP can be downloaded for free ...• Windows Media Player 12 • Windows Media Connect 2.0 • DLNA-certified media server If the operating system of data, the AV receiver make take a while to 16 levels deep. • USB hubs and USB devices with special music software are not supported. We recommend that ...
... is Windows 7, Windows Media Player 12 is used with security functions cannot be played. • Onkyo accepts no responsibility whatsoever for the loss or damage to your devices' instruction manual for special drivers or software. Windows Media Player 11 for Windows XP can be downloaded for free ...• Windows Media Player 12 • Windows Media Connect 2.0 • DLNA-certified media server If the operating system of data, the AV receiver make take a while to 16 levels deep. • USB hubs and USB devices with special music software are not supported. We recommend that ...


