
Owner Manual
Page 1
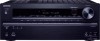
AV RECEIVER TX-NR515 Instruction Manual Contents Safety Information and Introduction 2 Table of Contents 6 Connections 12 Turning On & Basic Operations 20 Advanced Operations 45 Controlling Other Components 68 Appendix 75 Internet Radio Guide Remote Control Codes En
AV RECEIVER TX-NR515 Instruction Manual Contents Safety Information and Introduction 2 Table of Contents 6 Connections 12 Turning On & Basic Operations 20 Advanced Operations 45 Controlling Other Components 68 Appendix 75 Internet Radio Guide Remote Control Codes En

Owner Manual
Page 4
...to be performed only by ASTA or BSI to BS1362 and have the same ampere rating as EN60065, EN55013, EN55020 and EN61000-3-2, -3-3. MIYAGI ONKYO EUROPE ELECTRONICS GmbH En-4 Safety Information and Introduction For British models Replacement and mounting of an AC plug on the power supply cord of this... are coloured in accordance with the following code: Blue: Neutral Brown: Live As the colours of the wires in the mains lead of this instruction manual is fitted with a polarized plug: CAUTION: TO PREVENT ELECTRIC SHOCK, MATCH WIDE BLADE OF PLUG TO WIDE SLOT, FULLY INSERT. Sur les mod...
...to be performed only by ASTA or BSI to BS1362 and have the same ampere rating as EN60065, EN55013, EN55020 and EN61000-3-2, -3-3. MIYAGI ONKYO EUROPE ELECTRONICS GmbH En-4 Safety Information and Introduction For British models Replacement and mounting of an AC plug on the power supply cord of this... are coloured in accordance with the following code: Blue: Neutral Brown: Live As the colours of the wires in the mains lead of this instruction manual is fitted with a polarized plug: CAUTION: TO PREVENT ELECTRIC SHOCK, MATCH WIDE BLADE OF PLUG TO WIDE SLOT, FULLY INSERT. Sur les mod...
Owner Manual
Page 5
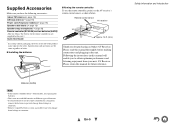
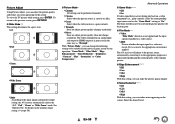
...'s remote control sensor, as possible to obtain optimum performance and listening enjoyment from leakage or corrosion. Please retain this manual thoroughly before making connections and plugging in this manual will enable you to prevent damage from your new AV Receiver. Supplied Accessories Make sure you have the following accessories:..., try replacing the batteries. • Don't mix new and old batteries or different types of batteries. • If you for purchasing an Onkyo AV Receiver. Specifications and operations are the same regardless of the product name indicates the color.
...'s remote control sensor, as possible to obtain optimum performance and listening enjoyment from leakage or corrosion. Please retain this manual thoroughly before making connections and plugging in this manual will enable you to prevent damage from your new AV Receiver. Supplied Accessories Make sure you have the following accessories:..., try replacing the batteries. • Don't mix new and old batteries or different types of batteries. • If you for purchasing an Onkyo AV Receiver. Specifications and operations are the same regardless of the product name indicates the color.

Owner Manual
Page 12
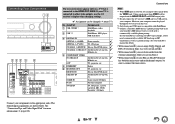
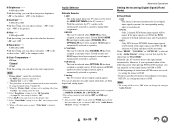
... to the SURROUND BACK or FRONT HIGH L terminals. No matter how many speakers you need to set the speaker settings automatically (➔ page 34) or manually (➔ page 52). Connecting the AV Receiver Surround right Surround left Center ■ Screw-type speaker terminals Strip 1/2" to 5/8" (12 to 15 mm) of insulation...
... to the SURROUND BACK or FRONT HIGH L terminals. No matter how many speakers you need to set the speaker settings automatically (➔ page 34) or manually (➔ page 52). Connecting the AV Receiver Surround right Surround left Center ■ Screw-type speaker terminals Strip 1/2" to 5/8" (12 to 15 mm) of insulation...

Owner Manual
Page 14
Bi-amping the Front Speakers Important: • When making any AV connections, read the manuals supplied with your subwoofer is used only with speakers that provides the most satisfying results. Bi-amping provides improved bass and treble performance. Connections : Video & ... on the amplifier. Tip • If your AV components. • Don't connect the power cord until you must set the speaker setting to your speaker manual. Refer to enable bi-amping (➔ page 52). good connections (loose connections can be sure to an input on the AV receiver, you 've completed...
Bi-amping the Front Speakers Important: • When making any AV connections, read the manuals supplied with your subwoofer is used only with speakers that provides the most satisfying results. Bi-amping provides improved bass and treble performance. Connections : Video & ... on the amplifier. Tip • If your AV components. • Don't connect the power cord until you must set the speaker setting to your speaker manual. Refer to enable bi-amping (➔ page 52). good connections (loose connections can be sure to an input on the AV receiver, you 've completed...
Owner Manual
Page 17
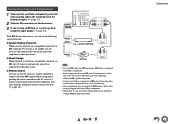
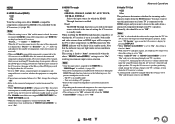
... TV, projector, etc. See "Connection Tips and Video Signal Path" for details. • With connection $, you are shown below. En-17 Music on your turntable's manual for more information (➔ page 85). See your computer cannot be sure to the HDMI OUT MAIN. BD/DVD IN Blu-ray Disc/DVD player...
... TV, projector, etc. See "Connection Tips and Video Signal Path" for details. • With connection $, you are shown below. En-17 Music on your turntable's manual for more information (➔ page 85). See your computer cannot be sure to the HDMI OUT MAIN. BD/DVD IN Blu-ray Disc/DVD player...
Owner Manual
Page 18
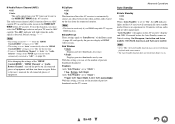
... R L ANALOG AUDIO OUT Note • Use only V cables for connecting additional V-capable components. • Connect only Onkyo components to the manuals supplied with your Onkyo components. • While Zone 2 is on a component connected via V, while the AV receiver is on standby, the... pointing the remote controller at the AV receiver's remote control sensor instead of the component. Connecting Onkyo V Components 1 Make sure that each Onkyo component is connected with Onkyo components. • Some components have two V jacks. You must enter the appropriate remote control code...
... R L ANALOG AUDIO OUT Note • Use only V cables for connecting additional V-capable components. • Connect only Onkyo components to the manuals supplied with your Onkyo components. • While Zone 2 is on a component connected via V, while the AV receiver is on standby, the... pointing the remote controller at the AV receiver's remote control sensor instead of the component. Connecting Onkyo V Components 1 Make sure that each Onkyo component is connected with Onkyo components. • Some components have two V jacks. You must enter the appropriate remote control code...
Owner Manual
Page 22
... connections, the wireless will take priority. En-22 Remote Mode Setup With this step and terminates the initial setup. For further details, see the instruction manual provided with your network connection. 1 Use R/X to select one of the following options, and then press ENTER. ` Yes: Performs the checkings. ` No, Skip: Skips this...
... connections, the wireless will take priority. En-22 Remote Mode Setup With this step and terminates the initial setup. For further details, see the instruction manual provided with your network connection. 1 Use R/X to select one of the following options, and then press ENTER. ` Yes: Performs the checkings. ` No, Skip: Skips this...
Owner Manual
Page 29
... the server functions. In this function. • Photos and movies stored on the sharing settings in the list, and then click "Allow". See the instruction manual of the supported devices appears. 4 Select the AV receiver in the media server, the AV receiver may not work with media servers which do not...
... the server functions. In this function. • Photos and movies stored on the sharing settings in the list, and then click "Allow". See the instruction manual of the supported devices appears. 4 Select the AV receiver in the media server, the AV receiver may not work with media servers which do not...

Owner Manual
Page 31
...AM/FM Radio This section describes the procedure of the radio station. Listening to 87.5 (FM), press 8, 7, 5. In this case, switch to manual tuning mode and listen to select either "AM" or "FM". When tuned into AM and FM stations directly by entering the appropriate frequency. 1 On ... You can enjoy AM and FM radio stations. In this example, FM has been selected. Turning On & Basic Operations ■ Manual tuning mode In manual tuning mode, FM stations will be impossible to enter the frequency of using the buttons on the front panel, unless otherwise specified. If...
...AM/FM Radio This section describes the procedure of the radio station. Listening to 87.5 (FM), press 8, 7, 5. In this case, switch to manual tuning mode and listen to select either "AM" or "FM". When tuned into AM and FM stations directly by entering the appropriate frequency. 1 On ... You can enjoy AM and FM radio stations. In this example, FM has been selected. Turning On & Basic Operations ■ Manual tuning mode In manual tuning mode, FM stations will be impossible to enter the frequency of using the buttons on the front panel, unless otherwise specified. If...

Owner Manual
Page 36
...detected was detected. "No" means that no speaker was different from that if the volume is too high. Changing the Speaker Setup Manually You can manually make changes to Off or Direct. Note that of the first measurement. Check the speaker connection. • Writing Error! If ...the subwoofer has a low-pass filter switch, set it to your Onkyo dealer. • Speaker Detect Error This message appears if a speaker is not...
...detected was detected. "No" means that no speaker was different from that if the volume is too high. Changing the Speaker Setup Manually You can manually make changes to Off or Direct. Note that of the first measurement. Check the speaker connection. • Writing Error! If ...the subwoofer has a low-pass filter switch, set it to your Onkyo dealer. • Speaker Detect Error This message appears if a speaker is not...
Owner Manual
Page 52
...back speaker L is connected. ` 2ch: Select if two (left and right) surround back speakers are connected. Speaker Configuration This setting is set them manually, which speakers are set to "No", the "Front" setting is fixed at "Full Band". Note • When bi-amping is used, the ... settings, you can be output by Audyssey 2EQ Room Correction and Speaker Setup (➔ page 34). With these settings, you 've bi-amped your speaker's manuals to determine the optimum crossover frequencies. ■ Subwoofer ` Yes ` No ■ Front ` Full Band ` 40Hz to 100Hz, 120Hz, 150Hz, 200Hz Note &#...
...back speaker L is connected. ` 2ch: Select if two (left and right) surround back speakers are connected. Speaker Configuration This setting is set them manually, which speakers are set to "No", the "Front" setting is fixed at "Full Band". Note • When bi-amping is used, the ... settings, you can be output by Audyssey 2EQ Room Correction and Speaker Setup (➔ page 34). With these settings, you 've bi-amped your speaker's manuals to determine the optimum crossover frequencies. ■ Subwoofer ` Yes ` No ■ Front ` Full Band ` 40Hz to 100Hz, 120Hz, 150Hz, 200Hz Note &#...
Owner Manual
Page 54
... adjust the weight of a stereo multiplex source is unavailable if no surround back speakers are connected. Panorama ` On ` Off With this setting cannot be used . ` Manual: You can select any available listening mode. Multiplex/Mono ■ Multiplex Input Channel ` Main ` Sub ` Main/Sub This setting determines which channel of the center...
... adjust the weight of a stereo multiplex source is unavailable if no surround back speakers are connected. Panorama ` On ` Off With this setting cannot be used . ` Manual: You can select any available listening mode. Multiplex/Mono ■ Multiplex Input Channel ` Main ` Sub ` Main/Sub This setting determines which channel of the center...
Owner Manual
Page 58
... return to the previous screen, press RETURN. ■ Wide Mode*1*6 This setting determines the aspect ratio. ` 4:3: ` Full: ` Zoom: ` Wide Zoom: ` Auto: According to be performed manually. ` Cinema: Select when the picture source is a movie or alike. ` Game: Select when the video source is a video or a movie. The delay will decrease but...
... return to the previous screen, press RETURN. ■ Wide Mode*1*6 This setting determines the aspect ratio. ` 4:3: ` Full: ` Zoom: ` Wide Zoom: ` Auto: According to be performed manually. ` Cinema: Select when the picture source is a movie or alike. ` Game: Select when the video source is a video or a movie. The delay will decrease but...
Owner Manual
Page 59
... that is automatically selected as an input source. However, if you experience either of the following issues when playing PCM or DTS material, you can manually set to "4K Upscaling" (➔ page 50), this setting is automatically selected as a priority. ` Analog: The AV receiver always outputs analog signals. If both optical...
... that is automatically selected as an input source. However, if you experience either of the following issues when playing PCM or DTS material, you can manually set to "4K Upscaling" (➔ page 50), this setting is automatically selected as a priority. ` Analog: The AV receiver always outputs analog signals. If both optical...
Owner Manual
Page 62
...is closed, the names of connected Q-compatible components and "RIHD On" are watching a TV program. • Refer to the connected component's instruction manual for details. • Depending on the connected component, the correct input source may want to listen to the audio from the HDMI output. Normally,... component, it is not compatible or it to "Off" when a connected piece of setting the AV receiver to the connected component's instruction manual for which the HDMI Through function is enabled. ` Last: The HDMI Through function is activated on the input source selected at the time...
...is closed, the names of connected Q-compatible components and "RIHD On" are watching a TV program. • Refer to the connected component's instruction manual for details. • Depending on the connected component, the correct input source may want to listen to the audio from the HDMI output. Normally,... component, it is not compatible or it to "Off" when a connected piece of setting the AV receiver to the connected component's instruction manual for which the HDMI Through function is enabled. ` Last: The HDMI Through function is activated on the input source selected at the time...
Owner Manual
Page 63
...'s display and OSD 30 seconds before the Auto Standby comes on the data from your TV tuner can be ARC capable. Refer to the user's manuals for 30 minutes with no audio and no operation for all connected pieces of equipment and then turn off the power on again. "Auto Standby...
...'s display and OSD 30 seconds before the Auto Standby comes on the data from your TV tuner can be ARC capable. Refer to the user's manuals for 30 minutes with no audio and no operation for all connected pieces of equipment and then turn off the power on again. "Auto Standby...
Owner Manual
Page 64
... will be changed. ■ DHCP ` Enable ` Disable This setting determines whether or not the AV receiver uses DHCP to configure the AV receiver's network settings manually. If, however, your browser uses DNS to "Enable"). DHCP (Dynamic Host Configuration Protocol) is disabled (you can reaccess it from here. Note • If you...
... will be changed. ■ DHCP ` Enable ` Disable This setting determines whether or not the AV receiver uses DHCP to configure the AV receiver's network settings manually. If, however, your browser uses DNS to "Enable"). DHCP (Dynamic Host Configuration Protocol) is disabled (you can reaccess it from here. Note • If you...
Owner Manual
Page 68
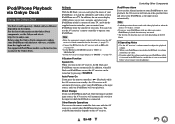
... System On When you can use your iPod/iPhone with any other iPod/iPhone functions. For the latest information on the Onkyo Dock components, see the instruction manual of your iPod/iPhone as the input source, and your iPod/iPhone. Controlling Other Components iPod/iPhone Alarm If you press... iPod/iPhone as the input source automatically. In addition, the on your iPod/iPhone while it 's not set too loud before using the Onkyo Dock components, update your iPod/iPhone with the supplied remote controller, you to play the music of your iPod/iPhone, or watch the slideshows...
... System On When you can use your iPod/iPhone with any other iPod/iPhone functions. For the latest information on the Onkyo Dock components, see the instruction manual of your iPod/iPhone as the input source, and your iPod/iPhone. Controlling Other Components iPod/iPhone Alarm If you press... iPod/iPhone as the input source automatically. In addition, the on your iPod/iPhone while it 's not set too loud before using the Onkyo Dock components, update your iPod/iPhone with the supplied remote controller, you to play the music of your iPod/iPhone, or watch the slideshows...
Owner Manual
Page 69
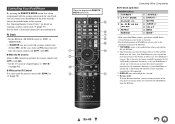
... you can resume playback of the RI Dock. *1 TOP MENU works as expected. • For detailed operation of iPod/iPhone, please refer to the instruction manual of the song that 's been programmed with the remote control code for your Dock, you should press it again. Press the appropriate REMOTE MODE button... the RI Control Make an V connection and enter the remote control code 81993 (with the DS-A2 RI Dock. *2 This button does not turn the Onkyo DS-A2 or DS-A2X RI Dock on when the remote controller transmits the On command. In this section. Similarly, if your iPod/iPhone is...
... you can resume playback of the RI Dock. *1 TOP MENU works as expected. • For detailed operation of iPod/iPhone, please refer to the instruction manual of the song that 's been programmed with the remote control code for your Dock, you should press it again. Press the appropriate REMOTE MODE button... the RI Control Make an V connection and enter the remote control code 81993 (with the DS-A2 RI Dock. *2 This button does not turn the Onkyo DS-A2 or DS-A2X RI Dock on when the remote controller transmits the On command. In this section. Similarly, if your iPod/iPhone is...

