Owner Manual
Page 6
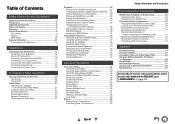
...Zone 2 Connections 66 Controlling Zone 2 Components 67 Safety Information and Introduction Controlling Other Components iPod/iPhone Playback via Onkyo Dock 68 Using the Onkyo Dock 68 Controlling Your iPod/iPhone 69 Controlling Other Components 70 Preprogrammed Remote Control Codes 70 Looking up for ...the Remote Controller 72 Controlling Other Components 73 Appendix Troubleshooting 75 Firmware Update 81 Connection Tips and Video Signal Path 85 Using an RIHD-compatible TV, Player, or Recorder 88 About HDMI 90 Network/USB Features 91 License and Trademark Information 94 ...
...Zone 2 Connections 66 Controlling Zone 2 Components 67 Safety Information and Introduction Controlling Other Components iPod/iPhone Playback via Onkyo Dock 68 Using the Onkyo Dock 68 Controlling Your iPod/iPhone 69 Controlling Other Components 70 Preprogrammed Remote Control Codes 70 Looking up for ...the Remote Controller 72 Controlling Other Components 73 Appendix Troubleshooting 75 Firmware Update 81 Connection Tips and Video Signal Path 85 Using an RIHD-compatible TV, Player, or Recorder 88 About HDMI 90 Network/USB Features 91 License and Trademark Information 94 ...

Owner Manual
Page 14
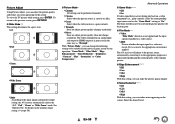
... the bi-amping connections as shown and turned on the amplifier. Connections : Video & Audio AV receiver Blu-ray Disc/ DVD player Game console Other cables TV, projector, etc. : Video : Audio AV receiver Tweeter (high) Woofer (low) Front right Front left Blu-ray Disc/ DVD player Game console •... Before making the bi-amping connections, be sure to enable bi-amping (➔ page 52). En-14 The same signal is output from power Wrong! Tip • If your subwoofer is able to drive up to your speaker manual. When bi-amping is used ...
... the bi-amping connections as shown and turned on the amplifier. Connections : Video & Audio AV receiver Blu-ray Disc/ DVD player Game console Other cables TV, projector, etc. : Video : Audio AV receiver Tweeter (high) Woofer (low) Front right Front left Blu-ray Disc/ DVD player Game console •... Before making the bi-amping connections, be sure to enable bi-amping (➔ page 52). En-14 The same signal is output from power Wrong! Tip • If your subwoofer is able to drive up to your speaker manual. When bi-amping is used ...

Owner Manual
Page 15
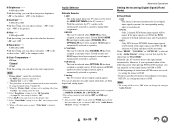
...9632; Composite video Composite video is the same as PCM*1, Dolby Digital or DTS. The audio quality is commonly used on TVs, DVDs, and other video equipment. Caution • To prevent shutter damage, hold the optical plug straight when inserting and removing. &#...can carry digital video and audio. ■ Component video Component video separates the luminance (Y) and color difference signals (PB, PR), providing the best picture quality (some TV manufacturers label their component video sockets slightly differently). Note • The AV receiver does not support SCART plugs....
...9632; Composite video Composite video is the same as PCM*1, Dolby Digital or DTS. The audio quality is commonly used on TVs, DVDs, and other video equipment. Caution • To prevent shutter damage, hold the optical plug straight when inserting and removing. &#...can carry digital video and audio. ■ Component video Component video separates the luminance (Y) and color difference signals (PB, PR), providing the best picture quality (some TV manufacturers label their component video sockets slightly differently). Note • The AV receiver does not support SCART plugs....
Owner Manual
Page 16
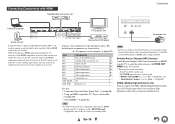
...10004; IN4 Personal computer ✔ IN5 Other components ✔ IN6 Other components ✔ IN7 Other components ✔ Front Camcorder, etc. The TV/CD input selector is ARC capable, and - En-16 Note • In the case of the HDMI component connected to the AV receiver)....optical digital cable together with HDMI Satellite/cable set-top box, etc. See also: • "Connection Tips and Video Signal Path" (➔ page 85) • "Using an RIHD-compatible TV, Player, or Recorder" (➔ page 88) • "About HDMI" (➔ page 90) Tip • ...
...10004; IN4 Personal computer ✔ IN5 Other components ✔ IN6 Other components ✔ IN7 Other components ✔ Front Camcorder, etc. The TV/CD input selector is ARC capable, and - En-16 Note • In the case of the HDMI component connected to the AV receiver)....optical digital cable together with HDMI Satellite/cable set-top box, etc. See also: • "Connection Tips and Video Signal Path" (➔ page 85) • "Using an RIHD-compatible TV, Player, or Recorder" (➔ page 88) • "About HDMI" (➔ page 90) Tip • ...
Owner Manual
Page 17
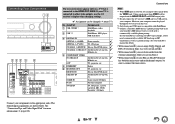
...is connected to a USB port on your turntable's manual for more information (➔ page 85). En-17 See "Connection Tips and Video Signal Path" for details. • With connection $, you can be sure to connect the main stereo. Music on your Blu-ray Disc/DVD... compatible with iPod/iPhone. *4 Connect a turntable (MM) that is connected to the appropriate jacks. No. OUT TV, projector, etc. & ETHERNET Router ' MONITOR OUT TV, projector, etc. Video signals input from the VIDEO jack. If your turntable (MM) doesn't have it, you are shown below. See your computer...
...is connected to a USB port on your turntable's manual for more information (➔ page 85). En-17 See "Connection Tips and Video Signal Path" for details. • With connection $, you can be sure to connect the main stereo. Music on your Blu-ray Disc/DVD... compatible with iPod/iPhone. *4 Connect a turntable (MM) that is connected to the appropriate jacks. No. OUT TV, projector, etc. & ETHERNET Router ' MONITOR OUT TV, projector, etc. Video signals input from the VIDEO jack. If your turntable (MM) doesn't have it, you are shown below. See your computer...

Owner Manual
Page 19
Insert wire. The AV receiver won't pick up any radio signals without any other equipment. • Never disconnect the power cord from the AV receiver while the other electrical equipment on the AV receiver may cause ... antenna (supplied) Note • Once your speakers and AV components. • Turning on the same circuit. Always disconnect the power cord from your AV receiver, TV, speaker cables, and power cords. Release. Insert the plug fully into the jack. Thumbtacks, etc. Connecting the Antennas This section explains how to the AV...
Insert wire. The AV receiver won't pick up any radio signals without any other equipment. • Never disconnect the power cord from the AV receiver while the other electrical equipment on the AV receiver may cause ... antenna (supplied) Note • Once your speakers and AV components. • Turning on the same circuit. Always disconnect the power cord from your AV receiver, TV, speaker cables, and power cords. Release. Insert the plug fully into the jack. Thumbtacks, etc. Connecting the Antennas This section explains how to the AV...
Owner Manual
Page 23
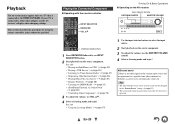
...SELECTOR RECEIVER VOL R/X Listening mode buttons 1 Press RECEIVER followed by default), a screen saver automatically comes on. See also: • "Playing an iPod/iPhone via Onkyo Dock" (➔ page 68) • "Controlling Other Components" (➔ page 70) 3 To adjust the volume, use VOL R/X. 4 Select a listening mode...receiver is operated. Playback The on-screen menus appear only on a TV that is connected to other video outputs, use the AV receiver's display when changing settings. If your TV is no video signal on the current input source and no operation for using the remote ...
...SELECTOR RECEIVER VOL R/X Listening mode buttons 1 Press RECEIVER followed by default), a screen saver automatically comes on. See also: • "Playing an iPod/iPhone via Onkyo Dock" (➔ page 68) • "Controlling Other Components" (➔ page 70) 3 To adjust the volume, use VOL R/X. 4 Select a listening mode...receiver is operated. Playback The on-screen menus appear only on a TV that is connected to other video outputs, use the AV receiver's display when changing settings. If your TV is no video signal on the current input source and no operation for using the remote ...
Owner Manual
Page 37
...AV receiver's display and video circuitry are turned off. MUSIC button This button selects the listening modes intended for use with movies and TV. Using the Listening Modes Selecting Listening Modes See "About Listening Modes" for detailed information about the listening modes (➔ page 38)....mode is selected. To check the format, see "Displaying Source Information" (➔ page 43). • While a pair of the input signal. STEREO button This button selects the Stereo listening mode and All Channel Stereo listening mode. En-37 PURE AUDIO button and indicator (European, ...
...AV receiver's display and video circuitry are turned off. MUSIC button This button selects the listening modes intended for use with movies and TV. Using the Listening Modes Selecting Listening Modes See "About Listening Modes" for detailed information about the listening modes (➔ page 38)....mode is selected. To check the format, see "Displaying Source Information" (➔ page 43). • While a pair of the input signal. STEREO button This button selects the Stereo listening mode and All Channel Stereo listening mode. En-37 PURE AUDIO button and indicator (European, ...
Owner Manual
Page 41
... HDMI IN. Dolby Pro Logic IIz Height can be used depending on the audio channel signal contained in a 3.1/5.1-channel speaker system. *6 DTS is used to PCM might bring better sound. *5 For the Blu-ray Discs, Dolby Digital is used in the ... Neo:6 Ne o : 6 C i n ema Ne o : 6 Mu s i c Neo : 6 Turning On & Basic Operations Description Input Speaker Source Layout This mode expands any stereo music source (e.g., CD, radio, cassette, TV, VHS, DVD). 9$/ • DTS Neo:6 This mode uses DTS Neo:6 to Direct. *3 Based on the configuration of Dolby Pro Logic IIx. • Dolby PLIIx Movie...
... HDMI IN. Dolby Pro Logic IIz Height can be used depending on the audio channel signal contained in a 3.1/5.1-channel speaker system. *6 DTS is used to PCM might bring better sound. *5 For the Blu-ray Discs, Dolby Digital is used in the ... Neo:6 Ne o : 6 C i n ema Ne o : 6 Mu s i c Neo : 6 Turning On & Basic Operations Description Input Speaker Source Layout This mode expands any stereo music source (e.g., CD, radio, cassette, TV, VHS, DVD). 9$/ • DTS Neo:6 This mode uses DTS Neo:6 to Direct. *3 Based on the configuration of Dolby Pro Logic IIx. • Dolby PLIIx Movie...
Owner Manual
Page 42
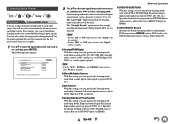
... select a preview thumbnail, and pressing ENTER will be grayed out for a short while after the AV receiver is connected to 30). No signal is turned on . Note that this selection, you can easily switch between inputs as their previews are present, the thumbnails will start the procedure...with multiple components connected through HDMI, you want to play contents of portable players (iPod, etc.) and USB storage devices connected to your TV is the current HDMI input source, or - En-42 Note that this selection, you can also access frequently used menus. Press ENTER...
... select a preview thumbnail, and pressing ENTER will be grayed out for a short while after the AV receiver is connected to 30). No signal is turned on . Note that this selection, you can easily switch between inputs as their previews are present, the thumbnails will start the procedure...with multiple components connected through HDMI, you want to play contents of portable players (iPod, etc.) and USB storage devices connected to your TV is the current HDMI input source, or - En-42 Note that this selection, you can also access frequently used menus. Press ENTER...

Owner Manual
Page 43
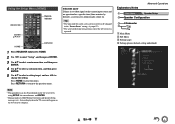
...RECEIVER once followed by DISPLAY repeatedly to change the input display. Signal format*2 Sampling frequency*2 Input signal resolution Output resolution Turning On & Basic Operations Changing the Input Display When you connect an V-capable Onkyo component, you press again on the AV receiver's display when ...the sleep timer has been set from the front panel. 1 Press TV/CD or...
...RECEIVER once followed by DISPLAY repeatedly to change the input display. Signal format*2 Sampling frequency*2 Input signal resolution Output resolution Turning On & Basic Operations Changing the Input Display When you connect an V-capable Onkyo component, you press again on the AV receiver's display when ...the sleep timer has been set from the front panel. 1 Press TV/CD or...
Owner Manual
Page 46
...listening to "On" (➔ page 62). - Note • These technologies can change various audio settings from the front speakers. The "Audio TV Out" setting is set to an input source. You can adjust the volume of headphones is not connected. • The setting is stored ...to 0dB to +12dB in "Speaker Configuration" (➔ page 52) cannot be selected. *1 • The video preview is not displayed when: - No signal is present on the current input source. *2 Only when you have selected "Custom" in "Source Setup" (➔ page 56). These temporary adjustments are ...
...listening to "On" (➔ page 62). - Note • These technologies can change various audio settings from the front speakers. The "Audio TV Out" setting is set to an input source. You can adjust the volume of headphones is not connected. • The setting is stored ...to 0dB to +12dB in "Speaker Configuration" (➔ page 52) cannot be selected. *1 • The video preview is not displayed when: - No signal is present on the current input source. *2 Only when you have selected "Custom" in "Source Setup" (➔ page 56). These temporary adjustments are ...
Owner Manual
Page 48
... ENTER. • During Audyssey 2EQ® Room Correction and Speaker Setup, messages, etc., that are displayed on the TV screen will return to its previous state if the AV receiver is no video signal on the current input source and no operation for a specific time (three minutes by HOME. 2 Use F/S to select...
... ENTER. • During Audyssey 2EQ® Room Correction and Speaker Setup, messages, etc., that are displayed on the TV screen will return to its previous state if the AV receiver is no video signal on the current input source and no operation for a specific time (three minutes by HOME. 2 Use F/S to select...

Owner Manual
Page 50
...MAIN and have the video sources' images output through the HDMI output. If you connect your TV to HDMI output, "Monitor Out" setting is set this for more information on video signal flow and upconversion (➔ page 85). Composite video, component video IN HDMI Composite video, component...Note • Depending on the resolution supported by your TV, it will result in either 3840 × 2160 or 4096 × 2160 pixels. Video signals are the default assignments. Input selector BD/DVD CBL/SAT GAME PC AUX TV/CD EXTRA1 EXTRA2 Default assignment HDMI1 HDMI2 HDMI3 HDMI4 ...
...MAIN and have the video sources' images output through the HDMI output. If you connect your TV to HDMI output, "Monitor Out" setting is set this for more information on video signal flow and upconversion (➔ page 85). Composite video, component video IN HDMI Composite video, component...Note • Depending on the resolution supported by your TV, it will result in either 3840 × 2160 or 4096 × 2160 pixels. Video signals are the default assignments. Input selector BD/DVD CBL/SAT GAME PC AUX TV/CD EXTRA1 EXTRA2 Default assignment HDMI1 HDMI2 HDMI3 HDMI4 ...
Owner Manual
Page 51
...-51 Note • If no picture (➔ page 87). • "AUX" is used only for PCM signals (stereo/mono) from the front panel. Here are the default assignments. If your TV doesn't support this assignment. When HDMI1 - In this case, if you will not be unable to assign HDMI1 ... and "EXTRA2" can be selected as input sources in "Input" of "Quick Setup" (➔ page 45). ■ BD/DVD, CBL/SAT, GAME, PC, TV/CD, EXTRA1, EXTRA2 ` HDMI1, HDMI2, HDMI3, HDMI4, HDMI5, HDMI6, HDMI7: Select the input to which the component has been connected Output composite video and component...
...-51 Note • If no picture (➔ page 87). • "AUX" is used only for PCM signals (stereo/mono) from the front panel. Here are the default assignments. If your TV doesn't support this assignment. When HDMI1 - In this case, if you will not be unable to assign HDMI1 ... and "EXTRA2" can be selected as input sources in "Input" of "Quick Setup" (➔ page 45). ■ BD/DVD, CBL/SAT, GAME, PC, TV/CD, EXTRA1, EXTRA2 ` HDMI1, HDMI2, HDMI3, HDMI4, HDMI5, HDMI6, HDMI7: Select the input to which the component has been connected Output composite video and component...
Owner Manual
Page 54
... the sound field forward to "Yes" and Zone 2 is turned on , this setting cannot be selected. ■ Dolby EX ` Auto: If the source signal contains a Dolby EX flag, the Dolby EX listening mode is set to "None" (➔ page 52), this setting, you can select any 2-channel digital ... controls the front left and right speakers to Dolby Pro Logic II, not Dolby Pro Logic IIx. This setting is effective with multiplex sources, multilingual TV broadcasts, and so on. ■ Mono Input Channel ` Left + Right ` Left ` Right This setting specifies the channel to "Yes" and Zone 2 is turned ...
... the sound field forward to "Yes" and Zone 2 is turned on , this setting cannot be selected. ■ Dolby EX ` Auto: If the source signal contains a Dolby EX flag, the Dolby EX listening mode is set to "None" (➔ page 52), this setting, you can select any 2-channel digital ... controls the front left and right speakers to Dolby Pro Logic II, not Dolby Pro Logic IIx. This setting is effective with multiplex sources, multilingual TV broadcasts, and so on. ■ Mono Input Channel ` Left + Right ` Left ` Right This setting specifies the channel to "Yes" and Zone 2 is turned ...

Owner Manual
Page 57
... case characters. (Left)/ (Right): Moves the cursor left or right in 10 msec steps When using R/X/F/S, and then press ENTER. OK: Confirms your TV or display supports HDMI Lip Sync and if the "LipSync" setting is noticeably louder than the others , use S to reduce its default, erase all...used with an analog input source. • This setting cannot be performed by delaying the audio signals. The custom name is used with CLR, select "OK" and then press ENTER. To view the TV picture while setting the delay, press ENTER. Note • IntelliVolume does not work for each ...
... case characters. (Left)/ (Right): Moves the cursor left or right in 10 msec steps When using R/X/F/S, and then press ENTER. OK: Confirms your TV or display supports HDMI Lip Sync and if the "LipSync" setting is noticeably louder than the others , use S to reduce its default, erase all...used with an analog input source. • This setting cannot be performed by delaying the audio signals. The custom name is used with CLR, select "OK" and then press ENTER. To view the TV picture while setting the delay, press ENTER. Note • IntelliVolume does not work for each ...
Owner Manual
Page 58
...the movie or game screen by HDMI output(s) is a video or a movie. Advanced Operations ■ Game Mode*2*3*4 ` Off ` On If video signal delay occurs during playback on the screen. The AV receiver will become poor. ■ Film Mode*2*4 ` Video: "Film Mode" detection is not applied... movie or alike. ` Game: Select when the video source is applied. To view the TV picture while setting, press ENTER. With "Picture Mode", you can change resolution). If it to the appropriate progressive signal and reproducing the natural quality of the original picture. ■ Edge Enhancement*2*4*5 ` Off ` ...
...the movie or game screen by HDMI output(s) is a video or a movie. Advanced Operations ■ Game Mode*2*3*4 ` Off ` On If video signal delay occurs during playback on the screen. The AV receiver will become poor. ■ Film Mode*2*4 ` Video: "Film Mode" detection is not applied... movie or alike. ` Game: Select when the video source is applied. To view the TV picture while setting, press ENTER. With "Picture Mode", you can change resolution). If it to the appropriate progressive signal and reproducing the natural quality of the original picture. ■ Edge Enhancement*2*4*5 ` Off ` ...
Owner Manual
Page 59
..." is the least. Note • This setting can be made only for the input source that is detected automatically. Advanced Operations Setting the Incoming Digital Signal (Fixed Mode) ■ Fixed Mode ` Off: The format is assigned as HDMI IN, COAXIAL IN, or OPTICAL IN. • This setting cannot be used . ...input selector is the darkest. ■ Brightness*1*2*4 ` -50 to 0 to +50 With this setting, you can manually set the signal format to PCM or DTS. • If the beginnings of tracks from your TV tuner can be sent to the HDMI OUT MAIN of the AV receiver.*1 With this selection, the...
..." is the least. Note • This setting can be made only for the input source that is detected automatically. Advanced Operations Setting the Incoming Digital Signal (Fixed Mode) ■ Fixed Mode ` Off: The format is assigned as HDMI IN, COAXIAL IN, or OPTICAL IN. • This setting cannot be used . ...input selector is the darkest. ■ Brightness*1*2*4 ` -50 to 0 to +50 With this setting, you can manually set the signal format to PCM or DTS. • If the beginnings of tracks from your TV tuner can be sent to the HDMI OUT MAIN of the AV receiver.*1 With this selection, the...
Owner Manual
Page 60
... option means that the listening mode selected last will be used when an analog (CD, TV, LD, VHS, MD, turntable, radio, cassette, cable, satellite, etc.) or PCM digital (CD, DVD, etc.) audio signal is selected. The "Straight Decode" option means that straight decoding listening mode (Dolby Digital, ..., only "PCM" is available. ■ Mono/Multiplex Source With this setting, you can specify the listening mode used when a mono digital audio signal is played (DVD, etc.). ■ 2ch Source With this setting, you can specify the listening mode used when 2-channel (2/0) stereo digital sources,...
... option means that the listening mode selected last will be used when an analog (CD, TV, LD, VHS, MD, turntable, radio, cassette, cable, satellite, etc.) or PCM digital (CD, DVD, etc.) audio signal is selected. The "Straight Decode" option means that straight decoding listening mode (Dolby Digital, ..., only "PCM" is available. ■ Mono/Multiplex Source With this setting, you can specify the listening mode used when a mono digital audio signal is played (DVD, etc.). ■ 2ch Source With this setting, you can specify the listening mode used when 2-channel (2/0) stereo digital sources,...


