

Owner Manual
Page 1
Artistry in Sound ONKYQ Audio Video Control Receiver TX-DS838 Instruction Manual = = 00 o 0 *O 1 I I I 1 I I OOO All models except European models c= 0 0 0O CO 0 0) I I I I I 000 European models CONTENTS Features 2 Important safeguards ... Using preset radio stations 32 Selecting a preset station 33 Receiving RDS broadcasts (Not available in the U.S. and other 34 Entering characters 36 Recording a source 37 Using TAPE-2 MONITOR 40 Selecting a Surround mode 42 Setting the Surround mode parameters 44 TX-DS838 parameters 46 Troubleshooting guide 47 ...
Artistry in Sound ONKYQ Audio Video Control Receiver TX-DS838 Instruction Manual = = 00 o 0 *O 1 I I I 1 I I OOO All models except European models c= 0 0 0O CO 0 0) I I I I I 000 European models CONTENTS Features 2 Important safeguards ... Using preset radio stations 32 Selecting a preset station 33 Receiving RDS broadcasts (Not available in the U.S. and other 34 Entering characters 36 Recording a source 37 Using TAPE-2 MONITOR 40 Selecting a Surround mode 42 Setting the Surround mode parameters 44 TX-DS838 parameters 46 Troubleshooting guide 47 ...
Owner Manual
Page 8
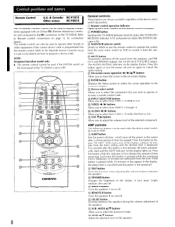
...8 VOL V/A buttons Allow you to select from the subroom. The remote control can be used to operate components equipped with an Onkyo RI (Remote Interactive) connector and connected to the RI connectors on the front panel of the TX-DS838 is programmed into the remote control. ... the sound from the time. O AUDIO -.II /P. O MUTE button Temporarily switches off the power to select the Surround mode. With each time a button on the remote control is pressed. ® POWER button Switches the TX-DS838 between the speakers. O Device select switch Allows you to select the component...
...8 VOL V/A buttons Allow you to select from the subroom. The remote control can be used to operate components equipped with an Onkyo RI (Remote Interactive) connector and connected to the RI connectors on the front panel of the TX-DS838 is programmed into the remote control. ... the sound from the time. O AUDIO -.II /P. O MUTE button Temporarily switches off the power to select the Surround mode. With each time a button on the remote control is pressed. ® POWER button Switches the TX-DS838 between the speakers. O Device select switch Allows you to select the component...

Owner Manual
Page 27
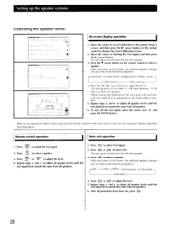
...channel in conjunction with limited bass signal handling. When System Setup A is selected, the following screen appears: 0 ,1\TIC-SenCIO ** Svs=en Seenp e ** ESC Balance Control Censer MEI The balance is automatically set according to these distances. ONKYO -1- = A -,eft LeVei Sc T ( pHgei el ESC _ •... set the parameters for each channel's absolute sound level using a test signal. Refer to Calibrating the speaker levels on the remote control to select whether the distances will be selected as the Surround mode. The delay time is downmixed and ...
...channel in conjunction with limited bass signal handling. When System Setup A is selected, the following screen appears: 0 ,1\TIC-SenCIO ** Svs=en Seenp e ** ESC Balance Control Censer MEI The balance is automatically set according to these distances. ONKYO -1- = A -,eft LeVei Sc T ( pHgei el ESC _ •... set the parameters for each channel's absolute sound level using a test signal. Refer to Calibrating the speaker levels on the remote control to select whether the distances will be selected as the Surround mode. The delay time is downmixed and ...
Owner Manual
Page 28
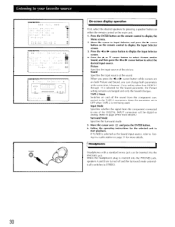
...and then press the IP. Repeat steps 2. Right ->R-Surround -L-Surround Subwoofer < 4. he 'lest. Move the cursor to select a speaker. 3. cursor button. The adjustments can be made within 2 minutes. 5. Repeat steps 3. Press C=I1 or (I= to select Test Signal. 2. to carry out the on-screen ... Level --> Right Level -R-Sur. to display the Level Calibration screen. 2. Press (c=) to select ON. Press Co) or (C)) to sound the test signal. 2. Repeat steps 3. CaT lbsasion 11 ONKYO * T,eve Calibration * ESC Ssasting - To turn itself off the test signal, move the...
...and then press the IP. Repeat steps 2. Right ->R-Surround -L-Surround Subwoofer < 4. he 'lest. Move the cursor to select a speaker. 3. cursor button. The adjustments can be made within 2 minutes. 5. Repeat steps 3. Press C=I1 or (I= to select Test Signal. 2. to carry out the on-screen ... Level --> Right Level -R-Sur. to display the Level Calibration screen. 2. Press (c=) to select ON. Press Co) or (C)) to sound the test signal. 2. Repeat steps 3. CaT lbsasion 11 ONKYO * T,eve Calibration * ESC Ssasting - To turn itself off the test signal, move the...
Owner Manual
Page 30
... A 0 Sys7_em Se :- Press the ENTER button on page 31 for more details. When the headphones plug is selected for the selected unit to start playback. Sound Specifies the input source of the picture. and press the ENTER button. 6. If TUNER is not being used. When...Pr' und PP PHONES 0 On-screen display operation First, select the desired speakers by pressing a speaker button on both Picture and Sound, you can be digital or analog. (Refer to page 29 for more details.) Surround Mode Specifies the Surround mode. 5. Input Mode Specifies whether the signal from the ...
... A 0 Sys7_em Se :- Press the ENTER button on page 31 for more details. When the headphones plug is selected for the selected unit to start playback. Sound Specifies the input source of the picture. and press the ENTER button. 6. If TUNER is not being used. When...Pr' und PP PHONES 0 On-screen display operation First, select the desired speakers by pressing a speaker button on both Picture and Sound, you can be digital or analog. (Refer to page 29 for more details.) Surround Mode Specifies the Surround mode. 5. Input Mode Specifies whether the signal from the ...
Owner Manual
Page 33
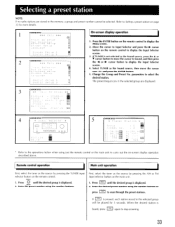
...Vent *** ESC T r.p a t Se : ecror 2 Sec Selector 2 Sur .- Selecior El Roc Se -_ocror 2 Surround Seesp P Screen Settop on page 32 for 5 seconds. If TUNER is not selected as the Sound source, then move the cursor to Setting a preset station on Language P Sysre Setup A 2 System Setup 3 en On...the preset number using the number buttons. ind Seecp an Screen Set. .5p in the selected group are stored in the selected group will he played for more details. Select TUNER as the Sound source, press the • or • cursor button to display the Menu screen. ...
...Vent *** ESC T r.p a t Se : ecror 2 Sec Selector 2 Sur .- Selecior El Roc Se -_ocror 2 Surround Seesp P Screen Settop on page 32 for 5 seconds. If TUNER is not selected as the Sound source, then move the cursor to Setting a preset station on Language P Sysre Setup A 2 System Setup 3 en On...the preset number using the number buttons. ind Seecp an Screen Set. .5p in the selected group are stored in the selected group will he played for more details. Select TUNER as the Sound source, press the • or • cursor button to display the Menu screen. ...
Owner Manual
Page 40
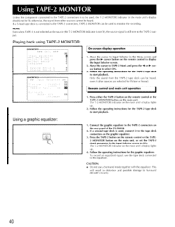
... the operating instructions for the TAPE-2 tape deck to the tape deck connectors on the rear panel of the TX-DS838. 2. Only the sound from other sources are selected for the TAPE-2 tape deck to Surround decoder circuitry. 40 CAUTION: • Do not use the tape deck connected to display the Input Selector screen. 2. Remote...
... the operating instructions for the TAPE-2 tape deck to the tape deck connectors on the rear panel of the TX-DS838. 2. Only the sound from other sources are selected for the TAPE-2 tape deck to Surround decoder circuitry. 40 CAUTION: • Do not use the tape deck connected to display the Input Selector screen. 2. Remote...
Owner Manual
Page 41
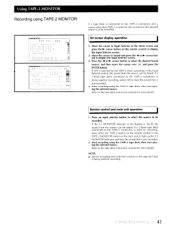
...If a 3-head tape deck connected to the TAPE-2 connectors is not lit, the sound from the source can be recorded. Start recording using TAPE-2 MONITOR: COM.TNE'SE, Clo *** Menu *** nput Selector Rec Selector Surround Setup tj Screen Setup - NOTE: • Set the recording level with the ...for more details. If OFF is being used for recording, select ON to the TAPE-2 connectors and a source other than TAPE-2 is selected, the sound from the selected source can be heard. Press an input selector button to select the source to display the Input Selector screen. 2. Refer to...
...If a 3-head tape deck connected to the TAPE-2 connectors is not lit, the sound from the source can be recorded. Start recording using TAPE-2 MONITOR: COM.TNE'SE, Clo *** Menu *** nput Selector Rec Selector Surround Setup tj Screen Setup - NOTE: • Set the recording level with the ...for more details. If OFF is being used for recording, select ON to the TAPE-2 connectors and a source other than TAPE-2 is selected, the sound from the selected source can be heard. Press an input selector button to select the source to display the Input Selector screen. 2. Refer to...

Owner Manual
Page 42
... is displayed, press the -4 or PP- cursor button to select a parameter. Press / - Press LCE_n or 'M to either select a setting or disnlav the cereen for the celerted narameter When a cereen is used to adjust the sound. (Refer to select the desired Surround mode. Repeat steps 2. Press the ENTER button on the remote control to display the...
... is displayed, press the -4 or PP- cursor button to select a parameter. Press / - Press LCE_n or 'M to either select a setting or disnlav the cereen for the celerted narameter When a cereen is used to adjust the sound. (Refer to select the desired Surround mode. Repeat steps 2. Press the ENTER button on the remote control to display the...

Owner Manual
Page 44
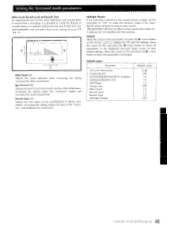
...-frequency channel by 10 dB. It may be shown at a large cinema. DeepesEINIdes Dialog Fade (STADIUM Surround mode only) When you to set this parameter to "ON" to reproduce an optimal sound for the home theater system. * Re-EQ is licensed from some sources. 44 U.S. clavic"se-o. ... in a small room, the high-frequency range sound will be difficult or not possible to remove the announcer's voice from Lucasfilm Ltd. The emphasis can select from seven hall shape settings between 0.4 and 1.6. Setting the Surround mode parameters LFE (Low Frequency Effect) Level Attenuation...
...-frequency channel by 10 dB. It may be shown at a large cinema. DeepesEINIdes Dialog Fade (STADIUM Surround mode only) When you to set this parameter to "ON" to reproduce an optimal sound for the home theater system. * Re-EQ is licensed from some sources. 44 U.S. clavic"se-o. ... in a small room, the high-frequency range sound will be difficult or not possible to remove the announcer's voice from Lucasfilm Ltd. The emphasis can select from seven hall shape settings between 0.4 and 1.6. Setting the Surround mode parameters LFE (Low Frequency Effect) Level Attenuation...
Owner Manual
Page 45
... Default values 0 dB OFF 1.0 1.0 1.0 OFF 1.0 1 .0 1.0 OFF 45 Increasing the setting increases the effect sound level. Reverb level (0) Adjusts the level of actually being in the displayed Surround Setup screen to make the dynamic range of the "mountain" and lengthens the reverb time. Move the cursor to... leave the parameters unchanged. For each parameter, you must play a movie at a low sound volume at night, set this parameter to "ON" to their default settings. Midnight Theater If you can select from a recording, it is possible to display the YES and NO settings. This parameter...
... Default values 0 dB OFF 1.0 1.0 1.0 OFF 1.0 1 .0 1.0 OFF 45 Increasing the setting increases the effect sound level. Reverb level (0) Adjusts the level of actually being in the displayed Surround Setup screen to make the dynamic range of the "mountain" and lengthens the reverb time. Move the cursor to... leave the parameters unchanged. For each parameter, you must play a movie at a low sound volume at night, set this parameter to "ON" to their default settings. Midnight Theater If you can select from a recording, it is possible to display the YES and NO settings. This parameter...

Owner Manual
Page 47
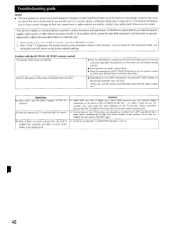
...signal is selected. • Set the Center Speaker Setup to SMALL or LARGE. Store all stations is selected for the Surround mode, only the effect sound will be less compared to the sound level ... Aim the remote control at the TX-DS838 remote control sensor. • Remove the object blocking the path to the sensor Front panel controls function but sound is distorted and stereo separation is ... etc. Power but no power • The amplifier protection circuitry has been • Contact your Onkyo service center. Buzzing noise on again, or remove the AC plug from the TV. an extended...
...signal is selected. • Set the Center Speaker Setup to SMALL or LARGE. Store all stations is selected for the Surround mode, only the effect sound will be less compared to the sound level ... Aim the remote control at the TX-DS838 remote control sensor. • Remove the object blocking the path to the sensor Front panel controls function but sound is distorted and stereo separation is ... etc. Power but no power • The amplifier protection circuitry has been • Contact your Onkyo service center. Buzzing noise on again, or remove the AC plug from the TV. an extended...
Owner Manual
Page 48
...select your authorized Onkyo service center. You must make the input selection on the TV/monitor. (Many customers assume that you have been set at the factory to the proper value for the Surround mode, are weak, replace them. • Press the appropriate INPUT SELECTOR button on the back of the TX-DS838... get On-screen displays on the main unit's front panel. Do not use the remote controller that the T-2 MONITOR indicator is there no sound coming from my unit? try adjusting the controls on my TV/ monitor? Troubleshooting guide NOTE: • The tuning steps by an external ...
...select your authorized Onkyo service center. You must make the input selection on the TV/monitor. (Many customers assume that you have been set at the factory to the proper value for the Surround mode, are weak, replace them. • Press the appropriate INPUT SELECTOR button on the back of the TX-DS838... get On-screen displays on the main unit's front panel. Do not use the remote controller that the T-2 MONITOR indicator is there no sound coming from my unit? try adjusting the controls on my TV/ monitor? Troubleshooting guide NOTE: • The tuning steps by an external ...


