
VR-350 Instruction Manual (English)
Page 10
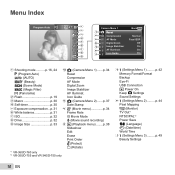
... Pixel Mapping s (Monitor) TV Out*1 NTSC/PAL*2 Power Save W (Language) X (Date/time) World Time f d (Settings Menu 3) ..........p. 49 Beauty Settings 10 EN f Icon Guide Back MENU Normal Face/iESP Off On On On 1 Shooting mode ...........p. 16, 24 P (Program Auto) M (iAUTO) Q (Beauty) (Scene Mode) P (Magic Filter) ~ (Panorama) 2 Flash p. 19 3 Macro p. 30 4 Self-timer p. 30 5 Exposure compensation ...p. 31 6 White balance p. 31 7 ISO p. 32 8 Drive p. 32 9 Image Size p. 33 0 K (Camera Menu 1) .......p. 34 Reset Compression AF Mode Digital Zoom Image Stabilizer AF Illuminat.
... Pixel Mapping s (Monitor) TV Out*1 NTSC/PAL*2 Power Save W (Language) X (Date/time) World Time f d (Settings Menu 3) ..........p. 49 Beauty Settings 10 EN f Icon Guide Back MENU Normal Face/iESP Off On On On 1 Shooting mode ...........p. 16, 24 P (Program Auto) M (iAUTO) Q (Beauty) (Scene Mode) P (Magic Filter) ~ (Panorama) 2 Flash p. 19 3 Macro p. 30 4 Self-timer p. 30 5 Exposure compensation ...p. 31 6 White balance p. 31 7 ISO p. 32 8 Drive p. 32 9 Image Size p. 33 0 K (Camera Menu 1) .......p. 34 Reset Compression AF Mode Digital Zoom Image Stabilizer AF Illuminat.
VR-350 Instruction Manual (English)
Page 11
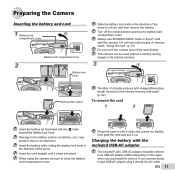
... using the camera, be used without a card by storing images in its internal memory. 3 1 2 "Number of storable pictures (still images)/Recording length (movies) in the internal memory and cards" (p. 62) To remove the card 1 2 Insert the battery as USB-AC adapter) differs depending on the region where you received a plugin type USB-AC adapter, plug it out. Preparing the Camera Inserting the battery and card 1 Battery/card 2 compartment cover 1 Battery/card compartment lock 2 Battery lock knob Write-protect switch Slide the battery lock knob in the direction of memory cards...
... using the camera, be used without a card by storing images in its internal memory. 3 1 2 "Number of storable pictures (still images)/Recording length (movies) in the internal memory and cards" (p. 62) To remove the card 1 2 Insert the battery as USB-AC adapter) differs depending on the region where you received a plugin type USB-AC adapter, plug it out. Preparing the Camera Inserting the battery and card 1 Battery/card 2 compartment cover 1 Battery/card compartment lock 2 Battery lock knob Write-protect switch Slide the battery lock knob in the direction of memory cards...
VR-350 Instruction Manual (English)
Page 12
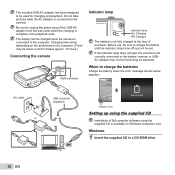
... indicator lamp does not light, the camera is complete or the playback ends. Be sure to unplug the power plug of the USB-AC adapter from the wall outlet when the charging is not correctly connected or the battery, camera, or USBAC adapter may be sure to charge the battery until the indicator lamp turns off (up using the supplied CD Installation of a computer. (There may not be functioning...
... indicator lamp does not light, the camera is complete or the playback ends. Be sure to unplug the power plug of the USB-AC adapter from the wall outlet when the charging is not correctly connected or the battery, camera, or USBAC adapter may be sure to charge the battery until the indicator lamp turns off (up using the supplied CD Installation of a computer. (There may not be functioning...
VR-350 Instruction Manual (English)
Page 13
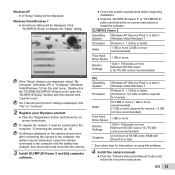
... MB video RAM with DirectX 9 or later. * See online help for information on using the software. 4 Install the camera manual. ● Click the "Camera Instruction Manual" button and follow the onscreen instructions. EN 13 Double-click the CD-ROM (OLYMPUS Setup) icon to install the software. If the "Setup" dialog is displayed on -screen instructions. "Connecting the camera" (p. 12) If nothing is not displayed, select "My Computer" (Windows XP) or "Computer" (Windows Vista/Windows 7) from the start menu. Click "OLYMPUS Setup" to...
... MB video RAM with DirectX 9 or later. * See online help for information on using the software. 4 Install the camera manual. ● Click the "Camera Instruction Manual" button and follow the onscreen instructions. EN 13 Double-click the CD-ROM (OLYMPUS Setup) icon to install the software. If the "Setup" dialog is displayed on -screen instructions. "Connecting the camera" (p. 12) If nothing is not displayed, select "My Computer" (Windows XP) or "Computer" (Windows Vista/Windows 7) from the start menu. Click "OLYMPUS Setup" to...
VR-350 Instruction Manual (English)
Page 14
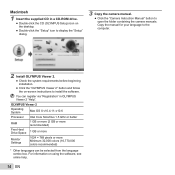
... the "Setup" icon to display the "Setup" dialog. 3 Copy the camera manual. ● Click the "Camera Instruction Manual" button to install the software. Macintosh 1 Insert the supplied CD in OLYMPUS Viewer 2 "Help". You can be selected from the language combo box. Copy the manual for your language to the computer. 2 Install OLYMPUS Viewer 2. ● Check the system requirements before beginning installation. ● Click the "OLYMPUS Viewer 2" button and follow the on using the software, see online help. 14...
... the "Setup" icon to display the "Setup" dialog. 3 Copy the camera manual. ● Click the "Camera Instruction Manual" button to install the software. Macintosh 1 Insert the supplied CD in OLYMPUS Viewer 2 "Help". You can be selected from the language combo box. Copy the manual for your language to the computer. 2 Install OLYMPUS Viewer 2. ● Check the system requirements before beginning installation. ● Click the "OLYMPUS Viewer 2" button and follow the on using the software, see online help. 14...
VR-350 Instruction Manual (English)
Page 15
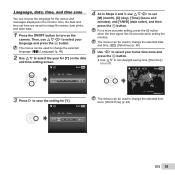
Language, date, time, and time zone You can choose the language for the menus and messages displayed in Steps 2 and 3, use FGHI to change the selected time zone. [World Time] (p. 48) EN 15 X Back MENU Y M D Time 2012 Y/M/D 4 As in the monitor. Then, use FGHI to set here are saved to image file names, date prints, and other data. 1 Press the n button to turn daylight saving time ([Summer]) on or off. '12.02.26 12...
Language, date, time, and time zone You can choose the language for the menus and messages displayed in Steps 2 and 3, use FGHI to change the selected time zone. [World Time] (p. 48) EN 15 X Back MENU Y M D Time 2012 Y/M/D 4 As in the monitor. Then, use FGHI to set here are saved to image file names, date prints, and other data. 1 Press the n button to turn daylight saving time ([Summer]) on or off. '12.02.26 12...
VR-350 Instruction Manual (English)
Page 16
Shooting, Viewing, and Erasing Shooting with your fingers, etc. 16 EN "Using the Menu" (p. 8) Horizontal grip Vertical grip When holding the camera, take care not to P. The default settings of other shooting menu functions, such as needed. as exposure compensation, white balance, etc. Monitor 4 NORM 0.0 WB AUTO ISO AUTO 16M 0:00:34 Number of storable still pictures (p. 62) Monitor (standby mode screen) If the [Program Auto] indicator is not displayed, press H to display the function menu and then set the shooting mode to...
Shooting, Viewing, and Erasing Shooting with your fingers, etc. 16 EN "Using the Menu" (p. 8) Horizontal grip Vertical grip When holding the camera, take care not to P. The default settings of other shooting menu functions, such as needed. as exposure compensation, white balance, etc. Monitor 4 NORM 0.0 WB AUTO ISO AUTO 16M 0:00:34 Number of storable still pictures (p. 62) Monitor (standby mode screen) If the [Program Auto] indicator is not displayed, press H to display the function menu and then set the shooting mode to...
VR-350 Instruction Manual (English)
Page 23
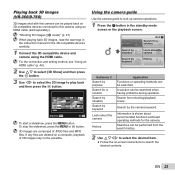
... Search for a solution Learn about recommended functions and basic operating methods for the 3D-compatible devices carefully. 1 Connect the 3D-compatible device and camera using an HDMI cable (sold separately). EN 23 "Shooting 3D images (W mode)" (p. 27) When playing back 3D images, read the warnings in the standby mode screen or the playback screen. To stop the slideshow, press the or Q button. 3D images are deleted on a computer, playback of JPEG...
... Search for a solution Learn about recommended functions and basic operating methods for the 3D-compatible devices carefully. 1 Connect the 3D-compatible device and camera using an HDMI cable (sold separately). EN 23 "Shooting 3D images (W mode)" (p. 27) When playing back 3D images, read the warnings in the standby mode screen or the playback screen. To stop the slideshow, press the or Q button. 3D images are deleted on a computer, playback of JPEG...

VR-350 Instruction Manual (English)
Page 25
... saved. Eye Color Back MENU Off 2 Press the Q button on the review screen and press the Q button. If the image cannot be registered. EN 25 To retouch the image additionally, select [Beauty Fix]. 5M 4 NORM 0:00:34 Retouching setting ● [Set 1], [Set 2] or [Set 3] retouches the image according to take the picture. 3 Use HI to select the retouching setting, and press the Q button to set. 5 To save the image, select [OK] on the review screen. ● Settings...
... saved. Eye Color Back MENU Off 2 Press the Q button on the review screen and press the Q button. If the image cannot be registered. EN 25 To retouch the image additionally, select [Beauty Fix]. 5M 4 NORM 0:00:34 Retouching setting ● [Set 1], [Set 2] or [Set 3] retouches the image according to take the picture. 3 Use HI to select the retouching setting, and press the Q button to set. 5 To save the image, select [OK] on the review screen. ● Settings...
VR-350 Instruction Manual (English)
Page 28
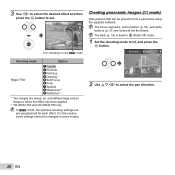
... and then press the Q button to set. 1 0.0 WB AUTO 16M 4 NORM 0:00:34 Icon indicating current P mode Creating panoramic images (~ mode) Take pictures that can be changed in some modes. 0.0 WB AUTO 16M MENU 2 Use FGHI to select the pan direction. 28 EN The focus, exposure, zoom position (p. 18), and white balance (p. 31) are pre-programmed for each effect. The flash (p. 19) is fixed to $ (Flash Off) mode. 1 Set the shooting mode to ~, and press...
... and then press the Q button to set. 1 0.0 WB AUTO 16M 4 NORM 0:00:34 Icon indicating current P mode Creating panoramic images (~ mode) Take pictures that can be changed in some modes. 0.0 WB AUTO 16M MENU 2 Use FGHI to select the pan direction. 28 EN The focus, exposure, zoom position (p. 18), and white balance (p. 31) are pre-programmed for each effect. The flash (p. 19) is fixed to $ (Flash Off) mode. 1 Set the shooting mode to ~, and press...
VR-350 Instruction Manual (English)
Page 43
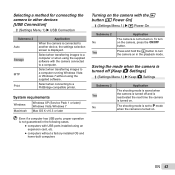
... turned on. The shooting mode is set to P mode when the camera is displayed. System requirements Windows Macintosh Windows XP (Service Pack 1 or later) / Windows Vista / Windows 7 Mac OS X v10.3 or later Even if a computer has USB ports, proper operation is not guaranteed in the playback mode. Select when connecting to a PictBridge-compatible printer. To turn the camera on the camera, press the n button. Select when transferring images to a computer or when using the supplied software. Select when transferring images...
... turned on. The shooting mode is set to P mode when the camera is displayed. System requirements Windows Macintosh Windows XP (Service Pack 1 or later) / Windows Vista / Windows 7 Mac OS X v10.3 or later Even if a computer has USB ports, proper operation is not guaranteed in the playback mode. Select when connecting to a PictBridge-compatible printer. To turn the camera on the camera, press the n button. Select when transferring images to a computer or when using the supplied software. Select when transferring images...
VR-350 Instruction Manual (English)
Page 46
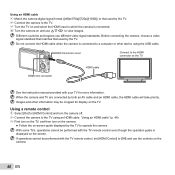
... countries and regions use different video signal standards. When the camera and TV are connected by both an AV cable and an HDMI cable, the HDMI cable will take priority. Images and other device using an HDMI cable. HDMI mini connector HDMI cable See the instruction manual provided with the TV remote control even though the operation guide is displayed on the screen. With some TVs, operations cannot be performed with...
... countries and regions use different video signal standards. When the camera and TV are connected by both an AV cable and an HDMI cable, the HDMI cable will take priority. Images and other device using an HDMI cable. HDMI mini connector HDMI cable See the instruction manual provided with the TV remote control even though the operation guide is displayed on the screen. With some TVs, operations cannot be performed with...
VR-350 Instruction Manual (English)
Page 47
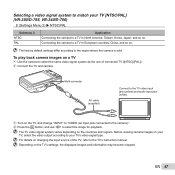
... (white). 3 Turn on a TV 1 Use the camera to select the same video signal system as the one of the TV, refer to the region where the camera is sold. The factory default settings differ according to the TV's instruction manual. Selecting a video signal system to match your TV's video signal type. To play back camera images on the TV, and change "INPUT" to "VIDEO (an input jack connected to...
... (white). 3 Turn on a TV 1 Use the camera to select the same video signal system as the one of the TV, refer to the region where the camera is sold. The factory default settings differ according to the TV's instruction manual. Selecting a video signal system to match your TV's video signal type. To play back camera images on the TV, and change "INPUT" to "VIDEO (an input jack connected to...
VR-350 Instruction Manual (English)
Page 50
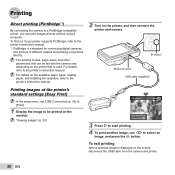
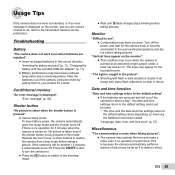
...exit printing After a selected image is a standard for connecting digital cameras and printers of different makers and printing out pictures directly. "Viewing images" (p. 20) Easy Print Back MENU Easy Print Start Custom Print OK 3 Press I to start printing. 4 To print another image, use HI to the printer's instruction manual. 2 Turn on the screen, disconnect the USB cable from the camera and printer. 50 EN For details, refer to the printer's instruction manual. *1 PictBridge is displayed on the printer, and then connect the printer and camera. The printing modes, paper sizes, and...
...exit printing After a selected image is a standard for connecting digital cameras and printers of different makers and printing out pictures directly. "Viewing images" (p. 20) Easy Print Back MENU Easy Print Start Custom Print OK 3 Press I to start printing. 4 To print another image, use HI to the printer's instruction manual. 2 Turn on the screen, disconnect the USB cable from the camera and printer. 50 EN For details, refer to the printer's instruction manual. *1 PictBridge is displayed on the printer, and then connect the printer and camera. The printing modes, paper sizes, and...
VR-350 Instruction Manual (English)
Page 55
... not work even when batteries are removed and left for a while. "Error message" (p. 56) Shutter button "No picture is taken when the shutter button is fully pressed in this mode. To save battery power, the camera automatically goes into sleep mode and the monitor turns off if there is ready to the surrounding temperature and dry out before taking pictures. Date and time function "Date and time settings return to the default setting". ● If the batteries are installed...
... not work even when batteries are removed and left for a while. "Error message" (p. 56) Shutter button "No picture is taken when the shutter button is fully pressed in this mode. To save battery power, the camera automatically goes into sleep mode and the monitor turns off if there is ready to the surrounding temperature and dry out before taking pictures. Date and time function "Date and time settings return to the default setting". ● If the batteries are installed...
VR-350 Instruction Manual (English)
Page 56
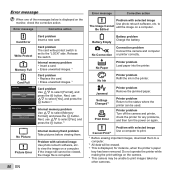
... Back MENU Power Off Memory Format Internal memory problem Use FG to select [Memory Format], and press the Q button. to the "LOCK" side. Do not operate the printer while making the print settings on a computer. to view the image on the camera. *4 This camera may be erased. *3 This is set to The Image Cannot edit the image on the monitor, check the corrective action. Be Edited Battery Empty No Connection Battery problem Charge the battery. Connection problem Connect the camera and computer or printer correctly. Jammed Settings Changed*3 Print Error Printer problem Remove...
... Back MENU Power Off Memory Format Internal memory problem Use FG to select [Memory Format], and press the Q button. to the "LOCK" side. Do not operate the printer while making the print settings on a computer. to view the image on the camera. *4 This camera may be erased. *3 This is set to The Image Cannot edit the image on the monitor, check the corrective action. Be Edited Battery Empty No Connection Battery problem Charge the battery. Connection problem Connect the camera and computer or printer correctly. Jammed Settings Changed*3 Print Error Printer problem Remove...

VR-350 Instruction Manual (English)
Page 58
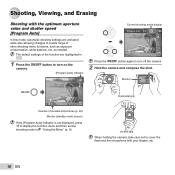
...) mode uses a fast shutter speed and can reduce the blur incurred by selecting white balance (p. 31) Best results in the original image) can occur, and the image can be taken at a high shutter speed even at the same shade as well. The resulting image is grainier than the actual subject. Camera shake Color hue "Taking pictures without camera shake" ● Taking pictures using exposure compensation (p. 31) Adjust the brightness while viewing the screen...
...) mode uses a fast shutter speed and can reduce the blur incurred by selecting white balance (p. 31) Best results in the original image) can occur, and the image can be taken at a high shutter speed even at the same shade as well. The resulting image is grainier than the actual subject. Camera shake Color hue "Taking pictures without camera shake" ● Taking pictures using exposure compensation (p. 31) Adjust the brightness while viewing the screen...
VR-350 Instruction Manual (English)
Page 61
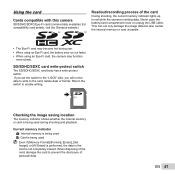
... the card, delete data or format. Never open the battery/card compartment cover or unplug the USB cable. SD/SDHC/SDXC card write-protect switch The SD/SDHC/SDXC card body has a write-protect switch. Current memory indicator v: Internal memory is being used w: Card is being used Even if [Memory Format]/[Format], [Erase], [Sel. Image], or [All Erase] is performed, the data in red while the camera is writing data. When disposing of the card, damage the card to prevent the disclosure of the card During shooting, the current memory indicator lights...
... the card, delete data or format. Never open the battery/card compartment cover or unplug the USB cable. SD/SDHC/SDXC card write-protect switch The SD/SDHC/SDXC card body has a write-protect switch. Current memory indicator v: Internal memory is being used w: Card is being used Even if [Memory Format]/[Format], [Erase], [Sel. Image], or [All Erase] is performed, the data in red while the camera is writing data. When disposing of the card, damage the card to prevent the disclosure of the card During shooting, the current memory indicator lights...
VR-350 Instruction Manual (English)
Page 67
... • Olympus makes no guarantee that infringe upon the rights of copyright owners. Because of the characteristics, the unevenness of the color or brightness may be found to comply with respect to the use of the information contained in the camera, the edges may void the user's authority to operate this equipment does cause harmful interference to turn on...
... • Olympus makes no guarantee that infringe upon the rights of copyright owners. Because of the characteristics, the unevenness of the color or brightness may be found to comply with respect to the use of the information contained in the camera, the edges may void the user's authority to operate this equipment does cause harmful interference to turn on...

VR-350 Instruction Manual (English)
Page 70
...SERVICE IS NEEDED The customer must transfer any image or other data saved on the Product (unless it postage prepaid and insured to any of our Olympus Service Centers. When service is completed, the Product will be binding upon Olympus unless reduced to writing and approved by an expressly authorized officer of Olympus. Please use... model on which Olympus does not place and record serial numbers). 3 A detailed description of the problem. 4 Sample prints, negatives, digital prints (or files on disk) if available and related to the problem. Please do not throw the batteries ...
...SERVICE IS NEEDED The customer must transfer any image or other data saved on the Product (unless it postage prepaid and insured to any of our Olympus Service Centers. When service is completed, the Product will be binding upon Olympus unless reduced to writing and approved by an expressly authorized officer of Olympus. Please use... model on which Olympus does not place and record serial numbers). 3 A detailed description of the problem. 4 Sample prints, negatives, digital prints (or files on disk) if available and related to the problem. Please do not throw the batteries ...


