
SP-610UZ Instruction Manual (English)
Page 1
Keep this manual. Before you start to use your camera before taking important photographs. ● In the interest of continually improving products, Olympus reserves the right to enjoy optimum performance and a longer service life. DIGITAL CAMERA SP-610UZ Instruction Manual ● Thank you take test shots to get accustomed to your new camera, please read these instructions carefully to update or modify information contained in this manual in a safe place for future reference. ● We recommend that you for purchasing an Olympus digital camera.
Keep this manual. Before you start to use your camera before taking important photographs. ● In the interest of continually improving products, Olympus reserves the right to enjoy optimum performance and a longer service life. DIGITAL CAMERA SP-610UZ Instruction Manual ● Thank you take test shots to get accustomed to your new camera, please read these instructions carefully to update or modify information contained in this manual in a safe place for future reference. ● We recommend that you for purchasing an Olympus digital camera.
SP-610UZ Instruction Manual (English)
Page 16
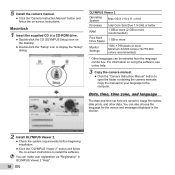
... set here are saved to open the folder containing the camera manuals. For information on -screen instructions. Copy the manual for the menus and messages displayed in the monitor. 2 Install OLYMPUS Viewer 2. ● Check the system requirements before beginning installation. ● Click the "OLYMPUS Viewer 2" button and follow the on using the software, see...
... set here are saved to open the folder containing the camera manuals. For information on -screen instructions. Copy the manual for the menus and messages displayed in the monitor. 2 Install OLYMPUS Viewer 2. ● Check the system requirements before beginning installation. ● Click the "OLYMPUS Viewer 2" button and follow the on using the software, see...
SP-610UZ Instruction Manual (English)
Page 25
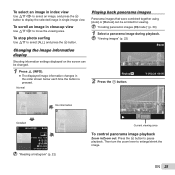
... shown below each time the button is pressed. Normal 3D 10 4/30 Playing back panorama images Panorama images that were combined together using [Auto] or [Manual] can be scrolled for viewing. "Creating panoramic images (p mode)" (p. 30) 1 Select a panorama image during playback. "Viewing images" (p. 22) 4/30 Replay OK 2 Press the A button. '11...
... shown below each time the button is pressed. Normal 3D 10 4/30 Playing back panorama images Panorama images that were combined together using [Auto] or [Manual] can be scrolled for viewing. "Creating panoramic images (p mode)" (p. 30) 1 Select a panorama image during playback. "Viewing images" (p. 22) 4/30 Replay OK 2 Press the A button. '11...
SP-610UZ Instruction Manual (English)
Page 26
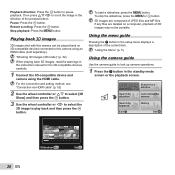
... slideshow, press the m or A button. 3D images are deleted on 3D-compatible devices connected to look up camera operations. 1 Press the E button in the instruction manual for a solution Learn about the camera History Set OK 26 EN Slideshow MENU Set OK Search by purpose Search by situation Search by keyword Exit...
... slideshow, press the m or A button. 3D images are deleted on 3D-compatible devices connected to look up camera operations. 1 Press the E button in the instruction manual for a solution Learn about the camera History Set OK 26 EN Slideshow MENU Set OK Search by purpose Search by situation Search by keyword Exit...
SP-610UZ Instruction Manual (English)
Page 30
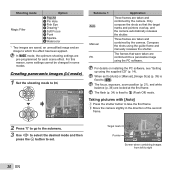
...shooting settings are taken and combined by the camera. For details on installing the PC software, see "Setting up using the guide frame and manually releases the shutter. For this reason, some settings cannot be changed in the direction of the second frame. Only compose the shots so that...by the camera. AUTO Target mark Pointer Cancel MENU Save OK Screen when combining images from left to $ (Flash Off) mode. Submenu 1 Auto Manual PC Application Three frames are pre-programmed for each scene effect. Shooting mode Magic Filter Option [ Pop Art \ Pin Hole ] Fish Eye @ Drawing*1 ;...
...shooting settings are taken and combined by the camera. For details on installing the PC software, see "Setting up using the guide frame and manually releases the shutter. For this reason, some settings cannot be changed in the direction of the second frame. Only compose the shots so that...by the camera. AUTO Target mark Pointer Cancel MENU Save OK Screen when combining images from left to $ (Flash Off) mode. Submenu 1 Auto Manual PC Application Three frames are pre-programmed for each scene effect. Shooting mode Magic Filter Option [ Pop Art \ Pin Hole ] Fish Eye @ Drawing*1 ;...
SP-610UZ Instruction Manual (English)
Page 31
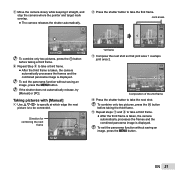
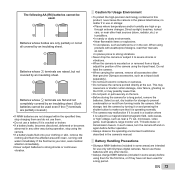
...;rst frame. To exit the panorama function without saving an image, press the m button. If the shutter does not automatically release, try [Manual] or [PC]. MANUAL 1 2 Cancel MENU Save OK Composition of the 2nd frame 4 Press the shutter button to take the next shot. 3 Move the camera ... the next frame Set OK 1st frame Cancel MENU Save OK 3 Compose the next shot so that joint area 1 overlaps joint area 2. Joint areas MANUAL 1 MANUAL 2 Cancel MENU Save OK To combine only two pictures, press the A button before taking a third frame. 4 Repeat Step 3 to take a third frame...
...;rst frame. To exit the panorama function without saving an image, press the m button. If the shutter does not automatically release, try [Manual] or [PC]. MANUAL 1 2 Cancel MENU Save OK Composition of the 2nd frame 4 Press the shutter button to take the next shot. 3 Move the camera ... the next frame Set OK 1st frame Cancel MENU Save OK 3 Compose the next shot so that joint area 1 overlaps joint area 2. Joint areas MANUAL 1 MANUAL 2 Cancel MENU Save OK To combine only two pictures, press the A button before taking a third frame. 4 Repeat Step 3 to take a third frame...
SP-610UZ Instruction Manual (English)
Page 32
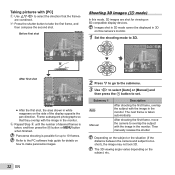
.... 3 Repeat Step 2 until the number of the display opposite the pan direction. Images shot in 3D mode cannot be displayed in the monitor. Then manually release the shutter. Refer to the PC software help guide for up to take the first frame, and then compose the second shot. Depending... on how to make panorama images. 4 14M NORM MENU 2 Press G to go to the submenu. 3 Use HI to select [Auto] or [Manual] and then press the A button to set. Before first shot PC Set OK Shooting 3D images (W mode) In this camera's monitor. 1 Set the shooting...
.... 3 Repeat Step 2 until the number of the display opposite the pan direction. Images shot in 3D mode cannot be displayed in the monitor. Then manually release the shutter. Refer to the PC software help guide for up to take the first frame, and then compose the second shot. Depending... on how to make panorama images. 4 14M NORM MENU 2 Press G to go to the submenu. 3 Use HI to select [Auto] or [Manual] and then press the A button to set. Before first shot PC Set OK Shooting 3D images (W mode) In this camera's monitor. 1 Set the shooting...

SP-610UZ Instruction Manual (English)
Page 33
EN 33 To exit 3D shooting mode without saving an image, press the m button. Taking pictures with [Manual] 1 Press the shutter button to shoot the first frame. 2 Overlap the subject with the image that is faintly displayed in the monitor, and choose the position for the second frame. 3 Press the shutter button to shoot the first frame. 2 Overlap the subject with the image that is faintly displayed in the monitor. ● The picture is taken automatically. Taking pictures with [Auto] 1 Press the shutter button to take the second shot.
EN 33 To exit 3D shooting mode without saving an image, press the m button. Taking pictures with [Manual] 1 Press the shutter button to shoot the first frame. 2 Overlap the subject with the image that is faintly displayed in the monitor, and choose the position for the second frame. 3 Press the shutter button to shoot the first frame. 2 Overlap the subject with the image that is faintly displayed in the monitor. ● The picture is taken automatically. Taking pictures with [Auto] 1 Press the shutter button to take the second shot.

SP-610UZ Instruction Manual (English)
Page 34
... option in lowlight or backlight conditions. The flash settings cannot be selected to best match the shooting conditions. 1 Lift up the flash unit manually. 3 Use HI to select the setting option, and press the A button to $ (Flash Off) mode. 2 Select the flash option in your photos. P Off 0.0 WB...
... option in lowlight or backlight conditions. The flash settings cannot be selected to best match the shooting conditions. 1 Lift up the flash unit manually. 3 Use HI to select the setting option, and press the A button to $ (Flash Off) mode. 2 Select the flash option in your photos. P Off 0.0 WB...
SP-610UZ Instruction Manual (English)
Page 42
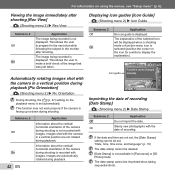
..., see "Setup menu" (p. 6). This function may not work properly if the camera is displayed. Images are not set, the [Date Stamp] setting cannot be changed manually. 0.0 WB AUTO ISO AUTO 4 14M NORM MENU Imprinting the date of the camera during shooting is not displayed. The image being recorded is not recorded...
..., see "Setup menu" (p. 6). This function may not work properly if the camera is displayed. Images are not set, the [Date Stamp] setting cannot be changed manually. 0.0 WB AUTO ISO AUTO 4 14M NORM MENU Imprinting the date of the camera during shooting is not displayed. The image being recorded is not recorded...
SP-610UZ Instruction Manual (English)
Page 48
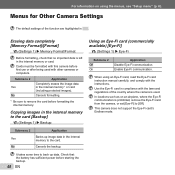
... use or after being used . Enable Eye-Fi communication. In locations such as on using an Eye-Fi card, read the Eye-Fi card instruction manual carefully, and comply with the laws and regulations of the function are highlighted in the internal memory to back up image data in . Copying images...
... use or after being used . Enable Eye-Fi communication. In locations such as on using an Eye-Fi card, read the Eye-Fi card instruction manual carefully, and comply with the laws and regulations of the function are highlighted in the internal memory to back up image data in . Copying images...
SP-610UZ Instruction Manual (English)
Page 52
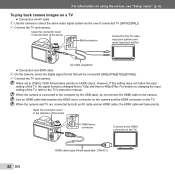
... HDMI micro connector on the camera and the HDMI connector on using the menus, see "Setup menu" (p. 6). HDMI micro connector Connect to the TV's instruction manual. For details on changing the input setting of the TV, the signal format is connected to the computer by both an AV cable and an...
... HDMI micro connector on the camera and the HDMI connector on using the menus, see "Setup menu" (p. 6). HDMI micro connector Connect to the TV's instruction manual. For details on changing the input setting of the TV, the signal format is connected to the computer by both an AV cable and an...

SP-610UZ Instruction Manual (English)
Page 53
... displayed on the camera, and use HI to the camera)." For details on changing the input source of the TV, refer to the TV's instruction manual. 4 Turn on the screen.
... displayed on the camera, and use HI to the camera)." For details on changing the input source of the TV, refer to the TV's instruction manual. 4 Turn on the screen.

SP-610UZ Instruction Manual (English)
Page 55
To find out if your printer supports PictBridge, refer to the printer's instruction manual. 2 Turn on the available paper types, loading paper, and installing ink cassettes, refer to the printer's instruction manual. *1 PictBridge is used. Open the connector cover in the direction of different makers and printing out pictures directly. EN 55... Connection] (p. 49) 1 Display the image to select an image, and press the A button. Printing Direct printing (PictBridge*1) By connecting the camera to the printer's instruction manual.
To find out if your printer supports PictBridge, refer to the printer's instruction manual. 2 Turn on the available paper types, loading paper, and installing ink cassettes, refer to the printer's instruction manual. *1 PictBridge is used. Open the connector cover in the direction of different makers and printing out pictures directly. EN 55... Connection] (p. 49) 1 Display the image to select an image, and press the A button. Printing Direct printing (PictBridge*1) By connecting the camera to the printer's instruction manual.

SP-610UZ Instruction Manual (English)
Page 66
...the battery manufacturer and shooting conditions. Monitor • Wipe gently with a lens cleaner. Mold may cause the camera to the instruction manual for extended periods, remove the battery, USB-AC adapter (sold separately) and card, and keep in a cool, dry place ...8226; Power consumption by the camera varies depending on which functions are reusable and economical. AA NiMH batteries (rechargeable batteries) Being rechargeable, Olympus NiMH batteries are used. • During the conditions described below, power is consumed continuously and the battery becomes exhausted quickly. •...
...the battery manufacturer and shooting conditions. Monitor • Wipe gently with a lens cleaner. Mold may cause the camera to the instruction manual for extended periods, remove the battery, USB-AC adapter (sold separately) and card, and keep in a cool, dry place ...8226; Power consumption by the camera varies depending on which functions are reusable and economical. AA NiMH batteries (rechargeable batteries) Being rechargeable, Olympus NiMH batteries are used. • During the conditions described below, power is consumed continuously and the battery becomes exhausted quickly. •...
SP-610UZ Instruction Manual (English)
Page 67
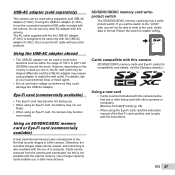
...the use . • When using an Eye-Fi card, the battery may run out faster. • When using the Eye-Fi card, read the instruction manual of larger capacity cards enables you to take more slowly. However, depending on the country or area you will not be erased, and retouching is... also available with this camera SD/SDHC/SDXC memory cards and Eye-Fi cards (for compatibility card details, visit the Olympus website.) Using a new card • Cards must be shaped differently and the USB-AC adapter may function more pictures. Do not use travel voltage ...
...the use . • When using an Eye-Fi card, the battery may run out faster. • When using the Eye-Fi card, read the instruction manual of larger capacity cards enables you to take more slowly. However, depending on the country or area you will not be erased, and retouching is... also available with this camera SD/SDHC/SDXC memory cards and Eye-Fi cards (for compatibility card details, visit the Olympus website.) Using a new card • Cards must be shaped differently and the USB-AC adapter may function more pictures. Do not use travel voltage ...
SP-610UZ Instruction Manual (English)
Page 71
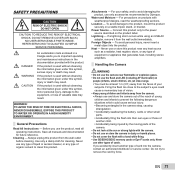
... a metal object into their own eyes or those of another type of valuable data may result. REFER SERVICING TO QUALIFIED OLYMPUS SERVICE PERSONNEL. Connect this symbol, minor personal injury, damage to important operating and maintenance instructions in dusty or humid places....For precautions on the product label. Never use or store the camera in the documentation provided with weatherproof designs, read all manuals and documentation for cleaning. DANGER WARNING CAUTION An exclamation mark enclosed in the camera strap, causing strangulation. • Accidentally ...
... a metal object into their own eyes or those of another type of valuable data may result. REFER SERVICING TO QUALIFIED OLYMPUS SERVICE PERSONNEL. Connect this symbol, minor personal injury, damage to important operating and maintenance instructions in dusty or humid places....For precautions on the product label. Never use or store the camera in the documentation provided with weatherproof designs, read all manuals and documentation for cleaning. DANGER WARNING CAUTION An exclamation mark enclosed in the camera strap, causing strangulation. • Accidentally ...
SP-610UZ Instruction Manual (English)
Page 73
...on again before using the tripod head. Battery Handling Precautions • Olympus NiMH batteries (included in a location where it is used . Batteries whose - Caution for use these batteries with weatherproof designs, read their manuals as well. • In places prone to strong vibrations. •...; Never drop the camera or subject it to a magnetic/electromagnetic field, radio waves, or high voltage, such as near other than genuine Olympus accessories, such as bathrooms...
...on again before using the tripod head. Battery Handling Precautions • Olympus NiMH batteries (included in a location where it is used . Batteries whose - Caution for use these batteries with weatherproof designs, read their manuals as well. • In places prone to strong vibrations. •...; Never drop the camera or subject it to a magnetic/electromagnetic field, radio waves, or high voltage, such as near other than genuine Olympus accessories, such as bathrooms...

SP-610UZ Instruction Manual (English)
Page 74
...information contained therein. When using NiMH or NiCd batteries, always read the provided instructions. • The number of pictures you . • Olympus reserves all rights to 86°F) • Using, charging or storing the batteries outside these written materials or software, or for consequential ...or warranties regarding any damages, or benefit expected by using this unit lawfully, or any benefit expected by using this manual. Always unload the batteries from a third person, which run down at low temperatures may be restored after they are warmed at low...
...information contained therein. When using NiMH or NiCd batteries, always read the provided instructions. • The number of pictures you . • Olympus reserves all rights to 86°F) • Using, charging or storing the batteries outside these written materials or software, or for consequential ...or warranties regarding any damages, or benefit expected by using this unit lawfully, or any benefit expected by using this manual. Always unload the batteries from a third person, which run down at low temperatures may be restored after they are warmed at low...

SP-610UZ Instruction Manual (English)
Page 80
... the name of the dealer, the serial number and the year, month and date of purchase are the "Design rule for the authorized international Olympus service network. THIS PRODUCT IS LICENSED UNDER THE AVC PATENT PORTFOLIO LICENSE FOR THE PERSONAL AND NONCOMMERCIAL USE OF A CONSUMER TO (i) ENCODE VIDEO ... trademarks and/or trademarks of inability to use of their respective owners. • The standards for camera file systems referred to in this manual are all completed. 2 Since this Warranty Certificate will not be re-issued, keep it . * Please refer to the appended list ...
... the name of the dealer, the serial number and the year, month and date of purchase are the "Design rule for the authorized international Olympus service network. THIS PRODUCT IS LICENSED UNDER THE AVC PATENT PORTFOLIO LICENSE FOR THE PERSONAL AND NONCOMMERCIAL USE OF A CONSUMER TO (i) ENCODE VIDEO ... trademarks and/or trademarks of inability to use of their respective owners. • The standards for camera file systems referred to in this manual are all completed. 2 Since this Warranty Certificate will not be re-issued, keep it . * Please refer to the appended list ...


