

SP-610UZ Instruction Manual (English)
Page 3
Camera Settings Using the Direct Buttons Frequently used functions can be accessed using the direct buttons. Zoom lever (p. 21, 24) Shutter button (p. 20, 61) Movie record button (p. 20) q button (switching between shooting and playback) (p. 20, 22, 47) m button (p. 6) E button (camera guide/ menu guide) (p. 26) EN 3
Camera Settings Using the Direct Buttons Frequently used functions can be accessed using the direct buttons. Zoom lever (p. 21, 24) Shutter button (p. 20, 61) Movie record button (p. 20) q button (switching between shooting and playback) (p. 20, 22, 47) m button (p. 6) E button (camera guide/ menu guide) (p. 26) EN 3
SP-610UZ Instruction Manual (English)
Page 4
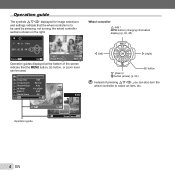
... . 1 Reset 2 Image Size 14M Compression Normal Shadow Adjust Auto 1 AF Mode Face/iESP 2 ESP/ ESP 3 Digital Zoom Off Sel. Set OK Operation guide OK Erase/Cancel MENU 4 EN Image 5/30 Exit MENU Set OK Wheel controller F (up) / INFO button (changing information display) (p. 22, 25) H...) / D button (erase) (p. 24) A button Instead of the screen indicate that the wheel controller is to select an item, etc. Operation guide The symbols FGHI displayed for image selections and settings indicate that the m button, A button, or zoom lever can also turn the wheel controller to...
... . 1 Reset 2 Image Size 14M Compression Normal Shadow Adjust Auto 1 AF Mode Face/iESP 2 ESP/ ESP 3 Digital Zoom Off Sel. Set OK Operation guide OK Erase/Cancel MENU 4 EN Image 5/30 Exit MENU Set OK Wheel controller F (up) / INFO button (changing information display) (p. 22, 25) H...) / D button (erase) (p. 24) A button Instead of the screen indicate that the wheel controller is to select an item, etc. Operation guide The symbols FGHI displayed for image selections and settings indicate that the m button, A button, or zoom lever can also turn the wheel controller to...
SP-610UZ Instruction Manual (English)
Page 10
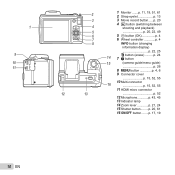
... shooting and playback) 5 p. 20, 22, 49 6 5 A button (OK p. 4 7 6 Wheel controller p. 4 8 INFO button (changing information display) p. 22, 25 14 D button (erase) ..........p. 24 7 E button 15 (camera guide/menu guide) p. 26 8 m button p. 4, 6 9 Connector cover p. 15, 52, 55 16 10 Multi-connector p. 15, 52, 55 11 HDMI micro connector 12 13 p. 52 12 Microphone p. 43, 45...
... shooting and playback) 5 p. 20, 22, 49 6 5 A button (OK p. 4 7 6 Wheel controller p. 4 8 INFO button (changing information display) p. 22, 25 14 D button (erase) ..........p. 24 7 E button 15 (camera guide/menu guide) p. 26 8 m button p. 4, 6 9 Connector cover p. 15, 52, 55 16 10 Multi-connector p. 15, 52, 55 11 HDMI micro connector 12 13 p. 52 12 Microphone p. 43, 45...
SP-610UZ Instruction Manual (English)
Page 26
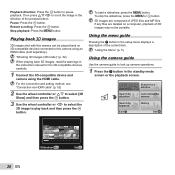
Then press FGHI to scroll the image in the standby mode screen or the playback screen. "Using the Menu" (p. 5) Using the camera guide Use the camera guide to this camera can be possible. Pause: Press the A button. If any files are composed of the current item. Search by .... 3 Use the wheel controller or HI to select the 3D image to pause playback. To start a slideshow, press the m button. Using the menu guide Pressing the E button in the instruction manual for a solution Learn about the camera History Set OK 26 EN Slideshow MENU Set OK Restart scrolling: Press...
Then press FGHI to scroll the image in the standby mode screen or the playback screen. "Using the Menu" (p. 5) Using the camera guide Use the camera guide to this camera can be possible. Pause: Press the A button. If any files are composed of the current item. Search by .... 3 Use the wheel controller or HI to select the 3D image to pause playback. To start a slideshow, press the m button. Using the menu guide Pressing the E button in the instruction manual for a solution Learn about the camera History Set OK 26 EN Slideshow MENU Set OK Restart scrolling: Press...
SP-610UZ Instruction Manual (English)
Page 30
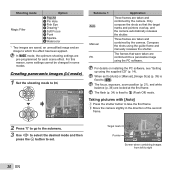
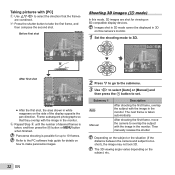
... direction of the second frame. Compose the shots using the supplied CD" (p. 14). For details on installing the PC software, see "Setting up using the guide frame and manually releases the shutter. Taking pictures with [Auto] 1 Press the shutter button to which the effect has been applied. Panorama 3D AUTO 0.0 WB...
... direction of the second frame. Compose the shots using the supplied CD" (p. 14). For details on installing the PC software, see "Setting up using the guide frame and manually releases the shutter. Taking pictures with [Auto] 1 Press the shutter button to which the effect has been applied. Panorama 3D AUTO 0.0 WB...
SP-610UZ Instruction Manual (English)
Page 32
... After first shot PC 1 2 Exit MENU ● After the first shot, the area shown in the monitor. Refer to the PC software help guide for viewing on this mode, 3D images are combined. 2 Press the shutter button to set. Frame subsequent photographs so that the frames are shot for...
... After first shot PC 1 2 Exit MENU ● After the first shot, the area shown in the monitor. Refer to the PC software help guide for viewing on this mode, 3D images are combined. 2 Press the shutter button to set. Frame subsequent photographs so that the frames are shot for...
SP-610UZ Instruction Manual (English)
Page 42
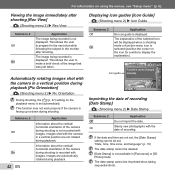
...is set . Information about the vertical/ horizontal orientation of recording. Images shot with images. Displaying icon guides [Icon Guide] J (Shooting menu 2) X Icon Guide Submenu 2 Off On Application No icon guide is recorded with the camera in the monitor after shooting [Rec View] J (Shooting menu 2) X...] J (Shooting menu 2) X Pic Orientation During shooting, the [y] (p. 47) setting on the playback menu is not displayed. Icon guide Program Auto 3D P Functions can be imprinted when taking sequential shots. This allows the user to prepare for a while to display the ...
...is set . Information about the vertical/ horizontal orientation of recording. Images shot with images. Displaying icon guides [Icon Guide] J (Shooting menu 2) X Icon Guide Submenu 2 Off On Application No icon guide is recorded with the camera in the monitor after shooting [Rec View] J (Shooting menu 2) X...] J (Shooting menu 2) X Pic Orientation During shooting, the [y] (p. 47) setting on the playback menu is not displayed. Icon guide Program Auto 3D P Functions can be imprinted when taking sequential shots. This allows the user to prepare for a while to display the ...
SP-610UZ Instruction Manual (English)
Page 44
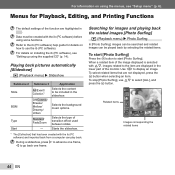
... for details on how to go back one frame, H to use FG to start [Photo Surfing]. Refer to the ib (PC software) help guide for Playback, Editing, and Printing Functions The default settings of transition effect used between slides. ― Starts the slideshow. *1 The [Collection] that are displayed in...
... for details on how to go back one frame, H to use FG to start [Photo Surfing]. Refer to the ib (PC software) help guide for Playback, Editing, and Printing Functions The default settings of transition effect used between slides. ― Starts the slideshow. *1 The [Collection] that are displayed in...

SP-610UZ Instruction Manual (English)
Page 45
... use FGHI to move the frame. Using the ib (PC software) and importing data back to the camera Refer to the ib (PC software) help guide for approx. 4 seconds while playing back the image. EN 45 For information on the pictures edited by other applications. 1 Use HI to select an image...
... use FGHI to move the frame. Using the ib (PC software) and importing data back to the camera Refer to the ib (PC software) help guide for approx. 4 seconds while playing back the image. EN 45 For information on the pictures edited by other applications. 1 Use HI to select an image...

SP-610UZ Instruction Manual (English)
Page 53
... on the camera, and use HI to the camera)." With some TVs, operations cannot be performed with the TV remote control even though the operation guide is displayed on the TV, and change "INPUT" to "VIDEO (an input jack connected to select the image for the menus and error messages displayed... 53 To operate images with the TV remote control 1 Set [HDMI Control] to [On], and turn on the camera. ● Operate by following the operation guide that is displayed on the TV's settings, the displayed images and information may become cropped. When the camera is selected.
... on the camera, and use HI to the camera)." With some TVs, operations cannot be performed with the TV remote control even though the operation guide is displayed on the TV, and change "INPUT" to "VIDEO (an input jack connected to select the image for the menus and error messages displayed... 53 To operate images with the TV remote control 1 Set [HDMI Control] to [On], and turn on the camera. ● Operate by following the operation guide that is displayed on the TV's settings, the displayed images and information may become cropped. When the camera is selected.

