
SP-610UZ Instruction Manual (English)
Page 1
Keep this manual in this manual. Before you take test shots to get accustomed to your new camera, please read these instructions carefully to update or modify information contained in a safe place for purchasing an Olympus digital camera. DIGITAL CAMERA SP-610UZ Instruction Manual ● Thank you for future reference. ● We recommend that you start to use your camera before taking important photographs. ● In the interest of continually improving products, Olympus reserves the right to enjoy optimum performance and a longer service life.
Keep this manual in this manual. Before you take test shots to get accustomed to your new camera, please read these instructions carefully to update or modify information contained in a safe place for purchasing an Olympus digital camera. DIGITAL CAMERA SP-610UZ Instruction Manual ● Thank you for future reference. ● We recommend that you start to use your camera before taking important photographs. ● In the interest of continually improving products, Olympus reserves the right to enjoy optimum performance and a longer service life.
SP-610UZ Instruction Manual (English)
Page 2
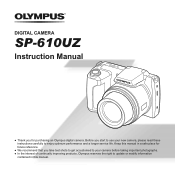
1 Step Checking the contents of the box Digital camera Camera Strap Lens cap and lens USB cable AV cable cap strap Four AA batteries OLYMPUS Setup CD-ROM Other accessories not shown: Warranty card Contents may vary depending on purchase location. 2 Step Preparing the Camera "Preparing the Camera" (p. 13) 3 Step ...
1 Step Checking the contents of the box Digital camera Camera Strap Lens cap and lens USB cable AV cable cap strap Four AA batteries OLYMPUS Setup CD-ROM Other accessories not shown: Warranty card Contents may vary depending on purchase location. 2 Step Preparing the Camera "Preparing the Camera" (p. 13) 3 Step ...

SP-610UZ Instruction Manual (English)
Page 3
Zoom lever (p. 21, 24) Shutter button (p. 20, 61) Movie record button (p. 20) q button (switching between shooting and playback) (p. 20, 22, 47) m button (p. 6) E button (camera guide/ menu guide) (p. 26) EN 3 Camera Settings Using the Direct Buttons Frequently used functions can be accessed using the direct buttons.
Zoom lever (p. 21, 24) Shutter button (p. 20, 61) Movie record button (p. 20) q button (switching between shooting and playback) (p. 20, 22, 47) m button (p. 6) E button (camera guide/ menu guide) (p. 26) EN 3 Camera Settings Using the Direct Buttons Frequently used functions can be accessed using the direct buttons.
SP-610UZ Instruction Manual (English)
Page 4
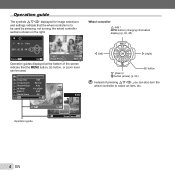
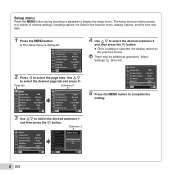
Set OK Operation guide OK Erase/Cancel MENU 4 EN X 4/30 Y M D Time 2011. 02 . 26 00 : 00 Y/M/D Cancel MENU Set OK Single Print NORM 14M FILE 100 0004 '11/02/26 00:00 Print OK More Operation guides displayed at the bottom of pressing FGHI, you can be used . 1 Reset 2 Image Size 14M Compression Normal Shadow Adjust Auto 1 AF Mode Face/iESP 2 ESP/ ESP 3 Digital Zoom Off Sel. Image 5/30 Exit MENU Set OK Wheel controller F (up) / INFO button (changing information display) (p. 22, 25) H (left) I (right) G (down) / D button (erase) (p. 24) A button Instead of the...
Set OK Operation guide OK Erase/Cancel MENU 4 EN X 4/30 Y M D Time 2011. 02 . 26 00 : 00 Y/M/D Cancel MENU Set OK Single Print NORM 14M FILE 100 0004 '11/02/26 00:00 Print OK More Operation guides displayed at the bottom of pressing FGHI, you can be used . 1 Reset 2 Image Size 14M Compression Normal Shadow Adjust Auto 1 AF Mode Face/iESP 2 ESP/ ESP 3 Digital Zoom Off Sel. Image 5/30 Exit MENU Set OK Wheel controller F (up) / INFO button (changing information display) (p. 22, 25) H (left) I (right) G (down) / D button (erase) (p. 24) A button Instead of the...
SP-610UZ Instruction Manual (English)
Page 5
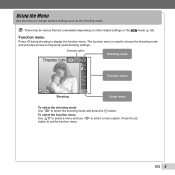
Selected option Program Auto 3D P Shooting mode 0.0 WB AUTO ISO AUTO 4 14M NORM Shooting Function menu Setup menu To select the shooting mode Use HI to set the function menu. EN 5 There may be menus that are unavailable depending on other related settings or the s mode (p. 28). Press the A button to select the shooting mode and press the A button. To select the function menu Use FG to select a menu and use HI to change camera settings such as the shooting mode. Using the Menu Use the menu to select a menu option. The function menu is used to choose the shooting mode and ...
Selected option Program Auto 3D P Shooting mode 0.0 WB AUTO ISO AUTO 4 14M NORM Shooting Function menu Setup menu To select the shooting mode Use HI to set the function menu. EN 5 There may be menus that are unavailable depending on other related settings or the s mode (p. 28). Press the A button to select the shooting mode and press the A button. To select the function menu Use FG to select a menu and use HI to change camera settings such as the shooting mode. Using the Menu Use the menu to select a menu option. The function menu is used to choose the shooting mode and ...
SP-610UZ Instruction Manual (English)
Page 6
Page tab Submenu 1 1 Reset 2 Image Size Compression Shadow Adjust 1 AF Mode 2 ESP/ 3 Digital Zoom Exit MENU 14M Normal Auto Face/iESP ESP Off Set OK 1 Reset 2 Image Size Compression Shadow Adjust 1 AF Mode 2 ESP/ 3 Digital Zoom Exit MENU 14M Normal Auto Face/iESP ESP Off Set OK 3 Use FG to display the setup menu. Submenu 2 1 Reset 2 Image Size Compression Shadow Adjust 1 AF Mode 2 ESP/ 3 Digital Zoom Exit MENU 14M Normal Auto Face/iESP ESP Off Set OK 1 Reset Digital Zoom 2 Image Size 14M Compression Shadow Adjust 1 AF Mode Normal OfAf uto FaOcne/iESP 2 ESP/ ESP 3 Digital ...
Page tab Submenu 1 1 Reset 2 Image Size Compression Shadow Adjust 1 AF Mode 2 ESP/ 3 Digital Zoom Exit MENU 14M Normal Auto Face/iESP ESP Off Set OK 1 Reset 2 Image Size Compression Shadow Adjust 1 AF Mode 2 ESP/ 3 Digital Zoom Exit MENU 14M Normal Auto Face/iESP ESP Off Set OK 3 Use FG to display the setup menu. Submenu 2 1 Reset 2 Image Size Compression Shadow Adjust 1 AF Mode 2 ESP/ 3 Digital Zoom Exit MENU 14M Normal Auto Face/iESP ESP Off Set OK 1 Reset Digital Zoom 2 Image Size 14M Compression Shadow Adjust 1 AF Mode Normal OfAf uto FaOcne/iESP 2 ESP/ ESP 3 Digital ...
SP-610UZ Instruction Manual (English)
Page 8
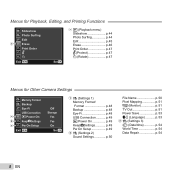
Menus for Playback, Editing, and Printing Functions 1 Slideshow 2 Photo Surfing Edit 1 Erase 1 Print Order 2R 3y Exit MENU Set OK 1 q (Playback menu) Slideshow p. 44 Photo Surfing p. 44 Edit p. 45 Erase p. 46 Print Order p. 47 R (Protect p. 47 y (Rotate p. 47 Menus for Other Camera Settings 1 Memory Format 2 Backup Eye-Fi USB Connection 1 1 q Power On 2 2 KeepzSettings 3 3 Pw On Setup Exit MENU Off Storage Yes Yes On Set OK 1 r (Settings 1) Memory Format/ Format p. 48 Backup p. 48 Eye-Fi p. 48 USB Connection........... p. 49 q Power On p. 49 KeepzSettings p. 49...
Menus for Playback, Editing, and Printing Functions 1 Slideshow 2 Photo Surfing Edit 1 Erase 1 Print Order 2R 3y Exit MENU Set OK 1 q (Playback menu) Slideshow p. 44 Photo Surfing p. 44 Edit p. 45 Erase p. 46 Print Order p. 47 R (Protect p. 47 y (Rotate p. 47 Menus for Other Camera Settings 1 Memory Format 2 Backup Eye-Fi USB Connection 1 1 q Power On 2 2 KeepzSettings 3 3 Pw On Setup Exit MENU Off Storage Yes Yes On Set OK 1 r (Settings 1) Memory Format/ Format p. 48 Backup p. 48 Eye-Fi p. 48 USB Connection........... p. 49 q Power On p. 49 KeepzSettings p. 49...
SP-610UZ Instruction Manual (English)
Page 10
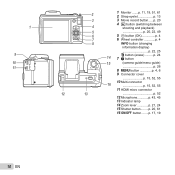
1 9 10 11 2 1 Monitor .......p. 11, 19, 51, 61 2 Strap eyelet p. 13 3 3 Movie record button......p. 20 4 4 q button (switching between shooting and playback) 5 p. 20, 22, 49 6 5 A button (OK p. 4 7 6 Wheel controller p. 4 8 INFO button (changing information display) p. 22, 25 14 D button (erase) ..........p. 24 7 E button 15 (camera guide/menu guide) p. 26 8 m button p. 4, 6 9 Connector cover p. 15, 52, 55 16 10 Multi-connector p. 15, 52, 55 11 HDMI micro connector 12 13 p. 52 12 Microphone p. 43, 45 13 Indicator lamp 14 Zoom lever p. 21, 24 ...
1 9 10 11 2 1 Monitor .......p. 11, 19, 51, 61 2 Strap eyelet p. 13 3 3 Movie record button......p. 20 4 4 q button (switching between shooting and playback) 5 p. 20, 22, 49 6 5 A button (OK p. 4 7 6 Wheel controller p. 4 8 INFO button (changing information display) p. 22, 25 14 D button (erase) ..........p. 24 7 E button 15 (camera guide/menu guide) p. 26 8 m button p. 4, 6 9 Connector cover p. 15, 52, 55 16 10 Multi-connector p. 15, 52, 55 11 HDMI micro connector 12 13 p. 52 12 Microphone p. 43, 45 13 Indicator lamp 14 Zoom lever p. 21, 24 ...
SP-610UZ Instruction Manual (English)
Page 11
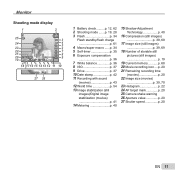
Monitor Shooting mode display 1 2 25 24 23 22 21 20 00:34 19 4 14M NORM P 3 4 5 P0.0 6 WB AUTO ISO AUTO 7 8 9 DATE 18 17 16 15 14 13 12 11 10 1/100 F3.3 27 26 1 Battery check..........p. 12, 62 2 Shooting mode .......p. 19, 28 3 Flash p. 34 Flash standby/flash charge p. 61 4 Macro/super macro ......p. 34 5 Self-timer p. 35 6 Exposure compensation p. 36 7 White balance p. 36 8 ISO p. 37 9 Drive p. 37 10 Date stamp p. 42 11 Recording with sound (movies p. 43 12 World time p. 54 13 Image stabilization (still images)/Digital image stabilization (movies p. ...
Monitor Shooting mode display 1 2 25 24 23 22 21 20 00:34 19 4 14M NORM P 3 4 5 P0.0 6 WB AUTO ISO AUTO 7 8 9 DATE 18 17 16 15 14 13 12 11 10 1/100 F3.3 27 26 1 Battery check..........p. 12, 62 2 Shooting mode .......p. 19, 28 3 Flash p. 34 Flash standby/flash charge p. 61 4 Macro/super macro ......p. 34 5 Self-timer p. 35 6 Exposure compensation p. 36 7 White balance p. 36 8 ISO p. 37 9 Drive p. 37 10 Date stamp p. 42 11 Recording with sound (movies p. 43 12 World time p. 54 13 Image stabilization (still images)/Digital image stabilization (movies p. ...

SP-610UZ Instruction Manual (English)
Page 12
Playback mode display ● Standard display 1 2 3 45 6 7 8 1 3D 10 4/30 9 '11/02/26 00:00 19 Still image 00:12/00:34 8 Movie ● Advanced display 1 2 3 45 6 7 8 11 12 13 14 3D 10 4/30 10 1/1000 F3.3 2.0 21 1/1000 F3.3 2.0 20 P ISO WB 100 AUTO NORM 14M P ISO WB 100 AUTO 15 16 NORM 14M 17 FILE 100 0004 18 FILE 100 0004 '11/02/26 00:00 '11/02/26 00:00 19 1 Battery check..........p. 12, 62 2 3D images p. 26 3 Print reservation/number of prints p. 59/p. 57 4 Eye-Fi transferred.........p. 48 5 Protect p. 47 6 Adding sound .........p. 43, 45 7 Current memory ...
Playback mode display ● Standard display 1 2 3 45 6 7 8 1 3D 10 4/30 9 '11/02/26 00:00 19 Still image 00:12/00:34 8 Movie ● Advanced display 1 2 3 45 6 7 8 11 12 13 14 3D 10 4/30 10 1/1000 F3.3 2.0 21 1/1000 F3.3 2.0 20 P ISO WB 100 AUTO NORM 14M P ISO WB 100 AUTO 15 16 NORM 14M 17 FILE 100 0004 18 FILE 100 0004 '11/02/26 00:00 '11/02/26 00:00 19 1 Battery check..........p. 12, 62 2 3D images p. 26 3 Print reservation/number of prints p. 59/p. 57 4 Eye-Fi transferred.........p. 48 5 Protect p. 47 6 Adding sound .........p. 43, 45 7 Current memory ...
SP-610UZ Instruction Manual (English)
Page 13
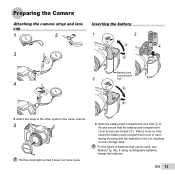
Failure to do so may cause the battery/card compartment cover to open during shooting and the batteries to fall out, resulting in the same manner. 5 Pull the strap tight so that it does not come loose. ● Slide the battery/card compartment lock from ) to the other eyelet in loss of batteries that the battery/card compartment cover is securely locked (7). Preparing the Camera Attaching the camera strap and lens cap 1 2 Inserting the battery 1 2 3 Battery/card compartment 3 lock 4 ● Attach the strap to = and ensure that can be used, see "Battery" (p. 66). If ...
Failure to do so may cause the battery/card compartment cover to open during shooting and the batteries to fall out, resulting in the same manner. 5 Pull the strap tight so that it does not come loose. ● Slide the battery/card compartment lock from ) to the other eyelet in loss of batteries that the battery/card compartment cover is securely locked (7). Preparing the Camera Attaching the camera strap and lens cap 1 2 Inserting the battery 1 2 3 Battery/card compartment 3 lock 4 ● Attach the strap to = and ensure that can be used, see "Battery" (p. 66). If ...

SP-610UZ Instruction Manual (English)
Page 14
User registration using the supplied CD Connect the camera to open the "OLYMPUS Setup" window and then double-click "Launcher.exe". Double-click the CD-ROM (OLYMPUS Setup) icon to the computer for set up using the supplied CD and installation of ib computer software is ...User Account Control" dialog is not displayed, select "My Computer" (Windows XP) or "Computer" (Windows Vista/Windows 7) from the start menu. Click "OLYMPUS Setup" to display the "Setup" dialog. 00:34 4 14M Monitor top left Battery Empty Error message Setting up using the camera, be exhausted. When using...
User registration using the supplied CD Connect the camera to open the "OLYMPUS Setup" window and then double-click "Launcher.exe". Double-click the CD-ROM (OLYMPUS Setup) icon to the computer for set up using the supplied CD and installation of ib computer software is ...User Account Control" dialog is not displayed, select "My Computer" (Windows XP) or "Computer" (Windows Vista/Windows 7) from the start menu. Click "OLYMPUS Setup" to display the "Setup" dialog. 00:34 4 14M Monitor top left Battery Empty Error message Setting up using the camera, be exhausted. When using...
SP-610UZ Instruction Manual (English)
Page 15
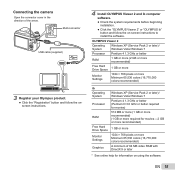
...1 GB or more 1024 × 768 pixels or more Minimum 65,536 colors (16,770,000 colors recommended) A minimum of the arrow. OLYMPUS Viewer 2 Operating System Windows XP (Service Pack 2 or later) / Windows Vista / Windows 7 Processor Pentium 4 1.3 GHz or better RAM ...on -screen instructions to install the software. Multi-connector USB cable (supplied) 3 Register your Olympus product. ● Click the "Registration" button and follow the onscreen instructions. 4 Install OLYMPUS Viewer 2 and ib computer software. ● Check the system requirements before beginning installation. &#...
...1 GB or more 1024 × 768 pixels or more Minimum 65,536 colors (16,770,000 colors recommended) A minimum of the arrow. OLYMPUS Viewer 2 Operating System Windows XP (Service Pack 2 or later) / Windows Vista / Windows 7 Processor Pentium 4 1.3 GHz or better RAM ...on -screen instructions to install the software. Multi-connector USB cable (supplied) 3 Register your Olympus product. ● Click the "Registration" button and follow the onscreen instructions. 4 Install OLYMPUS Viewer 2 and ib computer software. ● Check the system requirements before beginning installation. &#...
SP-610UZ Instruction Manual (English)
Page 16
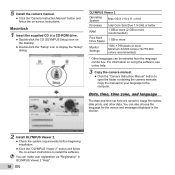
...16,770,000 colors recommended) * Other languages can make user registration via "Registration" in a CD-ROM drive. ● Double-click the CD (OLYMPUS Setup) icon on -screen instructions to install the software. Copy the manual for the menus and messages displayed in the monitor. 2 Install...to image file names, date prints, and other data. You can be selected from the language combo box. Macintosh 1 Insert the supplied CD in OLYMPUS Viewer 2 "Help". 16 EN 5 Install the camera manual. ● Click the "Camera Instruction Manual" button and follow the on the desktop. ●...
...16,770,000 colors recommended) * Other languages can make user registration via "Registration" in a CD-ROM drive. ● Double-click the CD (OLYMPUS Setup) icon on -screen instructions to install the software. Copy the manual for the menus and messages displayed in the monitor. 2 Install...to image file names, date prints, and other data. You can be selected from the language combo box. Macintosh 1 Insert the supplied CD in OLYMPUS Viewer 2 "Help". 16 EN 5 Install the camera manual. ● Click the "Camera Instruction Manual" button and follow the on the desktop. ●...
SP-610UZ Instruction Manual (English)
Page 17
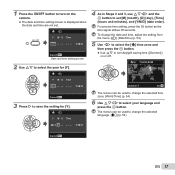
1 Press the n button to turn daylight saving time ([Summer]) on the camera. ● The date and time setting screen is displayed when the date and time are not set [M] (month), [D] (day), [Time] (hours and minutes), and [Y/M/D] (date order). For precise time setting, press the A button as the time signal strikes 00 seconds. To change the date and time, adjust the setting from the menu. [X] (Date/time) (p. 54) 5 Use HI to select the [x] time zone and then press the A button. ● Use FG to turn on or off. '11.02.26 00:00 Seoul Tokyo Summer Set OK The menus can be used to ...
1 Press the n button to turn daylight saving time ([Summer]) on the camera. ● The date and time setting screen is displayed when the date and time are not set [M] (month), [D] (day), [Time] (hours and minutes), and [Y/M/D] (date order). For precise time setting, press the A button as the time signal strikes 00 seconds. To change the date and time, adjust the setting from the menu. [X] (Date/time) (p. 54) 5 Use HI to select the [x] time zone and then press the A button. ● Use FG to turn on or off. '11.02.26 00:00 Seoul Tokyo Summer Set OK The menus can be used to ...
SP-610UZ Instruction Manual (English)
Page 18
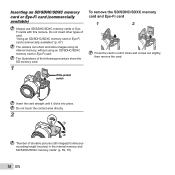
The illustrations of the following procedure show the SD memory card. 1 Write-protect switch To remove the SD/SDHC/SDXC memory card and Eye-Fi card 1 2 Press the card in the internal memory and SD/SDHC/SDXC memory cards" (p. 69, 70) 18 EN Insert the card straight until it clicks into place. Inserting an SD/SDHC/SDXC memory card or Eye-Fi card (commercially available) Always use SD/SDHC/SDXC memory cards or EyeFi cards with this camera. Do not touch the contact area directly. 2 "Number of card. Do not insert other types of storable pictures (still images)/Continuous ...
The illustrations of the following procedure show the SD memory card. 1 Write-protect switch To remove the SD/SDHC/SDXC memory card and Eye-Fi card 1 2 Press the card in the internal memory and SD/SDHC/SDXC memory cards" (p. 69, 70) 18 EN Insert the card straight until it clicks into place. Inserting an SD/SDHC/SDXC memory card or Eye-Fi card (commercially available) Always use SD/SDHC/SDXC memory cards or EyeFi cards with this camera. Do not touch the contact area directly. 2 "Number of card. Do not insert other types of storable pictures (still images)/Continuous ...
SP-610UZ Instruction Manual (English)
Page 19
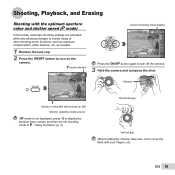
Shooting, Playback, and Erasing Shooting with your fingers, etc. Monitor Horizontal grip Number of storable still pictures (p. 69) Monitor (standby mode screen) If P mode is not displayed, press H to display the function menu screen and then set the shooting mode to a wide range of other shooting menu functions, such as needed. 1 Remove the lens cap. 2 Press the n button to cover the flash with the optimum aperture value and shutter speed (P mode) In this mode, automatic shooting settings are activated while also allowing changes to P. "Using the Menu" (p. 5) ...
Shooting, Playback, and Erasing Shooting with your fingers, etc. Monitor Horizontal grip Number of storable still pictures (p. 69) Monitor (standby mode screen) If P mode is not displayed, press H to display the function menu screen and then set the shooting mode to a wide range of other shooting menu functions, such as needed. 1 Remove the lens cap. 2 Press the n button to cover the flash with the optimum aperture value and shutter speed (P mode) In this mode, automatic shooting settings are activated while also allowing changes to P. "Using the Menu" (p. 5) ...

SP-610UZ Instruction Manual (English)
Page 20
4 Press the shutter button halfway down to focus on the subject. ● When the camera focuses on the subject, the exposure is performed in P mode, shooting is locked (shutter speed and aperture value are displayed), and the AF target mark changes to green. ● The camera was unable to start recording. AF target mark P To view images during shooting Pressing the q button enables playback of images. To return to shooting, either press the q button or press the shutter button halfway down while being careful not to stop recording. 20 EN Continuous recording length (p. 70) Press ...
4 Press the shutter button halfway down to focus on the subject. ● When the camera focuses on the subject, the exposure is performed in P mode, shooting is locked (shutter speed and aperture value are displayed), and the AF target mark changes to green. ● The camera was unable to start recording. AF target mark P To view images during shooting Pressing the q button enables playback of images. To return to shooting, either press the q button or press the shutter button halfway down while being careful not to stop recording. 20 EN Continuous recording length (p. 70) Press ...
SP-610UZ Instruction Manual (English)
Page 21
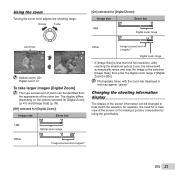
The display differs depending on the options selected for [Digital Zoom] (p. 41) and [Image Size] (p. 39). [Off] selected for making a precise composition by using the grid display. 14M Optical zoom range Other Image zoomed and cropped.*1 EN 21 Photographs taken with the zoom bar displayed in red may appear "grainy." Using the zoom Turning the zoom lever adjusts the shooting range. W side T side [On] selected for [Digital Zoom]: Image size Zoom bar 14M Digital zoom range Zoom bar P P 0.0 0.0 WB WB AUTO AUTO ISO ISO AUTO AUTO 00:34 00:34 4 14M 4 14M Optical ...
The display differs depending on the options selected for [Digital Zoom] (p. 41) and [Image Size] (p. 39). [Off] selected for making a precise composition by using the grid display. 14M Optical zoom range Other Image zoomed and cropped.*1 EN 21 Photographs taken with the zoom bar displayed in red may appear "grainy." Using the zoom Turning the zoom lever adjusts the shooting range. W side T side [On] selected for [Digital Zoom]: Image size Zoom bar 14M Digital zoom range Zoom bar P P 0.0 0.0 WB WB AUTO AUTO ISO ISO AUTO AUTO 00:34 00:34 4 14M 4 14M Optical ...
SP-610UZ Instruction Manual (English)
Page 22
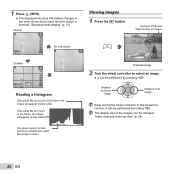
"Index view and close-up view" (p. 24) The green section shows luminance distribution within the screen's center. 22 EN 1 Press F (INFO). ● The displayed shooting information changes in the order shown below each time the button is pressed. It can be performed by holding HI. P '11/02/26 00:00 Playback image 2 Turn the wheel controller to fast forward or reverse. The display size of the frame, the image will appear mostly black. "Shooting mode display" (p. 11) Normal P Viewing images 1 Press the q button. Number of frames/ Total number of images 4/30 00:34 4 14M 0.0...
"Index view and close-up view" (p. 24) The green section shows luminance distribution within the screen's center. 22 EN 1 Press F (INFO). ● The displayed shooting information changes in the order shown below each time the button is pressed. It can be performed by holding HI. P '11/02/26 00:00 Playback image 2 Turn the wheel controller to fast forward or reverse. The display size of the frame, the image will appear mostly black. "Shooting mode display" (p. 11) Normal P Viewing images 1 Press the q button. Number of frames/ Total number of images 4/30 00:34 4 14M 0.0...
