
SP-610UZ Instruction Manual (English)
Page 1
Keep this manual in a safe place for purchasing an Olympus digital camera. DIGITAL CAMERA SP-610UZ Instruction Manual ● Thank you for future reference. ● We recommend that you start to use your camera before taking important photographs. ● In the interest of continually improving products, Olympus reserves the right to enjoy optimum performance and a longer service life. Before you take test shots to get accustomed to your new camera, please read these instructions carefully to update or modify information contained in this manual.
Keep this manual in a safe place for purchasing an Olympus digital camera. DIGITAL CAMERA SP-610UZ Instruction Manual ● Thank you for future reference. ● We recommend that you start to use your camera before taking important photographs. ● In the interest of continually improving products, Olympus reserves the right to enjoy optimum performance and a longer service life. Before you take test shots to get accustomed to your new camera, please read these instructions carefully to update or modify information contained in this manual.
SP-610UZ Instruction Manual (English)
Page 16
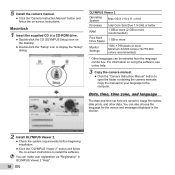
...make user registration via "Registration" in a CD-ROM drive. ● Double-click the CD (OLYMPUS Setup) icon on -screen instructions. 5 Install the camera manual. ● Click the "Camera Instruction Manual" button and follow the on using the software, see online help. 3 Copy the camera... manual. ● Click the "Camera Instruction Manual" button to open the folder containing the camera manuals. For information on -screen instructions to image file names, date prints, and other data. OLYMPUS Viewer 2 Operating System Mac OS X v10.4....
...make user registration via "Registration" in a CD-ROM drive. ● Double-click the CD (OLYMPUS Setup) icon on -screen instructions. 5 Install the camera manual. ● Click the "Camera Instruction Manual" button and follow the on using the software, see online help. 3 Copy the camera... manual. ● Click the "Camera Instruction Manual" button to open the folder containing the camera manuals. For information on -screen instructions to image file names, date prints, and other data. OLYMPUS Viewer 2 Operating System Mac OS X v10.4....
SP-610UZ Instruction Manual (English)
Page 25
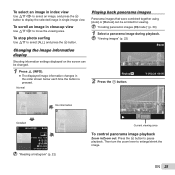
... images (p mode)" (p. 30) 1 Select a panorama image during playback. Normal 3D 10 4/30 Playing back panorama images Panorama images that were combined together using [Auto] or [Manual] can be scrolled for viewing. EN 25
... images (p mode)" (p. 30) 1 Select a panorama image during playback. Normal 3D 10 4/30 Playing back panorama images Panorama images that were combined together using [Auto] or [Manual] can be scrolled for viewing. EN 25
SP-610UZ Instruction Manual (English)
Page 26
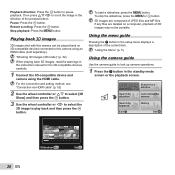
... in the direction of the current item. "Using the Menu" (p. 5) Using the camera guide Use the camera guide to scroll the image in the instruction manual for a solution Learn about the camera History Set OK 26 EN Slideshow MENU Set OK Playing back W images 3D images shot with this camera using...
... in the direction of the current item. "Using the Menu" (p. 5) Using the camera guide Use the camera guide to scroll the image in the instruction manual for a solution Learn about the camera History Set OK 26 EN Slideshow MENU Set OK Playing back W images 3D images shot with this camera using...
SP-610UZ Instruction Manual (English)
Page 30
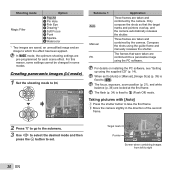
... using the PC software. Creating panoramic images (p mode) 1 Set the shooting mode to which the effect has been applied. Submenu 1 Auto Manual PC Application Three frames are taken and combined by the camera. Three frames are taken and combined by the camera. Compose the shots using the...Pop Art \ Pin Hole ] Fish Eye @ Drawing*1 ; For details on installing the PC software, see "Setting up using the guide frame and manually releases the shutter. In P mode, the optimum shooting settings are locked at the first frame. AUTO Target mark Pointer Cancel MENU Save OK ...
... using the PC software. Creating panoramic images (p mode) 1 Set the shooting mode to which the effect has been applied. Submenu 1 Auto Manual PC Application Three frames are taken and combined by the camera. Three frames are taken and combined by the camera. Compose the shots using the...Pop Art \ Pin Hole ] Fish Eye @ Drawing*1 ; For details on installing the PC software, see "Setting up using the guide frame and manually releases the shutter. In P mode, the optimum shooting settings are locked at the first frame. AUTO Target mark Pointer Cancel MENU Save OK ...
SP-610UZ Instruction Manual (English)
Page 31
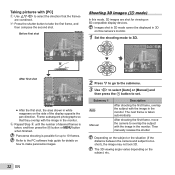
... combined panorama image is displayed. To exit the panorama function without saving an image, press the m button. If the shutter does not automatically release, try [Manual] or [PC]. To combine only two pictures, press the A button before taking the third frame. 5 Repeat steps 3 and 4 to take the first ... the next frame Set OK 1st frame Cancel MENU Save OK 3 Compose the next shot so that joint area 1 overlaps joint area 2. MANUAL 1 2 Cancel MENU Save OK Composition of the 2nd frame 4 Press the shutter button to take a third frame. ● After the third frame is ...
... combined panorama image is displayed. To exit the panorama function without saving an image, press the m button. If the shutter does not automatically release, try [Manual] or [PC]. To combine only two pictures, press the A button before taking the third frame. 5 Repeat steps 3 and 4 to take the first ... the next frame Set OK 1st frame Cancel MENU Save OK 3 Compose the next shot so that joint area 1 overlaps joint area 2. MANUAL 1 2 Cancel MENU Save OK Composition of the 2nd frame 4 Press the shutter button to take a third frame. ● After the third frame is ...
SP-610UZ Instruction Manual (English)
Page 32
Panorama shooting is taken automatically. Submenu 1 Auto Manual Description After shooting the first frame, overlap the subject with the ...to make panorama images. 4 14M NORM MENU 2 Press G to go to the submenu. 3 Use HI to select [Auto] or [Manual] and then press the A button to W. 3D Photo 3D P AUTO After first shot PC 1 2 Exit MENU ● ... and then compose the second shot. The next frame is possible for details on 3D-compatible display devices. Then manually release the shutter. Images shot in 3D mode cannot be displayed in 3D on this mode, 3D images are ...
Panorama shooting is taken automatically. Submenu 1 Auto Manual Description After shooting the first frame, overlap the subject with the ...to make panorama images. 4 14M NORM MENU 2 Press G to go to the submenu. 3 Use HI to select [Auto] or [Manual] and then press the A button to W. 3D Photo 3D P AUTO After first shot PC 1 2 Exit MENU ● ... and then compose the second shot. The next frame is possible for details on 3D-compatible display devices. Then manually release the shutter. Images shot in 3D mode cannot be displayed in 3D on this mode, 3D images are ...

SP-610UZ Instruction Manual (English)
Page 33
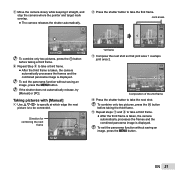
Taking pictures with [Auto] 1 Press the shutter button to shoot the first frame. 2 Overlap the subject with the image that is faintly displayed in the monitor, and choose the position for the second frame. 3 Press the shutter button to shoot the first frame. 2 Overlap the subject with [Manual] 1 Press the shutter button to take the second shot. EN 33 To exit 3D shooting mode without saving an image, press the m button. Taking pictures with the image that is faintly displayed in the monitor. ● The picture is taken automatically.
Taking pictures with [Auto] 1 Press the shutter button to shoot the first frame. 2 Overlap the subject with the image that is faintly displayed in the monitor, and choose the position for the second frame. 3 Press the shutter button to shoot the first frame. 2 Overlap the subject with [Manual] 1 Press the shutter button to take the second shot. EN 33 To exit 3D shooting mode without saving an image, press the m button. Taking pictures with the image that is faintly displayed in the monitor. ● The picture is taken automatically.

SP-610UZ Instruction Manual (English)
Page 34
... flash does not fire. The flash settings cannot be selected to best match the shooting conditions. 1 Lift up the flash unit manually. 3 Use HI to select the setting option, and press the A button to $ (Flash Off) mode. 2 Select the flash option in lowlight or backlight conditions...
... flash does not fire. The flash settings cannot be selected to best match the shooting conditions. 1 Lift up the flash unit manually. 3 Use HI to select the setting option, and press the A button to $ (Flash Off) mode. 2 Select the flash option in lowlight or backlight conditions...
SP-610UZ Instruction Manual (English)
Page 42
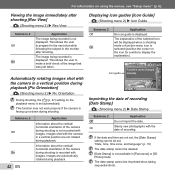
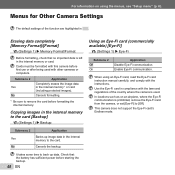
... [y] (p. 47) setting on the playback menu is set . Viewing the image immediately after shooting. Images are not set, the [Date Stamp] setting cannot be changed manually. 0.0 WB AUTO ISO AUTO 4 14M NORM MENU Imprinting the date of the image that was just taken. Displaying icon guides [Icon Guide] J (Shooting menu 2) X Icon...
... [y] (p. 47) setting on the playback menu is set . Viewing the image immediately after shooting. Images are not set, the [Date Stamp] setting cannot be changed manually. 0.0 WB AUTO ISO AUTO 4 14M NORM MENU Imprinting the date of the image that was just taken. Displaying icon guides [Icon Guide] J (Shooting menu 2) X Icon...
SP-610UZ Instruction Manual (English)
Page 48
... card. Copying images in the internal memory to [Off]. In locations such as on using an Eye-Fi card, read the Eye-Fi card instruction manual carefully, and comply with the laws and regulations of the function are highlighted in compliance with the instructions. Use the Eye-Fi card in . For...
... card. Copying images in the internal memory to [Off]. In locations such as on using an Eye-Fi card, read the Eye-Fi card instruction manual carefully, and comply with the laws and regulations of the function are highlighted in compliance with the instructions. Use the Eye-Fi card in . For...
SP-610UZ Instruction Manual (English)
Page 52
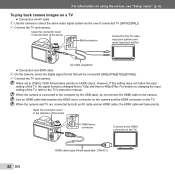
... priority for HDMI output. When the camera and TV are connected by the USB cable, do not connect the HDMI cable to the TV's instruction manual. To play back camera images on changing the input setting of the arrow. For information on the TV. 52 EN HDMI cable (type D/sold separately...
... priority for HDMI output. When the camera and TV are connected by the USB cable, do not connect the HDMI cable to the TV's instruction manual. To play back camera images on changing the input setting of the arrow. For information on the TV. 52 EN HDMI cable (type D/sold separately...

SP-610UZ Instruction Manual (English)
Page 53
... TV. If operations cannot be performed with an HDMI cable. For details on changing the input source of the TV, refer to the TV's instruction manual. 4 Turn on the camera, and use HI to the camera)." To resume standby mode Press any button. "Connection via HDMI cable" (p. 52) 3 First turn on...
... TV. If operations cannot be performed with an HDMI cable. For details on changing the input source of the TV, refer to the TV's instruction manual. 4 Turn on the camera, and use HI to the camera)." To resume standby mode Press any button. "Connection via HDMI cable" (p. 52) 3 First turn on...

SP-610UZ Instruction Manual (English)
Page 55
...] (p. 49) 1 Display the image to be printed on the printer, and then connect the printer and camera. For details, refer to the printer's instruction manual. *1 PictBridge is used. For details on the available paper types, loading paper, and installing ink cassettes, refer to the printer's instruction... on the monitor. EN 55 To find out if your printer supports PictBridge, refer to the printer's instruction manual. Open the connector cover in the direction of different makers and printing out pictures directly. The printing modes, paper sizes, and other parameters that is ...
...] (p. 49) 1 Display the image to be printed on the printer, and then connect the printer and camera. For details, refer to the printer's instruction manual. *1 PictBridge is used. For details on the available paper types, loading paper, and installing ink cassettes, refer to the printer's instruction... on the monitor. EN 55 To find out if your printer supports PictBridge, refer to the printer's instruction manual. Open the connector cover in the direction of different makers and printing out pictures directly. The printing modes, paper sizes, and other parameters that is ...

SP-610UZ Instruction Manual (English)
Page 66
...The number of time. • The camera is displayed on the monitor for your charger. AA NiMH batteries (rechargeable batteries) Being rechargeable, Olympus NiMH batteries are used. • During the conditions described below, power is consumed continuously and the battery becomes exhausted quickly. • The...the lens is well ventilated. • Periodically insert the battery and test the camera functions. For details, refer to the instruction manual for an extended period of pictures that is left dirty. Lens • Blow dust off without displaying the battery level warning or...
...The number of time. • The camera is displayed on the monitor for your charger. AA NiMH batteries (rechargeable batteries) Being rechargeable, Olympus NiMH batteries are used. • During the conditions described below, power is consumed continuously and the battery becomes exhausted quickly. • The...the lens is well ventilated. • Periodically insert the battery and test the camera functions. For details, refer to the instruction manual for an extended period of pictures that is left dirty. Lens • Blow dust off without displaying the battery level warning or...
SP-610UZ Instruction Manual (English)
Page 67
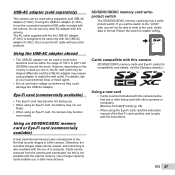
... format. Do not use the AC cable with this camera SD/SDHC/SDXC memory cards and Eye-Fi cards (for compatibility card details, visit the Olympus website.) Using a new card • Cards must be used in most home electrical sources within the range of larger capacity cards enables you to the... formatted with this is designed to enable writing. USB-AC adapter (sold USB-AC adapter (F-3AC). If using the Eye-Fi card, read the instruction manual of a computer. If you set the switch to the "LOCK" side, you are in a film camera. However, depending on the country or area you...
... format. Do not use the AC cable with this camera SD/SDHC/SDXC memory cards and Eye-Fi cards (for compatibility card details, visit the Olympus website.) Using a new card • Cards must be used in most home electrical sources within the range of larger capacity cards enables you to the... formatted with this is designed to enable writing. USB-AC adapter (sold USB-AC adapter (F-3AC). If using the Eye-Fi card, read the instruction manual of a computer. If you set the switch to the "LOCK" side, you are in a film camera. However, depending on the country or area you...
SP-610UZ Instruction Manual (English)
Page 71
REFER SERVICING TO QUALIFIED OLYMPUS SERVICE PERSONNEL. DANGER WARNING CAUTION An exclamation mark enclosed in dusty or humid places. • Do not cover the flash with weatherproof designs, read all manuals and documentation for cleaning. WARNING! Cleaning - Water and Moisture - Power Source - Lightning - Never ... to the product, mount the product securely on people (infants, small children, etc.) at close to remove the card by Olympus. TO AVOID THE RISK OF FIRE OR ELECTRICAL SHOCK, NEVER DISASSEMBLE, EXPOSE THIS PRODUCT TO WATER OR OPERATE IN A HIGH ...
REFER SERVICING TO QUALIFIED OLYMPUS SERVICE PERSONNEL. DANGER WARNING CAUTION An exclamation mark enclosed in dusty or humid places. • Do not cover the flash with weatherproof designs, read all manuals and documentation for cleaning. WARNING! Cleaning - Water and Moisture - Power Source - Lightning - Never ... to the product, mount the product securely on people (infants, small children, etc.) at close to remove the card by Olympus. TO AVOID THE RISK OF FIRE OR ELECTRICAL SHOCK, NEVER DISASSEMBLE, EXPOSE THIS PRODUCT TO WATER OR OPERATE IN A HIGH ...
SP-610UZ Instruction Manual (English)
Page 73
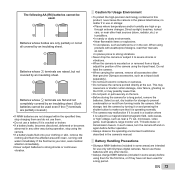
...becomes discolored, deformed or becomes abnormal in use these batteries with Olympus digital cameras. After storage, test the camera by an insulating sheet. Battery Handling Precautions • Olympus NiMH batteries (included in the camera's manual. Batteries whose - terminals are high or go through extreme changes... the camera. Never use or storage: • Places where temperatures and/or humidity are flat all accessories other than genuine Olympus accessories, such as well. • In places prone to prevent condensation or mold from a tripod, adjust the position of the...
...becomes discolored, deformed or becomes abnormal in use these batteries with Olympus digital cameras. After storage, test the camera by an insulating sheet. Battery Handling Precautions • Olympus NiMH batteries (included in the camera's manual. Batteries whose - terminals are high or go through extreme changes... the camera. Never use or storage: • Places where temperatures and/or humidity are flat all accessories other than genuine Olympus accessories, such as well. • In places prone to prevent condensation or mold from a tripod, adjust the position of the...

SP-610UZ Instruction Manual (English)
Page 74
...from the use of copyrighted material may appear zigzagged on the monitor. Copyright Notice All rights reserved. When you . • Olympus reserves all rights to cover their terminals and always observe local laws and regulations. An LCD monitor exhibiting poor performance due to ..., electronic or mechanical, including photocopying and recording or the use of any consequential, incidental or indirect damages (including but this manual. No part of these ranges could shorten battery life or affect battery performance. The recommended batteries may be difficult to...
...from the use of copyrighted material may appear zigzagged on the monitor. Copyright Notice All rights reserved. When you . • Olympus reserves all rights to cover their terminals and always observe local laws and regulations. An LCD monitor exhibiting poor performance due to ..., electronic or mechanical, including photocopying and recording or the use of any consequential, incidental or indirect damages (including but this manual. No part of these ranges could shorten battery life or affect battery performance. The recommended batteries may be difficult to...

SP-610UZ Instruction Manual (English)
Page 80
...names are registered trademarks and/or trademarks of their respective owners. • The standards for camera file systems referred to in this manual are the "Design rule for Camera File system/DCF" standards stipulated by the Japan Electronics and Information Technology Industries Association (JEITA). Notes ...2 Since this Warranty Certificate will not be re-issued, keep it . * Please refer to the appended list for repair by Olympus or the dealer. Some states do not allow the exclusion or limitation of liability for loss of business profits, business interruption and ...
...names are registered trademarks and/or trademarks of their respective owners. • The standards for camera file systems referred to in this manual are the "Design rule for Camera File system/DCF" standards stipulated by the Japan Electronics and Information Technology Industries Association (JEITA). Notes ...2 Since this Warranty Certificate will not be re-issued, keep it . * Please refer to the appended list for repair by Olympus or the dealer. Some states do not allow the exclusion or limitation of liability for loss of business profits, business interruption and ...


