
SP-610UZ Instruction Manual (English)
Page 5
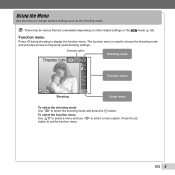
... function menu is used to choose the shooting mode and provides access to select the shooting mode and press the A button. Selected option Program Auto 3D P Shooting mode 0.0 WB AUTO ISO AUTO 4 14M NORM Shooting Function menu Setup menu To select the shooting mode Use HI to frequently used shooting settings...
... function menu is used to choose the shooting mode and provides access to select the shooting mode and press the A button. Selected option Program Auto 3D P Shooting mode 0.0 WB AUTO ISO AUTO 4 14M NORM Shooting Function menu Setup menu To select the shooting mode Use HI to frequently used shooting settings...

SP-610UZ Instruction Manual (English)
Page 12
... 4/30 9 '11/02/26 00:00 19 Still image 00:12/00:34 8 Movie ● Advanced display 1 2 3 45 6 7 8 11 12 13 14 3D 10 4/30 10 1/1000 F3.3 2.0 21 1/1000 F3.3 2.0 20 P ISO WB 100 AUTO NORM 14M P ISO WB 100 AUTO 15 16 NORM 14M 17 FILE ...100 0004 18 FILE 100 0004 '11/02/26 00:00 '11/02/26 00:00 19 1 Battery check..........p. 12, 62 2 3D images p. 26 3 Print reservation/number of prints p. 59/p. 57 4 Eye-Fi transferred.........p. 48 5 Protect p. 47 6 Adding sound .........p. 43, 45 7 Current memory ...........p. 68 8 Frame number/total...
... 4/30 9 '11/02/26 00:00 19 Still image 00:12/00:34 8 Movie ● Advanced display 1 2 3 45 6 7 8 11 12 13 14 3D 10 4/30 10 1/1000 F3.3 2.0 21 1/1000 F3.3 2.0 20 P ISO WB 100 AUTO NORM 14M P ISO WB 100 AUTO 15 16 NORM 14M 17 FILE ...100 0004 18 FILE 100 0004 '11/02/26 00:00 '11/02/26 00:00 19 1 Battery check..........p. 12, 62 2 3D images p. 26 3 Print reservation/number of prints p. 59/p. 57 4 Eye-Fi transferred.........p. 48 5 Protect p. 47 6 Adding sound .........p. 43, 45 7 Current memory ...........p. 68 8 Frame number/total...
SP-610UZ Instruction Manual (English)
Page 19
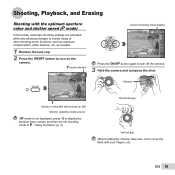
... your fingers, etc. as exposure compensation, white balance, etc. P mode indicator P 0.0 WB AUTO ISO AUTO 00:34 4 14M Current shooting mode display Program Auto 3D P 0.0 WB AUTO ISO AUTO 4 14M NORM MENU Press the n button again to turn on the camera.
... your fingers, etc. as exposure compensation, white balance, etc. P mode indicator P 0.0 WB AUTO ISO AUTO 00:34 4 14M Current shooting mode display Program Auto 3D P 0.0 WB AUTO ISO AUTO 4 14M NORM MENU Press the n button again to turn on the camera.
SP-610UZ Instruction Manual (English)
Page 25
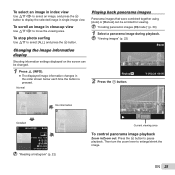
... changes in the order shown below each time the button is pressed. "Creating panoramic images (p mode)" (p. 30) 1 Select a panorama image during playback. Normal 3D 10 4/30 Playing back panorama images Panorama images that were combined together using [Auto] or [Manual] can be scrolled for viewing. To select an image.... EN 25 "Viewing images" (p. 22) 4/30 Replay OK 2 Press the A button. '11/02/26 00:00 '11/02/26 00:00 No information Detailed 3D 10 4/30 1/1000 F3.3 2.0 P ISO WB 100 AUTO NORM 14M FILE 100 0004 '11/02/26 00:00 "Reading a histogram" (p. 22) Current viewing area...
... changes in the order shown below each time the button is pressed. "Creating panoramic images (p mode)" (p. 30) 1 Select a panorama image during playback. Normal 3D 10 4/30 Playing back panorama images Panorama images that were combined together using [Auto] or [Manual] can be scrolled for viewing. To select an image.... EN 25 "Viewing images" (p. 22) 4/30 Replay OK 2 Press the A button. '11/02/26 00:00 '11/02/26 00:00 No information Detailed 3D 10 4/30 1/1000 F3.3 2.0 P ISO WB 100 AUTO NORM 14M FILE 100 0004 '11/02/26 00:00 "Reading a histogram" (p. 22) Current viewing area...
SP-610UZ Instruction Manual (English)
Page 26
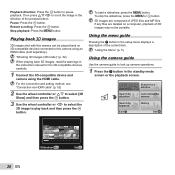
... not be played back on a computer, playback of the pressed button. To stop the slideshow, press the m or A button. 3D images are deleted on 3D-compatible devices connected to this camera can be possible. Then press FGHI to look up camera operations. 1 Press the E button in ...Playback direction: Press the A button to play back and then press the A button. Restart scrolling: Press the A button. "Shooting 3D images (3D mode)" (p. 32) When playing back 3D images, read the warnings in the standby mode screen or the playback screen. To start a slideshow, press the m button. Search ...
... not be played back on a computer, playback of the pressed button. To stop the slideshow, press the m or A button. 3D images are deleted on 3D-compatible devices connected to this camera can be possible. Then press FGHI to look up camera operations. 1 Press the E button in ...Playback direction: Press the A button to play back and then press the A button. Restart scrolling: Press the A button. "Shooting 3D images (3D mode)" (p. 32) When playing back 3D images, read the warnings in the standby mode screen or the playback screen. To start a slideshow, press the m button. Search ...
SP-610UZ Instruction Manual (English)
Page 30
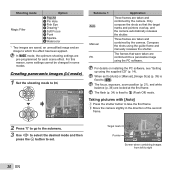
... combined by the camera. Only compose the shots so that were taken are taken and combined by the camera. For this reason, some modes. Panorama 3D AUTO 0.0 WB AUTO 4 2M NORM MENU 2 Press G to go to the submenu. 3 Use HI to select the desired mode and then press the A button to...
... combined by the camera. Only compose the shots so that were taken are taken and combined by the camera. For this reason, some modes. Panorama 3D AUTO 0.0 WB AUTO 4 2M NORM MENU 2 Press G to go to the submenu. 3 Use HI to select the desired mode and then press the A button to...
SP-610UZ Instruction Manual (English)
Page 32
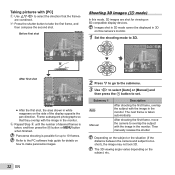
...compose the second shot. Submenu 1 Auto Manual Description After shooting the first frame, overlap the subject with the image in white reappears on 3D-compatible display devices. After shooting the first frame, move the camera to overlap the subject with the image in the monitor. 3 Repeat ...Frame subsequent photographs so that the frames are shot for viewing on the side of desired frames is too short), the image may not look 3D. The next frame is possible for up to 10 frames. Panorama shooting is taken automatically. Taking pictures with [PC] 1 Use FGHI to...
...compose the second shot. Submenu 1 Auto Manual Description After shooting the first frame, overlap the subject with the image in white reappears on 3D-compatible display devices. After shooting the first frame, move the camera to overlap the subject with the image in the monitor. 3 Repeat ...Frame subsequent photographs so that the frames are shot for viewing on the side of desired frames is too short), the image may not look 3D. The next frame is possible for up to 10 frames. Panorama shooting is taken automatically. Taking pictures with [PC] 1 Use FGHI to...

SP-610UZ Instruction Manual (English)
Page 33
Taking pictures with [Auto] 1 Press the shutter button to shoot the first frame. 2 Overlap the subject with the image that is faintly displayed in the monitor. ● The picture is faintly displayed in the monitor, and choose the position for the second frame. 3 Press the shutter button to shoot the first frame. 2 Overlap the subject with the image that is taken automatically. Taking pictures with [Manual] 1 Press the shutter button to take the second shot. To exit 3D shooting mode without saving an image, press the m button. EN 33
Taking pictures with [Auto] 1 Press the shutter button to shoot the first frame. 2 Overlap the subject with the image that is faintly displayed in the monitor. ● The picture is faintly displayed in the monitor, and choose the position for the second frame. 3 Press the shutter button to shoot the first frame. 2 Overlap the subject with the image that is taken automatically. Taking pictures with [Manual] 1 Press the shutter button to take the second shot. To exit 3D shooting mode without saving an image, press the m button. EN 33
SP-610UZ Instruction Manual (English)
Page 42
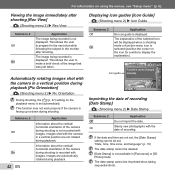
The image being recorded is not displayed. This allows the user to display the explanation). Images shot with the camera in [Panorama] or [3D Photo] mode. The explanation of recording [Date Stamp] J (Shooting menu 2) X Date Stamp Submenu 2 Off On Application Do not imprint the ... Images are not rotated during playback. Automatically rotating images shot with the date of the image that was just taken. Icon guide Program Auto 3D P Functions can be deleted. [Date Stamp] is selected (position the cursor on the icon for the next shot while following the subject ...
The image being recorded is not displayed. This allows the user to display the explanation). Images shot with the camera in [Panorama] or [3D Photo] mode. The explanation of recording [Date Stamp] J (Shooting menu 2) X Date Stamp Submenu 2 Off On Application Do not imprint the ... Images are not rotated during playback. Automatically rotating images shot with the date of the image that was just taken. Icon guide Program Auto 3D P Functions can be deleted. [Date Stamp] is selected (position the cursor on the icon for the next shot while following the subject ...
SP-610UZ Instruction Manual (English)
Page 81
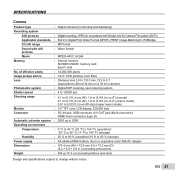
... type : Digital camera (for Camera File system (DCF)) Applicable standards : Exif 2.2, Digital Print Order Format (DPOF), PRINT Image Matching III, PictBridge 3D still image : MP format Sound with still pictures : Wave format Movie : MPEG-4AVC./H.264 Memory : Internal memory SD/SDHC/SDXC memory card Eye...-Fi card No. of effective pixels : 14,000,000 pixels Image pickup device : 1/2.3" CCD (primary color filter) Lens : Olympus lens 5.0 to 110.0 mm, f3.3 to 5.7 (equivalent to 28 to 616 mm on a 35 mm camera) Photometric system : Digital ESP metering, ...
... type : Digital camera (for Camera File system (DCF)) Applicable standards : Exif 2.2, Digital Print Order Format (DPOF), PRINT Image Matching III, PictBridge 3D still image : MP format Sound with still pictures : Wave format Movie : MPEG-4AVC./H.264 Memory : Internal memory SD/SDHC/SDXC memory card Eye...-Fi card No. of effective pixels : 14,000,000 pixels Image pickup device : 1/2.3" CCD (primary color filter) Lens : Olympus lens 5.0 to 110.0 mm, f3.3 to 5.7 (equivalent to 28 to 616 mm on a 35 mm camera) Photometric system : Digital ESP metering, ...
