FE-200 Advanced Manual (English)
Page 3
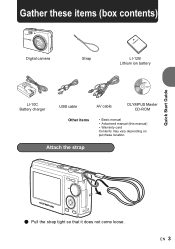
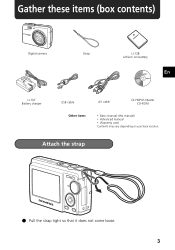
Gather these items (box contents) Digital camera Strap LI-12B Lithium ion battery LI-10C Battery charger USB cable AV cable OLYMPUS Master CD-ROM Other items • Basic manual • Advanced manual (this manual) • Warranty card Contents may vary depending on purchase location. Attach the strap Quick Start Guide ( Pull the strap tight so that it does not come loose. EN 3
Gather these items (box contents) Digital camera Strap LI-12B Lithium ion battery LI-10C Battery charger USB cable AV cable OLYMPUS Master CD-ROM Other items • Basic manual • Advanced manual (this manual) • Warranty card Contents may vary depending on purchase location. Attach the strap Quick Start Guide ( Pull the strap tight so that it does not come loose. EN 3
FE-200 Advanced Manual (English)
Page 29
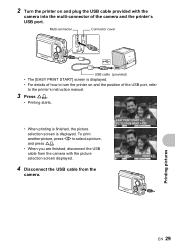
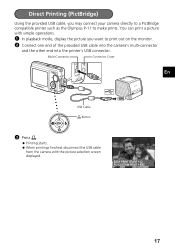
2 Turn the printer on and the position of the USB port, refer to turn the printer on and plug the USB cable provided with the camera into the multi-connector of how to the printer's instruction manual. 3 Press O Multi-connector Connector cover USB cable (provided) • The [EASY PRINT START] screen is displayed. • For details of the camera and the printer's USB port.
2 Turn the printer on and the position of the USB port, refer to turn the printer on and plug the USB cable provided with the camera into the multi-connector of how to the printer's instruction manual. 3 Press O Multi-connector Connector cover USB cable (provided) • The [EASY PRINT START] screen is displayed. • For details of the camera and the printer's USB port.
FE-200 Advanced Manual (English)
Page 30
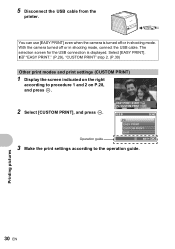
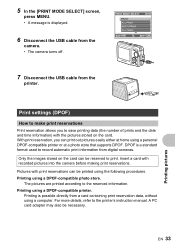
With the camera turned off or in shooting mode, connect the USB cable. g"EASY PRINT." (P.29), "CUSTOM PRINT" step 2. (P.30) Other print modes and print settings (CUSTOM PRINT) 1 Display the screen indicated on the right according to the operation guide. 5 Disconnect the USB cable from the printer.... Operation guide EASY PRINT START < PC/CUSTOM PRINT OK USB PC EASY PRINT CUSTOM PRINT EXIT SET OK 3 Make the print settings according to procedure 1 and...
With the camera turned off or in shooting mode, connect the USB cable. g"EASY PRINT." (P.29), "CUSTOM PRINT" step 2. (P.30) Other print modes and print settings (CUSTOM PRINT) 1 Display the screen indicated on the right according to the operation guide. 5 Disconnect the USB cable from the printer.... Operation guide EASY PRINT START < PC/CUSTOM PRINT OK USB PC EASY PRINT CUSTOM PRINT EXIT SET OK 3 Make the print settings according to procedure 1 and...
FE-200 Advanced Manual (English)
Page 33
...and time information) with recorded pictures into the camera before making print reservations. The pictures are printed according to record automatic print information from digital cameras. Printing pictures EN 33 DPOF is a ...standard format used to the reserved information. Only the images stored on the card. Printing using a computer. Print settings (DPOF) How to make print reservations Print reservation allows you can be necessary. Printing is displayed. 6 Disconnect the USB cable from the camera. • The camera...
...and time information) with recorded pictures into the camera before making print reservations. The pictures are printed according to record automatic print information from digital cameras. Printing pictures EN 33 DPOF is a ...standard format used to the reserved information. Only the images stored on the card. Printing using a computer. Print settings (DPOF) How to make print reservations Print reservation allows you can be necessary. Printing is displayed. 6 Disconnect the USB cable from the camera. • The camera...
FE-200 Advanced Manual (English)
Page 37
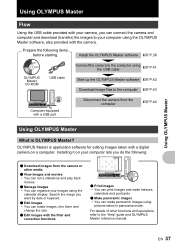
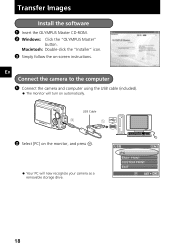
....38 OLYMPUS Master CD-ROM USB cable Connect the camera to the computer using the USB cable gP.41 Start up the OLYMPUS Master software gP.42 Download image files to the "Help" guide and OLYMPUS Master reference manual. For details of other functions and operations, refer to the computer gP.43 Computer equipped with a digital camera on...
....38 OLYMPUS Master CD-ROM USB cable Connect the camera to the computer using the USB cable gP.41 Start up the OLYMPUS Master software gP.42 Download image files to the "Help" guide and OLYMPUS Master reference manual. For details of other functions and operations, refer to the computer gP.43 Computer equipped with a digital camera on...

FE-200 Advanced Manual (English)
Page 38
... MHz or later 128 MB or more (at least 256 MB is recommended) 300 MB or more USB port 1024 × 768 pixels, 65,536 colors or more Using OLYMPUS Master 38 EN For newer operating systems, please refer to Windows 2000 Professional. • If you ...installed OS. • To install the software in Windows 2000 Professional/XP, you are using Windows 98SE, the USB driver is installed automatically. Install the OLYMPUS Master software Before installing the OLYMPUS Master software, please confirm that your computer. • Windows XP corresponds to Windows XP Professional/Home Edition. &#...
... MHz or later 128 MB or more (at least 256 MB is recommended) 300 MB or more USB port 1024 × 768 pixels, 65,536 colors or more Using OLYMPUS Master 38 EN For newer operating systems, please refer to Windows 2000 Professional. • If you ...installed OS. • To install the software in Windows 2000 Professional/XP, you are using Windows 98SE, the USB driver is installed automatically. Install the OLYMPUS Master software Before installing the OLYMPUS Master software, please confirm that your computer. • Windows XP corresponds to Windows XP Professional/Home Edition. &#...
FE-200 Advanced Manual (English)
Page 39
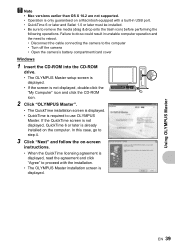
...10.2 are not supported. • Operation is only guaranteed on a Macintosh equipped with the installation. • The OLYMPUS Master installation screen is displayed. Failure to do so could result in USB port. • QuickTime 6 or later and Safari 1.0 or later must be installed. • Be sure to ...need to reboot. • Disconnect the cable connecting the camera to the computer • Turn off the camera • Open the camera's battery compartment/card cover Windows 1 Insert the CD-ROM into the CD-ROM drive. • The OLYMPUS Master setup screen is displayed. • If the ...
...10.2 are not supported. • Operation is only guaranteed on a Macintosh equipped with the installation. • The OLYMPUS Master installation screen is displayed. Failure to do so could result in USB port. • QuickTime 6 or later and Safari 1.0 or later must be installed. • Be sure to ...need to reboot. • Disconnect the cable connecting the camera to the computer • Turn off the camera • Open the camera's battery compartment/card cover Windows 1 Insert the CD-ROM into the CD-ROM drive. • The OLYMPUS Master setup screen is displayed. • If the ...
FE-200 Advanced Manual (English)
Page 41
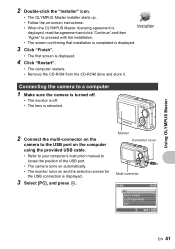
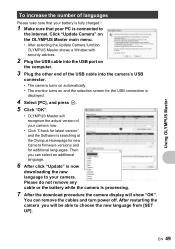
...Click "Finish". • The first screen is displayed. 3 Select [PC], and press i. Using OLYMPUS Master 2 Connect the multi-connector on the camera to the USB port on and the selection screen for the USB connection is displayed. 4 Click "Restart". • The computer restarts. • Remove the CD-...ROM from the CD-ROM drive and store it. Connecting the camera to locate the position of the USB port. • The camera turns on automatically. • The monitor turns on the computer using the provided USB cable. • Refer to your computer's instruction manual to a computer...
...Click "Finish". • The first screen is displayed. 3 Select [PC], and press i. Using OLYMPUS Master 2 Connect the multi-connector on the camera to the USB port on and the selection screen for the USB connection is displayed. 4 Click "Restart". • The computer restarts. • Remove the CD-...ROM from the CD-ROM drive and store it. Connecting the camera to locate the position of the USB port. • The camera turns on automatically. • The monitor turns on the computer using the provided USB cable. • Refer to your computer's instruction manual to a computer...

FE-200 Advanced Manual (English)
Page 42
...Enter your "Name" and "OLYMPUS Master Serial Number", and select your digital camera for the first time after installation, the "Registration" dialog box is displayed before the main menu. Follow the prompts and fill in the registration form. The camera is recognized as a "Removable ...and start OLYMPUS Master. Note • The camera functions are disabled while the camera is connected to a computer. • Connecting the camera to exit the message that is displayed. Click "OK" to a computer via a USB hub may cause unstable operation. Using OLYMPUS Master 4 The camera is ...
...Enter your "Name" and "OLYMPUS Master Serial Number", and select your digital camera for the first time after installation, the "Registration" dialog box is displayed before the main menu. Follow the prompts and fill in the registration form. The camera is recognized as a "Removable ...and start OLYMPUS Master. Note • The camera functions are disabled while the camera is connected to a computer. • Connecting the camera to exit the message that is displayed. Click "OK" to a computer via a USB hub may cause unstable operation. Using OLYMPUS Master 4 The camera is ...
FE-200 Advanced Manual (English)
Page 44
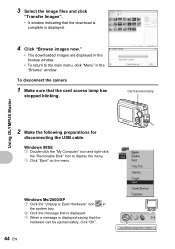
Using OLYMPUS Master Windows Me/2000/XP 1 Click the "Unplug or Eject Hardware" icon in the system tray. 2 Click the message that is displayed. 3 When a message is ... the browse window. • To return to display the menu. 2 Click "Eject" on the menu. Card access lamp 2 Make the following preparations for disconnecting the USB cable. 3 Select the image files and click "Transfer Images". • A window indicating that the hardware can be ejected safely, click "OK". 44 EN To disconnect...
Using OLYMPUS Master Windows Me/2000/XP 1 Click the "Unplug or Eject Hardware" icon in the system tray. 2 Click the message that is displayed. 3 When a message is ... the browse window. • To return to display the menu. 2 Click "Eject" on the menu. Card access lamp 2 Make the following preparations for disconnecting the USB cable. 3 Select the image files and click "Transfer Images". • A window indicating that the hardware can be ejected safely, click "OK". 44 EN To disconnect...
FE-200 Advanced Manual (English)
Page 45
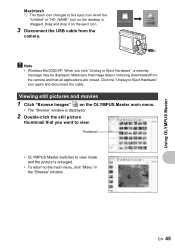
... to view. Click the "Unplug or Eject Hardware" icon again and disconnect the cable. Using OLYMPUS Master Macintosh 1 The trash icon changes to the eject icon when the "Untitled" or "NO_NAME" icon on the OLYMPUS Master main menu. • The "Browse" window is displayed. 2 Double-click the still ...• To return to view mode and the picture is dragged. Thumbnail • OLYMPUS Master switches to the main menu, click "Menu" in the "Browse" window. Drag and drop it on the eject icon. 3 Disconnect the USB cable from the camera and that image data is not being downloaded from the...
... to view. Click the "Unplug or Eject Hardware" icon again and disconnect the cable. Using OLYMPUS Master Macintosh 1 The trash icon changes to the eject icon when the "Untitled" or "NO_NAME" icon on the OLYMPUS Master main menu. • The "Browse" window is displayed. 2 Double-click the still ...• To return to view mode and the picture is dragged. Thumbnail • OLYMPUS Master switches to the main menu, click "Menu" in the "Browse" window. Drag and drop it on the eject icon. 3 Disconnect the USB cable from the camera and that image data is not being downloaded from the...

FE-200 Advanced Manual (English)
Page 48
... if your computer is compatible with the camera to download and save images to a computer without using OLYMPUS Master This camera is running Windows 98SE, you will need to your computer using OLYMPUS Master. Using OLYMPUS Master To download and save images without using the USB cable provided with USB mass storage. Windows: Windows 98SE/Me/2000...
... if your computer is compatible with the camera to download and save images to a computer without using OLYMPUS Master This camera is running Windows 98SE, you will need to your computer using OLYMPUS Master. Using OLYMPUS Master To download and save images without using the USB cable provided with USB mass storage. Windows: Windows 98SE/Me/2000...
FE-200 Advanced Manual (English)
Page 49
... latest version" and the Software is searching at the Olympus Homepage for new Camera firmware versions and for the USB connection is displayed. 4 Select [PC], and press i. 5 Click "OK". • OLYMPUS Master will recognize the actual version of the USB cable into the camera's USB connector. • The camera turns on automatically. • The monitor turns on and...
... latest version" and the Software is searching at the Olympus Homepage for new Camera firmware versions and for the USB connection is displayed. 4 Select [PC], and press i. 5 Click "OK". • OLYMPUS Master will recognize the actual version of the USB cable into the camera's USB connector. • The camera turns on automatically. • The monitor turns on and...

FE-200 Advanced Manual (English)
Page 67
... encouraged to try to correct the interference by one or more of the following measures: - Only the OLYMPUS-supplied USB cable should be reproduced or used to connect the camera to USB enabled personal computers (PC). These limits are caused by erasing picture data. Connect the equipment to an ...and recording or the use of the information contained therein. Consult your dealer or an experienced radio/TV technician for a Class B digital device, pursuant to Part 15 of the FCC Rules. Any unauthorized changes or modifications to this equipment. EN 67 Miscellaneous Disclaimer of Warranty ...
... encouraged to try to correct the interference by one or more of the following measures: - Only the OLYMPUS-supplied USB cable should be reproduced or used to connect the camera to USB enabled personal computers (PC). These limits are caused by erasing picture data. Connect the equipment to an ...and recording or the use of the information contained therein. Consult your dealer or an experienced radio/TV technician for a Class B digital device, pursuant to Part 15 of the FCC Rules. Any unauthorized changes or modifications to this equipment. EN 67 Miscellaneous Disclaimer of Warranty ...
FE-200 Advanced Manual (English)
Page 70
... : Digital camera (for shooting and displaying) Recording system Still pictures : Digital recording, JPEG (DCF compatible) Applicable standards : Exif 2.2, DPOF, PRINT Image Matching III, PictBridge Movie : QuickTime Motion JPEG compatible Memory : Internal memory xD-Picture Card (16 MB to 90% (storage) Power supply : One lithium ion battery (LI-12B/LI-10B specified by Olympus) or...
... : Digital camera (for shooting and displaying) Recording system Still pictures : Digital recording, JPEG (DCF compatible) Applicable standards : Exif 2.2, DPOF, PRINT Image Matching III, PictBridge Movie : QuickTime Motion JPEG compatible Memory : Internal memory xD-Picture Card (16 MB to 90% (storage) Power supply : One lithium ion battery (LI-12B/LI-10B specified by Olympus) or...
FE-200 Basic Manual (English, Français, Español, Português)
Page 3
Gather these items (box contents) Digital camera Strap LI-12B Lithium ion battery En LI-10C Battery charger USB cable Other items AV cable OLYMPUS Master CD-ROM • Basic manual (this manual) • Advanced manual • Warranty card Contents may vary depending on purchase location. Attach the strap ( Pull the strap tight so that it does not come loose. 3
Gather these items (box contents) Digital camera Strap LI-12B Lithium ion battery En LI-10C Battery charger USB cable Other items AV cable OLYMPUS Master CD-ROM • Basic manual (this manual) • Advanced manual • Warranty card Contents may vary depending on purchase location. Attach the strap ( Pull the strap tight so that it does not come loose. 3
FE-200 Basic Manual (English, Français, Español, Português)
Page 17
You can print a picture with simple operations. 1 In playback mode, display the picture you may connect your camera directly to a PictBridge compatible printer such as the Olympus P-11 to print out on the monitor. 2 Connect one end of the provided USB cable into the camera's multi-connector and the other end into the printer's USB connector. Direct Printing (PictBridge) Using the provided USB cable, you want to make prints. Multi-Connector Connector Cover En USB Cable < Button 3 Press
You can print a picture with simple operations. 1 In playback mode, display the picture you may connect your camera directly to a PictBridge compatible printer such as the Olympus P-11 to print out on the monitor. 2 Connect one end of the provided USB cable into the camera's multi-connector and the other end into the printer's USB connector. Direct Printing (PictBridge) Using the provided USB cable, you want to make prints. Multi-Connector Connector Cover En USB Cable < Button 3 Press
FE-200 Basic Manual (English, Français, Español, Português)
Page 18
Transfer Images Install the software 1 Insert the OLYMPUS Master CD-ROM. 2 Windows: Click the "OLYMPUS Master" button. En Connect the camera to the computer 1 Connect the camera and computer using the USB cable (included). Macintosh: Double-click the "Installer" icon. 3 Simply follow the on the monitor, and press i. USB Cable 2 1 2 Select [PC] on -screen instructions. Your PC will turn on automatically. The monitor will now recognize your camera as a removable storage drive. USB PC EASY PRINT CUSTOM PRINT EXIT SET OK 18
Transfer Images Install the software 1 Insert the OLYMPUS Master CD-ROM. 2 Windows: Click the "OLYMPUS Master" button. En Connect the camera to the computer 1 Connect the camera and computer using the USB cable (included). Macintosh: Double-click the "Installer" icon. 3 Simply follow the on the monitor, and press i. USB Cable 2 1 2 Select [PC] on -screen instructions. Your PC will turn on automatically. The monitor will now recognize your camera as a removable storage drive. USB PC EASY PRINT CUSTOM PRINT EXIT SET OK 18
FE-200 Basic Manual (English, Français, Español, Português)
Page 20
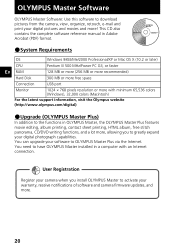
... or more (256 MB or more recommended) Hard Disk 300 MB or more free space Connection USB port Monitor 1024 × 768 pixels resolution or more , allowing you install OLYMPUS Master to activate your digital photograph capabilities. User Registration Register your camera when you to greatly expand your warranty, receive notifications of software and...
... or more (256 MB or more recommended) Hard Disk 300 MB or more free space Connection USB port Monitor 1024 × 768 pixels resolution or more , allowing you install OLYMPUS Master to activate your digital photograph capabilities. User Registration Register your camera when you to greatly expand your warranty, receive notifications of software and...
FE-200 Basic Manual (English, Français, Español, Português)
Page 21
...: Olympus lens 4.6 to 23 mm, F3.3 to 4.8 (equivalent to 28 to 140 mm on 35 mm film) Photometric system : Digital ESP metering Shutter speed : 4 to 1 GB) No. Specifications (Camera Product type : Digital camera (for shooting and displaying) Recording system Still pictures : Digital recording...m (7.9 in.) (W only) (super macro mode) Monitor: : 2.5" TFT color LCD display, 153,600 pixels Outer connector : DC-IN jack, USB connector/AV out jack (Multi-connector) Automatic calendar system : Automatic update from 2000 to 2099 Operating environment Temperature : 0 to 40°C (32&#...
...: Olympus lens 4.6 to 23 mm, F3.3 to 4.8 (equivalent to 28 to 140 mm on 35 mm film) Photometric system : Digital ESP metering Shutter speed : 4 to 1 GB) No. Specifications (Camera Product type : Digital camera (for shooting and displaying) Recording system Still pictures : Digital recording...m (7.9 in.) (W only) (super macro mode) Monitor: : 2.5" TFT color LCD display, 153,600 pixels Outer connector : DC-IN jack, USB connector/AV out jack (Multi-connector) Automatic calendar system : Automatic update from 2000 to 2099 Operating environment Temperature : 0 to 40°C (32&#...


