
FE-200 Advanced Manual (English)
Page 11
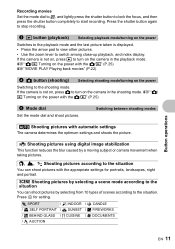
.... • Use the zoom lever to the shooting mode. j SPORT / R SELF PORTRAIT / V BEHIND GLASS / N INDOOR / S SUNSET / V CUISINE / b CANDLE / c FIREWORKS / d DOCUMENTS / i AUCTION EN 11 g"K/ q Turning on the power Switching to switch among close-up playback, and index display. Button operations Recording movies Set the mode dial to n, and lightly press the shutter button to lock the focus, and then press the shutter button completely to the situation You can shoot pictures by a moving subject or camera movement when taking pictures. h Shooting pictures using digital image...
.... • Use the zoom lever to the shooting mode. j SPORT / R SELF PORTRAIT / V BEHIND GLASS / N INDOOR / S SUNSET / V CUISINE / b CANDLE / c FIREWORKS / d DOCUMENTS / i AUCTION EN 11 g"K/ q Turning on the power Switching to switch among close-up playback, and index display. Button operations Recording movies Set the mode dial to n, and lightly press the shutter button to lock the focus, and then press the shutter button completely to the situation You can shoot pictures by a moving subject or camera movement when taking pictures. h Shooting pictures using digital image...
FE-200 Advanced Manual (English)
Page 12
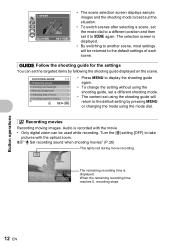
... targeted items by pressing MENU or changing the mode using the mode dial. Button operations 12 EN g Follow the shooting guide for the settings You can be returned to the default settings of each scene. SHOOTING GUIDE 1/3 1 Brightening subject. 2 Shooting into backlight. 3 Blurring background. 4 Adjusting area in focus. 5 Shooting subject in motion. n Recording movies Recording moving images. g"R Set recording sound when shooting movies" (P.26) This lights red during movie recording. 00:36 The remaining recording time is recorded with the optical zoom. Audio is displayed.
... targeted items by pressing MENU or changing the mode using the mode dial. Button operations 12 EN g Follow the shooting guide for the settings You can be returned to the default settings of each scene. SHOOTING GUIDE 1/3 1 Brightening subject. 2 Shooting into backlight. 3 Blurring background. 4 Adjusting area in focus. 5 Shooting subject in motion. n Recording movies Recording moving images. g"R Set recording sound when shooting movies" (P.26) This lights red during movie recording. 00:36 The remaining recording time is recorded with the optical zoom. Audio is displayed.
FE-200 Advanced Manual (English)
Page 14
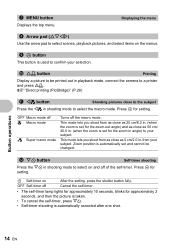
Displaying the menu 8 Arrow pad (ONXY) Use the arrow pad to select scenes, playback pictures, and select items on the menus. 9 i button This button is used to confirm your selection. 0 O< button Printing Display a picture to be printed out in playback mode, connect the camera to a printer and press O 7 MENU button Displays the top menu.
Displaying the menu 8 Arrow pad (ONXY) Use the arrow pad to select scenes, playback pictures, and select items on the menus. 9 i button This button is used to confirm your selection. 0 O< button Printing Display a picture to be printed out in playback mode, connect the camera to a printer and press O 7 MENU button Displays the top menu.

FE-200 Advanced Manual (English)
Page 24
... size of pictures 640 × 480 / 320 × 240 This changes the image size of a picture and saves it as a new file. 7 PRINT ORDER Making print reservations (DPOF) This function allows you to save printing data (the number of prints and the date and time information) with the pictures stored on the card. Menu operations 24 EN g"Print settings (DPOF)" (P.33) SETUP menus Shooting mode PANORAMA RESET IMAGE QUALITY EXPOSURE COMP. ALL ERASE Erase all the pictures in shooting mode. *4 This item can only be selected when shooting movies...
... size of pictures 640 × 480 / 320 × 240 This changes the image size of a picture and saves it as a new file. 7 PRINT ORDER Making print reservations (DPOF) This function allows you to save printing data (the number of prints and the date and time information) with the pictures stored on the card. Menu operations 24 EN g"Print settings (DPOF)" (P.33) SETUP menus Shooting mode PANORAMA RESET IMAGE QUALITY EXPOSURE COMP. ALL ERASE Erase all the pictures in shooting mode. *4 This item can only be selected when shooting movies...
FE-200 Advanced Manual (English)
Page 25
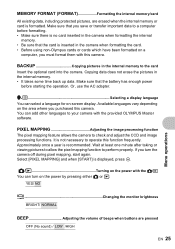
... s Changing the monitor brightness BRIGHT/ NORMAL BEEP Adjusting the volume of beeps when buttons are erased when the internal memory or card is inserted in the camera when formatting the card. • Before using non-Olympus cards or cards which have been formatted on the power by pressing either K or q. Make sure that the card is formatted. MEMORY FORMAT (FORMAT Formatting the internal memory/card All existing data, including protected pictures, are pressed OFF (No sound) / LOW /HIGH EN 25 Menu operations W Selecting a display language...
... s Changing the monitor brightness BRIGHT/ NORMAL BEEP Adjusting the volume of beeps when buttons are erased when the internal memory or card is inserted in the camera when formatting the card. • Before using non-Olympus cards or cards which have been formatted on the power by pressing either K or q. Make sure that the card is formatted. MEMORY FORMAT (FORMAT Formatting the internal memory/card All existing data, including protected pictures, are pressed OFF (No sound) / LOW /HIGH EN 25 Menu operations W Selecting a display language...
FE-200 Advanced Manual (English)
Page 26
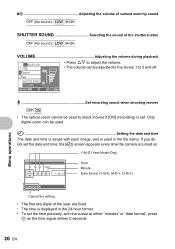
X Setting the date and time The date and time is saved with each image, and is displayed in the file name. Only digital zoom can be adjusted to five levels, 1 to shoot movies if [ON] (recording) is turned on. Menu operations 26 EN CANCEL MENU Cancel the setting • The first two digits of the shutter button OFF (No sound) / LOW /HIGH VOLUME Adjusting the volume during playback SETUP 1s • Press ON to adjust the volume. • The volume can be used to...
X Setting the date and time The date and time is saved with each image, and is displayed in the file name. Only digital zoom can be adjusted to five levels, 1 to shoot movies if [ON] (recording) is turned on. Menu operations 26 EN CANCEL MENU Cancel the setting • The first two digits of the shutter button OFF (No sound) / LOW /HIGH VOLUME Adjusting the volume during playback SETUP 1s • Press ON to adjust the volume. • The volume can be used to...
FE-200 Advanced Manual (English)
Page 28
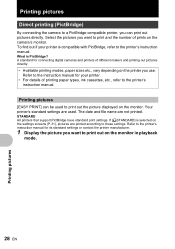
Printing pictures Direct printing (PictBridge) By connecting the camera to a PictBridge-compatible printer, you can be used . Select the pictures you use. What is compatible with PictBridge, refer to the printer's instruction manual. Printing pictures [EASY PRINT] can print out pictures directly. STANDARD All printers that support PictBridge have standard print settings. The date and file name are used to the instruction manual for connecting digital cameras and printers of different makers and printing out pictures directly. • Available printing modes, paper sizes etc.,...
Printing pictures Direct printing (PictBridge) By connecting the camera to a PictBridge-compatible printer, you can be used . Select the pictures you use. What is compatible with PictBridge, refer to the printer's instruction manual. Printing pictures [EASY PRINT] can print out pictures directly. STANDARD All printers that support PictBridge have standard print settings. The date and file name are used to the instruction manual for connecting digital cameras and printers of different makers and printing out pictures directly. • Available printing modes, paper sizes etc.,...
FE-200 Advanced Manual (English)
Page 33
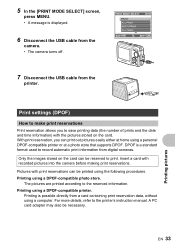
... necessary. For more details, refer to print. With print reservation, you to the reserved information. DPOF is possible directly from digital cameras. Printing pictures EN 33 PRINT MODE SELECT PRINT ALL PRINT MULTI PRINT ALL INDEX EXIT MENU SET OK 7 Disconnect the USB cable from the camera. • The camera turns off. A PC card adapter may also be reserved to the printer's instruction manual. 5 In the [PRINT MODE SELECT] screen, press MENU. • A message is displayed. 6 Disconnect the USB cable from the...
... necessary. For more details, refer to print. With print reservation, you to the reserved information. DPOF is possible directly from digital cameras. Printing pictures EN 33 PRINT MODE SELECT PRINT ALL PRINT MULTI PRINT ALL INDEX EXIT MENU SET OK 7 Disconnect the USB cable from the camera. • The camera turns off. A PC card adapter may also be reserved to the printer's instruction manual. 5 In the [PRINT MODE SELECT] screen, press MENU. • A message is displayed. 6 Disconnect the USB cable from the...
FE-200 Advanced Manual (English)
Page 34
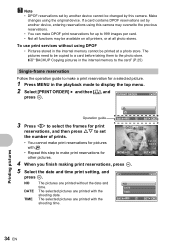
... functions may overwrite the previous reservations. • You can make a print reservation for a selected picture. 1 Press MENU in the internal memory cannot be copied to a card before taking them to the photo store. The pictures need to be printed at all photo stores. Note • DPOF reservations set by this camera may be available on all printers, or at a photo store. Make changes using DPOF • Pictures stored in the playback mode to display the top menu...
... functions may overwrite the previous reservations. • You can make a print reservation for a selected picture. 1 Press MENU in the internal memory cannot be copied to a card before taking them to the photo store. The pictures need to be printed at all photo stores. Note • DPOF reservations set by this camera may be available on all printers, or at a photo store. Make changes using DPOF • Pictures stored in the playback mode to display the top menu...
FE-200 Advanced Manual (English)
Page 37
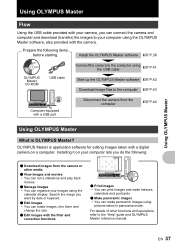
... other functions and operations, refer to the computer gP.43 Computer equipped with a USB port Disconnect the camera from the camera or other media ( View images and movies • You can run a slideshow and play back movies. ( Manage images • You can organize your computer using the USB cable gP.41 Start up the OLYMPUS Master software gP.42 Download image files to the "Help" guide and OLYMPUS Master reference manual. EN 37 Using OLYMPUS Master Using OLYMPUS...
... other functions and operations, refer to the computer gP.43 Computer equipped with a USB port Disconnect the camera from the camera or other media ( View images and movies • You can run a slideshow and play back movies. ( Manage images • You can organize your computer using the USB cable gP.41 Start up the OLYMPUS Master software gP.42 Download image files to the "Help" guide and OLYMPUS Master reference manual. EN 37 Using OLYMPUS Master Using OLYMPUS...

FE-200 Advanced Manual (English)
Page 51
... used in the center of the frame, lock the focus on the subject. g"Set date and time" (P.6), "X Setting the date and time" (P.26) The battery has been pulled out of the camera • The date and time settings will be returned to the factory default settings if the camera is not in the center of the frame • Place the subject in the same conditions from f to shoot pictures. Before taking important pictures...
... used in the center of the frame, lock the focus on the subject. g"Set date and time" (P.6), "X Setting the date and time" (P.26) The battery has been pulled out of the camera • The date and time settings will be returned to the factory default settings if the camera is not in the center of the frame • Place the subject in the same conditions from f to shoot pictures. Before taking important pictures...
FE-200 Advanced Manual (English)
Page 52
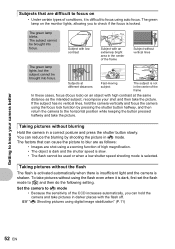
... the same distance as follows: • Images are difficult to focus on • Under certain types of conditions, it is shaken. Getting to know your shot and then take the picture. The green lamp on an object with the flash off. The subject cannot be used or when a low shutter speed shooting mode is locked. The factors that are shot using auto focus. g"h Shooting pictures using the focus lock function by shooting the picture in h mode.
... the same distance as follows: • Images are difficult to focus on • Under certain types of conditions, it is shaken. Getting to know your shot and then take the picture. The green lamp on an object with the flash off. The subject cannot be used or when a low shutter speed shooting mode is locked. The factors that are shot using auto focus. g"h Shooting pictures using the focus lock function by shooting the picture in h mode.
FE-200 Advanced Manual (English)
Page 53
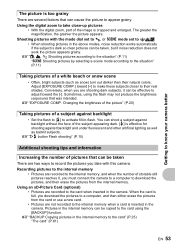
Adjust [EXPOSURE COMP.] toward the [-]. g"EXPOSURE COMP. Recording pictures to the internal memory • Pictures are several factors that can cause the picture to appear grainy. g"BACKUP Copying pictures in the camera. Sometimes, using the [BACKUP] function. You can be effective to adjust toward [+] to make these subjects closer to their natural colors. Conversely, when you are two ways to record the pictures you take close-up pictures • With the digital zoom, part of...
Adjust [EXPOSURE COMP.] toward the [-]. g"EXPOSURE COMP. Recording pictures to the internal memory • Pictures are several factors that can cause the picture to appear grainy. g"BACKUP Copying pictures in the camera. Sometimes, using the [BACKUP] function. You can be effective to adjust toward [+] to make these subjects closer to their natural colors. Conversely, when you are two ways to record the pictures you take close-up pictures • With the digital zoom, part of...
FE-200 Advanced Manual (English)
Page 54
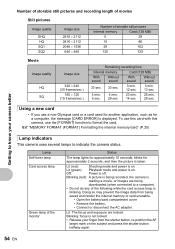
... . Lit: The focus and exposure are being downloaded (when connected to indicate the camera status. Blinking: focus is on . Using a new card • If you use the [FORMAT] function to know your finger from being recorded, the camera is reading a movie, or images are locked. Lamp Self-timer lamp Card access lamp Green lamp of storable still pictures Internal memory Card (128 MB) 5 29 15 86 29 162 130 725 Movie Image quality HQ SQ Image size 320 × 240...
... . Lit: The focus and exposure are being downloaded (when connected to indicate the camera status. Blinking: focus is on . Using a new card • If you use the [FORMAT] function to know your finger from being recorded, the camera is reading a movie, or images are locked. Lamp Self-timer lamp Card access lamp Green lamp of storable still pictures Internal memory Card (128 MB) 5 29 15 86 29 162 130 725 Movie Image quality HQ SQ Image size 320 × 240...

FE-200 Advanced Manual (English)
Page 55
... power is turned off the camera whenever it is no card in the camera. [PANORAMA]/[FORMAT]/[BACK UP]/[PRINT ORDER] Selecting the optimal image quality A record mode expresses a combination of desired image size and compression level. Quickly displaying a desired picture • Turn the zoom lever towards W to view the pictures as an e-mail attachment or post on a Web site • [SQ2] g"IMAGE QUALITY Changing the image quality" (P.19) To return the settings of functions to default settings...
... power is turned off the camera whenever it is no card in the camera. [PANORAMA]/[FORMAT]/[BACK UP]/[PRINT ORDER] Selecting the optimal image quality A record mode expresses a combination of desired image size and compression level. Quickly displaying a desired picture • Turn the zoom lever towards W to view the pictures as an e-mail attachment or post on a Web site • [SQ2] g"IMAGE QUALITY Changing the image quality" (P.19) To return the settings of functions to default settings...

FE-200 Advanced Manual (English)
Page 56
View the picture using Internet Explorer to the computer's instruction manual. 56 EN There are several ways you are using image browsing software • Install the OLYMPUS Master software from the provided CD-ROM. When the monitor setting is 1,024 × 768 and you can view the entire picture on the computer desktop may be viewed without scrolling. Change the monitor setting • The icons on the computer screen. For...
View the picture using Internet Explorer to the computer's instruction manual. 56 EN There are several ways you are using image browsing software • Install the OLYMPUS Master software from the provided CD-ROM. When the monitor setting is 1,024 × 768 and you can view the entire picture on the computer desktop may be viewed without scrolling. Change the monitor setting • The icons on the computer screen. For...
FE-200 Advanced Manual (English)
Page 57
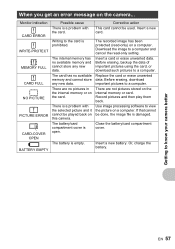
... erasing, download important pictures to know your camera better EN 57 Record pictures and then play them back. Insert a new battery. When you get an error message on this camera. The recorded image has been protected (read -only setting. There are no available memory and cannot store any new data. Getting to a computer. If that cannot be used. Monitor indication q CARD ERROR q WRITE-PROTECT > MEMORY FULL q CARD FULL L NO PICTURE r PICTURE ERROR CARD-COVER OPEN g BATTERY EMPTY Possible cause There is a problem with...
... erasing, download important pictures to know your camera better EN 57 Record pictures and then play them back. Insert a new battery. When you get an error message on this camera. The recorded image has been protected (read -only setting. There are no available memory and cannot store any new data. Getting to a computer. If that cannot be used. Monitor indication q CARD ERROR q WRITE-PROTECT > MEMORY FULL q CARD FULL L NO PICTURE r PICTURE ERROR CARD-COVER OPEN g BATTERY EMPTY Possible cause There is a problem with...
FE-200 Advanced Manual (English)
Page 66
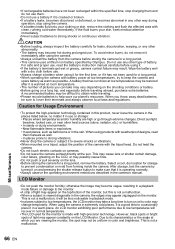
... in color and brightness. Wipe the battery well with weatherproof designs, read the battery's instruction manual carefully before traveling abroad, purchase extra batteries. However, black spots or bright spots of light may appear constantly on a tripod, adjust the position of pictures you throw away dead batteries, be uniform in the rain. Direct sunlight, beaches, locked cars, or near other way during prolonged use a battery if...
... in color and brightness. Wipe the battery well with weatherproof designs, read the battery's instruction manual carefully before traveling abroad, purchase extra batteries. However, black spots or bright spots of light may appear constantly on a tripod, adjust the position of pictures you throw away dead batteries, be uniform in the rain. Direct sunlight, beaches, locked cars, or near other way during prolonged use a battery if...
FE-200 Advanced Manual (English)
Page 76
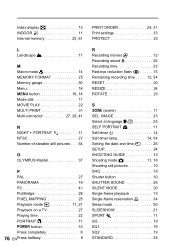
... halfway 8 PRINT ORDER 24, 31 Print settings 33 PROTECT 23 R Recording movies n 12 Recording sound R 26 Recording time 22 Red-eye reduction flash 15 Remaining recording time . . . . . 12, 54 RESET 20 RESIZE 24 ROTATE 23 S f (scene 11 SEL. IMAGE 23 Select a language W 25 SELF PORTRAIT R 11 Self-timer Y 14 Self-timer lamp 14, 54 Setting the date and time X . . . . . 26 SETUP 24 SHOOTING GUIDE 12 Shooting mode K 11, 18 Shooting still pictures 10 SHQ 19 Shutter button 10 SHUTTER SOUND 26 SILENT MODE 20 Single-frame playback 13 Single...
... halfway 8 PRINT ORDER 24, 31 Print settings 33 PROTECT 23 R Recording movies n 12 Recording sound R 26 Recording time 22 Red-eye reduction flash 15 Remaining recording time . . . . . 12, 54 RESET 20 RESIZE 24 ROTATE 23 S f (scene 11 SEL. IMAGE 23 Select a language W 25 SELF PORTRAIT R 11 Self-timer Y 14 Self-timer lamp 14, 54 Setting the date and time X . . . . . 26 SETUP 24 SHOOTING GUIDE 12 Shooting mode K 11, 18 Shooting still pictures 10 SHQ 19 Shutter button 10 SHUTTER SOUND 26 SILENT MODE 20 Single-frame playback 13 Single...
FE-200 Quick Start Guide (English, Português)
Page 1
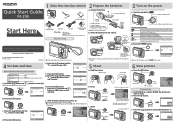
... shooting mode. a. Insert the battery into the camera 2 3 1 • Insert the battery side first. X Y M D TIME 2006.08.26 --:-- O< button X Y M D TIME 2006 Y / M / D NY button b. g. For a more information, please refer to the Basic & Advanced Manuals or visit: www.olympusamerica.com/support © 2006 Printed in China Set date and time VH745001 Pull the strap tight so that the focus and exposure are fixed. Press the Y# button. To turn on the power Quick Start Guide FE-200 Start Here a. above, display...
... shooting mode. a. Insert the battery into the camera 2 3 1 • Insert the battery side first. X Y M D TIME 2006.08.26 --:-- O< button X Y M D TIME 2006 Y / M / D NY button b. g. For a more information, please refer to the Basic & Advanced Manuals or visit: www.olympusamerica.com/support © 2006 Printed in China Set date and time VH745001 Pull the strap tight so that the focus and exposure are fixed. Press the Y# button. To turn on the power Quick Start Guide FE-200 Start Here a. above, display...


