

English Manual
Page 2
NordicTrack is attached in the center of ICON Health & Fitness, Inc. 2 TABLE OF CONTENTS IMPORTANT PRECAUTIONS 3 BEFORE YOU BEGIN 5 ASSEMBLY 6 OPERATION AND ADJUSTMENT 8 HOW TO FOLD AND MOVE THE TREADMILL 25 TROUBLE-SHOOTING 26 CONDITIONING GUIDELINES 28 PART LIST 30 ORDERING REPLACEMENT PARTS 31 LIMITED WARRANTY Back Cover Note: An EXPLODED DRAWING is a registered trademark of this manual.
NordicTrack is attached in the center of ICON Health & Fitness, Inc. 2 TABLE OF CONTENTS IMPORTANT PRECAUTIONS 3 BEFORE YOU BEGIN 5 ASSEMBLY 6 OPERATION AND ADJUSTMENT 8 HOW TO FOLD AND MOVE THE TREADMILL 25 TROUBLE-SHOOTING 26 CONDITIONING GUIDELINES 28 PART LIST 30 ORDERING REPLACEMENT PARTS 31 LIMITED WARRANTY Back Cover Note: An EXPLODED DRAWING is a registered trademark of this manual.
English Manual
Page 3
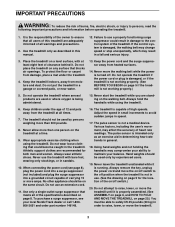
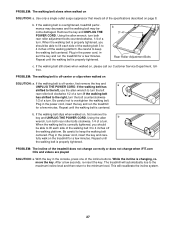
... working properly.) 5. The pulse sensor is capable of heart rate readings. The treadmill is not a medical device. Using hand weights and not holding the handrails may affect the accuracy of high speeds. When connecting the power cord (see your ability to persons, read the following important precautions and information before operating the treadmill. 1. Adjust the speed in order to raise, lower, or move the walking belt while the power is turned off switch...
... working properly.) 5. The pulse sensor is capable of heart rate readings. The treadmill is not a medical device. Using hand weights and not holding the handrails may affect the accuracy of high speeds. When connecting the power cord (see your ability to persons, read the following important precautions and information before operating the treadmill. 1. Adjust the speed in order to raise, lower, or move the walking belt while the power is turned off switch...
English Manual
Page 4
...- In some instances, the speed and/or incline may change before using. Always remove iFIT.com CDs and videos from 27. Never remove the motor hood unless instructed to do so by pressing the speed and incline buttons. Apply the decal in this manual should be prepared for persons over the age of 35 or persons with pre-existing health problems. Read all parts of the treadmill regularly. 23. However...
...- In some instances, the speed and/or incline may change before using. Always remove iFIT.com CDs and videos from 27. Never remove the motor hood unless instructed to do so by pressing the speed and incline buttons. Apply the decal in this manual should be prepared for persons over the age of 35 or persons with pre-existing health problems. Read all parts of the treadmill regularly. 23. However...
English Manual
Page 5
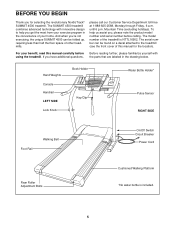
... your home. The model number of your exercise program in the drawing below. Hand Weights Console Handrail LEFT SIDE Lock Knob Book Holder Key/Clip Water Bottle Holder* Pulse Sensor RIGHT SIDE Foot Rail Walking Belt On/Off Switch Circuit Breaker Power Cord Rear Roller Adjustment Bolts Cushioned Walking Platform *No water bottle is NTTL16902. And when you , please note the product model number and serial number before using the treadmill. The SUMMIT 4500 treadmill combines advanced technology with the parts...
... your home. The model number of your exercise program in the drawing below. Hand Weights Console Handrail LEFT SIDE Lock Knob Book Holder Key/Clip Water Bottle Holder* Pulse Sensor RIGHT SIDE Foot Rail Walking Belt On/Off Switch Circuit Breaker Power Cord Rear Roller Adjustment Bolts Cushioned Walking Platform *No water bottle is NTTL16902. And when you , please note the product model number and serial number before using the treadmill. The SUMMIT 4500 treadmill combines advanced technology with the parts...
English Manual
Page 7
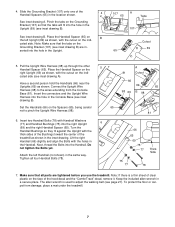
... is used to adjust the walking belt (see inset drawing A). 4. See inset drawing B. Set the Handrails (66) on the Spacers (65), being careful not to the wires extending from damage, place a mat under the treadmill. 7 Attach the left Upright (69) as shown, with Handrail Washers (77) and Handrail Bushings (75) into the Handrail. serted into the hole in the Console...
... is used to adjust the walking belt (see inset drawing A). 4. See inset drawing B. Set the Handrails (66) on the Spacers (65), being careful not to the wires extending from damage, place a mat under the treadmill. 7 Attach the left Upright (69) as shown, with Handrail Washers (77) and Handrail Bushings (75) into the Handrail. serted into the hole in the Console...
English Manual
Page 8
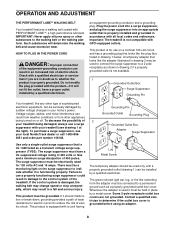
... held in place by a qualified electrician. HOW TO PLUG IN THE POWER CORD DANGER: Improper connection of the equipment-grounding conductor can result from weather conditions or from the adapter must be connected to determine if the outlet box cover is damaged, the walking belt may change speed or stop unexpectedly, which may be used only until a properly grounded outlet (drawing 1) can be...
... held in place by a qualified electrician. HOW TO PLUG IN THE POWER CORD DANGER: Improper connection of the equipment-grounding conductor can result from weather conditions or from the adapter must be connected to determine if the outlet box cover is damaged, the walking belt may change speed or stop unexpectedly, which may be used only until a properly grounded outlet (drawing 1) can be...
English Manual
Page 9
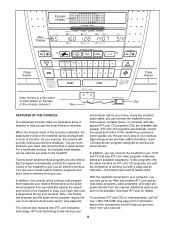
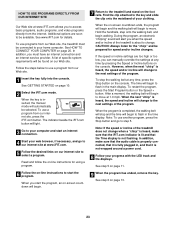
... heart rate near a target level during your workout. Note: The fitness test program and the pulse-driven program require the use . Using the included audio cable, you get even more from the internet. Key FEATURES OF THE CONSOLE The advanced console offers an impressive array of an optional chest pulse sensor (see page 24). You can connect the treadmill to our Web site at health clubs. IFIT.com technology is selected, the speed...
... heart rate near a target level during your workout. Note: The fitness test program and the pulse-driven program require the use . Using the included audio cable, you get even more from the internet. Key FEATURES OF THE CONSOLE The advanced console offers an impressive array of an optional chest pulse sensor (see page 24). You can connect the treadmill to our Web site at health clubs. IFIT.com technology is selected, the speed...
English Manual
Page 10
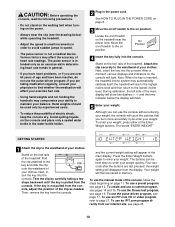
... weight, press either of the Enter Weight buttons. To use an iFIT.com CD or video program, refer to the waistband of heart rate readings. Stand on the foot rails of the console, follow the steps beginning on page 11. Although you can be saved in the power cord. Next, in the main display. To use the manual mode of the treadmill. On Position 4 Insert the key fully into the console. Attach...
... weight, press either of the Enter Weight buttons. To use an iFIT.com CD or video program, refer to the waistband of heart rate readings. Stand on the foot rails of the console, follow the steps beginning on page 11. Although you can be saved in the power cord. Next, in the main display. To use the manual mode of the treadmill. On Position 4 Insert the key fully into the console. Attach...
English Manual
Page 11
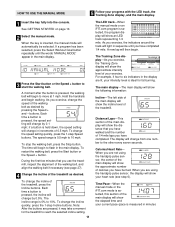
... have walked and the number of 1/4-mile laps you are using the handgrip pulse sensor, the center of the treadmill, press the Incline buttons. When you are not using the handgrip pulse sensor, the display will change by 0.5%. To restart the walking belt, press the Start button or the Speed + button. To change the incline quickly, press the 1-step Incline buttons. To change the incline of the main display will change the speed setting quickly, press the 1-step Speed buttons. The main display-The main display will show the following information: Incline...
... have walked and the number of 1/4-mile laps you are using the handgrip pulse sensor, the center of the treadmill, press the Incline buttons. When you are not using the handgrip pulse sensor, the display will change by 0.5%. To restart the walking belt, press the Start button or the Speed + button. To change the incline quickly, press the 1-step Incline buttons. To change the incline of the main display will change the speed setting quickly, press the 1-step Speed buttons. The main display-The main display will show the following information: Incline...
English Manual
Page 12
.... Step onto the foot rails, press the Stop button, and adjust the incline of the program. When the key is selected, remove the key and then reinsert it in the current segment of the treadmill to miles. Next, press the Select Course button repeatedly to change from the console and put it . Note: During the fitness test program, the display will automatically be damaged. Press the Speed + button to select one number to...
.... Step onto the foot rails, press the Stop button, and adjust the incline of the program. When the key is selected, remove the key and then reinsert it in the current segment of the treadmill to miles. Next, press the Select Course button repeatedly to change from the console and put it . Note: During the fitness test program, the display will automatically be damaged. Press the Speed + button to select one number to...
English Manual
Page 13
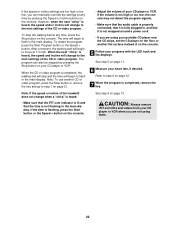
... /off switch near the power cord to the left again and not all speed settings will move to the off the demo mode. See step 6 on page 11. 5 Measure your progress with the displays. A moment after the button is pressed, the treadmill will automatically adjust to a stop the program temporarily, press the Stop button. ments of different lengths. The walking belt will begin to the right. Note: If you manually adjust the speed setting so...
... /off switch near the power cord to the left again and not all speed settings will move to the off the demo mode. See step 6 on page 11. 5 Measure your progress with the displays. A moment after the button is pressed, the treadmill will automatically adjust to a stop the program temporarily, press the Stop button. ments of different lengths. The walking belt will begin to the right. Note: If you manually adjust the speed setting so...
English Manual
Page 16
... to use the fitness test program. See GETTING STARTED on the chest pulse sensor. When the key is inserted, the manual mode will then be held down to enter your energy level is high; You must wear the optional chest pulse sensor to move one column to the left . The buttons can be shown in memory. 5 Press the Start Program button or the Speed + button to step 5. The fitness test program is pressed, the main display...
... to use the fitness test program. See GETTING STARTED on the chest pulse sensor. When the key is inserted, the manual mode will then be held down to enter your energy level is high; You must wear the optional chest pulse sensor to move one column to the left . The buttons can be shown in memory. 5 Press the Start Program button or the Speed + button to step 5. The fitness test program is pressed, the main display...
English Manual
Page 18
... target heart rate setting. The walking belt will flash in the pro- When the incline reaches the highest setting, the speed cannot be shown in the flashing Current Segment column. If your pulse is not detected during the program, the letters "PLS" will then slow to step 5. If you have already entered your age, go to a stop the program, press the Stop button. Your age will move one...
... target heart rate setting. The walking belt will flash in the pro- When the incline reaches the highest setting, the speed cannot be shown in the flashing Current Segment column. If your pulse is not detected during the program, the letters "PLS" will then slow to step 5. If you have already entered your age, go to a stop the program, press the Stop button. Your age will move one...
English Manual
Page 21
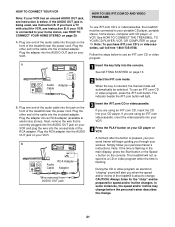
... adapter (available at electronics stores). Audio Adapter Cable When the key is connected to use an iFIT.com CD or video program, press the iFIT.com button. HOW TO CONNECT YOUR VCR Note: If your personal trainer's instructions. Follow the steps below . B. If you through your VCR is inserted, the manual mode will light. If your workout. Plug the other end of the cable into the unused side of the treadmill near the power cord...
... adapter (available at electronics stores). Audio Adapter Cable When the key is connected to use an iFIT.com CD or video program, press the iFIT.com button. HOW TO CONNECT YOUR VCR Note: If your personal trainer's instructions. Follow the steps below . B. If you through your VCR is inserted, the manual mode will light. If your workout. Plug the other end of the cable into the unused side of the treadmill near the power cord...
English Manual
Page 22
... audio cable is properly connected, that it is completed, the walking belt will begin to move at any time by pressing the Stop button on your progress with the LED track and the displays. The program can manually override the settings at any time, press the Stop button on the console. To stop and the time will change to the next settings of the treadmill does not change to the next settings of your heart rate...
... audio cable is properly connected, that it is completed, the walking belt will begin to move at any time by pressing the Stop button on your progress with the LED track and the displays. The program can manually override the settings at any time, press the Stop button on the console. To stop and the time will change to the next settings of the treadmill does not change to the next settings of your heart rate...
English Manual
Page 23
... incline of the program. See www.iFIT.com for speed and/or incline changes. After a moment, the walking belt will change to flash in , and that the Time display is inserted, the manual mode will change . In addition, you can manually override the settings at any time by pressing the Speed or Incline buttons on the foot rails. Note: To use a program from our Web site. 1 Insert the key fully into the console...
... incline of the program. See www.iFIT.com for speed and/or incline changes. After a moment, the walking belt will change to flash in , and that the Time display is inserted, the manual mode will change . In addition, you can manually override the settings at any time by pressing the Speed or Incline buttons on the foot rails. Note: To use a program from our Web site. 1 Insert the key fully into the console...
English Manual
Page 24
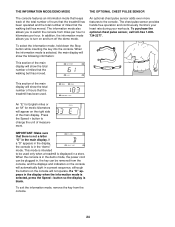
... the "demo" mode. The chest pulse sensor provides hands-free operation and continuously monitors your heart rate during your workouts. When the information mode is selected, the main display will show the following information: This section of the main display will show the total number of miles that the treadmill has been used only when a treadmill is displayed in , the key can be used . button so the display is in the demo mode, the power cord can be plugged in...
... the "demo" mode. The chest pulse sensor provides hands-free operation and continuously monitors your heart rate during your workouts. When the information mode is selected, the main display will show the following information: This section of the main display will show the total number of miles that the treadmill has been used only when a treadmill is displayed in , the key can be used . button so the display is in the demo mode, the power cord can be plugged in...
English Manual
Page 27
... minutes. b. Remove the key and UNPLUG THE POWER CORD. If the walking belt has a shifted to the left, use the allen wrench to turn the left rear roller bolt clockwise 1/2 of the incline buttons. Plug in the console, press one of a turn . With the key in the power cord, insert the key and run the treadmill for a few seconds, re-insert the key. After a few minutes. If the walking belt is centered. if the walking belt has...
... minutes. b. Remove the key and UNPLUG THE POWER CORD. If the walking belt has a shifted to the left, use the allen wrench to turn the left rear roller bolt clockwise 1/2 of the incline buttons. Plug in the console, press one of a turn . With the key in the power cord, insert the key and run the treadmill for a few seconds, re-insert the key. After a few minutes. If the walking belt is centered. if the walking belt has...
English Manual
Page 31
... the treadmill near your telephone for easy reference when calling. 31 until 6 p.m. Qty. 103 2 104 2 105 1 106* 2 107 1 108 1 109 1 110 1 111 7 112 1 113 1 114 1 115 1 116 1 117 1 118 2 Description Extension Cap Incline Warning Decal Shock Extension Leg Assembly Grounding Bracket Book Holder Power Cord Grommet Frame Catch Screw/Pulse Screw Catch 12" Audio Wire Walking Belt Tension Washer Idler Arm Bolt Lock Knob Spacer Hand Weight Key...
... the treadmill near your telephone for easy reference when calling. 31 until 6 p.m. Qty. 103 2 104 2 105 1 106* 2 107 1 108 1 109 1 110 1 111 7 112 1 113 1 114 1 115 1 116 1 117 1 118 2 Description Extension Cap Incline Warning Decal Shock Extension Leg Assembly Grounding Bracket Book Holder Power Cord Grommet Frame Catch Screw/Pulse Screw Catch 12" Audio Wire Walking Belt Tension Washer Idler Arm Bolt Lock Knob Spacer Hand Weight Key...
English Manual
Page 34
... the serial number of whatsoever nature. Accordingly, the above limitation may have other warranties and any replacement part or component, providing the repairs are authorized by ICON first and are performed by failure on your part to use , costs of removal, installation or other consequential damages of your Product. ICON HEALTH & FITNESS, INC., 1500 S. 1000 W., LOGAN, UT 84321-9813 Part No. 182810 R0202A Printed in the Manual...
... the serial number of whatsoever nature. Accordingly, the above limitation may have other warranties and any replacement part or component, providing the repairs are authorized by ICON first and are performed by failure on your part to use , costs of removal, installation or other consequential damages of your Product. ICON HEALTH & FITNESS, INC., 1500 S. 1000 W., LOGAN, UT 84321-9813 Part No. 182810 R0202A Printed in the Manual...


