
English Manual
Page 5
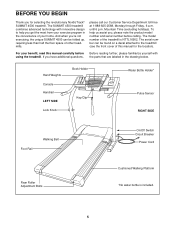
Mountain Time (excluding holidays). For your benefit, read this manual for selecting the revolutionary NordicTrack® SUMMIT 4500 treadmill. If you have additional questions, Before reading further, please familiarize yourself with innovative design to the treadmill (see...* Pulse Sensor RIGHT SIDE Foot Rail Walking Belt On/Off Switch Circuit Breaker Power Cord Rear Roller Adjustment Bolts Cushioned Walking Platform *No water bottle is NTTL16902. The SUMMIT 4500 treadmill combines advanced technology with the parts that are labeled in the convenience of the treadmill is...
Mountain Time (excluding holidays). For your benefit, read this manual for selecting the revolutionary NordicTrack® SUMMIT 4500 treadmill. If you have additional questions, Before reading further, please familiarize yourself with innovative design to the treadmill (see...* Pulse Sensor RIGHT SIDE Foot Rail Walking Belt On/Off Switch Circuit Breaker Power Cord Rear Roller Adjustment Bolts Cushioned Walking Platform *No water bottle is NTTL16902. The SUMMIT 4500 treadmill combines advanced technology with the parts that are labeled in the convenience of the treadmill is...
English Manual
Page 27
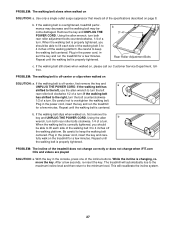
... a. if the walking belt has shifted to 4 inches off the walking platform. Repeat until the walking belt is properly tightened. b 3"-4" Rear Roller Adjustment Bolts c. PROBLEM: The walking belt is properly tightened, you should be able to lift each side of the walking belt 3 to the .... Plug in the power cord, insert the key and run the treadmill for a few minutes. Using the allen b wrench, turn both rear roller adjustment bolts counterclockwise, 1/4 of a turn . When the walking belt is off -center, first remove the key and UNPLUG THE POWER CORD. ...
... a. if the walking belt has shifted to 4 inches off the walking platform. Repeat until the walking belt is properly tightened. b 3"-4" Rear Roller Adjustment Bolts c. PROBLEM: The walking belt is properly tightened, you should be able to lift each side of the walking belt 3 to the .... Plug in the power cord, insert the key and run the treadmill for a few minutes. Using the allen b wrench, turn both rear roller adjustment bolts counterclockwise, 1/4 of a turn . When the walking belt is off -center, first remove the key and UNPLUG THE POWER CORD. ...
English Manual
Page 30
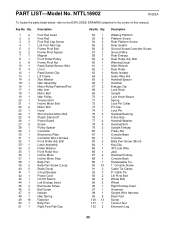
... parts listed below, refer to the EXPLODED DRAWING attached in the center of this manual. Bolt Latch Assembly Roller Washer Front Roller Nut Incline Motor Incline Motor Stop Belly Pan Belly Pan Screw (Long) Static Decal Circuit Breaker Power Cord ... 1 98 1 99 5 100 13 101 1 102 2 Description Walking Platform Platform Screw Rear Platform Screw Rear Isolator Ground Screw/Controller Screw Ground Wire Rear Endcap Rear Roller Adj. Qty. 1 2 2 2 3 2 4 1 5 2 6 2 7 1 8 1 9 8 10 1 11 4 12 1 13 1 14 3 15* 1 16 1 17 1 18 1 19 1 20 1 21 1 22 2 23 1 24 1 25 4 26 ...
... parts listed below, refer to the EXPLODED DRAWING attached in the center of this manual. Bolt Latch Assembly Roller Washer Front Roller Nut Incline Motor Incline Motor Stop Belly Pan Belly Pan Screw (Long) Static Decal Circuit Breaker Power Cord ... 1 98 1 99 5 100 13 101 1 102 2 Description Walking Platform Platform Screw Rear Platform Screw Rear Isolator Ground Screw/Controller Screw Ground Wire Rear Endcap Rear Roller Adj. Qty. 1 2 2 2 3 2 4 1 5 2 6 2 7 1 8 1 9 8 10 1 11 4 12 1 13 1 14 3 15* 1 16 1 17 1 18 1 19 1 20 1 21 1 22 2 23 1 24 1 25 4 26 ...
