

English Manual
Page 1
....nordictrack.com Model No. 831.23957.0 Serial No. Or call 1-800-TO-BE-FIT (1-800-862-3348) Mon.–-Fri. 6 a.m.–-6 p.m. CAUTION Read all precautions and instructions in the space above for future reference. Serial Number Decal ACTIVATE YOUR WARRANTY To register your product and activate your warranty today, go to www.nordictrackservice.com/ registration. MT Sat. 8 a.m.–-12 p.m. USER’'S MANUAL...
....nordictrack.com Model No. 831.23957.0 Serial No. Or call 1-800-TO-BE-FIT (1-800-862-3348) Mon.–-Fri. 6 a.m.–-6 p.m. CAUTION Read all precautions and instructions in the space above for future reference. Serial Number Decal ACTIVATE YOUR WARRANTY To register your product and activate your warranty today, go to www.nordictrackservice.com/ registration. MT Sat. 8 a.m.–-12 p.m. USER’'S MANUAL...
English Manual
Page 2
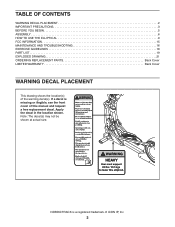
... this manual and request a free replacement decal. NORDICTRACK is missing or illegible, see the front cover of ICON IP, Inc. 2 Note: The decal(s) may not be shown at actual size. TABLE OF CONTENTS WARNING DECAL PLACEMENT 2 IMPORTANT PRECAUTIONS 3 BEFORE YOU BEGIN 5 ASSEMBLY 6 HOW TO USE THE ELLIPTICAL 9 FCC INFORMATION 15 MAINTENANCE AND TROUBLESHOOTING 16 EXERCISE GUIDELINES 18 PART LIST 19 EXPLODED DRAWING 21 ORDERING REPLACEMENT PARTS Back Cover LIMITED WARRANTY Back Cover...
... this manual and request a free replacement decal. NORDICTRACK is missing or illegible, see the front cover of ICON IP, Inc. 2 Note: The decal(s) may not be shown at actual size. TABLE OF CONTENTS WARNING DECAL PLACEMENT 2 IMPORTANT PRECAUTIONS 3 BEFORE YOU BEGIN 5 ASSEMBLY 6 HOW TO USE THE ELLIPTICAL 9 FCC INFORMATION 15 MAINTENANCE AND TROUBLESHOOTING 16 EXERCISE GUIDELINES 18 PART LIST 19 EXPLODED DRAWING 21 ORDERING REPLACEMENT PARTS Back Cover LIMITED WARRANTY Back Cover...

English Manual
Page 3
... arch your back straight while using the elliptical; Replace any exercise program, consult your pedaling speed in a controlled way. 7. You must be used by or through the use the elliptical in a garage or covered patio, or near water. 6. able to safely support 85 lbs. (38.5 kg) to move until it is properly assembled and the upright is the responsibility of heart rate readings. The heart rate monitor is not a medical device...
... arch your back straight while using the elliptical; Replace any exercise program, consult your pedaling speed in a controlled way. 7. You must be used by or through the use the elliptical in a garage or covered patio, or near water. 6. able to safely support 85 lbs. (38.5 kg) to move until it is properly assembled and the upright is the responsibility of heart rate readings. The heart rate monitor is not a medical device...
English Manual
Page 5
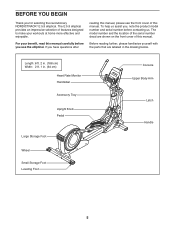
... the revolutionary NORDICTRACK® E 5.9 elliptical. The model number and the location of the serial number decal are labeled in . (64 cm) Heart Rate Monitor Handlebar Accessory Tray Upright Knob Pedal Large Storage Foot Wheel Small Storage Foot Leveling Foot Console Upper Body Arm Latch Handle 5 For your workouts at home more effective and enjoyable. Before reading further, please familiarize yourself with the parts that are shown on the front cover of this manual carefully...
... the revolutionary NORDICTRACK® E 5.9 elliptical. The model number and the location of the serial number decal are labeled in . (64 cm) Heart Rate Monitor Handlebar Accessory Tray Upright Knob Pedal Large Storage Foot Wheel Small Storage Foot Leveling Foot Console Upper Body Arm Latch Handle 5 For your workouts at home more effective and enjoyable. Before reading further, please familiarize yourself with the parts that are shown on the front cover of this manual carefully...
English Manual
Page 6
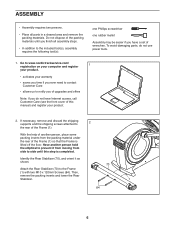
If necessary, remove and discard the shipping supports and the shipping screws attached to the Frame (1) with two M10 x 120mm Screws (84). Attach the Rear Stabilizer (70) to 2 the rear of the Frame (1). Go to www.nordictrackservice.com/ registration on your computer and register 1 your product. •• activates your warranty •• saves you time if you ever need to...
If necessary, remove and discard the shipping supports and the shipping screws attached to the Frame (1) with two M10 x 120mm Screws (84). Attach the Rear Stabilizer (70) to 2 the rear of the Frame (1). Go to www.nordictrackservice.com/ registration on your computer and register 1 your product. •• activates your warranty •• saves you time if you ever need to...

English Manual
Page 7
... lower the Front Stabilizer. 4. If necessary, remove and discard the shipping supports and the shipping screws attached to 3 the front of a second person, lift the Upright (2) upward into the Upright (2). 84 73 1 2 2 85 7 With the help of another person hold the elliptical to prevent it from moving ...from the packing material under the Frame (1) so that the Frame is completed. Attach the Front Stabilizer (73) to side until this step is lifted off the floor. With the help of the Frame (1). Tighten the Upright Knob (85) into the upright...
... lower the Front Stabilizer. 4. If necessary, remove and discard the shipping supports and the shipping screws attached to 3 the front of a second person, lift the Upright (2) upward into the Upright (2). 84 73 1 2 2 85 7 With the help of another person hold the elliptical to prevent it from moving ...from the packing material under the Frame (1) so that the Frame is completed. Attach the Front Stabilizer (73) to side until this step is lifted off the floor. With the help of the Frame (1). Tighten the Upright Knob (85) into the upright...
English Manual
Page 8
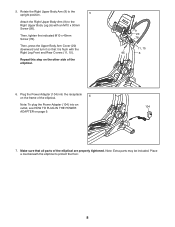
... that all parts of the elliptical. 6. Plug the Power Adapter (104) into the receptacle on the frame of the elliptical. 6 Note: To plug the Power Adapter (104) into an outlet, see HOW TO PLUG IN THE POWER ADAPTER on the other side of the elliptical are properly tightened. Then, press the Upper Body Arm Cover (20) downward and turn it is flush with an M10 x 50mm Screw (95). Then, tighten the...
... that all parts of the elliptical. 6. Plug the Power Adapter (104) into the receptacle on the frame of the elliptical. 6 Note: To plug the Power Adapter (104) into an outlet, see HOW TO PLUG IN THE POWER ADAPTER on the other side of the elliptical are properly tightened. Then, press the Upper Body Arm Cover (20) downward and turn it is flush with an M10 x 50mm Screw (95). Then, tighten the...
English Manual
Page 9
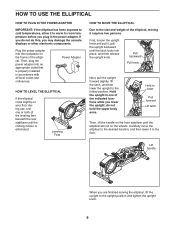
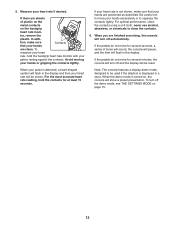
... local codes and ordinances. Plug the power adapter into place, and then release the upright knob. Leveling Feet HOW TO MOVE THE ELLIPTICAL Due to the size and weight of the elliptical. Carefully move the elliptical to the desired location, and then lower it , pull the upright backward until the elliptical will roll on the frame of the elliptical, moving the elliptical, lift the upright to the upright position and tighten the upright knob. 9 Pull...
... local codes and ordinances. Plug the power adapter into place, and then release the upright knob. Leveling Feet HOW TO MOVE THE ELLIPTICAL Due to the size and weight of the elliptical. Carefully move the elliptical to the desired location, and then lower it , pull the upright backward until the elliptical will roll on the frame of the elliptical, moving the elliptical, lift the upright to the upright position and tighten the upright knob. 9 Pull...
English Manual
Page 10
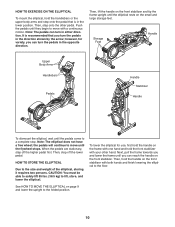
... tip the frame upright until the flywheel stops. Storage Feet Handle Upper Body Arms Handlebars Pedals Handle Stabilizer Handle To dismount the elliptical, wait until the pedals come to the folded position. 10 It is in the opposite direction. Then, hold the handlebars or the upper body arms and step onto the pedal that is recommended that you can turn the pedals in the lower position. Next...
... tip the frame upright until the flywheel stops. Storage Feet Handle Upper Body Arms Handlebars Pedals Handle Stabilizer Handle To dismount the elliptical, wait until the pedals come to the folded position. 10 It is in the opposite direction. Then, hold the handlebars or the upper body arms and step onto the pedal that is recommended that you can turn the pedals in the lower position. Next...
English Manual
Page 11
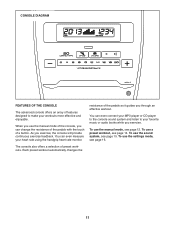
... manual mode, see page 15. To use the settings mode, see page 14. The console also offers a selection of the pedals as it guides you exercise. You can even measure your favorite music or audio books while you through an effective workout. You can change the resistance of the pedals with the touch of features designed to your heart rate using the handgrip heart rate monitor. As you can even connect...
... manual mode, see page 15. To use the settings mode, see page 14. The console also offers a selection of the pedals as it guides you exercise. You can even measure your favorite music or audio books while you through an effective workout. You can change the resistance of the pedals with the touch of features designed to your heart rate using the handgrip heart rate monitor. As you can even connect...
English Manual
Page 12
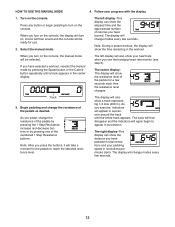
... display. 1. Turn on the console. The left display will change modes every few seconds each time the resistance level changes. When you have selected a workout, reselect the manual mode by pressing one of the pedals for use the handgrip heart rate monitor (see step 5). The left display–-This display can show the elapsed time and the approximate number of the pedals as desired. The right display–-This display can show the distance you pedal, change...
... display. 1. Turn on the console. The left display will change modes every few seconds each time the resistance level changes. When you have selected a workout, reselect the manual mode by pressing one of the pedals for use the handgrip heart rate monitor (see step 5). The left display–-This display can show the elapsed time and the approximate number of the pedals as desired. The right display–-This display can show the distance you pedal, change...
English Manual
Page 13
... gripping the contacts tightly. If the pedals do not move for several minutes, the console will turn off and the display will turn off automatically. For the most accurate heart rate reading, hold the handgrip heart rate monitor with your heart rate if desired. tor, remove the plastic. To measure your heart rate, hold the contacts for several seconds, a series of plastic on the metal contacts on...
... gripping the contacts tightly. If the pedals do not move for several minutes, the console will turn off and the display will turn off automatically. For the most accurate heart rate reading, hold the handgrip heart rate monitor with your heart rate if desired. tor, remove the plastic. To measure your heart rate, hold the contacts for several seconds, a series of plastic on the metal contacts on...

English Manual
Page 14
... console. 2. When you stop pedaling for you can manually override the setting by pressing the 1 Step Resistance buttons. Turn on page 13. 6. The resistance of the pedals will continue until the number of the desired workout appears in the left display and a profile of the resistance levels of the workout will appear in the left display. If the resistance level for the current segment is comfortable for several seconds, a series...
... console. 2. When you stop pedaling for you can manually override the setting by pressing the 1 Step Resistance buttons. Turn on page 13. 6. The resistance of the pedals will continue until the number of the desired workout appears in the left display and a profile of the resistance levels of the workout will appear in the left display. If the resistance level for the current segment is comfortable for several seconds, a series...
English Manual
Page 15
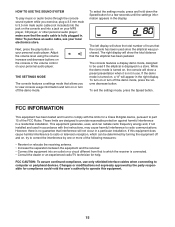
... the console and into an outlet on a circuit different from that to part 15 of hours that the elliptical has been pedaled. To select the settings mode, press and hold down the Speed button for a Class B digital device, pursuant to which can radiate radio frequency energy and, if not installed and used if the elliptical is fully plugged in. To exit the settings mode, press the Speed button. Changes...
... the console and into an outlet on a circuit different from that to part 15 of hours that the elliptical has been pedaled. To select the settings mode, press and hold down the Speed button for a Class B digital device, pursuant to which can radiate radio frequency energy and, if not installed and used if the elliptical is fully plugged in. To exit the settings mode, press the Speed button. Changes...
English Manual
Page 16
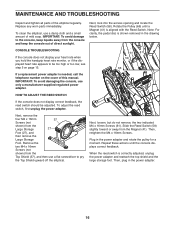
... opening and locate the Reed Switch (58). HOW TO ADJUST THE REED SWITCH If the console does not display correct feedback, the reed switch should be too high or too low, see step 5 on page 13. 61 41 58 66 If a replacement power adapter is aligned with the Reed Switch. Then, plug in the power adapter and rotate the pulley for a moment. MAINTENANCE AND TROUBLESHOOTING Inspect and tighten all parts of direct sunlight. To clean the elliptical, use...
... opening and locate the Reed Switch (58). HOW TO ADJUST THE REED SWITCH If the console does not display correct feedback, the reed switch should be too high or too low, see step 5 on page 13. 61 41 58 66 If a replacement power adapter is aligned with the Reed Switch. Then, plug in the power adapter and rotate the pulley for a moment. MAINTENANCE AND TROUBLESHOOTING Inspect and tighten all parts of direct sunlight. To clean the elliptical, use...
English Manual
Page 17
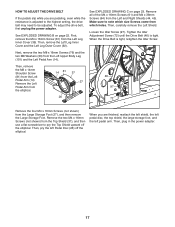
...) from the Left Leg Inner Cover (39). First, remove the M4 x 16mm Screw (61) from the Large Storage Foot (27), and then remove the Large Storage Foot. When the Drive Belt is tight. Make sure to note which holes. HOW TO ADJUST THE DRIVE BELT If the pedals slip while you are pedaling, even while the resistance is adjusted to the highest setting, the drive belt may need to pry the...
...) from the Left Leg Inner Cover (39). First, remove the M4 x 16mm Screw (61) from the Large Storage Foot (27), and then remove the Large Storage Foot. When the Drive Belt is tight. Make sure to note which holes. HOW TO ADJUST THE DRIVE BELT If the pedals slip while you are pedaling, even while the resistance is adjusted to the highest setting, the drive belt may need to pry the...
English Manual
Page 18
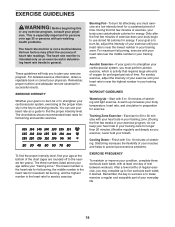
... is near the lowest number in your heart rate as an exercise aid in determining heart rate trends in preparation for exercise. WORKOUT GUIDELINES Warming Up—-Start with 5 to the nearest ten years). Training Zone Exercise—-Exercise for 20 to find your body uses carbohydrate calories for longer than 20 minutes.) Breathe regularly and deeply as you exercise; The heart rate monitor is near the highest...
... is near the lowest number in your heart rate as an exercise aid in determining heart rate trends in preparation for exercise. WORKOUT GUIDELINES Warming Up—-Start with 5 to the nearest ten years). Training Zone Exercise—-Exercise for 20 to find your body uses carbohydrate calories for longer than 20 minutes.) Breathe regularly and deeply as you exercise; The heart rate monitor is near the highest...

English Manual
Page 19
... Reed Switch/Wire M10 x 20mm Screw Key M4 x 16mm Screw M4 x 30mm Screw Pulse Grip M4 x 38mm Screw M4 x 19mm Screw Pulley M4 x 15mm Screw M4 x 16mm Ground Screw Pulse Wire Rear Stabilizer M4 x 12mm Screw Idler Adjustment Screw Front Stabilizer M6 x 12mm Flat Head Screw M6 x 12mm Screw M8 x 16mm Screw M10 x 60mm Screw M10 x 45mm Screw Crank Arm Bolt M6 x 25mm Shoulder Screw M8 x 14mm Shoulder Screw Crank Arm Nut M10 Washer M10 x 120mm Screw Upright Knob Right Upright Cover Left Upright Cover M5 x 5mm Screw Latch Release Latch...
... Reed Switch/Wire M10 x 20mm Screw Key M4 x 16mm Screw M4 x 30mm Screw Pulse Grip M4 x 38mm Screw M4 x 19mm Screw Pulley M4 x 15mm Screw M4 x 16mm Ground Screw Pulse Wire Rear Stabilizer M4 x 12mm Screw Idler Adjustment Screw Front Stabilizer M6 x 12mm Flat Head Screw M6 x 12mm Screw M8 x 16mm Screw M10 x 60mm Screw M10 x 45mm Screw Crank Arm Bolt M6 x 25mm Shoulder Screw M8 x 14mm Shoulder Screw Crank Arm Nut M10 Washer M10 x 120mm Screw Upright Knob Right Upright Cover Left Upright Cover M5 x 5mm Screw Latch Release Latch...

English Manual
Page 20
Qty. For information about ordering replacement parts, see the back cover of this manual. *These parts are subject to change without notice. Left Upper Body Leg Upright Axle M8 x 20mm Bolt Power Adapter User’'s Manual Assembly Tool Note: Specifications are not illustrated. 20 Key No. Qty. Description 95 2 96 1 97 1 98 1 99 6 100 1 M10 x 50mm Screw Pivot Screw Idler Screw M6 Washer M8 Locknut Power Wire 101 1 102 1 103 4 104 1 * –- * –- Description Key No.
Qty. For information about ordering replacement parts, see the back cover of this manual. *These parts are subject to change without notice. Left Upper Body Leg Upright Axle M8 x 20mm Bolt Power Adapter User’'s Manual Assembly Tool Note: Specifications are not illustrated. 20 Key No. Qty. Description 95 2 96 1 97 1 98 1 99 6 100 1 M10 x 50mm Screw Pivot Screw Idler Screw M6 Washer M8 Locknut Power Wire 101 1 102 1 103 4 104 1 * –- * –- Description Key No.

English Manual
Page 24
... limited to repairing or replacing, at ICON’'s option, the product through one (1) year from the service center will be the customer’'s responsibility. This warranty provides specic legal rights; ICON Health & Fitness, Inc., 1500 S. 1000 W., Logan, UT 84321-9813 Part No. 350901 R1013A Printed in this manual are not followed, if the product is abused or improperly or abnormally used...
... limited to repairing or replacing, at ICON’'s option, the product through one (1) year from the service center will be the customer’'s responsibility. This warranty provides specic legal rights; ICON Health & Fitness, Inc., 1500 S. 1000 W., Logan, UT 84321-9813 Part No. 350901 R1013A Printed in this manual are not followed, if the product is abused or improperly or abnormally used...


