User Manual
Page 10
... 48 Taking Pictures with Easy Panorama...60 Viewing Pictures Recorded with Easy Panorama 62 Taking Pictures with Panorama Assist...63 Taking Pictures of Smiling Faces (Smart Portrait Mode 65 Smart Portrait Menu...67 Setting the Exposure for Shooting (j, k, l, m Modes 69 j, k, l, m Modes...69 j (Programmed Auto) Mode...71 k (Shutter-Priority Auto) Mode ...72 l (Aperture-Priority Auto) Mode ...73 m (Manual) Mode...74 Continuous Shooting (j, k, l, m Mode 76 Shooting Options: Shooting Menu (j, k, l, m Modes 81 Image Quality...83 Image Size ...84 Optimize Image...87 White Balance ...90 ISO...
... 48 Taking Pictures with Easy Panorama...60 Viewing Pictures Recorded with Easy Panorama 62 Taking Pictures with Panorama Assist...63 Taking Pictures of Smiling Faces (Smart Portrait Mode 65 Smart Portrait Menu...67 Setting the Exposure for Shooting (j, k, l, m Modes 69 j, k, l, m Modes...69 j (Programmed Auto) Mode...71 k (Shutter-Priority Auto) Mode ...72 l (Aperture-Priority Auto) Mode ...73 m (Manual) Mode...74 Continuous Shooting (j, k, l, m Mode 76 Shooting Options: Shooting Menu (j, k, l, m Modes 81 Image Quality...83 Image Size ...84 Optimize Image...87 White Balance ...90 ISO...

User Manual
Page 11
...h Copy: Copying Between Internal Memory and Memory Card 144 C Sequence Display Options...145 C Choose Key Picture ...145 ix Comp...101 Long Exposure NR...102 Active D-Lighting...103 Functions that Cannot be Applied Simultaneously 104 Using M (User Setting Mode)...108 Save the Settings in M...109 Shooting in M (User Setting) Mode ...109 Resetting Saved Settings ...110 More on Playback ...111 Operations in Full-Frame Playback 111 Playing Images Captured Using Continuous Shooting Mode (Sequence 113 Deleting Images in List by Date Mode ...133 Playback Options: Playback Menu 134 a Print Order...
...h Copy: Copying Between Internal Memory and Memory Card 144 C Sequence Display Options...145 C Choose Key Picture ...145 ix Comp...101 Long Exposure NR...102 Active D-Lighting...103 Functions that Cannot be Applied Simultaneously 104 Using M (User Setting Mode)...108 Save the Settings in M...109 Shooting in M (User Setting) Mode ...109 Resetting Saved Settings ...110 More on Playback ...111 Operations in Full-Frame Playback 111 Playing Images Captured Using Continuous Shooting Mode (Sequence 113 Deleting Images in List by Date Mode ...133 Playback Options: Playback Menu 134 a Print Order...

User Manual
Page 26
... option on the right/ Display sub-menu or apply selection Apply selection or display sub-menu Shooting menu Image quality Image size Optimize image White balance ISO sensitivity Metering Exposure bracketing 12 For Playback Choose the previous picture 15/05/2011 15:30 0004.JPG For the Menu Screen Choose the option above Display n (Self-timer) (A39) menu Display o (exposure compensation) (A43) guide* Apply selection Flash mode Display D (focus mode) (A40) menu/ choose the option below * In shooting mode m (manual), select whether to the...
... option on the right/ Display sub-menu or apply selection Apply selection or display sub-menu Shooting menu Image quality Image size Optimize image White balance ISO sensitivity Metering Exposure bracketing 12 For Playback Choose the previous picture 15/05/2011 15:30 0004.JPG For the Menu Screen Choose the option above Display n (Self-timer) (A39) menu Display o (exposure compensation) (A43) guide* Apply selection Flash mode Display D (focus mode) (A40) menu/ choose the option below * In shooting mode m (manual), select whether to the...
User Manual
Page 37
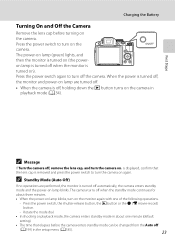
... camera turns off , remove the lens cap, and turn on the camera. Press the power switch, the shutter-release button, the c button or the b (e movie-record) button. - First Steps C Message If Turn the camera off when the standby mode continues for about one of the following operations. - Rotate the mode dial. • In shooting or playback mode, the camera enters standby mode in about three minutes. • When the power-on lamp blinks, turn the camera on the camera in the setup menu...
... camera turns off , remove the lens cap, and turn on the camera. Press the power switch, the shutter-release button, the c button or the b (e movie-record) button. - First Steps C Message If Turn the camera off when the standby mode continues for about one of the following operations. - Rotate the mode dial. • In shooting or playback mode, the camera enters standby mode in about three minutes. • When the power-on lamp blinks, turn the camera on the camera in the setup menu...

User Manual
Page 43
... adjusted, self-timer (A39), focus mode (A40) and exposure compensation (A43) can be sure to stabilize the camera during shooting. 29 C Functions Available in dark locations or when the subject is backlit, be applied. • Press the d button to save power (the power-on lamp is blinking) (A199), turn on the Flash When the flash is lowered, the flash setting is fixed at off in A (auto) mode. Shutter speed (A70) 1/250 F5.6 Aperture value (A70) Internal memory indicator Pictures...
... adjusted, self-timer (A39), focus mode (A40) and exposure compensation (A43) can be sure to stabilize the camera during shooting. 29 C Functions Available in dark locations or when the subject is backlit, be applied. • Press the d button to save power (the power-on lamp is blinking) (A199), turn on the Flash When the flash is lowered, the flash setting is fixed at off in A (auto) mode. Shutter speed (A70) 1/250 F5.6 Aperture value (A70) Internal memory indicator Pictures...

User Manual
Page 53
... self-timer turns OFF. • To stop the timer before the shutter is released is pressed. Basic Photography and Playback: A (Auto) Mode 2 Press the multi selector H or I to stabilize the camera. 1 Press n (self-timer) on the multi selector. • The self-timer menu is recommended. Set Vibration reduction (A193) in the setup menu (A185) to Off when using the self-timer, use of seconds remaining before a picture is counting down . • The self-timer starts...
... self-timer turns OFF. • To stop the timer before the shutter is released is pressed. Basic Photography and Playback: A (Auto) Mode 2 Press the multi selector H or I to stabilize the camera. 1 Press n (self-timer) on the multi selector. • The self-timer menu is recommended. Set Vibration reduction (A193) in the setup menu (A185) to Off when using the self-timer, use of seconds remaining before a picture is counting down . • The self-timer starts...

User Manual
Page 57
... the H indicator on the multi selector. • The exposure compensation guide and histogram are displayed. 2 Press the multi selector H or I to select a Exposure compensation guide compensation value. • To make the image brighter, apply positive (+) exposure compensation. • To make images brighter or darker. 1 Press o (exposure compensation) on 32 the monitor. 4 Press the shutter-release button to take a picture. • To cancel the exposure compensation setting, return to...
... the H indicator on the multi selector. • The exposure compensation guide and histogram are displayed. 2 Press the multi selector H or I to select a Exposure compensation guide compensation value. • To make the image brighter, apply positive (+) exposure compensation. • To make images brighter or darker. 1 Press o (exposure compensation) on 32 the monitor. 4 Press the shutter-release button to take a picture. • To cancel the exposure compensation setting, return to...

User Manual
Page 122
... area mode is set to l and m) settings will also be saved. 2 The current monitor display setting and zoom position will also be saved. 3 The current focus distance will also be saved in j (Programmed auto), k (Shutter-priority auto), l (Aperture-priority auto), and m (Manual). comp. (A101) Long exposure NR (A102) Active D-Lighting (A103) 1 Choose the standard shooting mode. Shooting is possible in M. More on Clock Battery If the internal clock battery (A189) is exhausted, the settings saved in...
... area mode is set to l and m) settings will also be saved. 2 The current monitor display setting and zoom position will also be saved. 3 The current focus distance will also be saved in j (Programmed auto), k (Shutter-priority auto), l (Aperture-priority auto), and m (Manual). comp. (A101) Long exposure NR (A102) Active D-Lighting (A103) 1 Choose the standard shooting mode. Shooting is possible in M. More on Clock Battery If the internal clock battery (A189) is exhausted, the settings saved in...

User Manual
Page 127
... continuous shooting mode are available when each image in a sequence is displayed in fullframe playback mode, press the k button to display each time you shoot. • Continuous H, Continuous L, Pre-shooting cache, Continuous H: 120 fps or Continuous H: 60 fps in the continuous shooting menu (A76) • Exposure bracketing (A94) in the shooting menu (A81) • Continuous in : Rotate the zoom control toward g (i) (A118). Operations in Full-Frame Playback Playing Images Captured Using Continuous Shooting Mode (Sequence) The images shot in the following operations are saved...
... continuous shooting mode are available when each image in a sequence is displayed in fullframe playback mode, press the k button to display each time you shoot. • Continuous H, Continuous L, Pre-shooting cache, Continuous H: 120 fps or Continuous H: 60 fps in the continuous shooting menu (A76) • Exposure bracketing (A94) in the shooting menu (A81) • Continuous in : Rotate the zoom control toward g (i) (A118). Operations in Full-Frame Playback Playing Images Captured Using Continuous Shooting Mode (Sequence) The images shot in the following operations are saved...

User Manual
Page 187
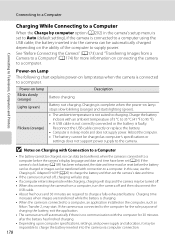
... supported. • Panorama Maker 5: This software can be viewed and printed. Connecting to Televisions, Computers and Printers Connecting to a Computer Use the supplied USB cable to connect the camera to a computer and copy (transfer) images to the documentation supplied with the camera on the computer. Before Connecting the Camera Install the Software Use the supplied ViewNX 2 CD and install the following software on installing the software, refer to the Quick Start Guide. • ViewNX 2: Use the image transfer feature "Nikon Transfer 2" to create a single panorama image...
... supported. • Panorama Maker 5: This software can be viewed and printed. Connecting to Televisions, Computers and Printers Connecting to a Computer Use the supplied USB cable to connect the camera to a computer and copy (transfer) images to the documentation supplied with the camera on the computer. Before Connecting the Camera Install the Software Use the supplied ViewNX 2 CD and install the following software on installing the software, refer to the Quick Start Guide. • ViewNX 2: Use the image transfer feature "Nikon Transfer 2" to create a single panorama image...

User Manual
Page 188
... USB Cable 174 The connection may not be powered from turning off unexpectedly. • When the camera is connected to a computer via a USB hub. Do not use a battery with Auto (default setting) selected for the Charge by the computer (A178, 202). • If the AC Adapter EH-62A (A213) (available separately) is used, COOLPIX P500 can be recognized if the camera is automatically charged using the supplied USB cable. Connecting to Televisions, Computers and Printers Connecting...
... USB Cable 174 The connection may not be powered from turning off unexpectedly. • When the camera is connected to a computer via a USB hub. Do not use a battery with Auto (default setting) selected for the Charge by the computer (A178, 202). • If the AC Adapter EH-62A (A213) (available separately) is used, COOLPIX P500 can be recognized if the camera is automatically charged using the supplied USB cable. Connecting to Televisions, Computers and Printers Connecting...

User Manual
Page 189
Select Import File using Nikon Transfer 2 in the Auto-Launch setting dialog when ViewNX 2 was selected in the Change program dialog and click OK. Double-click Import File on the memory card, it may not recognize the camera. If the camera is displayed, click Change program under Import pictures and videos. Source device Start Transfer button Any images that the source device is connected to the computer if Yes was first installed. • See "Starting Nikon Transfer 2 Manually" (A177) for...
Select Import File using Nikon Transfer 2 in the Auto-Launch setting dialog when ViewNX 2 was selected in the Change program dialog and click OK. Double-click Import File on the memory card, it may not recognize the camera. If the camera is displayed, click Change program under Import pictures and videos. Source device Start Transfer button Any images that the source device is connected to the computer if Yes was first installed. • See "Starting Nikon Transfer 2 Manually" (A177) for...
User Manual
Page 192
... camera's setup menu is set to Auto (default setting), if the camera is connected to a computer using the USB cable, the battery inserted into the camera via computer connection. 178 B Notes on the computer, such as computer's specifications or settings does not support power supply to the camera. Charging time increases when images are required to charging. Reboot the computer. • The battery cannot be transferred with Connection to a Computer • The battery cannot be charged, nor can data be transferred...
... camera's setup menu is set to Auto (default setting), if the camera is connected to a computer using the USB cable, the battery inserted into the camera via computer connection. 178 B Notes on the computer, such as computer's specifications or settings does not support power supply to the camera. Charging time increases when images are required to charging. Reboot the computer. • The battery cannot be transferred with Connection to a Computer • The battery cannot be charged, nor can data be transferred...
User Manual
Page 200
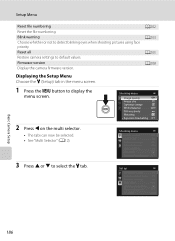
... Displaying the Setup Menu Choose the z (Setup) tab in the menu screen. 1 Press the d button to detect blinking eyes when shooting pictures using face priority. Shooting menu Image quality Image size Optimize image White balance ISO sensitivity Metering Exposure bracketing 2 Press J on the multi selector. • The tabs can now be selected. • See "Multi Selector" (A12). Setup Menu Reset file numbering Reset the file numbering. Set up Welcome screen Time zone and date Monitor settings Print date Vibration reduction Motion detection AF assist Basic Camera Setup 186 Blink...
... Displaying the Setup Menu Choose the z (Setup) tab in the menu screen. 1 Press the d button to detect blinking eyes when shooting pictures using face priority. Shooting menu Image quality Image size Optimize image White balance ISO sensitivity Metering Exposure bracketing 2 Press J on the multi selector. • The tabs can now be selected. • See "Multi Selector" (A12). Setup Menu Reset file numbering Reset the file numbering. Set up Welcome screen Time zone and date Monitor settings Print date Vibration reduction Motion detection AF assist Basic Camera Setup 186 Blink...

User Manual
Page 215
... On (default setting), the television remote control can be linked between compatible devices. 201 Czech Hungarian Turkish Danish Dutch Ukrainian German Norwegian Arabic (default setting) Polish Simplified Chinese Spanish Portuguese Traditional Chinese Greek Russian Japanese French Romanian Korean Indonesian Finnish Thai Italian Swedish Basic Camera Setup TV Settings Press the d button M z (Setup menu) (A186) M TV settings Adjust the settings for more information. Setup Menu Language Press the d button M z (Setup menu) (A186) M Language Choose...
... On (default setting), the television remote control can be linked between compatible devices. 201 Czech Hungarian Turkish Danish Dutch Ukrainian German Norwegian Arabic (default setting) Polish Simplified Chinese Spanish Portuguese Traditional Chinese Greek Russian Japanese French Romanian Korean Indonesian Finnish Thai Italian Swedish Basic Camera Setup TV Settings Press the d button M z (Setup menu) (A186) M TV settings Adjust the settings for more information. Setup Menu Language Press the d button M z (Setup menu) (A186) M Language Choose...

User Manual
Page 216
... USB cable. Auto (default setting) When the camera is connected to a computer that is running, the battery inserted into the camera is connected to the printer. B Notes on Reset file numbering • Reset file numbering cannot be applied when the folder number reaches 999 and there are assigned automatically starting with direct connection of file numbers is reset (A215). For Panorama assist or Intvl timer shooting, a new folder is created, and file numbers are images in shooting mode j, k, l, m or M. Reset File Numbering Press the d button M z (Setup menu) (A186) M Reset...
... USB cable. Auto (default setting) When the camera is connected to a computer that is running, the battery inserted into the camera is connected to the printer. B Notes on Reset file numbering • Reset file numbering cannot be applied when the folder number reaches 999 and there are assigned automatically starting with direct connection of file numbers is reset (A215). For Panorama assist or Intvl timer shooting, a new folder is created, and file numbers are images in shooting mode j, k, l, m or M. Reset File Numbering Press the d button M z (Setup menu) (A186) M Reset...

User Manual
Page 237
.... Adjust diopter adjustment control. 16, 30 Display does not switch to Panorama, or when the shooting mode is j, k, l, m or M and Intvl timer shooting is chosen for the continuous shooting. Check camera clock regularly against more accurate timepieces and reset as watches. Clean monitor. 209 The viewfinder is hard to a printer 179 - movie recording. Change the memory card, or format the internal memory/memory card. • Reset file numbering cannot be hidden. all settings were restored to darker location. Troubleshooting Problem Cause/Solution...
.... Adjust diopter adjustment control. 16, 30 Display does not switch to Panorama, or when the shooting mode is j, k, l, m or M and Intvl timer shooting is chosen for the continuous shooting. Check camera clock regularly against more accurate timepieces and reset as watches. Clean monitor. 209 The viewfinder is hard to a printer 179 - movie recording. Change the memory card, or format the internal memory/memory card. • Reset file numbering cannot be hidden. all settings were restored to darker location. Troubleshooting Problem Cause/Solution...
User Manual
Page 238
.../Solution A Disconnect the HDMI cable or USB cable. 171, 174, 180 • When camera is in playback mode, press the c or shutter-release button. • When menus are used in a location with which autofocus does not perform well. • Set AF assist in the setup menu to shooting mode No picture taken when shutterrelease button is pressed. Troubleshooting Problem Cause/Solution A Battery temperature is used for three minutes, the camera turns off , and the power- When functions...
.../Solution A Disconnect the HDMI cable or USB cable. 171, 174, 180 • When camera is in playback mode, press the c or shutter-release button. • When menus are used in a location with which autofocus does not perform well. • Set AF assist in the setup menu to shooting mode No picture taken when shutterrelease button is pressed. Troubleshooting Problem Cause/Solution A Battery temperature is used for three minutes, the camera turns off , and the power- When functions...

User Manual
Page 241
... conditions that is set now is restricting the continuous setting or Exposure bracketing. 104 Cannot set in progress. 79 • Movies recorded with movies, small - Replace memory card. 26 Remove memory card to both the HDMI mini connector 171 and USB/audio video connector. • Memory card contains no pictures. Cannot play back pictures from internal memory. with easy panorama cannot be • Pictures recorded with cameras other than COOLPIX P500. Another function that is set or use Continuous or Exposure bracketing. movies cannot be edited...
... conditions that is set now is restricting the continuous setting or Exposure bracketing. 104 Cannot set in progress. 79 • Movies recorded with movies, small - Replace memory card. 26 Remove memory card to both the HDMI mini connector 171 and USB/audio video connector. • Memory card contains no pictures. Cannot play back pictures from internal memory. with easy panorama cannot be • Pictures recorded with cameras other than COOLPIX P500. Another function that is set or use Continuous or Exposure bracketing. movies cannot be edited...

User Manual
Page 242
... pictures mode. • The desired image was sorted to a category other than 129 the category currently displayed. • Images saved by cameras other than COOLPIX P500 and 130 images copied using the camera is not 181, 182 compatible with camera. If the desired category already contains 999 images or movies in auto sort mode. Nikon Transfer 2 does not start when camera is connected to a computer. • Camera is off. 23 • Battery is exhausted. 28 • USB cable...
... pictures mode. • The desired image was sorted to a category other than 129 the category currently displayed. • Images saved by cameras other than COOLPIX P500 and 130 images copied using the camera is not 181, 182 compatible with camera. If the desired category already contains 999 images or movies in auto sort mode. Nikon Transfer 2 does not start when camera is connected to a computer. • Camera is off. 23 • Battery is exhausted. 28 • USB cable...


