
User Manual
Page 9
.../All the Way 15 x (Monitor) Button ...16 s (Display) Button ...17 First Steps ...18 Inserting the Battery...18 Removing the Battery...19 Charging the Battery ...20 Turning On and Off the Camera...23 Setting the Display Language, Date and Time 24 Inserting the Memory Card ...26 Removing the Memory Card...26 vii
.../All the Way 15 x (Monitor) Button ...16 s (Display) Button ...17 First Steps ...18 Inserting the Battery...18 Removing the Battery...19 Charging the Battery ...20 Turning On and Off the Camera...23 Setting the Display Language, Date and Time 24 Inserting the Memory Card ...26 Removing the Memory Card...26 vii
User Manual
Page 38
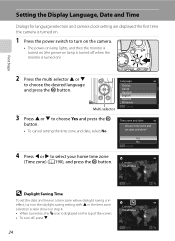
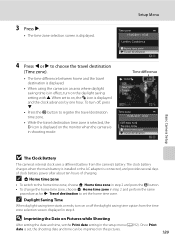
... 2 Press the multi selector H or I . 24 Back London Casablanca Back Setting the Display Language, Date and Time Dialogs for language selection and camera clock setting are displayed the first time the camera is turned on. 1 Press the power switch to select your home time zone (Time zone) (A190), and press... H in the time zone selection screen shown in step 4. • When turned on, the W icon is displayed on ). Time zone and date Choose time zone and set the date and time in a time zone where daylight saving is in effect, turn off, press I to choose Yes and press the k button. •...
... 2 Press the multi selector H or I . 24 Back London Casablanca Back Setting the Display Language, Date and Time Dialogs for language selection and camera clock setting are displayed the first time the camera is turned on. 1 Press the power switch to select your home time zone (Time zone) (A190), and press... H in the time zone selection screen shown in step 4. • When turned on, the W icon is displayed on ). Time zone and date Choose time zone and set the date and time in a time zone where daylight saving is in effect, turn off, press I to choose Yes and press the k button. •...
User Manual
Page 192
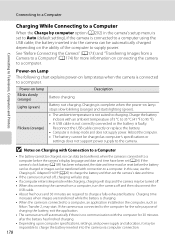
...to the computer for the sole purpose of charging the battery, exit the application. • The camera turns off . • When disconnecting the camera from a Camera to a Computer" (A174) for 30...; Depending upon computer specifications, settings, and power supply and allocation, it may be charged as Nikon Transfer 2, may be transferred with connection to a computer. Reboot the computer. • The battery...Charging AC Adapter EH-69P (A20) to charge the battery and then set the camera's date and time. • If the camera is faulty. Connecting to Televisions, Computers and ...
...to the computer for the sole purpose of charging the battery, exit the application. • The camera turns off . • When disconnecting the camera from a Camera to a Computer" (A174) for 30...; Depending upon computer specifications, settings, and power supply and allocation, it may be charged as Nikon Transfer 2, may be transferred with connection to a computer. Reboot the computer. • The battery...Charging AC Adapter EH-69P (A20) to charge the battery and then set the camera's date and time. • If the camera is faulty. Connecting to Televisions, Computers and ...

User Manual
Page 199
...save power. Sound settings A199 Adjust sound settings. Vibration reduction A193 Set the vibration reduction for the camera monitor display. Print date A192 Imprint date and time of camera shake and subject movement when shooting still pictures. Auto off A199 Set the time before the camera enters...whether or not to charge the camera battery when connecting to display the Welcome screen on the monitor when the camera is turned on pictures. AF assist A196 Enable or disable AF-assist illuminator. Language A201 Choose the language used for taking still pictures. Time...
...save power. Sound settings A199 Adjust sound settings. Vibration reduction A193 Set the vibration reduction for the camera monitor display. Print date A192 Imprint date and time of camera shake and subject movement when shooting still pictures. Auto off A199 Set the time before the camera enters...whether or not to charge the camera battery when connecting to display the Welcome screen on the monitor when the camera is turned on pictures. AF assist A196 Enable or disable AF-assist illuminator. Language A201 Choose the language used for taking still pictures. Time...
User Manual
Page 201
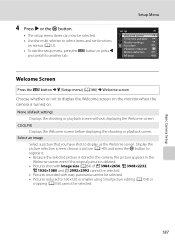
... the picture appears in the Welcome screen even if the original picture is turned on menus (A12). • To exit the setup menu, press the d button or press J and switch to another tab. COOLPIX Displays the Welcome screen before displaying the shooting or playback screen. Setup Menu... 4 Press K or the k button. • The setup menu items can now be selected. Set up Welcome screen Time zone and date Monitor settings Print date Vibration reduction Motion detection...
... the picture appears in the Welcome screen even if the original picture is turned on menus (A12). • To exit the setup menu, press the d button or press J and switch to another tab. COOLPIX Displays the Welcome screen before displaying the shooting or playback screen. Setup Menu... 4 Press K or the k button. • The setup menu items can now be selected. Set up Welcome screen Time zone and date Monitor settings Print date Vibration reduction Motion detection...
User Manual
Page 203
... selection screen is connected, and provides several days of clock battery power after about ten hours of charging. When set to set , the shooting date and time can be imprinted on the monitor when the camera is in step 4. C Daylight Saving Time When daylight saving time starts or ends..., turn on , the W icon is set the home time zone. Once Print date is displayed and the clock advances by one hour. To turn on Pictures while Shooting After setting the date and time, set the Print date setting in step 2 and perform the same procedure...
... selection screen is connected, and provides several days of clock battery power after about ten hours of charging. When set to set , the shooting date and time can be imprinted on the monitor when the camera is in step 4. C Daylight Saving Time When daylight saving time starts or ends..., turn on , the W icon is set the home time zone. Once Print date is displayed and the clock advances by one hour. To turn on Pictures while Shooting After setting the date and time, set the Print date setting in step 2 and perform the same procedure...
User Manual
Page 231
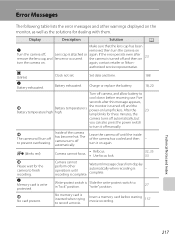
Set date and time. The camera turns off manually. Insert a memory card before resuming use. If the error persists even after this message appears, P Battery temperature high Battery temperature is Slide the write-protect switch to turn the camera on. O (blinks) N Battery exhausted. Battery exhausted. After ... the monitor, as well as the solutions for the camera to record a movie. again, contact retailer or Nikon- Charge or replace the battery. 188 18, 20 Turn off , and the power-on again. - the monitor is attached or lens error occurred. Error Messages The...
Set date and time. The camera turns off manually. Insert a memory card before resuming use. If the error persists even after this message appears, P Battery temperature high Battery temperature is Slide the write-protect switch to turn the camera on. O (blinks) N Battery exhausted. Battery exhausted. After ... the monitor, as well as the solutions for the camera to record a movie. again, contact retailer or Nikon- Charge or replace the battery. 188 18, 20 Turn off , and the power-on again. - the monitor is attached or lens error occurred. Error Messages The...


