User Manual
Page 12
...Enhancing Contrast and Saturation 148 I D-Lighting: Enhancing Brightness and Contrast 149 e Skin Softening: Making Skin Appear Smoother 150 p Filter Effects: Digital Filter...152 g Small Picture: Decreasing Image Size 154 j Black Border: Adding a Black Border to Pictures 155 a Crop: Creating a ... a TV...171 Connecting to a Computer...173 Before Connecting the Camera ...173 Transferring Images from a Camera to a Computer 174 Charging While Connecting to a Computer 178 Connecting to a Printer...179 Connecting the Camera and Printer...180 Printing Pictures One at a Time...181 Printing ...
...Enhancing Contrast and Saturation 148 I D-Lighting: Enhancing Brightness and Contrast 149 e Skin Softening: Making Skin Appear Smoother 150 p Filter Effects: Digital Filter...152 g Small Picture: Decreasing Image Size 154 j Black Border: Adding a Black Border to Pictures 155 a Crop: Creating a ... a TV...171 Connecting to a Computer...173 Before Connecting the Camera ...173 Transferring Images from a Camera to a Computer 174 Charging While Connecting to a Computer 178 Connecting to a Printer...179 Connecting the Camera and Printer...180 Printing Pictures One at a Time...181 Printing ...

User Manual
Page 13
Table of Contents Basic Camera Setup ...185 Setup Menu...185 Welcome Screen ...187 Time Zone and Date...188 Monitor Settings...191 Print Date ...192 Vibration Reduction ...193 Motion Detection...195 AF Assist...196 Red-eye Reduction ...196 Digital Zoom...197 Assign Side Zoom Control ...198 Sound Settings...199 Auto Off ...199 Format Memory/Format Card...200 Language...201 TV Settings ...201 Charge by Computer...202 Reset File Numbering...202 Blink Warning ...203 Reset All ...205 Firmware Version...208 Caring for the Camera...209 Caring for the Camera ...209 Cleaning ...211 Storage ...212 xi
Table of Contents Basic Camera Setup ...185 Setup Menu...185 Welcome Screen ...187 Time Zone and Date...188 Monitor Settings...191 Print Date ...192 Vibration Reduction ...193 Motion Detection...195 AF Assist...196 Red-eye Reduction ...196 Digital Zoom...197 Assign Side Zoom Control ...198 Sound Settings...199 Auto Off ...199 Format Memory/Format Card...200 Language...201 TV Settings ...201 Charge by Computer...202 Reset File Numbering...202 Blink Warning ...203 Reset All ...205 Firmware Version...208 Caring for the Camera...209 Caring for the Camera ...209 Cleaning ...211 Storage ...212 xi
User Manual
Page 15
... the pictures on removable memory cards. Symbols and Conventions To make it . Illustrations and Screen Display Illustrations and text displays shown in the camera monitor, and the names of Nikon COOLPIX P500 digital camera. This manual is inserted, all those who use the product will apply only to as the "default setting." • The names of...
... the pictures on removable memory cards. Symbols and Conventions To make it . Illustrations and Screen Display Illustrations and text displays shown in the camera monitor, and the names of Nikon COOLPIX P500 digital camera. This manual is inserted, all those who use the product will apply only to as the "default setting." • The names of...
User Manual
Page 16
... this product may be held liable for contact information: http://imaging.nikon.com/ Use Only Nikon Brand Electronic Accessories Nikon COOLPIX cameras are engineered and proven to operate within the operational and safety requirements... of third-party rechargeable Li-ion batteries not bearing the Nikon holographic seal could interfere with the latest product information, tips, answers to frequently asked questions (FAQs), and general advice on digital...
... this product may be held liable for contact information: http://imaging.nikon.com/ Use Only Nikon Brand Electronic Accessories Nikon COOLPIX cameras are engineered and proven to operate within the operational and safety requirements... of third-party rechargeable Li-ion batteries not bearing the Nikon holographic seal could interfere with the latest product information, tips, answers to frequently asked questions (FAQs), and general advice on digital...

User Manual
Page 17
..., music, paintings, woodcut prints, maps, drawings, movies and photographs is prohibited. Unless the prior permission of the government was digitally copied or reproduced by law from discarded storage devices using commercial deletion software, or format the device and then completely refill it with...bonds, even if such copies or reproductions are to be punishable by law. • Items prohibited by means of a scanner, digital camera or other device may be provided for business use this product for example, pictures of empty sky). Disposing of Data Storage Devices Please...
..., music, paintings, woodcut prints, maps, drawings, movies and photographs is prohibited. Unless the prior permission of the government was digitally copied or reproduced by law from discarded storage devices using commercial deletion software, or format the device and then completely refill it with...bonds, even if such copies or reproductions are to be punishable by law. • Items prohibited by means of a scanner, digital camera or other device may be provided for business use this product for example, pictures of empty sky). Disposing of Data Storage Devices Please...
User Manual
Page 40
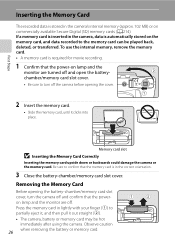
... caution when removing the battery or memory card. 26 If a memory card is inserted in the camera, data is automatically stored on the memory card, and data recorded to turn the camera off and confirm that the poweron lamp and the monitor are turned off and open the batterychamber/memory...the battery-chamber/memory card slot cover. Press the memory card in lightly with your finger (1) to confirm that the power-on commercially available Secure Digital (SD) memory cards (A214). Be sure to partially eject it, and then pull it clicks into place. First Steps Inserting the Memory Card ...
... caution when removing the battery or memory card. 26 If a memory card is inserted in the camera, data is automatically stored on the memory card, and data recorded to turn the camera off and confirm that the poweron lamp and the monitor are turned off and open the batterychamber/memory...the battery-chamber/memory card slot cover. Press the memory card in lightly with your finger (1) to confirm that the power-on commercially available Secure Digital (SD) memory cards (A214). Be sure to partially eject it, and then pull it clicks into place. First Steps Inserting the Memory Card ...
User Manual
Page 41
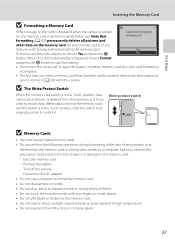
...other data on , the memory card must be formatted before formatting the memory card. Write protect switch B Memory Cards • Use only Secure Digital memory cards. • Do not perform the following operations during data transfer to a computer. Remove the battery - Failure to observe this precaution ...card, and the switch is not formatted. If you wish to the memory card: - Note that has been used in another device into this camera, be written to, or deleted from the memory card, or during formatting, while data is complete. • The first time you insert ...
...other data on , the memory card must be formatted before formatting the memory card. Write protect switch B Memory Cards • Use only Secure Digital memory cards. • Do not perform the following operations during data transfer to a computer. Remove the battery - Failure to observe this precaution ...card, and the switch is not formatted. If you wish to the memory card: - Note that has been used in another device into this camera, be written to, or deleted from the memory card, or during formatting, while data is complete. • The first time you insert ...
User Manual
Page 42
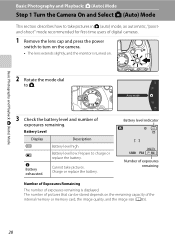
... high. Cannot take pictures in A (auto) mode, an automatic, "pointand-shoot" mode recommended for first-time users of digital cameras. 1 Remove the lens cap and press the power switch to turn on the camera. • The lens extends slightly, and the monitor is displayed. Battery level indicator 1/250 F5.6 32 Number of exposures... size (A85). 28 Prepare to charge or replace the battery. Basic Photography and Playback: A (Auto) Mode Basic Photography and Playback: A (Auto) Mode Step 1 Turn the Camera On and Select A (Auto) Mode This section describes how to take pictures.
... high. Cannot take pictures in A (auto) mode, an automatic, "pointand-shoot" mode recommended for first-time users of digital cameras. 1 Remove the lens cap and press the power switch to turn on the camera. • The lens extends slightly, and the monitor is displayed. Battery level indicator 1/250 F5.6 32 Number of exposures... size (A85). 28 Prepare to charge or replace the battery. Basic Photography and Playback: A (Auto) Mode Basic Photography and Playback: A (Auto) Mode Step 1 Turn the Camera On and Select A (Auto) Mode This section describes how to take pictures.

User Manual
Page 45
... the zoom control to zoom out, increasing the area visible in the frame. • When the camera is turned on the image size (A84) and digital zoom magnification. Optical zoom Digital zoom • A zoom indicator is displayed at the top of the frame and the focus area ... control toward f to activate the optical zoom. Maximum optical zoom Digital zoom enabled • The camera focuses at the current image mode setting. When zoom is small • Using Digital zoom (A197) in slight deterioration of the digital zoom to a range where images do not deteriorate, or to ...
... the zoom control to zoom out, increasing the area visible in the frame. • When the camera is turned on the image size (A84) and digital zoom magnification. Optical zoom Digital zoom • A zoom indicator is displayed at the top of the frame and the focus area ... control toward f to activate the optical zoom. Maximum optical zoom Digital zoom enabled • The camera focuses at the current image mode setting. When zoom is small • Using Digital zoom (A197) in slight deterioration of the digital zoom to a range where images do not deteriorate, or to ...
User Manual
Page 46
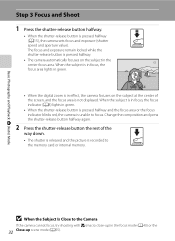
.... • The shutter is released and the picture is pressed halfway. • The camera automatically focuses on the subject at the center of the screen, and the focus area is unable to the... Camera If the camera cannot focus, try shooting with p (macro close-up) in the center focus area. When the... the subject is in focus, the focus area lights in green. 1/250 F5.6 • When the digital zoom is in effect, the camera focuses on the subject in the focus mode (A40) or the 32 Close-up scene mode (A55). ...
.... • The shutter is released and the picture is pressed halfway. • The camera automatically focuses on the subject at the center of the screen, and the focus area is unable to the... Camera If the camera cannot focus, try shooting with p (macro close-up) in the center focus area. When the... the subject is in focus, the focus area lights in green. 1/250 F5.6 • When the digital zoom is in effect, the camera focuses on the subject in the focus mode (A40) or the 32 Close-up scene mode (A55). ...

User Manual
Page 58
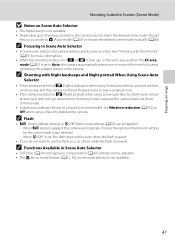
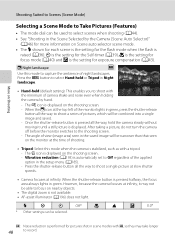
The saved settings can be used for shooting can be immediately retrieved for shooting simply by choosing one of digital cameras. y (Scene): Choose the desired scene from being hidden in shadow, or the HDR function can be saved. More on Shooting j, k, l, m mode ... following shooting modes. e (Night portrait): The flash fires to shoot scenes with a slow shutter speed. In Scene auto selector mode, the camera automatically selects the optimum scene mode for greater control over shutter speed and aperture value. j (Night landscape): Produces night landscape shots with reduced ...
The saved settings can be used for shooting can be immediately retrieved for shooting simply by choosing one of digital cameras. y (Scene): Choose the desired scene from being hidden in shadow, or the HDR function can be saved. More on Shooting j, k, l, m mode ... following shooting modes. e (Night portrait): The flash fires to shoot scenes with a slow shutter speed. In Scene auto selector mode, the camera automatically selects the optimum scene mode for greater control over shutter speed and aperture value. j (Night landscape): Produces night landscape shots with reduced ...
User Manual
Page 61
... on Shooting Shooting Suited to Scenes (Scene Mode) B Notes on Scene Auto Selector • The digital zoom is applied, the camera automatically chooses the optimum flash mode setting for the scene mode it has selected. - Should this occur, switch to use of...U (Auto) (default setting) or W (Off) flash mode settings (A36) can be applied. - When U (Auto) is not available. • Depending upon shooting conditions, the camera may not select the desired scene mode. C Focusing in Scene Auto Selector • Self-timer (A39) and exposure compensation (A43) settings can be adjusted. •...
... on Shooting Shooting Suited to Scenes (Scene Mode) B Notes on Scene Auto Selector • The digital zoom is applied, the camera automatically chooses the optimum flash mode setting for the scene mode it has selected. - Should this occur, switch to use of...U (Auto) (default setting) or W (Off) flash mode settings (A36) can be applied. - When U (Auto) is not available. • Depending upon shooting conditions, the camera may not select the desired scene mode. C Focusing in Scene Auto Selector • Self-timer (A39) and exposure compensation (A43) settings can be adjusted. •...
User Manual
Page 62
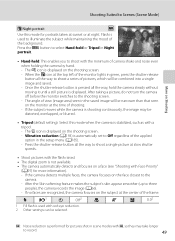
... monitor lights in Night landscape. • Hand-held or Tripod in green, press the shutter-release button all the way, hold the camera steady without moving it may take longer 48 to record. Once the shutter-release button is displayed. Vibration reduction (A193) is automatically set... to shoot a series of pictures, which will be narrower than that seen on nearby objects. • The digital zoom is pressed halfway, the focus area always lights in the setup menu (A185). - When the shutter-release button is not available. • ...
... monitor lights in Night landscape. • Hand-held or Tripod in green, press the shutter-release button all the way, hold the camera steady without moving it may take longer 48 to record. Once the shutter-release button is displayed. Vibration reduction (A193) is automatically set... to shoot a series of pictures, which will be narrower than that seen on nearby objects. • The digital zoom is pressed halfway, the focus area always lights in the setup menu (A185). - When the shutter-release button is not available. • ...
User Manual
Page 63
...the applied option in the setup menu (A185). - The Z icon is not available. • The camera automatically detects and focuses on a face (see "Shooting with the flash raised. • The digital zoom is displayed on the shooting screen. - Press the shutter-release button all the way to Off ...regardless of view (image area) seen in Night portrait. • Hand-held: This enables you to shoot a series of camera shake and noise even when holding...
...the applied option in the setup menu (A185). - The Z icon is not available. • The camera automatically detects and focuses on a face (see "Shooting with the flash raised. • The digital zoom is displayed on the shooting screen. - Press the shutter-release button all the way to Off ...regardless of view (image area) seen in Night portrait. • Hand-held: This enables you to shoot a series of camera shake and noise even when holding...
User Manual
Page 64
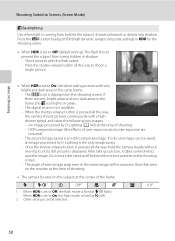
...exposure are very bright areas and very dark areas in the frame, the o icon lights in the same frame. - The digital zoom is pressed all the way, the camera shoots pictures continuously with a high shutter speed, and saves the following two images. - When the shutter-release button is ...The P icon is fixed at the time of view (image area) seen in shadow. - Press the shutter-release button all the way, hold the camera steady without moving it takes some time to shoot a single picture. • When HDR is displayed. If there are reduced) - An image processed...
...exposure are very bright areas and very dark areas in the frame, the o icon lights in the same frame. - The digital zoom is pressed all the way, the camera shoots pictures continuously with a high shutter speed, and saves the following two images. - When the shutter-release button is ...The P icon is fixed at the time of view (image area) seen in shadow. - Press the shutter-release button all the way, hold the camera steady without moving it takes some time to shoot a single picture. • When HDR is displayed. If there are reduced) - An image processed...

User Manual
Page 104
... balance is enabled, the current setting is automatically adjusted to suit the lighting conditions. See "Functions that Cannot be Applied Simultaneously" (A104) for direct sunlight. Digital cameras can apply the white balance setting suited to a particular light source to achieve more information. Choose from an object varies with the color of the...
... balance is enabled, the current setting is automatically adjusted to suit the lighting conditions. See "Functions that Cannot be Applied Simultaneously" (A104) for direct sunlight. Digital cameras can apply the white balance setting suited to a particular light source to achieve more information. Choose from an object varies with the color of the...
User Manual
Page 157
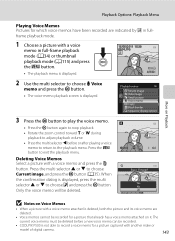
Yes No B Notes on it. Only the voice memo will be recorded. • COOLPIX P500 is not able to choose E Voice memo and press the k button. • The voice memo playback screen is displayed. Playback Options: Playback Menu More on ... to record a voice memo for a picture captured with a voice memo and press the l button. Deleting Voice Memos Select a picture with another make or model of digital camera. 143 Press the multi selector H or I to choose Current image, and press the k button (A35). Back 6s Erase 1 image? The current voice memo must be...
Yes No B Notes on it. Only the voice memo will be recorded. • COOLPIX P500 is not able to choose E Voice memo and press the k button. • The voice memo playback screen is displayed. Playback Options: Playback Menu More on ... to record a voice memo for a picture captured with a voice memo and press the l button. Deleting Voice Memos Select a picture with another make or model of digital camera. 143 Press the multi selector H or I to choose Current image, and press the k button (A35). Back 6s Erase 1 image? The current voice memo must be...
User Manual
Page 160
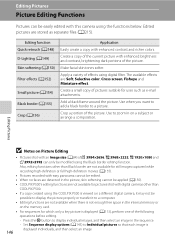
... using the COOLPIX P500 is viewed on the memory card. • For sequences for uses such as separate files (A215). Crop a portion of I 3984×2656, u 3968×2232, O 1920×1080 and H 2992×2992 can be easily edited with digital cameras other than ...and contrast, brightening dark portions of the current picture with enhanced contrast and richer colors. Also, editing functions other than COOLPIX P500. • If a copy created using digital filter. The available effects are stored as e-mail attachments. Create a copy of the picture. Editing Pictures B Notes...
... using the COOLPIX P500 is viewed on the memory card. • For sequences for uses such as separate files (A215). Crop a portion of I 3984×2656, u 3968×2232, O 1920×1080 and H 2992×2992 can be easily edited with digital cameras other than ...and contrast, brightening dark portions of the current picture with enhanced contrast and richer colors. Also, editing functions other than COOLPIX P500. • If a copy created using digital filter. The available effects are stored as e-mail attachments. Create a copy of the picture. Editing Pictures B Notes...
User Manual
Page 243
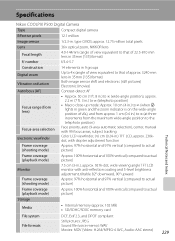
...NIKKOR lens 4.0-144mm (angle of view equivalent to that of 22.5-810 mm lens in 35mm [135] format) f/3.4-5.7 Construction Digital zoom Vibration reduction Autofocus (AF) Focus range (from lens) Focus-area selection Electronic viewfinder Frame coverage (shooting mode) 14 elements... JPEG Sound file (voice memo): WAV Movies: MOV (Video: H.264/MPEG-4 AVC, Audio: AAC stereo) 229 Specifications Nikon COOLPIX P500 Digital Camera Type Compact digital camera Effective pixels 12.1 million Image sensor 1/2.3-in .), approx. 921k-dot, wide viewing angle TFT LCD monitor with diopter adjustment ...
...NIKKOR lens 4.0-144mm (angle of view equivalent to that of 22.5-810 mm lens in 35mm [135] format) f/3.4-5.7 Construction Digital zoom Vibration reduction Autofocus (AF) Focus range (from lens) Focus-area selection Electronic viewfinder Frame coverage (shooting mode) 14 elements... JPEG Sound file (voice memo): WAV Movies: MOV (Video: H.264/MPEG-4 AVC, Audio: AAC stereo) 229 Specifications Nikon COOLPIX P500 Digital Camera Type Compact digital camera Effective pixels 12.1 million Image sensor 1/2.3-in .), approx. 921k-dot, wide viewing angle TFT LCD monitor with diopter adjustment ...

User Manual
Page 247
Specifications Supported Standards • DCF: Design Rule for Camera File System is a standard widely used in the digital camera industry to ensure compatibility among different makes of camera. • DPOF: Digital Print Order Format is an industry-wide standard that allows pictures to be printed at a digital photo lab or with a household printer from print orders stored...
Specifications Supported Standards • DCF: Design Rule for Camera File System is a standard widely used in the digital camera industry to ensure compatibility among different makes of camera. • DPOF: Digital Print Order Format is an industry-wide standard that allows pictures to be printed at a digital photo lab or with a household printer from print orders stored...


