

User Manual
Page 9
... ...1 Information and Precautions ...2 Parts of the Camera ...4 Camera Body ...4 Changing the Angle of the Monitor ...6 Raising and Lowering the Flash...7 Attaching the Camera Strap and Lens Cap 7 Monitor ...8 Basic Operations...11 Command Dial ...11 Multi Selector ...12 d (Menu) Button...13 Switching Between Tabs in the Menu Screen 13 Using Camera Menus...14...
... ...1 Information and Precautions ...2 Parts of the Camera ...4 Camera Body ...4 Changing the Angle of the Monitor ...6 Raising and Lowering the Flash...7 Attaching the Camera Strap and Lens Cap 7 Monitor ...8 Basic Operations...11 Command Dial ...11 Multi Selector ...12 d (Menu) Button...13 Switching Between Tabs in the Menu Screen 13 Using Camera Menus...14...

User Manual
Page 21
... power is off, or while you are carrying the camera, attach the lens cap to the camera to the camera (at two places). Attaching the Camera Strap and Lens Cap Attach the lens cap to the strap, and then attach the strap to protect the lens. 7 Introduction Parts of the Camera Raising and Lowering the Flash Press...
... power is off, or while you are carrying the camera, attach the lens cap to the camera to the camera (at two places). Attaching the Camera Strap and Lens Cap Attach the lens cap to the strap, and then attach the strap to protect the lens. 7 Introduction Parts of the Camera Raising and Lowering the Flash Press...
User Manual
Page 37
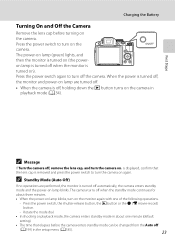
...elapses before turning on again. The camera turns off when the standby mode continues for about one minute (default setting). • The time that the lens cap is turned on the monitor again with one of the following operations. - Rotate the mode dial. • In shooting or playback mode, the ... is turned off automatically, the camera enters standby mode and the power-on . First Steps C Message If Turn the camera off, remove the lens cap, and turn on the camera in playback mode (A34). Press the power switch to turn the camera on lamp blinks. When the power is ...
...elapses before turning on again. The camera turns off when the standby mode continues for about one minute (default setting). • The time that the lens cap is turned on the monitor again with one of the following operations. - Rotate the mode dial. • In shooting or playback mode, the ... is turned off automatically, the camera enters standby mode and the power-on . First Steps C Message If Turn the camera off, remove the lens cap, and turn on the camera in playback mode (A34). Press the power switch to turn the camera on lamp blinks. When the power is ...

User Manual
Page 39
... • To set by rotating the command dial (A11). • Finish setting: Choose minute, check that the lens cap has been removed, and then press the k button or K. • After finishing the setting, the lens extends slightly and the shooting screen is displayed. D Imprinting the Date and Changing the Date and Time •...
... • To set by rotating the command dial (A11). • Finish setting: Choose minute, check that the lens cap has been removed, and then press the k button or K. • After finishing the setting, the lens extends slightly and the shooting screen is displayed. D Imprinting the Date and Changing the Date and Time •...
User Manual
Page 42
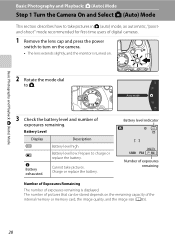
... pictures in A (auto) mode, an automatic, "pointand-shoot" mode recommended for first-time users of digital cameras. 1 Remove the lens cap and press the power switch to turn on the camera. • The lens extends slightly, and the monitor is displayed. Basic Photography and Playback: A (Auto) Mode Basic Photography and Playback: A (Auto) Mode...
... pictures in A (auto) mode, an automatic, "pointand-shoot" mode recommended for first-time users of digital cameras. 1 Remove the lens cap and press the power switch to turn on the camera. • The lens extends slightly, and the monitor is displayed. Basic Photography and Playback: A (Auto) Mode Basic Photography and Playback: A (Auto) Mode...

User Manual
Page 227
... of the Quick Start Guide). 2 When using in other countries, use a commercially available plug adapter as shown) 1 2 3 AC adapter USB cable Audio/video cable Lens cap Before closing the battery-chamber/memory card slot cover, fully insert the power connector cord into the slot in the battery chamber. USB Cable UC...-E61 Audio Video Cable EG-CP161 Lens cap LC-CP231 1 Supplied with the camera at the time of purchase (➝ page 3 of the groove, the cover or cord may be damaged when...
... of the Quick Start Guide). 2 When using in other countries, use a commercially available plug adapter as shown) 1 2 3 AC adapter USB cable Audio/video cable Lens cap Before closing the battery-chamber/memory card slot cover, fully insert the power connector cord into the slot in the battery chamber. USB Cable UC...-E61 Audio Video Cable EG-CP161 Lens cap LC-CP231 1 Supplied with the camera at the time of purchase (➝ page 3 of the groove, the cover or cord may be damaged when...
User Manual
Page 231
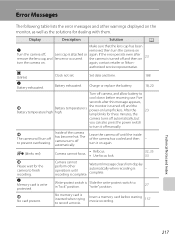
..., then turn it off manually. again, contact retailer or Nikon- O (blinks) N Battery exhausted. Five seconds after the camera is attached or lens error occurred. Inside of the camera has cooled and then turn the camera on Turn the camera off, remove the lens cap, and Lens cap is turned off to turn the camera on again...
..., then turn it off manually. again, contact retailer or Nikon- O (blinks) N Battery exhausted. Five seconds after the camera is attached or lens error occurred. Inside of the camera has cooled and then turn the camera on Turn the camera off, remove the lens cap, and Lens cap is turned off to turn the camera on again...

User Manual
Page 249
... Image size 84 Infinity 40 Internal memory 26 Internal memory indicator 29 Interval Timer Shooting 77, 79 ISO sensitivity 92 L Landscape c 51 Language 201 Lens 211, 229 Lens cap 7 List by date mode 132 Lithium-ion type battery 18, 20, 213 Long exposure NR 102 Technical Notes and Index M Macro close-up 40...
... Image size 84 Infinity 40 Internal memory 26 Internal memory indicator 29 Interval Timer Shooting 77, 79 ISO sensitivity 92 L Landscape c 51 Language 201 Lens 211, 229 Lens cap 7 List by date mode 132 Lithium-ion type battery 18, 20, 213 Long exposure NR 102 Technical Notes and Index M Macro close-up 40...


