User Manual
Page 2
AVC Patent Portfolio License This product is licensed under the AVC Patent Portfolio License for any other use of a consumer to (i) encode video in compliance with your Nikon product are trademarks or registered trademarks of their respective holders. No license is a trademark. • HDMI...be obtained from a video provider licensed to provide AVC video. Additional information may be implied for the personal and non-commercial use . See http://www.mpegla.com. Trademark Information • Microsoft, Windows and Windows Vista are either registered trademarks or trademarks of...
AVC Patent Portfolio License This product is licensed under the AVC Patent Portfolio License for any other use of a consumer to (i) encode video in compliance with your Nikon product are trademarks or registered trademarks of their respective holders. No license is a trademark. • HDMI...be obtained from a video provider licensed to provide AVC video. Additional information may be implied for the personal and non-commercial use . See http://www.mpegla.com. Trademark Information • Microsoft, Windows and Windows Vista are either registered trademarks or trademarks of...
User Manual
Page 4
...the result of children Particular care should be taken to avoid burns. This icon marks warnings, information that should be read before using this Nikon product, to others, read them. Handle the camera strap with care Never place the strap around the neck of malfunction Should... technicians. ii WARNINGS Turn off in injury. Keep out of reach of a fall or other accident, take the equipment to a Nikon-authorized service representative for inspection. Should the camera or Charging AC Adapter break open as this equipment. After removing or disconnecting the power...
...the result of children Particular care should be taken to avoid burns. This icon marks warnings, information that should be read before using this Nikon product, to others, read them. Handle the camera strap with care Never place the strap around the neck of malfunction Should... technicians. ii WARNINGS Turn off in injury. Keep out of reach of a fall or other accident, take the equipment to a Nikon-authorized service representative for inspection. Should the camera or Charging AC Adapter break open as this equipment. After removing or disconnecting the power...
User Manual
Page 5
...remains. • Do not use with travel converters or • Discontinue use immediately should be removed with ...caution when handling • If liquid from you are using the • Keep dry. Continued use in this precaution could result in fire or sure it...8226; Replace the terminal cover when transporting the battery. authorized service representative for use could result in contact with clothing or The battery may leak or explode ...electric shock. Observe the water. electric shock. • Use only a Rechargeable Li-ion • Dust on or near the Charging AC ...
...remains. • Do not use with travel converters or • Discontinue use immediately should be removed with ...caution when handling • If liquid from you are using the • Keep dry. Continued use in this precaution could result in fire or sure it...8226; Replace the terminal cover when transporting the battery. authorized service representative for use could result in contact with clothing or The battery may leak or explode ...electric shock. Observe the water. electric shock. • Use only a Rechargeable Li-ion • Dust on or near the Charging AC ...

User Manual
Page 6
... objects are not pinched by broken glass and to prevent liquid crystal from the subject. For Your Safety Use appropriate cables When connecting cables to the input and output jacks, use only the cables provided or sold by this camera may disrupt the electronic systems of the airplane or the...The CD-ROMs supplied with product regulations. Turn the power off when using inside an airplane or the hospital Turn the power off while inside the airplane during take off or landing. The electromagnetic waves given out by Nikon for the purpose, to maintain compliance with this device should be ...
... objects are not pinched by broken glass and to prevent liquid crystal from the subject. For Your Safety Use appropriate cables When connecting cables to the input and output jacks, use only the cables provided or sold by this camera may disrupt the electronic systems of the airplane or the...The CD-ROMs supplied with product regulations. Turn the power off when using inside an airplane or the hospital Turn the power off while inside the airplane during take off or landing. The electromagnetic waves given out by Nikon for the purpose, to maintain compliance with this device should be ...
User Manual
Page 7
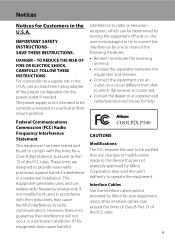
... radio frequency energy and, if not installed and used in a vertical or floor mount position. This equipment generates, uses, and can be notified that any changes or modifications made to this equipment does cause harmful COOLPIX P500 CAUTIONS Modifications The FCC requires the user to be...reception, which the receiver is no guarantee that interference will not occur in a residential installation. These limits are not expressly approved by Nikon for your equipment. However, there is connected. • Consult the dealer or an experienced radio/television technician for help. If ...
... radio frequency energy and, if not installed and used in a vertical or floor mount position. This equipment generates, uses, and can be notified that any changes or modifications made to this equipment does cause harmful COOLPIX P500 CAUTIONS Modifications The FCC requires the user to be...reception, which the receiver is no guarantee that interference will not occur in a residential installation. These limits are not expressly approved by Nikon for your equipment. However, there is connected. • Consult the dealer or an experienced radio/television technician for help. If ...
User Manual
Page 8
... of as household waste. • For more information, contact the retailer or the local authorities in charge of waste management. DISPOSE OF USED BATTERIES ACCORDING TO THE INSTRUCTIONS. This symbol indicates that the battery is to be collected separately. This symbol on this symbol or not, ...Canada. • This product is to users in European countries: vi The following apply only to cause birth defects or other reproductive harm. Nikon Inc., 1300 Walt Whitman Road, Melville, New York 11747-3064 USA Tel: 631-547-4200 Notice for Customers in Europe CAUTION RISK OF...
... of as household waste. • For more information, contact the retailer or the local authorities in charge of waste management. DISPOSE OF USED BATTERIES ACCORDING TO THE INSTRUCTIONS. This symbol indicates that the battery is to be collected separately. This symbol on this symbol or not, ...Canada. • This product is to users in European countries: vi The following apply only to cause birth defects or other reproductive harm. Nikon Inc., 1300 Walt Whitman Road, Melville, New York 11747-3064 USA Tel: 631-547-4200 Notice for Customers in Europe CAUTION RISK OF...

User Manual
Page 9
... Strap and Lens Cap 7 Monitor ...8 Basic Operations...11 Command Dial ...11 Multi Selector ...12 d (Menu) Button...13 Switching Between Tabs in the Menu Screen 13 Using Camera Menus...14 Pressing the Shutter-Release Button Halfway/All the Way 15 x (Monitor) Button ...16 s (Display) Button ...17 First Steps ...18 Inserting the Battery...
... Strap and Lens Cap 7 Monitor ...8 Basic Operations...11 Command Dial ...11 Multi Selector ...12 d (Menu) Button...13 Switching Between Tabs in the Menu Screen 13 Using Camera Menus...14 Pressing the Shutter-Release Button Halfway/All the Way 15 x (Monitor) Button ...16 s (Display) Button ...17 First Steps ...18 Inserting the Battery...
User Manual
Page 10
... 1 Turn the Camera On and Select A (Auto) Mode 28 Indicators Displayed in A (Auto) Mode 29 Step 2 Frame a Picture...30 Using the Viewfinder ...30 Using the Zoom...31 Step 3 Focus and Shoot ...32 Step 4 Viewing and Deleting Pictures 34 Viewing Pictures (Playback Mode) ...34 Deleting Unnecessary Images......35 Using the Flash...36 Setting the Flash Mode...37 Taking Pictures with the Self-Timer 39 Using Focus Mode ...40 Setting the Focus Mode ...41 Using Manual Focus...42 Adjusting Brightness (Exposure Compensation 43 More on ...
... 1 Turn the Camera On and Select A (Auto) Mode 28 Indicators Displayed in A (Auto) Mode 29 Step 2 Frame a Picture...30 Using the Viewfinder ...30 Using the Zoom...31 Step 3 Focus and Shoot ...32 Step 4 Viewing and Deleting Pictures 34 Viewing Pictures (Playback Mode) ...34 Deleting Unnecessary Images......35 Using the Flash...36 Setting the Flash Mode...37 Taking Pictures with the Self-Timer 39 Using Focus Mode ...40 Setting the Focus Mode ...41 Using Manual Focus...42 Adjusting Brightness (Exposure Compensation 43 More on ...

User Manual
Page 11
... Tracking 99 Autofocus Mode...101 Flash Exp. Table of Contents Focusing on Playback ...111 Operations in Full-Frame Playback 111 Playing Images Captured Using Continuous Shooting Mode (Sequence 113 Deleting Images in a Sequence...114 Viewing Multiple Pictures: Thumbnail Playback 115 Calendar Display...117 Taking a Closer ...(Favorite Pictures Mode 122 Adding Images to an Album ...122 Viewing Images in an Album ...124 Removing Images From an Album...125 Using Favorite Pictures Mode ...126 Changing the Album Icons ...127 Finding Images in Auto Sort Mode 129 Viewing Images in Auto Sort Mode ...
... Tracking 99 Autofocus Mode...101 Flash Exp. Table of Contents Focusing on Playback ...111 Operations in Full-Frame Playback 111 Playing Images Captured Using Continuous Shooting Mode (Sequence 113 Deleting Images in a Sequence...114 Viewing Multiple Pictures: Thumbnail Playback 115 Calendar Display...117 Taking a Closer ...(Favorite Pictures Mode 122 Adding Images to an Album ...122 Viewing Images in an Album ...124 Removing Images From an Album...125 Using Favorite Pictures Mode ...126 Changing the Album Icons ...127 Finding Images in Auto Sort Mode 129 Viewing Images in Auto Sort Mode ...
User Manual
Page 12
... Recording and Playback 157 Recording Movies ...157 Recording Movies in Slow Motion and Fast Motion (HS Movie 160 Capturing Still Pictures While Recording Movies 162 Using the Movie Menu...163 Movie Options ...164 HS Movie Options...165 Open with HS Footage...165 Autofocus Mode...166 Electronic VR ...167 Wind Noise Reduction...
... Recording and Playback 157 Recording Movies ...157 Recording Movies in Slow Motion and Fast Motion (HS Movie 160 Capturing Still Pictures While Recording Movies 162 Using the Movie Menu...163 Movie Options ...164 HS Movie Options...165 Open with HS Footage...165 Autofocus Mode...166 Electronic VR ...167 Wind Noise Reduction...
User Manual
Page 15
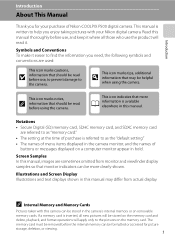
... may be more A information is referred to the camera. Screen Samples In this manual. The memory card must be removed before use, and keep it where all new pictures will be stored on a computer monitor appear in this camera can be read before... camera. Read this manual thoroughly before the internal memory can be read before use the product will apply only to as "memory card." • The setting at the time of Nikon COOLPIX P500 digital camera. Introduction Introduction About This Manual Thank you for picture storage, deletion, or viewing. 1 This icon marks ...
... may be more A information is referred to the camera. Screen Samples In this manual. The memory card must be removed before use, and keep it where all new pictures will be stored on a computer monitor appear in this camera can be read before... camera. Read this manual thoroughly before the internal memory can be read before use the product will apply only to as "memory card." • The setting at the time of Nikon COOLPIX P500 digital camera. Introduction Introduction About This Manual Thank you for picture storage, deletion, or viewing. 1 This icon marks ...
User Manual
Page 16
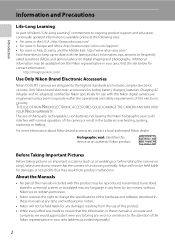
... AC adapters) certified by any means, without prior notice. • Nikon will not be held liable for contact information: http://imaging.nikon.com/ Use Only Nikon Brand Electronic Accessories Nikon COOLPIX cameras are engineered and proven to the attention of the Nikon representative in your area. The use of this product. • While every effort was made to...
... AC adapters) certified by any means, without prior notice. • Nikon will not be held liable for contact information: http://imaging.nikon.com/ Use Only Nikon Brand Electronic Accessories Nikon COOLPIX cameras are engineered and proven to the attention of the Nikon representative in your area. The use of this product. • While every effort was made to...

User Manual
Page 17
...copies or to infringe copyright laws. Before discarding a data storage device or transferring ownership to another person, erase all data using commercially available software, potentially resulting in the Welcome screen setting (A187). Deleted files can sometimes be recovered from being in possession..., coins, securities, government bonds or local government bonds, even if such copies or reproductions are to be provided for business use by national and international copyright laws. Ensuring the privacy of empty sky). Be sure to property when physically destroying data storage ...
...copies or to infringe copyright laws. Before discarding a data storage device or transferring ownership to another person, erase all data using commercially available software, potentially resulting in the Welcome screen setting (A187). Deleted files can sometimes be recovered from being in possession..., coins, securities, government bonds or local government bonds, even if such copies or reproductions are to be provided for business use by national and international copyright laws. Ensuring the privacy of empty sky). Be sure to property when physically destroying data storage ...
User Manual
Page 20
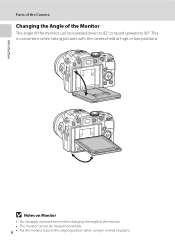
This is convenient when taking pictures with the camera held at high or low positions. Introduction Parts of the Camera Changing the Angle of the Monitor The angle of the monitor. • The monitor cannot be lowered down to 82° or raised upward to 90°. B Notes on Monitor • Do not apply excessive force when changing the angle of the monitor can be moved horizontally. 6 • Put the monitor back in the original position when using in normal situations.
This is convenient when taking pictures with the camera held at high or low positions. Introduction Parts of the Camera Changing the Angle of the Monitor The angle of the monitor. • The monitor cannot be lowered down to 82° or raised upward to 90°. B Notes on Monitor • Do not apply excessive force when changing the angle of the monitor can be moved horizontally. 6 • Put the monitor back in the original position when using in normal situations.

User Manual
Page 21
... Cap Attach the lens cap to the strap, and then attach the strap to raise the flash. • See "Using the Flash" (A36) for more information on setting the flash. • When not using the flash, lower it by gently pushing it down until it clicks. B Lens Cap • Remove the lens...
... Cap Attach the lens cap to the strap, and then attach the strap to raise the flash. • See "Using the Flash" (A36) for more information on setting the flash. • When not using the flash, lower it by gently pushing it down until it clicks. B Lens Cap • Remove the lens...

User Manual
Page 27
...*/tab for playback mode menu Shooting menu Tab for movie menu (during shooting mode)/ playback menu (during playback mode) Tab for the menu items. • Use the multi selector to navigate the menus (A12).
...*/tab for playback mode menu Shooting menu Tab for movie menu (during shooting mode)/ playback menu (during playback mode) Tab for the menu items. • Use the multi selector to navigate the menus (A12).
User Manual
Page 28
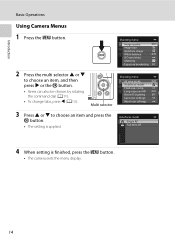
... an item and press the k button. • The setting is finished, press the d button. • The camera exits the menu display. 14 Introduction Basic Operations Using Camera Menus 1 Press the d button. Long exposure NR Active D-Lighting Save user settings Reset user settings Autofocus mode Single AF Full-time AF 4 When setting...
... an item and press the k button. • The setting is finished, press the d button. • The camera exits the menu display. 14 Introduction Basic Operations Using Camera Menus 1 Press the d button. Long exposure NR Active D-Lighting Save user settings Reset user settings Autofocus mode Single AF Full-time AF 4 When setting...
User Manual
Page 29
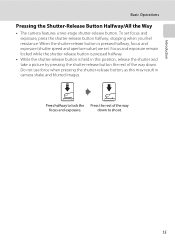
... and exposure (shutter speed and aperture value) are set focus and exposure, press the shutter-release button halfway, stopping when you feel resistance. Do not use force when pressing the shutter-release button, as this position, release the shutter and take a picture by pressing the shutter-release button the rest of...
... and exposure (shutter speed and aperture value) are set focus and exposure, press the shutter-release button halfway, stopping when you feel resistance. Do not use force when pressing the shutter-release button, as this position, release the shutter and take a picture by pressing the shutter-release button the rest of...
User Manual
Page 30
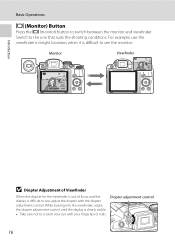
... , adjust the diopter with your eye with the diopter adjustment control. Diopter adjustment control 16 Switch to switch between the monitor and viewfinder. For example, use the viewfinder in bright locations when it is difficult to see the monitor.
... , adjust the diopter with your eye with the diopter adjustment control. Diopter adjustment control 16 Switch to switch between the monitor and viewfinder. For example, use the viewfinder in bright locations when it is difficult to see the monitor.
User Manual
Page 31
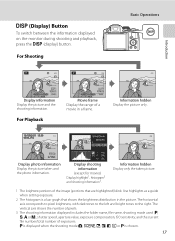
...dark tones to the left and bright tones to the right. For Playback 1/250 F5.6 1342 Movie frame Display the range of exposures. Use highlights as a guide when setting exposure. 2 The histogram is chosen. 17 The vertical axis shows the number of pixels. 3 The ...shooting information displayed includes the folder name, file name, shooting mode used (j, k, l or m), shutter speed, aperture value, exposure compensation, ISO sensitivity, and the current file number/total number of a movie in the picture....
...dark tones to the left and bright tones to the right. For Playback 1/250 F5.6 1342 Movie frame Display the range of exposures. Use highlights as a guide when setting exposure. 2 The histogram is chosen. 17 The vertical axis shows the number of pixels. 3 The ...shooting information displayed includes the folder name, file name, shooting mode used (j, k, l or m), shutter speed, aperture value, exposure compensation, ISO sensitivity, and the current file number/total number of a movie in the picture....


