
User Manual
Page 11
...: CF Card Format 135 Controlling the Flash: Speedlight Options 136 Audio Confirmation: Shutter Sound 140 Setting the Time and Date: Date 141 Storing Photo Info in a Separate File: info.txt 141 Choosing a Video Standard: Video Mode 142 Choosing a Language: Language 142 Choosing a USB Protocol... 152 Ordering Prints: Print Set 153 Selecting Images for Transfer: Auto Transfer 155 Technical Notes: Camera Care, Options, and Resources 157 Optional Accessories 158 Caring for the Camera and Battery 160 Web Resources 163 Troubleshooting 164 Specifications 171 Index ...175 ix Using the SET-...
...: CF Card Format 135 Controlling the Flash: Speedlight Options 136 Audio Confirmation: Shutter Sound 140 Setting the Time and Date: Date 141 Storing Photo Info in a Separate File: info.txt 141 Choosing a Video Standard: Video Mode 142 Choosing a Language: Language 142 Choosing a USB Protocol... 152 Ordering Prints: Print Set 153 Selecting Images for Transfer: Auto Transfer 155 Technical Notes: Camera Care, Options, and Resources 157 Optional Accessories 158 Caring for the Camera and Battery 160 Web Resources 163 Troubleshooting 164 Specifications 171 Index ...175 ix Using the SET-...

User Manual
Page 18
... the following camera settings: 1 2 8 4 Self-timer indicator 58 3 9 5 Shutter speed 73 10 11 6 Exposure mode 70 4 12 7 Metering mode 103 5 13 8 Flash-ready indicator 28 6 7 14 15 9 Flash mode 62 10 Battery level indicator1........... 23 16 17 18 11 "Date not set" icon 2 20 User Set A 12 Focus indicator 3 28 1 Digital zoom... 16 Aperture 74 17 Exposure compensation ........ 66 18 Number of exposures remaining/ length of movie 23, 77 The (Display) Button To turn the display of camera settings or photo information in the monitor on and off, press .
... the following camera settings: 1 2 8 4 Self-timer indicator 58 3 9 5 Shutter speed 73 10 11 6 Exposure mode 70 4 12 7 Metering mode 103 5 13 8 Flash-ready indicator 28 6 7 14 15 9 Flash mode 62 10 Battery level indicator1........... 23 16 17 18 11 "Date not set" icon 2 20 User Set A 12 Focus indicator 3 28 1 Digital zoom... 16 Aperture 74 17 Exposure compensation ........ 66 18 Number of exposures remaining/ length of movie 23, 77 The (Display) Button To turn the display of camera settings or photo information in the monitor on and off, press .
User Manual
Page 50
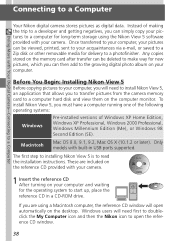
... transfer can simply copy your computer. The first step to installing Nikon View 5 is to a Computer Your Nikon digital camera stores pictures as digital data. Connecting to a Computer Doing More with your camera. 1 Insert the reference CD After turning on the desktop. Before...digital photo album on your pictures to a computer for the operating system to a developer and getting negatives, you are included on the reference CD provided with built-in a CD-ROM drive. Only models with your camera. These are using the Nikon View 5 software provided with Your Digital Camera...
... transfer can simply copy your computer. The first step to installing Nikon View 5 is to a Computer Your Nikon digital camera stores pictures as digital data. Connecting to a Computer Doing More with your camera. 1 Insert the reference CD After turning on the desktop. Before...digital photo album on your pictures to a computer for the operating system to a developer and getting negatives, you are included on the reference CD provided with built-in a CD-ROM drive. Only models with your camera. These are using the Nikon View 5 software provided with Your Digital Camera...

User Manual
Page 76
Red-Eye Reduction Mode When taking photos in Speedlight will pop up when an external Speedlight is attached so that your fingers are not obstructing the red-eye reduction lamp. 64 The ...-in red-eye reduction mode, make sure that the photocell can be used to correctly set to Auto ( 136). Taking Pictures : The Details-Using the Camera Controls (All User Sets) Do Not Obstruct the Built-in Speedlight • By default, the Pop Up option in Speedlight is raised, keep your fingers...
Red-Eye Reduction Mode When taking photos in Speedlight will pop up when an external Speedlight is attached so that your fingers are not obstructing the red-eye reduction lamp. 64 The ...-in red-eye reduction mode, make sure that the photocell can be used to correctly set to Auto ( 136). Taking Pictures : The Details-Using the Camera Controls (All User Sets) Do Not Obstruct the Built-in Speedlight • By default, the Pop Up option in Speedlight is raised, keep your fingers...

User Manual
Page 85
... a shutter speed of /1 4000 s, the aperture range is f/7.4. photo, the f/-number of the lens ranges from 8 s to 1 EV (one step). at maximum tele- Shutter-Speed Limitations At Continuous settings of Ultra HS and Movie ( 104), the camera takes a fixed number of 1/4 s or slower, the shutter-speed...or aperture displayed in the control panel and monitor or viewfinder will turn Noise Reduction on ( 117). Shutter speed can not be set the camera to values slower than the frame advance rate (1/30 s and 1/15 s, respectively). 73 To adjust shutter speed, set to (shutter-...
... a shutter speed of /1 4000 s, the aperture range is f/7.4. photo, the f/-number of the lens ranges from 8 s to 1 EV (one step). at maximum tele- Shutter-Speed Limitations At Continuous settings of Ultra HS and Movie ( 104), the camera takes a fixed number of 1/4 s or slower, the shutter-speed...or aperture displayed in the control panel and monitor or viewfinder will turn Noise Reduction on ( 117). Shutter speed can not be set the camera to values slower than the frame advance rate (1/30 s and 1/15 s, respectively). 73 To adjust shutter speed, set to (shutter-...

User Manual
Page 99
... monitor. While image is zoomed in, icon and zoom ratio are displayed in View other pictures on the memory card, first cancel zoom. To Zoom photo in upper left corner of the image not visible in the Continuous menu).
... monitor. While image is zoomed in, icon and zoom ratio are displayed in View other pictures on the memory card, first cancel zoom. To Zoom photo in upper left corner of the image not visible in the Continuous menu).

User Manual
Page 108
... Options HIDE IMAGE 1 2 4 5 96 Delete Delete all or selected images; Select pictures 6 152 Print Set Select pictures for printing on the memory card. Selected Photos All Photos Select pictures 155 PLAY BACK Menu The PLAY BACK menu contains options for managing the images stored on Select pictures; Selected Images All Images Print...
... Options HIDE IMAGE 1 2 4 5 96 Delete Delete all or selected images; Select pictures 6 152 Print Set Select pictures for printing on the memory card. Selected Photos All Photos Select pictures 155 PLAY BACK Menu The PLAY BACK menu contains options for managing the images stored on Select pictures; Selected Images All Images Print...

User Manual
Page 126
...User Sets 1, 2, and 3, you can not be previewed in the monitor or viewfinder. 114 Option Auto High Normal Low Off Description Camera sharpens edges for a softer effect. Menu Guide-Using the SHOOTING Menu Making Edges More Distinct: Image Sharpening This option controls whether pictures are... being saved to the memory card, the effects of sharpening on all photos. Camera performs same standard level of sharpening can use the menu options shown below normal level for optimal results; Photos processed to what degree. Because this processing takes place only as the ...
...User Sets 1, 2, and 3, you can not be previewed in the monitor or viewfinder. 114 Option Auto High Normal Low Off Description Camera sharpens edges for a softer effect. Menu Guide-Using the SHOOTING Menu Making Edges More Distinct: Image Sharpening This option controls whether pictures are... being saved to the memory card, the effects of sharpening on all photos. Camera performs same standard level of sharpening can use the menu options shown below normal level for optimal results; Photos processed to what degree. Because this processing takes place only as the ...
User Manual
Page 153
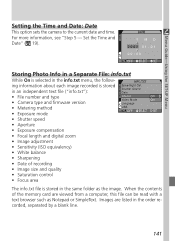
Storing Photo Info in a Separate File: info.txt While On is selected in the info.txt menu, the following information about each image recorded is stored in an independent text file ("info.txt"): • File number and type • Camera type and firmware version • ...Metering method • Exposure mode • Shutter speed • Aperture • Exposure compensation • Focal length and digital zoom • Image adjustment • Sensitivity (ISO equivalency) • White...
Storing Photo Info in a Separate File: info.txt While On is selected in the info.txt menu, the following information about each image recorded is stored in an independent text file ("info.txt"): • File number and type • Camera type and firmware version • ...Metering method • Exposure mode • Shutter speed • Aperture • Exposure compensation • Focal length and digital zoom • Image adjustment • Sensitivity (ISO equivalency) • White...

User Manual
Page 165
... in Digital Print Order Format (DPOF). Once a print order has been created, the memory card can specify photographs to be printed, the number of prints, and the information to select images for printing. The Nikon NP-100 photo printer does not support printing photo information or...Prints: Print Set Use the Print Set menu to be it your personal photo printer or a photofinisher's print system-and images printed directly from the camera and inserted in any DPOF-compatible device-be included on the memory card in Digital Print Order Format (DPOF). 1 Highlight image 2 PRINT 1 2 3 ...
... in Digital Print Order Format (DPOF). Once a print order has been created, the memory card can specify photographs to be printed, the number of prints, and the information to select images for printing. The Nikon NP-100 photo printer does not support printing photo information or...Prints: Print Set Use the Print Set menu to be it your personal photo printer or a photofinisher's print system-and images printed directly from the camera and inserted in any DPOF-compatible device-be included on the memory card in Digital Print Order Format (DPOF). 1 Highlight image 2 PRINT 1 2 3 ...

User Manual
Page 167
... to the computer. Menu Guide-Using the PLAY BACK Menu Selecting Images for Transfer: Auto Transfer When the camera is connected to a computer running Nikon View 5, images that have been selected for transfer. Selecting Images for Transfer Highlight Selected Photos in the Auto Transfer menu and press the multi selector to the right.
... to the computer. Menu Guide-Using the PLAY BACK Menu Selecting Images for Transfer: Auto Transfer When the camera is connected to a computer running Nikon View 5, images that have been selected for transfer. Selecting Images for Transfer Highlight Selected Photos in the Auto Transfer menu and press the multi selector to the right.

User Manual
Page 168
...using the Auto Transfer option. To transfer more are selected for transfer, no images will be transferred when the camera is connected to a computer. Menu Guide-Using the PLAY BACK Menu Marking All Images for Transfer To mark ...all images on the memory card for transfer Marking All Images for Transfer No more than 999 images, use Nikon View 5 to select the images for transfer. Press multi selector up or down to highlight option, press to..., select Transfer from all images for later transfer to a computer: 1 2 Highlight All Photos A confirmation dialog will be displayed.
...using the Auto Transfer option. To transfer more are selected for transfer, no images will be transferred when the camera is connected to a computer. Menu Guide-Using the PLAY BACK Menu Marking All Images for Transfer To mark ...all images on the memory card for transfer Marking All Images for Transfer No more than 999 images, use Nikon View 5 to select the images for transfer. Press multi selector up or down to highlight option, press to..., select Transfer from all images for later transfer to a computer: 1 2 Highlight All Photos A confirmation dialog will be displayed.
User Manual
Page 177
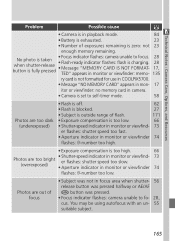
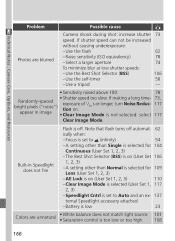
You may be using autofocus with an un- 55 suitable subject. 165 No photo is taken when shutter-release button is fully pressed • Focus indicator flashes: camera unable to fo- 28, cus. Photos are too bright (overexposed) • Shutter-speed indicator in monitor or viewfinder flashes: shutter speed ...use in COOLPIX5700. • Message "NO MEMORY CARD" appears in mon- 17 itor or viewfinder: no memory card in camera. • Camera is set to self-timer mode. 58 Photos are too dark (underexposed) • Flash is off. 62 • Flash is blocked. 27 • Subject is ...
You may be using autofocus with an un- 55 suitable subject. 165 No photo is taken when shutter-release button is fully pressed • Focus indicator flashes: camera unable to fo- 28, cus. Photos are too bright (overexposed) • Shutter-speed indicator in monitor or viewfinder flashes: shutter speed ...use in COOLPIX5700. • Message "NO MEMORY CARD" appears in mon- 17 itor or viewfinder: no memory card in camera. • Camera is set to self-timer mode. 58 Photos are too dark (underexposed) • Flash is off. 62 • Flash is blocked. 27 • Subject is ...
User Manual
Page 178
...low or too high. 101 108 166 Speedlight Cntrl is off automat- 62 ically when: - Battery is low 23 Colors are blurred Camera shook during shot: increase shutter 73 speed. Use the flash 62 - Use the Best Shot Selector (BSS) 106 - Note that flash...low shutter speeds: - The Best Shot Selector (BSS) is selected for 104 Continuous (User Set 1, 2, 3) - Technical Notes : Camera Care, Options, and Resources Problem Possible cause Photos are unnatural • White balance does not match light source. • Saturation control is selected (User Set 1, 117 2, 3) -...
...low or too high. 101 108 166 Speedlight Cntrl is off automat- 62 ically when: - Battery is low 23 Colors are blurred Camera shook during shot: increase shutter 73 speed. Use the flash 62 - Use the Best Shot Selector (BSS) 106 - Note that flash...low shutter speeds: - The Best Shot Selector (BSS) is selected for 104 Continuous (User Set 1, 2, 3) - Technical Notes : Camera Care, Options, and Resources Problem Possible cause Photos are unnatural • White balance does not match light source. • Saturation control is selected (User Set 1, 117 2, 3) -...
User Manual
Page 181
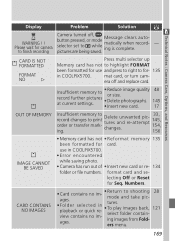
...Numbers. format card and selecting Off or Reset for card. Please wait for camera to while pictures are being saved. era off , button pressed, or mode selector set to finish recording Camera turned off and replace card. Insufficient memory to record further pictures at current settings... FORMAT been formatted for - 135 in COOLPIX5700. •Error encountered while saving photo. • Camera has run out of • Insert new card or re- 134 folder or file numbers. Technical Notes : Camera Care, Options, and Resources Display Problem Solution WARNING ! ! CARD IS NOT...
...Numbers. format card and selecting Off or Reset for card. Please wait for camera to while pictures are being saved. era off , button pressed, or mode selector set to finish recording Camera turned off and replace card. Insufficient memory to record further pictures at current settings... FORMAT been formatted for - 135 in COOLPIX5700. •Error encountered while saving photo. • Camera has run out of • Insert new card or re- 134 folder or file numbers. Technical Notes : Camera Care, Options, and Resources Display Problem Solution WARNING ! ! CARD IS NOT...
User Manual
Page 188
...148 manual focus Focus area, 112 Focus Confirmation, 113 Focus information. See Focus Confirma- photo information Focus lock, 56. See manual focus Focus Options, 112 Folders PLAY BACK menu ..., 6, 88 creating, renaming, and deleting, 121 numbering, 88 selecting for Camera File systems. See DCF Digital Print Order Format. See image database software; See image quality Computer. See ... Nikon View 5; See Image Adjustment Control panel, 8 Controls, 129 Copying images. focus area; See also AE-L/AF-L Focus mode, 53 autofocus. See self-timer manual. See DPOF Digital Tele...
...148 manual focus Focus area, 112 Focus Confirmation, 113 Focus information. See Focus Confirma- photo information Focus lock, 56. See manual focus Focus Options, 112 Folders PLAY BACK menu ..., 6, 88 creating, renaming, and deleting, 121 numbering, 88 selecting for Camera File systems. See DCF Digital Print Order Format. See image database software; See image quality Computer. See ... Nikon View 5; See Image Adjustment Control panel, 8 Controls, 129 Copying images. focus area; See also AE-L/AF-L Focus mode, 53 autofocus. See self-timer manual. See DPOF Digital Tele...

User Manual
Page 189
..., 4, 8 Lens, 13, 162 Lens cap, 13 Lens, converter, 109 Lens adapter ring, 158 Long time-exposure, 76 button, 57, 131 M . See image files Nikon Electronic Format. ity 177 Index See image files Movies, 104 playing back, 90 recording, 77 Multi selector, 18, 98 N NEF. See... photo information Histogram. manual focus info.txt, 141 Information. See photo information Hue, 128 I Image Adjustment, 107 Image files, 88 file name and type, 88 file size, 48, 89 Image quality,...
..., 4, 8 Lens, 13, 162 Lens cap, 13 Lens, converter, 109 Lens adapter ring, 158 Long time-exposure, 76 button, 57, 131 M . See image files Nikon Electronic Format. ity 177 Index See image files Movies, 104 playing back, 90 recording, 77 Multi selector, 18, 98 N NEF. See... photo information Histogram. manual focus info.txt, 141 Information. See photo information Hue, 128 I Image Adjustment, 107 Image files, 88 file name and type, 88 file size, 48, 89 Image quality,...

User Manual
Page 190
...See image size Slide Show, 149 Speaker, 90 Specifications, 171 Speedlight, pop up Speedlight. See camera strap SXGA, 48, 51 T . See zoom, button Telephoto. See also quick review full-screen...thumbnail, 35 QuickTime. See exposure mode, shutter-priority auto Saturation Control, 108 Self-portrait. Index Nikon View 5, 38 system requirements for, 174 Noise, 73, 117 Noise Reduction, 117 NORMAL, 48...158 P . See flash mode 178 Reset All, 118 Reset print, 147 Reset transfer, 147 Retouch, photo, See Image Adjustment; See monitor; See Lens; See exposure mode Protect, 151 Q Quality. PAL....
...See image size Slide Show, 149 Speaker, 90 Specifications, 171 Speedlight, pop up Speedlight. See camera strap SXGA, 48, 51 T . See zoom, button Telephoto. See also quick review full-screen...thumbnail, 35 QuickTime. See exposure mode, shutter-priority auto Saturation Control, 108 Self-portrait. Index Nikon View 5, 38 system requirements for, 174 Noise, 73, 117 Noise Reduction, 117 NORMAL, 48...158 P . See flash mode 178 Reset All, 118 Reset print, 147 Reset transfer, 147 Retouch, photo, See Image Adjustment; See monitor; See Lens; See exposure mode Protect, 151 Q Quality. PAL....


