User Manual
Page 2
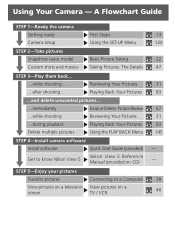
...Delete multiple pictures Using the PLAY BACK Menu STEP 4-Install camera software Install software Quick Start Guide (provided) Get to know Nikon View 5 Nikon View 5 Reference Manual (provided on CD) STEP 5-Enjoy your pictures Transfer pictures View pictures on a television screen Connecting to a Computer View pictures on a TV / VCR 13 120 22 47 31 83 67 31 83 145 - - 38 46 Using Your Camera - A Flowchart Guide STEP 1-Ready the camera Getting ready Camera setup First Steps Using the SET-UP Menu STEP 2-Take pictures Snapshots (auto mode) Custom shots and movies Basic Picture Taking...
...Delete multiple pictures Using the PLAY BACK Menu STEP 4-Install camera software Install software Quick Start Guide (provided) Get to know Nikon View 5 Nikon View 5 Reference Manual (provided on CD) STEP 5-Enjoy your pictures Transfer pictures View pictures on a television screen Connecting to a Computer View pictures on a TV / VCR 13 120 22 47 31 83 67 31 83 145 - - 38 46 Using Your Camera - A Flowchart Guide STEP 1-Ready the camera Getting ready Camera setup First Steps Using the SET-UP Menu STEP 2-Take pictures Snapshots (auto mode) Custom shots and movies Basic Picture Taking...

User Manual
Page 3
... Menus Using the SHOOTING Menu Using the SET-UP Menu Using the PLAY BACK Menu Technical Notes Index i Guide to Digital Photography The Guide to your camera. For information on viewing the Reference Manual, see "Connections" in electronic format on a TV / VCR Using the Camera Controls (All User Sets) Choosing a User Set Using the Camera Controls (User Sets 1, 2, 3) Playing Back Your Pictures List of unpacking and setting up your Nikon digital camera, taking your first photographs, and transferring them to Digital Photography (this manual) provides complete operating instructions for...
... Menus Using the SHOOTING Menu Using the SET-UP Menu Using the PLAY BACK Menu Technical Notes Index i Guide to Digital Photography The Guide to your camera. For information on viewing the Reference Manual, see "Connections" in electronic format on a TV / VCR Using the Camera Controls (All User Sets) Choosing a User Set Using the Camera Controls (User Sets 1, 2, 3) Playing Back Your Pictures List of unpacking and setting up your Nikon digital camera, taking your first photographs, and transferring them to Digital Photography (this manual) provides complete operating instructions for...
User Manual
Page 10
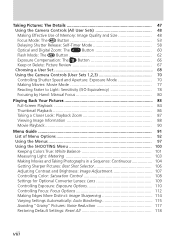
Taking Pictures: The Details 47 Using the Camera Controls (All User Sets 48 Making Effective Use of Memory: Image Quality and Size 48 Focus Mode: The Button 53 Delaying Shutter Release: Self-Timer Mode 58 Optical and Digital Zoom: The Button 60 Flash Mode: The Button 62 Exposure Compensation: The Button 66 Keep or Delete: Picture Review 67 Choosing a User Set 68 Using the Camera Controls (User Sets 1,2,3 70 Controlling Shutter Speed and Aperture: Exposure Mode 70 Making Movies: Movie Mode 77 Reacting Faster to Light: Sensitivity (ISO Equivalency 78 Focusing by Hand...
Taking Pictures: The Details 47 Using the Camera Controls (All User Sets 48 Making Effective Use of Memory: Image Quality and Size 48 Focus Mode: The Button 53 Delaying Shutter Release: Self-Timer Mode 58 Optical and Digital Zoom: The Button 60 Flash Mode: The Button 62 Exposure Compensation: The Button 66 Keep or Delete: Picture Review 67 Choosing a User Set 68 Using the Camera Controls (User Sets 1,2,3 70 Controlling Shutter Speed and Aperture: Exposure Mode 70 Making Movies: Movie Mode 77 Reacting Faster to Light: Sensitivity (ISO Equivalency 78 Focusing by Hand...

User Manual
Page 11
... Format 135 Controlling the Flash: Speedlight Options 136 Audio Confirmation: Shutter Sound 140 Setting the Time and Date: Date 141 Storing Photo Info in a Separate File: info.txt 141 Choosing a Video Standard: Video Mode 142 Choosing a Language: Language 142 Choosing a USB Protocol: USB 143 Using the PLAY BACK Menu 145 Deleting Images: Delete 145 Selecting a Folder for Playback: Folders 148 Automated Playback: Slide Show 149 Safeguarding Valuable Images: Protect 151 Hiding Images During Playback: Hide Image 152 Ordering Prints: Print Set 153 Selecting Images for Transfer: Auto...
... Format 135 Controlling the Flash: Speedlight Options 136 Audio Confirmation: Shutter Sound 140 Setting the Time and Date: Date 141 Storing Photo Info in a Separate File: info.txt 141 Choosing a Video Standard: Video Mode 142 Choosing a Language: Language 142 Choosing a USB Protocol: USB 143 Using the PLAY BACK Menu 145 Deleting Images: Delete 145 Selecting a Folder for Playback: Folders 148 Automated Playback: Slide Show 149 Safeguarding Valuable Images: Protect 151 Hiding Images During Playback: Hide Image 152 Ordering Prints: Print Set 153 Selecting Images for Transfer: Auto...
User Manual
Page 19
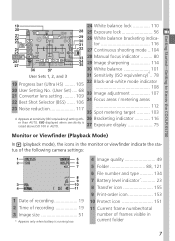
... than AUTO. ISO displayed when sensitivity is raised above ISO 100 in AUTO. 37 Exposure display 75 Monitor or Viewfinder (Playback Mode) In (playback mode), the icons in the monitor or viewfinder indicate the status of the following camera settings: 1 Date of recording 19 2 Time of recording 19 3 Image size 51 * Appears only when battery is running low. 4 Image quality 49 5 Folder 88, 121 6 File number and type .......... 134 7 Battery level indicator 23 8 Transfer icon 155 9 Print-order icon 153 10 Protect icon 151...
... than AUTO. ISO displayed when sensitivity is raised above ISO 100 in AUTO. 37 Exposure display 75 Monitor or Viewfinder (Playback Mode) In (playback mode), the icons in the monitor or viewfinder indicate the status of the following camera settings: 1 Date of recording 19 2 Time of recording 19 3 Image size 51 * Appears only when battery is running low. 4 Image quality 49 5 Folder 88, 121 6 File number and type .......... 134 7 Battery level indicator 23 8 Transfer icon 155 9 Print-order icon 153 10 Protect icon 151...
User Manual
Page 28
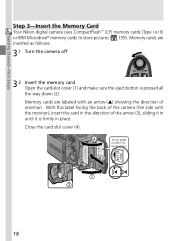
...: 3.1 Turn the camera off 3.2 Insert the memory card Open the card-slot cover (1) and make sure the eject button is firmly in place. Getting Started-First Steps Step 3-Insert the Memory Card Your Nikon digital camera uses CompactFlash™ (CF) memory cards (Type I or II) or IBM Microdrive® memory cards to store pictures ( 159). With this label facing the back of the camera (the side with an arrow (v) showing the direction...
...: 3.1 Turn the camera off 3.2 Insert the memory card Open the card-slot cover (1) and make sure the eject button is firmly in place. Getting Started-First Steps Step 3-Insert the Memory Card Your Nikon digital camera uses CompactFlash™ (CF) memory cards (Type I or II) or IBM Microdrive® memory cards to store pictures ( 159). With this label facing the back of the camera (the side with an arrow (v) showing the direction...

User Manual
Page 37
...to User Set A by default. Taking and Reviewing Pictures-Basic Picture Taking Step 2-Select User Set A The following table. If a , , or appears in the automatic "point and shoot" mode, User Set A. Pictures compressed for Image quality NORMAL balance between quality and file size that the defaults are 2,560 × 1,920 pixels in poor 62 lighting. For details on changing these settings. Setting Default Description Control Speedlight pops up and Flash mode Auto fires automatically in size. + 51 Continuous mode Single Camera records one picture each time shutter...
...to User Set A by default. Taking and Reviewing Pictures-Basic Picture Taking Step 2-Select User Set A The following table. If a , , or appears in the automatic "point and shoot" mode, User Set A. Pictures compressed for Image quality NORMAL balance between quality and file size that the defaults are 2,560 × 1,920 pixels in poor 62 lighting. For details on changing these settings. Setting Default Description Control Speedlight pops up and Flash mode Auto fires automatically in size. + 51 Continuous mode Single Camera records one picture each time shutter...
User Manual
Page 43
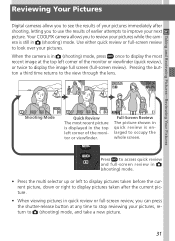
... time to stop reviewing your next picture. Your COOLPIX camera allows you to review your pictures. Full-Screen Review The picture shown in (shooting) mode, press once to display the most recent picture is displayed in the top left corner of the monitor or viewfinder (quick review), or twice to display the image full screen (full-screen review). When the camera is in quick review is still in quick review or full-screen review, you can press the shutter-release button...
... time to stop reviewing your next picture. Your COOLPIX camera allows you to review your pictures. Full-Screen Review The picture shown in (shooting) mode, press once to display the most recent picture is displayed in the top left corner of the monitor or viewfinder (quick review), or twice to display the image full screen (full-screen review). When the camera is in quick review is still in quick review or full-screen review, you can press the shutter-release button...
User Manual
Page 47
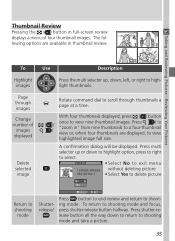
...-screen review displays a menu of images displayed Delete selected image Rotate command dial to shooting mode and focus, press shutter-release button halfway. Press shutter-release button all the way down to return to view highlighted image full size. A confirmation dialog will be displayed. Page through thumbnails a page at a time. To return to scroll through images Change number of four thumbnail images. The following options are displayed, to shooting mode and take a picture. 35 Taking and Reviewing Pictures-Reviewing Your Pictures To Use Description Highlight images...
...-screen review displays a menu of images displayed Delete selected image Rotate command dial to shooting mode and focus, press shutter-release button halfway. Press shutter-release button all the way down to return to view highlighted image full size. A confirmation dialog will be displayed. Page through thumbnails a page at a time. To return to scroll through images Change number of four thumbnail images. The following options are displayed, to shooting mode and take a picture. 35 Taking and Reviewing Pictures-Reviewing Your Pictures To Use Description Highlight images...
User Manual
Page 50
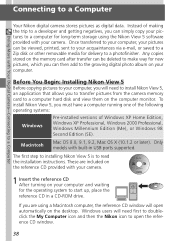
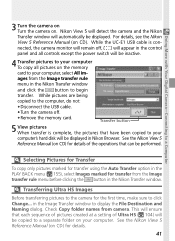
... Your Digital Camera-Connecting to a Computer Your Nikon digital camera stores pictures as digital data. Only models with your camera. The first step to installing Nikon View 5 is to read the installation instructions. Windows users will open the reference CD window. 38 To install Nikon View 5, you to transfer pictures from the camera memory card to a computer hard disk and view them on the computer monitor. Any copies stored on the memory card after transfer can be viewed, printed, sent to your acquaintances via e-mail, or saved...
... Your Digital Camera-Connecting to a Computer Your Nikon digital camera stores pictures as digital data. Only models with your camera. The first step to installing Nikon View 5 is to read the installation instructions. Windows users will open the reference CD window. 38 To install Nikon View 5, you to transfer pictures from the camera memory card to a computer hard disk and view them on the computer monitor. Any copies stored on the memory card after transfer can be viewed, printed, sent to your acquaintances via e-mail, or saved...
User Manual
Page 53
...) will be copied to a separate folder on CD) for the first time, make sure to the computer, do not: • Disconnect the USB cable. • Turn the camera off , will appear in the control panel and all pictures on the memory card to your computer's hard disk will be performed. See the Nikon View 5 Reference Manual (on your computer To copy all controls except the power switch will be displayed. This...
...) will be copied to a separate folder on CD) for the first time, make sure to the computer, do not: • Disconnect the USB cable. • Turn the camera off , will appear in the control panel and all pictures on the memory card to your computer's hard disk will be performed. See the Nikon View 5 Reference Manual (on your computer To copy all controls except the power switch will be displayed. This...
User Manual
Page 57
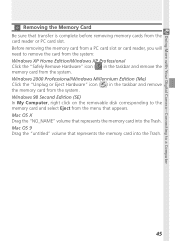
... "NO_NAME" volume that represents the memory card into the Trash. Doing More with Your Digital Camera-Connecting to the memory card and select Eject from the menu that appears. Before removing the memory card from a PC card slot or card reader, you will need to remove the card from the system: Windows XP Home Edition/Windows XP Professional Click the "Safely Remove Hardware" icon ( ) in the taskbar and remove the memory card from the...
... "NO_NAME" volume that represents the memory card into the Trash. Doing More with Your Digital Camera-Connecting to the memory card and select Eject from the menu that appears. Before removing the memory card from a PC card slot or card reader, you will need to remove the card from the system: Windows XP Home Edition/Windows XP Professional Click the "Safely Remove Hardware" icon ( ) in the taskbar and remove the memory card from the...
User Manual
Page 60
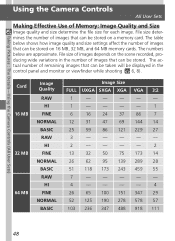
.... File size determines the number of images that can be displayed in the number of images that can be stored on 16 MB, 32 MB, and 64 MB memory cards. The table below are approximate. Taking Pictures : The Details-Using the Camera Controls (All User Sets) Using the Camera Controls All User Sets Making Effective Use of remaining images that can be taken will be stored on a memory card. The actual number of Memory: Image Quality and Size Image quality and size...
.... File size determines the number of images that can be displayed in the number of images that can be stored on 16 MB, 32 MB, and 64 MB memory cards. The table below are approximate. Taking Pictures : The Details-Using the Camera Controls (All User Sets) Using the Camera Controls All User Sets Making Effective Use of remaining images that can be taken will be stored on a memory card. The actual number of Memory: Image Quality and Size Image quality and size...
User Manual
Page 80
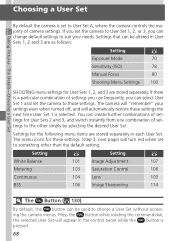
... User Sets 1, 2 and 3 are as follows: Setting Exposure Mode 70 Sensitivity (ISO) 78 Manual Focus 80 Shooting Menu Settings 100 SHOOTING menu settings for User Sets 1, 2, and 3 are stored separately. If you set the camera to User Set 1, 2, or 3, you can create further combinations of camera settings. The camera will "remember" your needs. Setting Setting White Balance 101 Image Adjustment 107 Metering 103 Saturation Control 108 Continuous 104 Lens 109 BSS 106 Image Sharpening 114 The Button ( 130) By default, the button can be used to suit your settings...
... User Sets 1, 2 and 3 are as follows: Setting Exposure Mode 70 Sensitivity (ISO) 78 Manual Focus 80 Shooting Menu Settings 100 SHOOTING menu settings for User Sets 1, 2, and 3 are stored separately. If you set the camera to User Set 1, 2, or 3, you can create further combinations of camera settings. The camera will "remember" your needs. Setting Setting White Balance 101 Image Adjustment 107 Metering 103 Saturation Control 108 Continuous 104 Lens 109 BSS 106 Image Sharpening 114 The Button ( 130) By default, the button can be used to suit your settings...

User Manual
Page 93
Changing the focus mode after setting focusing will cancel manual focus. Focus Confirmation Setting Focus Confirmation to MF or On ( 113) in the SHOOTING menu will cause the areas in focus to be sure that the self-timer is selected ( 58) before manually adjusting focus. If the camera is no longer shown in red. Zoom the camera in or out until the focus distance is unable to focus at some zoom positions. Taking Pictures : The Details-Using the Camera Controls (User Sets 1, 2, 3) Close...
Changing the focus mode after setting focusing will cancel manual focus. Focus Confirmation Setting Focus Confirmation to MF or On ( 113) in the SHOOTING menu will cause the areas in focus to be sure that the self-timer is selected ( 58) before manually adjusting focus. If the camera is no longer shown in red. Zoom the camera in or out until the focus distance is unable to focus at some zoom positions. Taking Pictures : The Details-Using the Camera Controls (User Sets 1, 2, 3) Close...
User Manual
Page 112
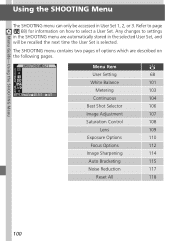
... recalled the next time the User Set is selected. Any changes to settings in the SHOOTING menu are described on how to page ( 68) for information on the following pages. Menu Item User Setting 68 White Balance 101 Metering 103 Continuous 104 Best Shot Selector 106 Image Adjustment 107 Saturation Control 108 Lens 109 Exposure Options 110 Focus Options 112 Image Sharpening 114 Auto Bracketing 115 Noise Reduction 117 Reset All 118 100 The SHOOTING menu...
... recalled the next time the User Set is selected. Any changes to settings in the SHOOTING menu are described on how to page ( 68) for information on the following pages. Menu Item User Setting 68 White Balance 101 Metering 103 Continuous 104 Best Shot Selector 106 Image Adjustment 107 Saturation Control 108 Lens 109 Exposure Options 110 Focus Options 112 Image Sharpening 114 Auto Bracketing 115 Noise Reduction 117 Reset All 118 100 The SHOOTING menu...
User Manual
Page 179
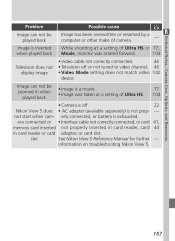
... not display image • Video cable not correctly connected. 46 • Television off . 22 Nikon View 5 does • AC adapter (available separately) is not prop- - slot See Nikon View 5 Reference Manual for further - Image is inverted While shooting at a setting of Ultra HS or 77, when played back Movie, monitor was taken at a setting of camera. - Technical Notes : Camera Care, Options, and Resources Problem Possible cause Image can not be played back Image...
... not display image • Video cable not correctly connected. 46 • Television off . 22 Nikon View 5 does • AC adapter (available separately) is not prop- - slot See Nikon View 5 Reference Manual for further - Image is inverted While shooting at a setting of Ultra HS or 77, when played back Movie, monitor was taken at a setting of camera. - Technical Notes : Camera Care, Options, and Resources Problem Possible cause Image can not be played back Image...

User Manual
Page 180
... them. A flashing icon appears in the camera. Error accessing memory • Turn camera off and replace battery. 23 (Green dot flashes) Can not focus. This CF card cannot be read be damaged, contact retailer or Nikon representative. 168 re- Display Problem Solution NO CARD PRESENT Camera can not detect a memory card, when an error occurs accessing the memory card, or when the card has not been formatted for use in the control panel when the camera can not memory card. on...
... them. A flashing icon appears in the camera. Error accessing memory • Turn camera off and replace battery. 23 (Green dot flashes) Can not focus. This CF card cannot be read be damaged, contact retailer or Nikon representative. 168 re- Display Problem Solution NO CARD PRESENT Camera can not detect a memory card, when an error occurs accessing the memory card, or when the card has not been formatted for use in the control panel when the camera can not memory card. on...
User Manual
Page 181
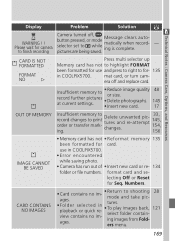
... folder or file numbers. CARD IS NOT FORMATTED FORMAT NO Press multi selector up Memory card has not to while pictures are being saved. format card and selecting Off or Reset for card. Insufficient memory to record further pictures at current settings. • Reduce image quality or size. • Delete photographs. • Insert new card. 48 145 17 OUT OF MEMORY IMAGE CANNOT BE SAVED Insufficient memory to record changes to shooting mode and take pictures. • To play images back, select folder containing images from Folders menu...
... folder or file numbers. CARD IS NOT FORMATTED FORMAT NO Press multi selector up Memory card has not to while pictures are being saved. format card and selecting Off or Reset for card. Insufficient memory to record further pictures at current settings. • Reduce image quality or size. • Delete photographs. • Insert new card. 48 145 17 OUT OF MEMORY IMAGE CANNOT BE SAVED Insufficient memory to record changes to shooting mode and take pictures. • To play images back, select folder containing images from Folders menu...

User Manual
Page 190
...-speed/aperture display, 6 Shutter Release Speed, 127 Size. See Flash, built-in Print Set, 153 Programmed auto exposure. Image Sharpening; See exposure mode, shutter-priority auto Saturation Control, 108 Self-portrait. See flash Speedlight Cntrl, 137 Speedlight Opt., 136 Start-up Speedlight. See Video Mode O On/off. See also quick review full-screen, 84 movie, 90 thumbnail, 86 zoom, 87 PLAY BACK menu, 145 Power switch, 22 Pop up Display, 126 Strap. See Lens; See exposure mode, programmed auto. See Video Mode Photo information, 141. See Continuous R RAW, 48, 49 Red-eye...
...-speed/aperture display, 6 Shutter Release Speed, 127 Size. See Flash, built-in Print Set, 153 Programmed auto exposure. Image Sharpening; See exposure mode, shutter-priority auto Saturation Control, 108 Self-portrait. See flash Speedlight Cntrl, 137 Speedlight Opt., 136 Start-up Speedlight. See Video Mode O On/off. See also quick review full-screen, 84 movie, 90 thumbnail, 86 zoom, 87 PLAY BACK menu, 145 Power switch, 22 Pop up Display, 126 Strap. See Lens; See exposure mode, programmed auto. See Video Mode Photo information, 141. See Continuous R RAW, 48, 49 Red-eye...


