
User Manual
Page 1
En The Guide to Digital Photography with the DIGITAL CAMERA
En The Guide to Digital Photography with the DIGITAL CAMERA
User Manual
Page 2
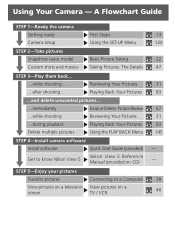
...and movies Basic Picture Taking Taking Pictures: The Details STEP 3-Play them back... ...while shooting... ...after shooting... Using Your Camera - Reviewing Your Pictures Playing Back Your Pictures ...and delete unwanted pictures... ...immediately Keep or Delete: Picture Review ...while shooting ... Playing Back Your Pictures Delete multiple pictures Using the PLAY BACK Menu STEP 4-Install camera software Install software Quick Start Guide (provided) Get to know Nikon View 5 Nikon View 5 Reference Manual (provided on CD) STEP 5-Enjoy your pictures Transfer pictures View...
...and movies Basic Picture Taking Taking Pictures: The Details STEP 3-Play them back... ...while shooting... ...after shooting... Using Your Camera - Reviewing Your Pictures Playing Back Your Pictures ...and delete unwanted pictures... ...immediately Keep or Delete: Picture Review ...while shooting ... Playing Back Your Pictures Delete multiple pictures Using the PLAY BACK Menu STEP 4-Install camera software Install software Quick Start Guide (provided) Get to know Nikon View 5 Nikon View 5 Reference Manual (provided on CD) STEP 5-Enjoy your pictures Transfer pictures View...

User Manual
Page 3
... the Reference Manual, see "Connections" in electronic format on a TV / VCR Using the Camera Controls (All User Sets) Choosing a User Set Using the Camera Controls (User Sets 1, 2, 3) Playing Back Your Pictures List of unpacking and setting up your Nikon digital camera, taking your first photographs, and transferring them to a Computer Viewing Pictures on the reference...
... the Reference Manual, see "Connections" in electronic format on a TV / VCR Using the Camera Controls (All User Sets) Choosing a User Set Using the Camera Controls (User Sets 1, 2, 3) Playing Back Your Pictures List of unpacking and setting up your Nikon digital camera, taking your first photographs, and transferring them to a Computer Viewing Pictures on the reference...

User Manual
Page 4
...not use in the presence of flammable gas Do not use in this equipment. ii Do not place strap around neck Placing the camera strap around the neck of a fall or other strong light source through the viewfinder could cause permanent visual impairment. Turn off before... using this product: • Be sure the product is unplugged. • Use only a rechargeable Nikon EN-EL1 lithium-ion battery (supplied) or a sixvolt 2CR5 (DL245) lithium battery (available separately). Do not disassemble Touching the product's internal parts...
...not use in the presence of flammable gas Do not use in this equipment. ii Do not place strap around neck Placing the camera strap around the neck of a fall or other strong light source through the viewfinder could cause permanent visual impairment. Turn off before... using this product: • Be sure the product is unplugged. • Use only a rechargeable Nikon EN-EL1 lithium-ion battery (supplied) or a sixvolt 2CR5 (DL245) lithium battery (available separately). Do not disassemble Touching the product's internal parts...

User Manual
Page 5
...not to maintain compliance with product regulations. Removing memory cards Memory cards may become hot during use only the cables provided or sold by Nikon for an extended period, the battery may be taken to avoid injury due to broken glass and to leakage when fully discharged. Observe... caution when operating the flash Using the flash close to remove the battery when no less than one meter (39˝) from the camera. Use appropriate cables When connecting cables to the input and output jacks, use . When using the viewfinder When operating the diopter adjustment dial ...
...not to maintain compliance with product regulations. Removing memory cards Memory cards may become hot during use only the cables provided or sold by Nikon for an extended period, the battery may be taken to avoid injury due to broken glass and to leakage when fully discharged. Observe... caution when operating the flash Using the flash close to remove the battery when no less than one meter (39˝) from the camera. Use appropriate cables When connecting cables to the input and output jacks, use . When using the viewfinder When operating the diopter adjustment dial ...
User Manual
Page 6
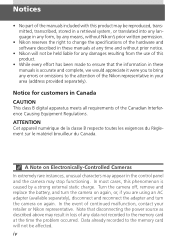
...toutes les exigences du Règlement sur le matériel brouilleur du Canada. Turn the camera off, remove and replace the battery, and turn the camera on Electronically-Controlled Cameras In extremely rare instances, unusual characters may appear in these manuals at the time the problem ...recorded to the memory card will not be held liable for customers in Canada CAUTION This class B digital apparatus meets all requirements of the Nikon representative in your retailer or Nikon representative. In most cases, this product. • While every effort has been made to the ...
...toutes les exigences du Règlement sur le matériel brouilleur du Canada. Turn the camera off, remove and replace the battery, and turn the camera on Electronically-Controlled Cameras In extremely rare instances, unusual characters may appear in these manuals at the time the problem ...recorded to the memory card will not be held liable for customers in Canada CAUTION This class B digital apparatus meets all requirements of the Nikon representative in your retailer or Nikon representative. In most cases, this product. • While every effort has been made to the ...

User Manual
Page 8
...their respective holders. CompactFlash is prohibited. Notice Concerning Prohibition of Copying or Reproduction Note that has been digitally copied or reproduced by means of a scanner, digital camera or other device may be money, coins, or securities which are stamped checks, gift certificates, etc....), commuter "Sample." prohibited. • Comply with your Nikon product are registered trademarks of SanDisk Corporation. Finder, ...
...their respective holders. CompactFlash is prohibited. Notice Concerning Prohibition of Copying or Reproduction Note that has been digitally copied or reproduced by means of a scanner, digital camera or other device may be money, coins, or securities which are stamped checks, gift certificates, etc....), commuter "Sample." prohibited. • Comply with your Nikon product are registered trademarks of SanDisk Corporation. Finder, ...
User Manual
Page 9
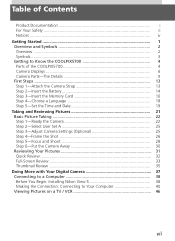
...1 Overview and Symbols 2 Overview ...2 Symbols ...3 Getting to Know the COOLPIX5700 4 Parts of the COOLPIX5700 4 Camera Displays 6 Camera Parts-The Details 9 First Steps ...13 Step 1-Attach the Camera Strap 13 Step 2-Insert the Battery 14 Step 3-Insert the Memory Card 16 Step 4-Choose a Language 18 Step... and Shoot 28 Step 6-Put the Camera Away 30 Reviewing Your Pictures 31 Quick Review 32 Full-Screen Review 33 Thumbnail Review 35 Doing More with Your Digital Camera 37 Connecting to a Computer 38 Before You Begin: Installing Nikon View 5 38 Making the Connection: Connecting...
...1 Overview and Symbols 2 Overview ...2 Symbols ...3 Getting to Know the COOLPIX5700 4 Parts of the COOLPIX5700 4 Camera Displays 6 Camera Parts-The Details 9 First Steps ...13 Step 1-Attach the Camera Strap 13 Step 2-Insert the Battery 14 Step 3-Insert the Memory Card 16 Step 4-Choose a Language 18 Step... and Shoot 28 Step 6-Put the Camera Away 30 Reviewing Your Pictures 31 Quick Review 32 Full-Screen Review 33 Thumbnail Review 35 Doing More with Your Digital Camera 37 Connecting to a Computer 38 Before You Begin: Installing Nikon View 5 38 Making the Connection: Connecting...
User Manual
Page 10
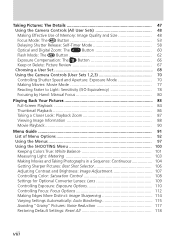
Taking Pictures: The Details 47 Using the Camera Controls (All User Sets 48 Making Effective Use of Memory: Image Quality and Size 48 Focus Mode: The Button 53 Delaying Shutter Release: Self-Timer Mode 58 Optical and Digital Zoom: The Button 60 Flash Mode: The Button 62 ...Exposure Compensation: The Button 66 Keep or Delete: Picture Review 67 Choosing a User Set 68 Using the Camera Controls (User Sets 1,2,3 70 Controlling Shutter Speed and Aperture:...
Taking Pictures: The Details 47 Using the Camera Controls (All User Sets 48 Making Effective Use of Memory: Image Quality and Size 48 Focus Mode: The Button 53 Delaying Shutter Release: Self-Timer Mode 58 Optical and Digital Zoom: The Button 60 Flash Mode: The Button 62 ...Exposure Compensation: The Button 66 Keep or Delete: Picture Review 67 Choosing a User Set 68 Using the Camera Controls (User Sets 1,2,3 70 Controlling Shutter Speed and Aperture:...

User Manual
Page 11
Using the SET-UP Menu 120 Organizing Your Pictures: Folders 121 Adjusting Monitor Settings: Monitor Options 126 Customizing Camera Controls: Controls 129 Controlling Zoom: Zoom Options 131 Conserving Battery Power: Auto Off 133 File Numbering: Seq. Numbers 134 Formatting... During Playback: Hide Image 152 Ordering Prints: Print Set 153 Selecting Images for Transfer: Auto Transfer 155 Technical Notes: Camera Care, Options, and Resources 157 Optional Accessories 158 Caring for the Camera and Battery 160 Web Resources 163 Troubleshooting 164 Specifications 171 Index ...175 ix
Using the SET-UP Menu 120 Organizing Your Pictures: Folders 121 Adjusting Monitor Settings: Monitor Options 126 Customizing Camera Controls: Controls 129 Controlling Zoom: Zoom Options 131 Conserving Battery Power: Auto Off 133 File Numbering: Seq. Numbers 134 Formatting... During Playback: Hide Image 152 Ordering Prints: Print Set 153 Selecting Images for Transfer: Auto Transfer 155 Technical Notes: Camera Care, Options, and Resources 157 Optional Accessories 158 Caring for the Camera and Battery 160 Web Resources 163 Troubleshooting 164 Specifications 171 Index ...175 ix
User Manual
Page 13
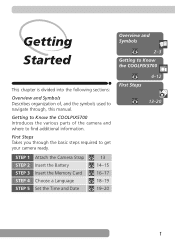
STEP 1 STEP 2 STEP 3 STEP 4 STEP 5 Attach the Camera Strap Insert the Battery Insert the Memory Card Choose a Language Set the Time and Date 13 14-15 16-17 18-19 19-20 First ... to Know the COOLPIX5700 This chapter is divided into the following sections: Overview and Symbols Describes organization of the camera and where to navigate through the basic steps required to get your camera ready. Getting to Know the COOLPIX5700 Introduces the various parts of , and the symbols used to find additional information...
STEP 1 STEP 2 STEP 3 STEP 4 STEP 5 Attach the Camera Strap Insert the Battery Insert the Memory Card Choose a Language Set the Time and Date 13 14-15 16-17 18-19 19-20 First ... to Know the COOLPIX5700 This chapter is divided into the following sections: Overview and Symbols Describes organization of the camera and where to navigate through the basic steps required to get your camera ready. Getting to Know the COOLPIX5700 Introduces the various parts of , and the symbols used to find additional information...

User Manual
Page 14
... chapter. Playing Back Your Pictures: Explains how to operate the camera's menus, and gives a full explanation of this electronic circuitry. THE USE OF NON-NIKON ELECTRONIC ACCESSORIES COULD DAMAGE YOUR CAMERA AND MAY VOID YOUR NIKON WARRANTY. Use Only Nikon Brand Electronic Accessories Your Nikon COOLPIX digital camera is designed to operate within the operational and safety requirements of...
... chapter. Playing Back Your Pictures: Explains how to operate the camera's menus, and gives a full explanation of this electronic circuitry. THE USE OF NON-NIKON ELECTRONIC ACCESSORIES COULD DAMAGE YOUR CAMERA AND MAY VOID YOUR NIKON WARRANTY. Use Only Nikon Brand Electronic Accessories Your Nikon COOLPIX digital camera is designed to operate within the operational and safety requirements of...

User Manual
Page 15
...: helpful information for contact information: http://www.nikon-image.com/eng/ 3 Additional information may be available from the Nikon representative in your camera. Life-Long Learning As part of Nikon's "Life-Long Learning" commitment to ongoing product support and education, continually-updated information is available on digital imaging and photography. See: additional information in Asia...
...: helpful information for contact information: http://www.nikon-image.com/eng/ 3 Additional information may be available from the Nikon representative in your camera. Life-Long Learning As part of Nikon's "Life-Long Learning" commitment to ongoing product support and education, continually-updated information is available on digital imaging and photography. See: additional information in Asia...

User Manual
Page 16
... page numbers listed. For more information on the function of each part, refer to Know the COOLPIX5700 Parts of the COOLPIX5700 The parts of the camera are identified below. Getting Started-Getting to Know the COOLPIX5700 1 Command dial 2 LCD illuminator button 8 3 (Exposure compensation) button 66 4 (Exposure ...-timer/red-eye reduction/shot confirmation lamp .. 58, 63, 137 4 11 Power switch 22 12 Shutter-release button ......... 28 13 Eyelet for camera strap (x2) ... 13 14 Audio/video (A/V) out connector (under cover 46 15 DC-IN connector (under cover) 15 16 USB connector (under...
... page numbers listed. For more information on the function of each part, refer to Know the COOLPIX5700 Parts of the COOLPIX5700 The parts of the camera are identified below. Getting Started-Getting to Know the COOLPIX5700 1 Command dial 2 LCD illuminator button 8 3 (Exposure compensation) button 66 4 (Exposure ...-timer/red-eye reduction/shot confirmation lamp .. 58, 63, 137 4 11 Power switch 22 12 Shutter-release button ......... 28 13 Eyelet for camera strap (x2) ... 13 14 Audio/video (A/V) out connector (under cover 46 15 DC-IN connector (under cover) 15 16 USB connector (under...

User Manual
Page 18
... Monitor or Viewfinder (Shooting Mode) In (shooting mode), the icons in the monitor or viewfinder indicate the status of the following camera settings: 1 2 8 4 Self-timer indicator 58 3 9 5 Shutter speed 73 10 11 6 Exposure mode 70 4 12 7 Metering mode 103 5 13 8 Flash-ready indicator...9 Flash mode 62 10 Battery level indicator1........... 23 16 17 18 11 "Date not set" icon 2 20 User Set A 12 Focus indicator 3 28 1 Digital zoom 60 2 Zoom indicator 60, 105 3 Current folder 125 1 Appears when battery is running low. 2 Appears when clock-calendar has not been set. ...
... Monitor or Viewfinder (Shooting Mode) In (shooting mode), the icons in the monitor or viewfinder indicate the status of the following camera settings: 1 2 8 4 Self-timer indicator 58 3 9 5 Shutter speed 73 10 11 6 Exposure mode 70 4 12 7 Metering mode 103 5 13 8 Flash-ready indicator...9 Flash mode 62 10 Battery level indicator1........... 23 16 17 18 11 "Date not set" icon 2 20 User Set A 12 Focus indicator 3 28 1 Digital zoom 60 2 Zoom indicator 60, 105 3 Current folder 125 1 Appears when battery is running low. 2 Appears when clock-calendar has not been set. ...
User Manual
Page 19
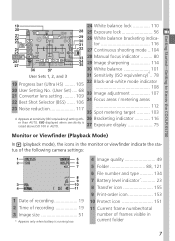
.... 37 Exposure display 75 Monitor or Viewfinder (Playback Mode) In (playback mode), the icons in the monitor or viewfinder indicate the status of the following camera settings: 1 Date of recording 19 2 Time of recording 19 3 Image size 51 * Appears only when battery is running low. 4 Image quality 49 5 Folder 88, 121...
.... 37 Exposure display 75 Monitor or Viewfinder (Playback Mode) In (playback mode), the icons in the monitor or viewfinder indicate the status of the following camera settings: 1 Date of recording 19 2 Time of recording 19 3 Image size 51 * Appears only when battery is running low. 4 Image quality 49 5 Folder 88, 121...

User Manual
Page 20
... balance indicator (appears when button is used to Know the COOLPIX5700 Control Panel The indicators in the control panel show the status of the following camera settings. shutter-speed/aperture display shows white balance mode selected 130 3 Battery level indicator 23 4 Image quality 49 5 Exposure mode 70 6 Shutter-speed 73 Aperture...
... balance indicator (appears when button is used to Know the COOLPIX5700 Control Panel The indicators in the control panel show the status of the following camera settings. shutter-speed/aperture display shows white balance mode selected 130 3 Battery level indicator 23 4 Image quality 49 5 Exposure mode 70 6 Shutter-speed 73 Aperture...

User Manual
Page 21
... in use will do the opposite. Choose (shooting mode) to take still pictures and movies ( 22), (playback mode) to Know the COOLPIX5700 Camera Parts - The monitor and viewfinder display the same contents. Using the Monitor Do not apply excessive force to the viewfinder before closing the monitor, ...and viewfinder (which cannot be framed in use will not turn it again. Press the / SEL button after opening the monitor to the camera. Opening the monitor while the viewfinder is open it on the viewfinder. The Details A The Mode Selector The mode selector selects the operating mode...
... in use will do the opposite. Choose (shooting mode) to take still pictures and movies ( 22), (playback mode) to Know the COOLPIX5700 Camera Parts - The monitor and viewfinder display the same contents. Using the Monitor Do not apply excessive force to the viewfinder before closing the monitor, ...and viewfinder (which cannot be framed in use will not turn it again. Press the / SEL button after opening the monitor to the camera. Opening the monitor while the viewfinder is open it on the viewfinder. The Details A The Mode Selector The mode selector selects the operating mode...

User Manual
Page 22
...176;, and backward 90°. When the monitor is pointing in the same direction as shown, the monitor can be folded back onto the camera body for shooting or playback. Getting Started-Getting to Know the COOLPIX5700 C The Electronic Viewfinder The viewfinder is a smaller version of the monitor...the same direction as shown to review the pictures that you have taken ( 31, 84). the monitor will show a mirror image of various camera settings during shooting ( 6). When the monitor is also used when bright ambient lighting conditions make the display in the monitor difficult to point in...
...176;, and backward 90°. When the monitor is pointing in the same direction as shown, the monitor can be folded back onto the camera body for shooting or playback. Getting Started-Getting to Know the COOLPIX5700 C The Electronic Viewfinder The viewfinder is a smaller version of the monitor...the same direction as shown to review the pictures that you have taken ( 31, 84). the monitor will show a mirror image of various camera settings during shooting ( 6). When the monitor is also used when bright ambient lighting conditions make the display in the monitor difficult to point in...

User Manual
Page 23
...the COOLPIX5700 E The (Function) Button By default, the button can be used to choose a User Set without using the buttons on the camera ( 129). By default, the camera is pressed. Setting assigned to the automatic "point-and-shoot" mode, User Set A. Press the button while rotating the command dial, ... button, making it possible to select the User Set or adjust white balance and metering without accessing the camera menus, or to adjust flash and focus mode without accessing the camera menus. It will appear in the control panel shutter-speed/ aperture display while the button is set to...
...the COOLPIX5700 E The (Function) Button By default, the button can be used to choose a User Set without using the buttons on the camera ( 129). By default, the camera is pressed. Setting assigned to the automatic "point-and-shoot" mode, User Set A. Press the button while rotating the command dial, ... button, making it possible to select the User Set or adjust white balance and metering without accessing the camera menus, or to adjust flash and focus mode without accessing the camera menus. It will appear in the control panel shutter-speed/ aperture display while the button is set to...


