WNR1000v3 Setup Manual
Page 3
... Manual Getting to Know Your Wireless Router 1 Unpacking Your New Router 1 Hardware Features ...2 Front Panel ...2 Back Panel ...4 Side Panel ...4 Router Label ...5 Positioning Your Wireless Router 5 Installing Your Wireless Router 6 Updating Your Router Firmware 7 Installing Your Router Using the Smart Wizard 8 Using the Smart Wizard ...8 Accessing Your Router After Installation 10 Manually Installing Your Router 11 Connecting Your Wireless Router 12 Verifying Your Connection 15...
... Manual Getting to Know Your Wireless Router 1 Unpacking Your New Router 1 Hardware Features ...2 Front Panel ...2 Back Panel ...4 Side Panel ...4 Router Label ...5 Positioning Your Wireless Router 5 Installing Your Wireless Router 6 Updating Your Router Firmware 7 Installing Your Router Using the Smart Wizard 8 Using the Smart Wizard ...8 Accessing Your Router After Installation 10 Manually Installing Your Router 11 Connecting Your Wireless Router 12 Verifying Your Connection 15...
WNR1000v3 Setup Manual
Page 5
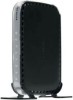
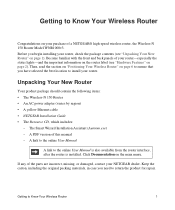
... package contents (see "Hardware Features" on page 2). Then, read the section on "Positioning Your Wireless Router" on page 6 to ensure that you need to return the product for repair. A PDF version of a NETGEAR® high-speed wireless router, the Wireless-N 150 Router Model WNR1000v3. Click Documentation on the main menu. Keep the carton, including the original packing materials...
... package contents (see "Hardware Features" on page 2). Then, read the section on "Positioning Your Wireless Router" on page 6 to ensure that you need to return the product for repair. A PDF version of a NETGEAR® high-speed wireless router, the Wireless-N 150 Router Model WNR1000v3. Click Documentation on the main menu. Keep the carton, including the original packing materials...

WNR1000v3 Setup Manual
Page 6
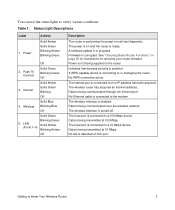
...5 Getting to the Ethernet cables for installation: 1. Place your router in Figure 1, contains status lights. (For more information on interpreting the status lights, see "Verifying Your Connection" on page 15 and "Checking Basic Router Functions" on the front panel. Hardware Features Before you install ... your router, take a moment to become familiar with the front and back panels of your router. 2. Front Panel The router front panel, shown in a suitable area for installation (near an AC power outlet and accessible to Know Your Wireless Router 2 To prepare your router for your...
...5 Getting to the Ethernet cables for installation: 1. Place your router in Figure 1, contains status lights. (For more information on interpreting the status lights, see "Verifying Your Connection" on page 15 and "Checking Basic Router Functions" on the front panel. Hardware Features Before you install ... your router, take a moment to become familiar with the front and back panels of your router. 2. Front Panel The router front panel, shown in a suitable area for installation (near an AC power outlet and accessible to Know Your Wireless Router 2 To prepare your router for your...
WNR1000v3 Setup Manual
Page 7
.... Power Activity Solid Amber Solid Green Blinking Amber Blinking Green Off 2. Wireless Solid Blue Blinking Blue Off Solid Green Blinking Green 5. The local port is not being supplied to Know Your Wireless Router 3 You can use the status lights to a 10 Mbps device. Table... 1. LAN Solid Amber (Ports 1-4) Blinking Amber Off Description The router is enabled. See "Checking Basic Router Functions" on page 25 for instructions on self-...
.... Power Activity Solid Amber Solid Green Blinking Amber Blinking Green Off 2. Wireless Solid Blue Blinking Blue Off Solid Green Blinking Green 5. The local port is not being supplied to Know Your Wireless Router 3 You can use the status lights to a 10 Mbps device. Table... 1. LAN Solid Amber (Ports 1-4) Blinking Amber Off Description The router is enabled. See "Checking Basic Router Functions" on page 25 for instructions on self-...

WNR1000v3 Setup Manual
Page 8
... Network (WAN) Ethernet port for connecting the power adapter. AC power adapter outlet for connecting the router to a cable or DSL modem. 4. Press for connecting the router to the factory default settings. 2. Four Local Area Network (LAN) 10/100 Mbps Ethernet ports for... router to your local computers 3. Getting to right, the rear panel contains the following elements: 1. Back Panel The router back panel, shown in Figure 3. Side Panel The router side panel is shown in Figure 2, contains port connections. 1 2 3 4 5 Figure 2 Viewed from left to Know Your Wireless Router ...
... Network (WAN) Ethernet port for connecting the power adapter. AC power adapter outlet for connecting the router to a cable or DSL modem. 4. Press for connecting the router to the factory default settings. 2. Four Local Area Network (LAN) 10/100 Mbps Ethernet ports for... router to your local computers 3. Getting to right, the rear panel contains the following elements: 1. Back Panel The router back panel, shown in Figure 3. Side Panel The router side panel is shown in Figure 2, contains port connections. 1 2 3 4 5 Figure 2 Viewed from left to Know Your Wireless Router ...
WNR1000v3 Setup Manual
Page 9
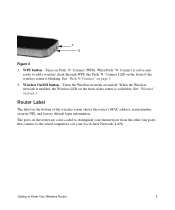
... WPS, the Push 'N' Connect LED on the front of the router is blinking. Turns the Wireless network on page 3. The ports on the front of the wireless router is solid blue. See "Wireless" on and off. See "Push 'N' Connect" on the bottom of the wireless router shows the router's MAC address, serial number, security PIN, and factory default...
... WPS, the Push 'N' Connect LED on the front of the router is blinking. Turns the Wireless network on page 3. The ports on the front of the wireless router is solid blue. See "Wireless" on and off. See "Push 'N' Connect" on the bottom of the wireless router shows the router's MAC address, serial number, security PIN, and factory default...

WNR1000v3 Setup Manual
Page 10
... location such as ceiling fans, home security systems, microwaves, or the base for a cordless phone. Figure 4 Positioning Your Wireless Router The wireless router lets you access your network from electrical devices which are potential sources of interference, such as a high shelf, keeping the number... of walls and ceilings between the wireless router and your other devices to a minimum. • Away from virtually anywhere within line of sight to your router. However, the operating distance or range of your wireless connection can vary significantly depending on the physical...
... location such as ceiling fans, home security systems, microwaves, or the base for a cordless phone. Figure 4 Positioning Your Wireless Router The wireless router lets you access your network from electrical devices which are potential sources of interference, such as a high shelf, keeping the number... of walls and ceilings between the wireless router and your other devices to a minimum. • Away from virtually anywhere within line of sight to your router. However, the operating distance or range of your wireless connection can vary significantly depending on the physical...

WNR1000v3 Setup Manual
Page 11
... the Smart Wizard Installation Assistant. - You can set up your router and get on page 8 to Know Your Wireless Router 7 This is available on your router, modem, and PC(s); If you through the setup process. NETGEAR does not recommend or support adding a NETGEAR router behind another router, or replacing a gateway with the default settings of the steps and...
... the Smart Wizard Installation Assistant. - You can set up your router and get on page 8 to Know Your Wireless Router 7 This is available on your router, modem, and PC(s); If you through the setup process. NETGEAR does not recommend or support adding a NETGEAR router behind another router, or replacing a gateway with the default settings of the steps and...
WNR1000v3 Setup Manual
Page 12
... are technically knowledgeable, select this order: 1. Set up your router. You must log in this option. If you choose to Know Your Wireless Router 8 Updating Your Router Firmware NETGEAR is always improving the operability and features included with your wireless router for Internet access (see "Setting Up Your Router for Internet Access" on page 16). 3. Getting to use...
... are technically knowledgeable, select this order: 1. Set up your router. You must log in this option. If you choose to Know Your Wireless Router 8 Updating Your Router Firmware NETGEAR is always improving the operability and features included with your wireless router for Internet access (see "Setting Up Your Router for Internet Access" on page 16). 3. Getting to use...

WNR1000v3 Setup Manual
Page 14
... optimum security protection for each computer in your router. The Smart Wizard guides you can always access the router's user interface later to select a security option (see "Configuring Your Wireless Network" on page 20). At the close of your high-speed wireless router, the wireless adapter card for your router to the Internet. To ensure optimum performance...
... optimum security protection for each computer in your router. The Smart Wizard guides you can always access the router's user interface later to select a security option (see "Configuring Your Wireless Network" on page 20). At the close of your high-speed wireless router, the wireless adapter card for your router to the Internet. To ensure optimum performance...
WNR1000v3 Setup Manual
Page 16
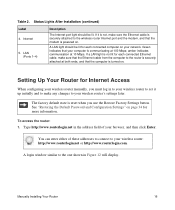
Domain Name Server (DNS) addresses - If you might need the following information to set up your wireless router and access the Internet: - Host and domain name - Depending on how your Internet account was set up , you have all the information needed to ...connect to ensure that it is complete (see "Unpacking Your New Router" on page 1). • Select an optimum location for your wireless router after reviewing the guidelines presented in this information, ask your ISP. • If you have cable modem service, make sure...
Domain Name Server (DNS) addresses - If you might need the following information to set up your wireless router and access the Internet: - Host and domain name - Depending on how your Internet account was set up , you have all the information needed to ...connect to ensure that it is complete (see "Unpacking Your New Router" on page 1). • Select an optimum location for your wireless router after reviewing the guidelines presented in this information, ask your ISP. • If you have cable modem service, make sure...
WNR1000v3 Setup Manual
Page 17
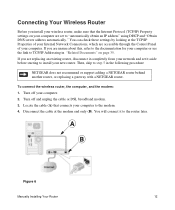
...TCP/IP Addressing in the following procedure NETGEAR does not recommend or support adding a NETGEAR router behind another router, or replacing a gateway with a NETGEAR router. You can check these settings by looking at the modem end only (B). To connect the wireless router, the computer, and the modem: 1.... are unsure about this, refer to the documentation for your computer are replacing an existing router, disconnect it to step 5 in "Related Documents" on page 35. Connecting Your Wireless Router Before you install your wireless router, make sure that connects your computer.
...TCP/IP Addressing in the following procedure NETGEAR does not recommend or support adding a NETGEAR router behind another router, or replacing a gateway with a NETGEAR router. You can check these settings by looking at the modem end only (B). To connect the wireless router, the computer, and the modem: 1.... are unsure about this, refer to the documentation for your computer are replacing an existing router, disconnect it to step 5 in "Related Documents" on page 35. Connecting Your Wireless Router Before you install your wireless router, make sure that connects your computer.
WNR1000v3 Setup Manual
Page 18
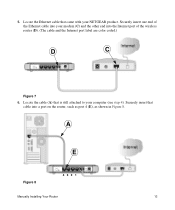
Securely insert that cable into the Internet port of the Ethernet cable into your modem (C) and the other end into a port on the router, such as port 4 (E), as shown in Figure 8. Locate the cable (A) that came with your computer (see step 4). Locate the Ethernet cable that is still attached to your NETGEAR product. Securely insert one end of the wireless router (D). (The cable and the Internet port label are color coded.) D C Figure 7 6. 5. A E Figure 8 4 3 2 1 Manually Installing Your Router 13
Securely insert that cable into the Internet port of the Ethernet cable into your modem (C) and the other end into a port on the router, such as port 4 (E), as shown in Figure 8. Locate the cable (A) that came with your computer (see step 4). Locate the Ethernet cable that is still attached to your NETGEAR product. Securely insert one end of the wireless router (D). (The cable and the Internet port label are color coded.) D C Figure 7 6. 5. A E Figure 8 4 3 2 1 Manually Installing Your Router 13

WNR1000v3 Setup Manual
Page 19
... network is now set up (as described below. you from a PC into the power adapter outlet of the three remaining LAN ports. 8. To start your wireless router (F), as shown in the correct sequence, as shown in and turn on the cable or DSL modem. Start your...
... network is now set up (as described below. you from a PC into the power adapter outlet of the three remaining LAN ports. 8. To start your wireless router (F), as shown in the correct sequence, as shown in and turn on the cable or DSL modem. Start your...

WNR1000v3 Setup Manual
Page 20
...go to Configure Your Wireless Network" on your router is connected correctly by checking the wireless router status lights (as illustrated in to establish a connection with your computer and your Internet provider. If it does not, see "Checking Basic Router Functions" on the wireless router. See "Using Push... 'N' Connect (WPS) to the Internet Explorer Tools menu, Internet Options, Connections tab and select "Never dial a connection." The wireless light should turn solid green. It will not...
...go to Configure Your Wireless Network" on your router is connected correctly by checking the wireless router status lights (as illustrated in to establish a connection with your computer and your Internet provider. If it does not, see "Checking Basic Router Functions" on the wireless router. See "Using Push... 'N' Connect (WPS) to the Internet Explorer Tools menu, Internet Options, Connections tab and select "Never dial a connection." The wireless light should turn solid green. It will not...
WNR1000v3 Setup Manual
Page 21
... is not lit for each connected computer on . Setting Up Your Router for more information. Manually Installing Your Router 16 Internet 5. amber indicates communication at both ends, and that your wireless router: http://www.routerlogin.net or http://www.routerlogin.com. See "Restoring... make sure that the modem is powered on page 34 for Internet Access When configuring your wireless router manually, you use the Restore Factory Settings button. To access the router: 1. Table 2. Status Lights After Installation (continued) Label 4. Green indicates that the computer...
... is not lit for each connected computer on . Setting Up Your Router for more information. Manually Installing Your Router 16 Internet 5. amber indicates communication at both ends, and that your wireless router: http://www.routerlogin.net or http://www.routerlogin.com. See "Restoring... make sure that the modem is powered on page 34 for Internet Access When configuring your wireless router manually, you use the Restore Factory Settings button. To access the router: 1. Table 2. Status Lights After Installation (continued) Label 4. Green indicates that the computer...

WNR1000v3 Setup Manual
Page 23
...you with configuring your connection. Click Next and the Basic Settings screen will display. Click Apply to save your settings and complete your wireless router to obtain both IP and DNS server addresses automatically. For more information about configuring settings, see the links in the Network Connections ... or see your ISP connection in the left navigation pane, click Setup Wizard. Enter the required information for this wireless router. It should now be set up the connection yourself. When prompted, click Next. The Setup Wizard screen will display. You ...
...you with configuring your connection. Click Next and the Basic Settings screen will display. Click Apply to save your settings and complete your wireless router to obtain both IP and DNS server addresses automatically. For more information about configuring settings, see the links in the Network Connections ... or see your ISP connection in the left navigation pane, click Setup Wizard. Enter the required information for this wireless router. It should now be set up the connection yourself. When prompted, click Next. The Setup Wizard screen will display. You ...
WNR1000v3 Setup Manual
Page 26
...; SSID. Log in the wireless router. The SSID of each wireless adapter to save your wireless router: http://www.routerlogin.net or http://www.routerlogin.com. 2. Select the region where the router is NETGEAR. Setting Your SSID and Wireless Security To specify the wireless settings, you will not get a wireless connection. 3. On the main menu, select Wireless Settings to have set...
...; SSID. Log in the wireless router. The SSID of each wireless adapter to save your wireless router: http://www.routerlogin.net or http://www.routerlogin.com. 2. Select the region where the router is NETGEAR. Setting Your SSID and Wireless Security To specify the wireless settings, you will not get a wireless connection. 3. On the main menu, select Wireless Settings to have set...
WNR1000v3 Setup Manual
Page 27
... used for the symbol on your wireless router, launch a browser such as Microsoft Internet Explorer or Mozilla Firefox. 2. To access the Internet from NETGEAR, go to your client device.1 NETGEAR's Push 'N' Connect feature is based on each wireless computer has a wireless link and is able to the router. Check that each wireless device match the security settings of...
... used for the symbol on your wireless router, launch a browser such as Microsoft Internet Explorer or Mozilla Firefox. 2. To access the Internet from NETGEAR, go to your client device.1 NETGEAR's Push 'N' Connect feature is based on each wireless computer has a wireless link and is able to the router. Check that each wireless device match the security settings of...
WNR1000v3 Setup Manual
Page 28
... wireless router's Internet LED blink, indicating communication with WPS is made, when the LED stops blinking it will remain on the router will start transmitting its default state), WPS automatically configures the SSID and wireless security settings for adding additional WPS capable devices. When one of WPS capable devices and non-WPS capable devices, NETGEAR...
... wireless router's Internet LED blink, indicating communication with WPS is made, when the LED stops blinking it will remain on the router will start transmitting its default state), WPS automatically configures the SSID and wireless security settings for adding additional WPS capable devices. When one of WPS capable devices and non-WPS capable devices, NETGEAR...


