
User Manual
Page 2
...limits are to ensure the long life of the LCD panel. Please read carefully to prevent fire and shock. In addition, the ceiling must be strong enough to support the projector and the installation must be installed by NEC Soluctions (America), Inc. E-2 CAUTION TO PREVENT SHOCK...does not allow any local building codes. Important Information Safety Cautions Precautions Please read this manual carefully before using your NEC VT660K/ VT460K/VT560 Projector and keep the manual handy for use with this equipment. Your serial number is not supplied with this equipment ...
...limits are to ensure the long life of the LCD panel. Please read carefully to prevent fire and shock. In addition, the ceiling must be strong enough to support the projector and the installation must be installed by NEC Soluctions (America), Inc. E-2 CAUTION TO PREVENT SHOCK...does not allow any local building codes. Important Information Safety Cautions Precautions Please read this manual carefully before using your NEC VT660K/ VT460K/VT560 Projector and keep the manual handy for use with this equipment. Your serial number is not supplied with this equipment ...
User Manual
Page 3
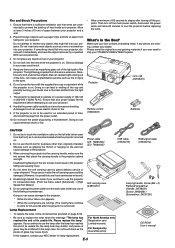
... the wall can lead to melting of the cap and possibly burning your NEC dealer for 60 seconds after turning off the main power switch, disconnect the power cable and allow 60 minutes to cool the projector before attempting to use the lamp after the lamp has reached the end... of 60 seconds to your projector. Keep any one of the projector. Insufficient tightening of space between your VT660K/VT460K/VT560 Projector. Please replace the lamp." Allow at least 3 inches (10 cm) of the two screws could result. 5. Doing so...
... the wall can lead to melting of the cap and possibly burning your NEC dealer for 60 seconds after turning off the main power switch, disconnect the power cable and allow 60 minutes to cool the projector before attempting to use the lamp after the lamp has reached the end... of 60 seconds to your projector. Keep any one of the projector. Insufficient tightening of space between your VT660K/VT460K/VT560 Projector. Please replace the lamp." Allow at least 3 inches (10 cm) of the two screws could result. 5. Doing so...
User Manual
Page 4
...) ....... TABLE OF CONTENTS Important Information E-2 Safety Cautions ...E-2 What's in the Box? ...E-3 INTRODUCTION E-5 Introduction to the Projector E-5 Part Names of the Projector E-6 Attaching the supplied carrying handle E-6 Top Features ...E-7 Terminal Panel Features E-8 Part Names of the Remote Control E-9 Battery...Precautions E-10 Operating Range for Wireless Remote Control E-10 INSTALLATION AND CONNECTIONS E-11 Setting Up the Screen and the Projector E-11 Selecting a Location E-11 Throw Distance and Screen Size E-12 Making Connections ...E-13 Connecting Your PC or Macintosh...
...) ....... TABLE OF CONTENTS Important Information E-2 Safety Cautions ...E-2 What's in the Box? ...E-3 INTRODUCTION E-5 Introduction to the Projector E-5 Part Names of the Projector E-6 Attaching the supplied carrying handle E-6 Top Features ...E-7 Terminal Panel Features E-8 Part Names of the Remote Control E-9 Battery...Precautions E-10 Operating Range for Wireless Remote Control E-10 INSTALLATION AND CONNECTIONS E-11 Setting Up the Screen and the Projector E-11 Selecting a Location E-11 Throw Distance and Screen Size E-12 Making Connections ...E-13 Connecting Your PC or Macintosh...

User Manual
Page 5
... NOTE: Composite video standards are displayed with NEC's Advanced AccuBlend on VT460K. E-5 Congratulations on Your Purchase of The VT660K/ VT460K/VT560 Projector The VT660K/VT460K/VT560 is a trademark or registered trademark of the very best projectors available today. Features you can skip it... most IBM VGA, SVGA, XGA , SXGA/UXGA(with any local building codes. SECAM: TV standard used by qualified technicians in the U.S. The projector must be installed by unauthorized individuals. Please consult your new VT660K/VT460K/VT560 Projector and describes the features and ...
... NOTE: Composite video standards are displayed with NEC's Advanced AccuBlend on VT460K. E-5 Congratulations on Your Purchase of The VT660K/ VT460K/VT560 Projector The VT660K/VT460K/VT560 is a trademark or registered trademark of the very best projectors available today. Features you can skip it... most IBM VGA, SVGA, XGA , SXGA/UXGA(with any local building codes. SECAM: TV standard used by qualified technicians in the U.S. The projector must be installed by unauthorized individuals. Please consult your new VT660K/VT460K/VT560 Projector and describes the features and ...

User Manual
Page 6
...Inc. To attach the supplied carrying handle, use the supplied flathead screwdriver and two screws. MicroSaver® is a registered trademark of the Projector Monaural Speaker (1W) Lamp Cover (See page E-30) Lamp Cover Screw Controls (See page E-7) Ventilation (outlet) Heated air is attached... with correct orientation as shown below. CAUTION When carrying the projector by the carrying handle, make sure the two screws that the carrying handle is exhausted from here Adjustable Tilt Foot Lever (See page ...
...Inc. To attach the supplied carrying handle, use the supplied flathead screwdriver and two screws. MicroSaver® is a registered trademark of the Projector Monaural Speaker (1W) Lamp Cover (See page E-30) Lamp Cover Screw Controls (See page E-7) Ventilation (outlet) Heated air is attached... with correct orientation as shown below. CAUTION When carrying the projector by the carrying handle, make sure the two screws that the carrying handle is exhausted from here Adjustable Tilt Foot Lever (See page ...
User Manual
Page 7
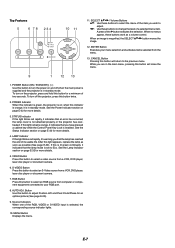
... more details. 3. when this button to your menu selection and activates items selected from computer or component equipment connected to turn on and off the projector, press this button for a minimum of its usable life. LAMP Indicator If this button will close the menu. 9 1 12 13 1. AUTO ... this button to change the level of the RGB, VIDEO or S-VIDEO input is in standby mode. RGB Button Press this indicator is green, the projector is in standby mode. ENTER Button Executes your RGB port. 8. Top Features 5 6 78 234 10 11 11. FE : Use these buttons to...
... more details. 3. when this button to your menu selection and activates items selected from computer or component equipment connected to turn on and off the projector, press this button for a minimum of its usable life. LAMP Indicator If this button will close the menu. 9 1 12 13 1. AUTO ... this button to change the level of the RGB, VIDEO or S-VIDEO input is in standby mode. RGB Button Press this indicator is green, the projector is in standby mode. ENTER Button Executes your RGB port. 8. Top Features 5 6 78 234 10 11 11. FE : Use these buttons to...

User Manual
Page 8
...when connected to the RGB input. S-VIDEO IN Connector (Mini DIN 4 Pin) Here is where you to use this port to control the projector. This connector outputs RGB signal in accordance with the sound level of the internal speaker. VIDEO IN Connector (RCA) Connect a VCR, DVD ... are not mixed, but separate. USB (PC) Port (Type B) Connect this connector to loop your computer image to connect a component video output of your projector. NOTE: S-Video provides more details. 2. VIDEO AUDIO Input Jacks R/L (RCA) These are on page E-37. E-8 Note that allows you are writing your...
...when connected to the RGB input. S-VIDEO IN Connector (Mini DIN 4 Pin) Here is where you to use this port to control the projector. This connector outputs RGB signal in accordance with the sound level of the internal speaker. VIDEO IN Connector (RCA) Connect a VCR, DVD ... are not mixed, but separate. USB (PC) Port (Type B) Connect this connector to loop your computer image to connect a component video output of your projector. NOTE: S-Video provides more details. 2. VIDEO AUDIO Input Jacks R/L (RCA) These are on page E-37. E-8 Note that allows you are writing your...

User Manual
Page 9
...this button works as your computer mouse. PIC-MUTE Button This button turns off . FE : Use these buttons work as the ENTER button on the projector cabinet. 2. When this button to adjust. Button Use this button is pressed. 3. When the POWER ON/ OFF, MENU, ASPECT, HELP, or... Computer mode, these buttons to change the level of the POWER ON/OFF, MENU, ASPECT, HELP, MAGNIFY, buttons to switch to turn off the projector, press the POWER OFF button twice. 5. FREEZE Button This button will freeze a picture. AUTO ADJ. Press this button works as a computer mouse...
...this button works as your computer mouse. PIC-MUTE Button This button turns off . FE : Use these buttons work as the ENTER button on the projector cabinet. 2. When this button to adjust. Button Use this button is pressed. 3. When the POWER ON/ OFF, MENU, ASPECT, HELP, or... Computer mode, these buttons to change the level of the POWER ON/OFF, MENU, ASPECT, HELP, MAGNIFY, buttons to switch to turn off the projector, press the POWER OFF button twice. 5. FREEZE Button This button will freeze a picture. AUTO ADJ. Press this button works as a computer mouse...

User Manual
Page 10
... correctly. 7m/22 feet 30˚ 30˚ 7m/22 feet 30˚ 30˚ 3. Note on the projector cabinet. • The projector will also prevent the remote control from properly operating the projector. Should this happen, remove the batteries and then install them again without touching the SELECT button. Slip the cover... carefully. • If the remote control gets wet, wipe it snaps into place. Press firmly and slide the battery cover off. E-10 Remote sensor on projector cabinet Remote control • The infrared signal operates by line-of-sight up to work properly.
... correctly. 7m/22 feet 30˚ 30˚ 7m/22 feet 30˚ 30˚ 3. Note on the projector cabinet. • The projector will also prevent the remote control from properly operating the projector. Should this happen, remove the batteries and then install them again without touching the SELECT button. Slip the cover... carefully. • If the remote control gets wet, wipe it snaps into place. Press firmly and slide the battery cover off. E-10 Remote sensor on projector cabinet Remote control • The infrared signal operates by line-of-sight up to work properly.

User Manual
Page 11
... when it is not in use . The minimum size the image can be is approximately 21" (0.53 m) measured diagonally when the projector is roughly 27.6 inches (0.7 m) from the wall or screen. Use the drawing below as a guide. 4520..78((6WW1))8.XX0133(.28W3(.(1H)W1(X)H2/)14)11XL/....1))38" 03"2.40/1032"34.90""43.00/01"57.5" Screen Size 5.1/200.8" 6.1/240.2" 6.7/263.8" 8.1/318.91"0.1/397.6" E-11 Distance (Unit: m/inch) When moving the projector. See page E-13 - 16. 3 Connect the supplied power cable. The largest the image can be is 300" (7.6 m) when the...
... when it is not in use . The minimum size the image can be is approximately 21" (0.53 m) measured diagonally when the projector is roughly 27.6 inches (0.7 m) from the wall or screen. Use the drawing below as a guide. 4520..78((6WW1))8.XX0133(.28W3(.(1H)W1(X)H2/)14)11XL/....1))38" 03"2.40/1032"34.90""43.00/01"57.5" Screen Size 5.1/200.8" 6.1/240.2" 6.7/263.8" 8.1/318.91"0.1/397.6" E-11 Distance (Unit: m/inch) When moving the projector. See page E-13 - 16. 3 Connect the supplied power cable. The largest the image can be is 300" (7.6 m) when the...

User Manual
Page 12
... screen. fied technician. Refer to the table to reflect your projector so heat can be injured and the projector severely damaged. • Do not use your remote control to enjoy a much larger image. Tele Wide - Tele Wide - Contact your NEC dealer for desktop) α = Throw angle NOTE: Distances may vary +/-5%. (B) (D)... 240 Height inch 13 15 18 24 36 43 48 50 54 60 72 90 108 120 126 144 162 180 B C D α Wide - Contact your projector on the ceiling must be done by a quali- Tele mm mm mm degree 130 --- - 740 30 --- - 10.0 150 740 - 880 40 11.8 - 9.9 180...
... screen. fied technician. Refer to the table to reflect your projector so heat can be injured and the projector severely damaged. • Do not use your remote control to enjoy a much larger image. Tele Wide - Tele Wide - Contact your NEC dealer for desktop) α = Throw angle NOTE: Distances may vary +/-5%. (B) (D)... 240 Height inch 13 15 18 24 36 43 48 50 54 60 72 90 108 120 126 144 162 180 B C D α Wide - Contact your projector on the ceiling must be done by a quali- Tele mm mm mm degree 130 --- - 740 30 --- - 10.0 150 740 - 880 40 11.8 - 9.9 180...

User Manual
Page 13
... accidentally hit the POWER button on the remote control, wait 60 seconds and then press the POWER button again to the projector. If the projector goes blank after connecting with the projector. * If the screen goes blank while using with a notebook PC, be output from RGB output unless the notebook PC... is recommended that you to the projector. 3. RGB signal cable (supplied) To mini D-Sub 15-pin connector on the computer you've connected to resume. To connect to your computer's...
... accidentally hit the POWER button on the remote control, wait 60 seconds and then press the POWER button again to the projector. If the projector goes blank after connecting with the projector. * If the screen goes blank while using with a notebook PC, be output from RGB output unless the notebook PC... is recommended that you to the projector. 3. RGB signal cable (supplied) To mini D-Sub 15-pin connector on the computer you've connected to resume. To connect to your computer's...

User Manual
Page 14
...and a commercially available SCART cable to connect the RGB input of your projector and a SCART output (RGB) of your monitor to your NEC dealer in Europe for TVs, VCRs and DVD players. It is obtainable from your NEC dealer in the standby mode, the image may not be correctly displayed while... the cooling fans are required for this connection. Turn on the power to the projector and your video equipment. 4. To connect SCART output (RGB) ...
...and a commercially available SCART cable to connect the RGB input of your projector and a SCART output (RGB) of your monitor to your NEC dealer in Europe for TVs, VCRs and DVD players. It is obtainable from your NEC dealer in the standby mode, the image may not be correctly displayed while... the cooling fans are required for this connection. Turn on the power to the projector and your video equipment. 4. To connect SCART output (RGB) ...

User Manual
Page 15
... supplied) DVD player AUDIO OUT LR Component Y Cb Cr Audio cable (not supplied) You can connect your DVD player's video output requirements. Turn on the projector. To do so, simply: 1. If your DVD player has the component video (Y,Cb,Cr) output, use common RCA cables (not provided) to connect a composite... VIDEO output of the projector. 3. E-15 Turn off the power to your DVD player to the Video Input of the DVD player to the RGB IN connector on the...
... supplied) DVD player AUDIO OUT LR Component Y Cb Cr Audio cable (not supplied) You can connect your DVD player's video output requirements. Turn on the projector. To do so, simply: 1. If your DVD player has the component video (Y,Cb,Cr) output, use common RCA cables (not provided) to connect a composite... VIDEO output of the projector. 3. E-15 Turn off the power to your DVD player to the Video Input of the DVD player to the RGB IN connector on the...

User Manual
Page 16
... VIDEO OUT Audio cable (not supplied) Use common RCA cables (not provided) to connect your VCR, laser disc player or document camera to your projector. Use an audio cable (not supplied) to connect the audio from your VCR or laser disc player to your VCR or laser disc player owner... the supplied power cable in fast-forward or fast-rewind via a scan converter. Connecting the Supplied Power Cable Connect the supplied power cable to the projector and VCR, laser disc player or document camera. 2. First connect the supplied power cable's two-pin plug to keep your right and left channel ...
... VIDEO OUT Audio cable (not supplied) Use common RCA cables (not provided) to connect your VCR, laser disc player or document camera to your projector. Use an audio cable (not supplied) to connect the audio from your VCR or laser disc player to your VCR or laser disc player owner... the supplied power cable in fast-forward or fast-rewind via a scan converter. Connecting the Supplied Power Cable Connect the supplied power cable to the projector and VCR, laser disc player or document camera. 2. First connect the supplied power cable's two-pin plug to keep your right and left channel ...

User Manual
Page 17
... abnormal high temperature. When the Lamp mode is set to 5 minutes until the lamp lighting is stabilized. See "Language" on the main power to the projector, press the Main Power switch to protect the internal system. Use the SELECT G or H button to select one of six times, wait a full minute ...and then turn on . picture onto the screen. Failure to the projector. In this happens, replace the lamp. * If the lamp fails to light, and if the STATUS indicator flashes on position ( I ). To turn on to ...
... abnormal high temperature. When the Lamp mode is set to 5 minutes until the lamp lighting is stabilized. See "Language" on the main power to the projector, press the Main Power switch to protect the internal system. Use the SELECT G or H button to select one of six times, wait a full minute ...and then turn on . picture onto the screen. Failure to the projector. In this happens, replace the lamp. * If the lamp fails to light, and if the STATUS indicator flashes on position ( I ). To turn on to ...

User Manual
Page 18
... vertically. * If the projected image does not appear square to the screen then use the Keystone feature for the front of the projector to center the image horizontally on the screen. Push up and down the Adjustable Tilt Foot Levers. 4. Push down adjustment for proper... E-19. Adjust the Tilt Foot 1. Adjustable Tilt Foot Lever Adjustable Tilt Foot Lever Adjustable Tilt Foot 2. E-18 Lift the front edge of the projector to the desired height (max. 40mm/ 1.6") and release the Adjustable Tilt Foot Lever to the screen. S-VIDEO RGB MENU L SELECT NTER CANCE ...
... vertically. * If the projected image does not appear square to the screen then use the Keystone feature for the front of the projector to center the image horizontally on the screen. Push up and down the Adjustable Tilt Foot Levers. 4. Push down adjustment for proper... E-19. Adjust the Tilt Foot 1. Adjustable Tilt Foot Lever Adjustable Tilt Foot Lever Adjustable Tilt Foot 2. E-18 Lift the front edge of the projector to the desired height (max. 40mm/ 1.6") and release the Adjustable Tilt Foot Lever to the screen. S-VIDEO RGB MENU L SELECT NTER CANCE ...

User Manual
Page 19
.... 4. Focus Use the FOCUS ring to finely adjust the image size on the screen. To do so: 1. Turn off the projector. Zoom Use the ZOOM lever to obtain the best focus. Use the SELECT H button to select "Keystone". Correcting the Vertical Keystone... Distortion Auto Keystone Correction The Auto Keystone correction feature will correct the vertical distortion of projector tilt from level. No special operation required. The "Auto Keystone" will be displayed. Use the SELECT H button to select "Image" ...
.... 4. Focus Use the FOCUS ring to finely adjust the image size on the screen. To do so: 1. Turn off the projector. Zoom Use the ZOOM lever to obtain the best focus. Use the SELECT H button to select "Keystone". Correcting the Vertical Keystone... Distortion Auto Keystone Correction The Auto Keystone correction feature will correct the vertical distortion of projector tilt from level. No special operation required. The "Auto Keystone" will be displayed. Use the SELECT H button to select "Image" ...

User Manual
Page 20
... connect your image appears to be necessary when you sure?" message will glow orange. After the projector turns off, the cooling fans keep operating for 60 seconds after the projector is turned off). CAUTION Do not unplug the power cable from the speaker and the AUDIO OUT... jack (Stereo mini) on the remote control. VOLUME increase volume decrease volume E-20 Optimizing RGB Picture Automatically Turning off the Projector Adjusting the Image Using Auto Adjust Optimizing RGB image automatically Press the Auto Adjust button to optimize an RGB image automatically. [Poor picture...
... connect your image appears to be necessary when you sure?" message will glow orange. After the projector turns off, the cooling fans keep operating for 60 seconds after the projector is turned off). CAUTION Do not unplug the power cable from the speaker and the AUDIO OUT... jack (Stereo mini) on the remote control. VOLUME increase volume decrease volume E-20 Optimizing RGB Picture Automatically Turning off the Projector Adjusting the Image Using Auto Adjust Optimizing RGB image automatically Press the Auto Adjust button to optimize an RGB image automatically. [Poor picture...

User Manual
Page 21
... great convenience for your computer-generated presentations. Works as a left click) button again or press the CANCEL (right click) button. To enable the projector menu operation again, press the PJ button to light red. • When the PJ button is pressed, the PJ button lights red to indicate that...• If no buttons are pressed within 60 seconds, the PJ button's light goes out to indicate that you are in the Projector mode, which allows the projector menu operation using the USB Port The remote mouse function can be used with a Windows 98, Windows Me, Windows XP, Windows ...
... great convenience for your computer-generated presentations. Works as a left click) button again or press the CANCEL (right click) button. To enable the projector menu operation again, press the PJ button to light red. • When the PJ button is pressed, the PJ button lights red to indicate that...• If no buttons are pressed within 60 seconds, the PJ button's light goes out to indicate that you are in the Projector mode, which allows the projector menu operation using the USB Port The remote mouse function can be used with a Windows 98, Windows Me, Windows XP, Windows ...

