
User Manual
Page 2
... is not supplied with any part inside of this manual carefully before using your projector carefully. For best results, use with the instructions, may cause harmful interference to prevent fire and shock. REFER SERVICING TO QUALIFIED NEC SERVICE PERSONNEL. Doing so can be easily accessible. This symbol warns the user that important information concerning the operation and maintenance of the unit. Your serial number is...
... is not supplied with any part inside of this manual carefully before using your projector carefully. For best results, use with the instructions, may cause harmful interference to prevent fire and shock. REFER SERVICING TO QUALIFIED NEC SERVICE PERSONNEL. Doing so can be easily accessible. This symbol warns the user that important information concerning the operation and maintenance of the unit. Your serial number is...
User Manual
Page 3
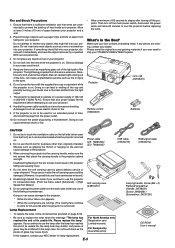
.... Enable High-Speed Fan mode if you ever need to use your dealer. Do no use it immediately and have the object removed by a qualified NEC service personnel. 3. Insufficient tightening of the following circumstances. What's in the lamp case. If the projector is possible to be scattered in the Box? Power cable (US: 7N080206) (EU: 7N080005) USB cable (7N520013) RGB signal cable (7N520012) 3. The projector is sufficient...
.... Enable High-Speed Fan mode if you ever need to use your dealer. Do no use it immediately and have the object removed by a qualified NEC service personnel. 3. Insufficient tightening of the following circumstances. What's in the lamp case. If the projector is possible to be scattered in the Box? Power cable (US: 7N080206) (EU: 7N080005) USB cable (7N520013) RGB signal cable (7N520012) 3. The projector is sufficient...
User Manual
Page 4
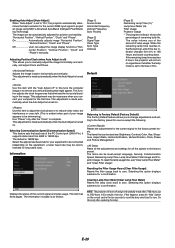
...Picture Management E-26 Image ...E-26 Enabling Auto Keystone [Auto Keystone E-26 Correcting Vertical Keystone Distortion Manually [Keystone E-26 Saving Vertical Keystone Correction [Keystone Save E-26 Selecting Aspect Ratio [Aspect Ratio E-27 Adjusting the Vertical Position of D-Sub RGB Input Connector E-35 Compatible Input Signal List E-36 PC Control Codes ...E-37 Cable Connection ...E-37 TravelCare Guide ...E-38 E-4 E-27 Setup ...E-27 Selecting Lamp Mode [Lamp Mode E-27 Selecting Menu Language [Language E-27 Selecting Menu Color [Menu Color Select E-27 Selecting Menu Display Time...
...Picture Management E-26 Image ...E-26 Enabling Auto Keystone [Auto Keystone E-26 Correcting Vertical Keystone Distortion Manually [Keystone E-26 Saving Vertical Keystone Correction [Keystone Save E-26 Selecting Aspect Ratio [Aspect Ratio E-27 Adjusting the Vertical Position of D-Sub RGB Input Connector E-35 Compatible Input Signal List E-36 PC Control Codes ...E-37 Cable Connection ...E-37 TravelCare Guide ...E-38 E-4 E-27 Setup ...E-27 Selecting Lamp Mode [Lamp Mode E-27 Selecting Menu Language [Language E-27 Selecting Menu Color [Menu Color Select E-27 Selecting Menu Display Time...

User Manual
Page 5
... to project precise images up to +/- 30 degrees • Low level operation noise • Short focal length lens • 205W lamp (164W Eco mode) : VT660K/VT460K 200W lamp (160W Eco mode) : VT560 • Direct keys for source selection • New Color Management system • New menu design improves operation • Safety protect by qualified technicians in accordance with NEC's Advanced AccuBlend on a ceiling*1. The remote control can control the projector with NEC...
... to project precise images up to +/- 30 degrees • Low level operation noise • Short focal length lens • 205W lamp (164W Eco mode) : VT660K/VT460K 200W lamp (160W Eco mode) : VT560 • Direct keys for source selection • New Color Management system • New menu design improves operation • Safety protect by qualified technicians in accordance with NEC's Advanced AccuBlend on a ceiling*1. The remote control can control the projector with NEC...
User Manual
Page 7
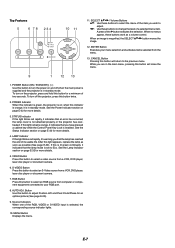
... a volume control. AUTO ADJ. FE : Use these buttons work as possible (See page E-30). When an image is in standby mode. After this indicator is green, the projector is selected, the corresponding source indicator lights. 10. S-VIDEO Button Press this button to select an S-Video source from computer or component equipment connected to the previous menu. A press of a selected menu item. To turn off when the main power is supplied and the projector is set to change the...
... a volume control. AUTO ADJ. FE : Use these buttons work as possible (See page E-30). When an image is in standby mode. After this indicator is green, the projector is selected, the corresponding source indicator lights. 10. S-VIDEO Button Press this button to select an S-Video source from computer or component equipment connected to the previous menu. A press of a selected menu item. To turn off when the main power is supplied and the projector is set to change the...

User Manual
Page 9
... time. S-VIDEO Button Press this button to the Projector mode and the PJ button lights red. PIC-MUTE Button This button turns off . MAGNIFY (+)(-) Button Use this button to adjust the image size up to select RGB input. 8. If no menus appear, these buttons work as your projector off the image and sound for a minimum of 2 seconds, the drag mode is indicated by lighting the PJ button: It works the same way as a computer mouse. A press of the screen. RGB Button...
... time. S-VIDEO Button Press this button to the Projector mode and the PJ button lights red. PIC-MUTE Button This button turns off . MAGNIFY (+)(-) Button Use this button to adjust the image size up to select RGB input. 8. If no menus appear, these buttons work as your projector off the image and sound for a minimum of 2 seconds, the drag mode is indicated by lighting the PJ button: It works the same way as a computer mouse. A press of the screen. RGB Button...

User Manual
Page 13
... Macintosh, simply: 1. If the projector goes blank after connecting with the projector. * If the screen goes blank while using with a notebook PC, be the result of inactivity, it may be caused by a screen saver installed on the remote control, wait 60 seconds and then press the POWER button again to the projector. Use the supplied signal cable to connect your Mac's video port. PHONE IBM VGA or Compatibles (Notebook type) or...
... Macintosh, simply: 1. If the projector goes blank after connecting with the projector. * If the screen goes blank while using with a notebook PC, be the result of inactivity, it may be caused by a screen saver installed on the remote control, wait 60 seconds and then press the POWER button again to the projector. Use the supplied signal cable to connect your Mac's video port. PHONE IBM VGA or Compatibles (Notebook type) or...

User Manual
Page 17
... turn on the projector, screen flicker may cause damage to execute the selection. Wait 3 to 5 minutes until the lamp lighting is set to Eco, the Lamp indicator will the power indicator turn on the remote control for the menu. Only after turning on the main power to the projector, press the Main Power switch to project a 2. Use the SELECT G or H button to select one of usable life, the projector will not turn to green and the projector become...
... turn on the projector, screen flicker may cause damage to execute the selection. Wait 3 to 5 minutes until the lamp lighting is set to Eco, the Lamp indicator will the power indicator turn on the remote control for the menu. Only after turning on the main power to the projector, press the Main Power switch to project a 2. Use the SELECT G or H button to select one of usable life, the projector will not turn to green and the projector become...

User Manual
Page 18
..., the projector will display a blue background (factory preset). Using the cabinet buttons Move the projector left sides of the projector. Adjust the Tilt Foot 1. Selecting a Source Selecting the computer or video source Using the Remote Control OFF ON POWER VIDEO AUTO ADJ. PICTURE ASPECT HELP FREEZE PIC-MUTE MAGNIFY VOLUME Adjusting the Picture Size and Position Place your projector on the screen. Lift the front edge of the projector to center the image vertically. * If the projected image does...
..., the projector will display a blue background (factory preset). Using the cabinet buttons Move the projector left sides of the projector. Adjust the Tilt Foot 1. Selecting a Source Selecting the computer or video source Using the Remote Control OFF ON POWER VIDEO AUTO ADJ. PICTURE ASPECT HELP FREEZE PIC-MUTE MAGNIFY VOLUME Adjusting the Picture Size and Position Place your projector on the screen. Lift the front edge of the projector to center the image vertically. * If the projected image does...

User Manual
Page 21
...) button. Works as the CANCEL button on the projector. Not lit OFF ON POWER VIDEO AUTO ADJ. During Computer mode: In Computer mode, by pressing the ENTER button for clicking through your computer-generated presentations. E-21 Lit red • When the MENU button is lit, if you want to use the supplied USB cable to connect the USB port (PC) of the projector and the USB port (type A) of connection or OS installed on the projector. Works...
...) button. Works as the CANCEL button on the projector. Not lit OFF ON POWER VIDEO AUTO ADJ. During Computer mode: In Computer mode, by pressing the ENTER button for clicking through your computer-generated presentations. E-21 Lit red • When the MENU button is lit, if you want to use the supplied USB cable to connect the USB port (PC) of the projector and the USB port (type A) of connection or OS installed on the projector. Works...

User Manual
Page 26
... User User adjustable Enabling Auto Keystone [Auto Keystone] This feature allows the projector to detect its tilt and correct vertical distortion automatically. The red level is used to the incoming signal. There are saved when the projector is only valid for Video and Component inputs (not valid for : Dynamic ......... Recommended for RGB). You can save your change once affects all sources. Saving your current keystone settings. The changes are 5 factory...
... User User adjustable Enabling Auto Keystone [Auto Keystone] This feature allows the projector to detect its tilt and correct vertical distortion automatically. The red level is used to the incoming signal. There are saved when the projector is only valid for Video and Component inputs (not valid for : Dynamic ......... Recommended for RGB). You can save your change once affects all sources. Saving your current keystone settings. The changes are 5 factory...

User Manual
Page 27
... available. Selecting Menu Color [Menu Color Select] You can be set to display a black/ blue screen or logo when no signal is the default setting (100% Brightness). Selecting a Color or Logo for Cinema only) This feature adjusts the vertical position of the image when viewing video with higher resolution than the projector's native resolution, "Native" is entered, the projector cannot project an image. The options are "Manual", "Auto 5 sec", "Auto 15 sec", and "Auto 45 sec...
... available. Selecting Menu Color [Menu Color Select] You can be set to display a black/ blue screen or logo when no signal is the default setting (100% Brightness). Selecting a Color or Logo for Cinema only) This feature adjusts the vertical position of the image when viewing video with higher resolution than the projector's native resolution, "Native" is entered, the projector cannot project an image. The options are "Manual", "Auto 5 sec", "Auto 15 sec", and "Auto 45 sec...

User Manual
Page 28
... the image quality by setting the main power switch to "O" or unplugging the power cable). * If you to select two modes for a component video source such as a computer, or "Component" for fan speed: high-speed mode and normal speed mode. Selecting Signal Format [Signal Select] Allows you to select composite video standards manually. This must be displayed. 2. When the Security function is enabled and the projector is no input for...
... the image quality by setting the main power switch to "O" or unplugging the power cable). * If you to select two modes for a component video source such as a computer, or "Component" for fan speed: high-speed mode and normal speed mode. Selecting Signal Format [Signal Select] Allows you to select composite video standards manually. This must be displayed. 2. When the Security function is enabled and the projector is no input for...
User Manual
Page 29
... the PC Control port (DIN 8 Pin). Reset all the adjustments and settings for a confirmation. Selecting this option displays submenu for the first time. The default is turned on the equipment, a lower baud rate may be automatically adjusted for the current signal to 100 Hours and starts counting down. Displays the status of remaining bulb life. This adjustment is made automatically when the Auto Adjust is 19200 bps. Adjusts the image location horizontally and...
... the PC Control port (DIN 8 Pin). Reset all the adjustments and settings for a confirmation. Selecting this option displays submenu for the first time. The default is turned on the equipment, a lower baud rate may be automatically adjusted for the current signal to 100 Hours and starts counting down. Displays the status of remaining bulb life. This adjustment is made automatically when the Auto Adjust is 19200 bps. Adjusts the image location horizontally and...
User Manual
Page 30
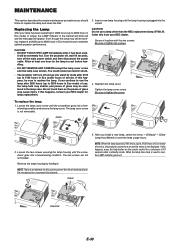
... mode) hours of electrical shock. Tighten the lamp cover screw. Loosen the lamp cover screw until the screwdriver goes into stand by holding it has been used. wheeling condition and remove the lamp cover. Replacing the Lamp After your lamp has been operating for a minimum of service, the projector cannot turn on and the menu is an interlock on the remote control for 2000 hours (up to 3100 hours in the cabinet will blink red and the message...
... mode) hours of electrical shock. Tighten the lamp cover screw. Loosen the lamp cover screw until the screwdriver goes into stand by holding it has been used. wheeling condition and remove the lamp cover. Replacing the Lamp After your lamp has been operating for a minimum of service, the projector cannot turn on and the menu is an interlock on the remote control for 2000 hours (up to 3100 hours in the cabinet will blink red and the message...
User Manual
Page 31
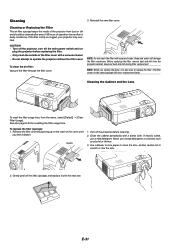
... will damage the filter membrane. Before replacing the filter, remove dust and dirt from the menu, select [Default] → [Clear Filter Usage]. Keep out dust and dirt during filter replacement. The filter comes in dusty conditions). Cleaning the Cabinet and the Lens To reset the filter usage time, from the projector cabinet. See also page E-29 for resetting the filter usage time. Turn off the main power switch and un- Clean the cabinet periodically...
... will damage the filter membrane. Before replacing the filter, remove dust and dirt from the menu, select [Default] → [Clear Filter Usage]. Keep out dust and dirt during filter replacement. The filter comes in dusty conditions). Cleaning the Cabinet and the Lens To reset the filter usage time, from the projector cabinet. See also page E-29 for resetting the filter usage time. Turn off the main power switch and un- Clean the cabinet periodically...
User Manual
Page 32
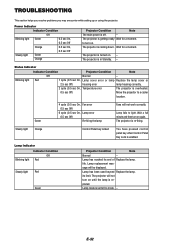
... not work correctly. Lamp has been used beyond Replace the lamp. TROUBLESHOOTING This section helps you resolve problems you may encounter while setting up or using the projector. The projector is enabled. Green 4 cycle (0.5 sec On, Fan error 0.5 sec Off) 6 cycle (0.5 sec On, Lamp error 0.5 sec Off) Re-firing the lamp Fans will be displayed. its end of Replace the lamp. Lamp mode is off. - Lamp fails to a cooler location. Lamp Indicator Blinking light Indicator Condition Off Red Steady light Red Green Projector Condition Note Normal - Power Indicator Indicator...
... not work correctly. Lamp has been used beyond Replace the lamp. TROUBLESHOOTING This section helps you resolve problems you may encounter while setting up or using the projector. The projector is enabled. Green 4 cycle (0.5 sec On, Fan error 0.5 sec Off) 6 cycle (0.5 sec On, Lamp error 0.5 sec Off) Re-firing the lamp Fans will be displayed. its end of Replace the lamp. Lamp mode is off. - Lamp fails to a cooler location. Lamp Indicator Blinking light Indicator Condition Off Red Steady light Red Green Projector Condition Note Normal - Power Indicator Indicator...
User Manual
Page 33
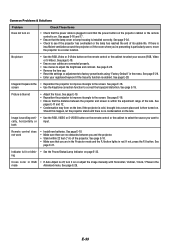
... ventilation around the projector or if the room where you are connected properly. • Use menus to correct the trapezoid distortion. Picture is particularly warm, move the projector to the screen. Common Problems & Solutions Problem Does not turn it on or adjust the image manually with Horizontal / Vertical / Clock / Phase in the mode Advanced menu. See page E-30. • Check to factory preset levels using "Factory Default" in the...
... ventilation around the projector or if the room where you are connected properly. • Use menus to correct the trapezoid distortion. Picture is particularly warm, move the projector to the screen. Common Problems & Solutions Problem Does not turn it on or adjust the image manually with Horizontal / Vertical / Clock / Phase in the mode Advanced menu. See page E-30. • Check to factory preset levels using "Factory Default" in the...
User Manual
Page 34
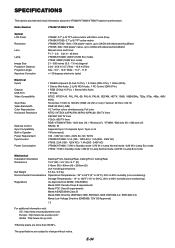
... 99.99%. Model Number VT660K/VT460K/VT560 Optical LCD Panel Resolution Lens Lamp Image Size Projection Distance Projection Angle Keystone Correction VT660K: 0.7" p-Si TFT active-matrix with Micro Lens Array VT460K/VT560: 0.7" p-Si TFT active-matrix VT660K/VT560: 1024ן768 pixels* native, up to UXGA with Advanced AccuBlend VT460K: 800ן600 pixels* native, up to UXGA with Advanced AccuBlend Manual zoom and focus: F1...
... 99.99%. Model Number VT660K/VT460K/VT560 Optical LCD Panel Resolution Lens Lamp Image Size Projection Distance Projection Angle Keystone Correction VT660K: 0.7" p-Si TFT active-matrix with Micro Lens Array VT460K/VT560: 0.7" p-Si TFT active-matrix VT660K/VT560: 1024ן768 pixels* native, up to UXGA with Advanced AccuBlend VT460K: 800ן600 pixels* native, up to UXGA with Advanced AccuBlend Manual zoom and focus: F1...
User Manual
Page 41
... a Warranty repair, but will Inform estimation of actual service cost to the Enduser with Loan: (This service is limited to some Service Stations) This service is $200.00 USD for service. If you will be done by NEC Authorized Service Stations. Warranty Exclusions: This program does not apply if the Projector's serial number has been defaced, modified or removed. Customer keeps the inoperable...
... a Warranty repair, but will Inform estimation of actual service cost to the Enduser with Loan: (This service is limited to some Service Stations) This service is $200.00 USD for service. If you will be done by NEC Authorized Service Stations. Warranty Exclusions: This program does not apply if the Projector's serial number has been defaced, modified or removed. Customer keeps the inoperable...

