
42XM2/50XM3/61XM2
Page 5
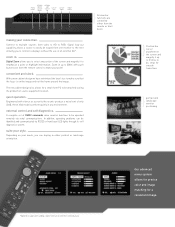
.... The new cabinet design also allows for a small form PC to more than 4 monitors simultaneously. Engineered with push button ease from the remote or front bezel. All monitor functions are controlled either portrait or landscape orientation. zoom in any portion of only 22dB, these XGA models perform... quietly in . Zoom in either from the remote control to make sure that the focus is on the screen and magnify it to easily be operated remotely via RS232 or front bezel LED lights through its self diagnostics system. A complete set...
.... The new cabinet design also allows for a small form PC to more than 4 monitors simultaneously. Engineered with push button ease from the remote or front bezel. All monitor functions are controlled either portrait or landscape orientation. zoom in any portion of only 22dB, these XGA models perform... quietly in . Zoom in either from the remote control to make sure that the focus is on the screen and magnify it to easily be operated remotely via RS232 or front bezel LED lights through its self diagnostics system. A complete set...
42XM2/50XM3/61XM2
Page 6
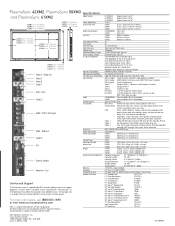
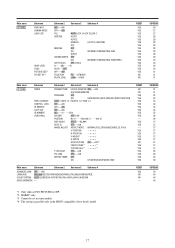
...Itasca, IL 60143-1248 NEC 080320 Plug & Play Power Requirements Power Consumption Standby Power Dimensions (WxHxD) without base Weight Environmental Considerations Warranty Regulatory Included Accessories Optional Accessories PX-61XM2A Diagonal Screen Size 61" PX-50XM3A Diagonal Screen Size 50" PX-42XM2A Diagonal Screen Size ... 768 61XM2 0.99mm x 0.99mm 50XM3 0.81mm x 0.81mm 42XM2 0.897mm x 0.675mm Yes Yes AR - On mode, Control Lock, IR Remote, Loop Out, ID Number Video Wall Advanced OSM, Language, Color System, Source Information DDC1, DDC2B (RGB3 is DDC2B only) 120V 50/60...
...Itasca, IL 60143-1248 NEC 080320 Plug & Play Power Requirements Power Consumption Standby Power Dimensions (WxHxD) without base Weight Environmental Considerations Warranty Regulatory Included Accessories Optional Accessories PX-61XM2A Diagonal Screen Size 61" PX-50XM3A Diagonal Screen Size 50" PX-42XM2A Diagonal Screen Size ... 768 61XM2 0.99mm x 0.99mm 50XM3 0.81mm x 0.81mm 42XM2 0.897mm x 0.675mm Yes Yes AR - On mode, Control Lock, IR Remote, Loop Out, ID Number Video Wall Advanced OSM, Language, Color System, Source Information DDC1, DDC2B (RGB3 is DDC2B only) 120V 50/60...
42VP4/42XM2/50XM3/61XM2
Page 2
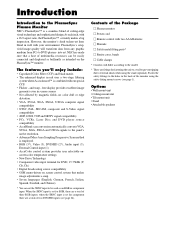
... • Ceiling mount unit • Tilt mount unit • Stand • Attachable speakers Introduction Introduction to the PlasmaSync Plasma Monitor NEC's PlasmaSync™ is a seamless blend of the monitor using the stand (optional). PlasmaSync's crisp, vivid image quality will differ according to...Spanish, Swedish, and Chinese) * You can be used as an RGB or component input. NEC has made sure that a host of the Package Ⅺ Plasma monitor Ⅺ Power cord Ⅺ Remote control with our special CCF. • Flicker - Contents of multimedia resources can set for...
... • Ceiling mount unit • Tilt mount unit • Stand • Attachable speakers Introduction Introduction to the PlasmaSync Plasma Monitor NEC's PlasmaSync™ is a seamless blend of the monitor using the stand (optional). PlasmaSync's crisp, vivid image quality will differ according to...Spanish, Swedish, and Chinese) * You can be used as an RGB or component input. NEC has made sure that a host of the Package Ⅺ Plasma monitor Ⅺ Power cord Ⅺ Remote control with our special CCF. • Flicker - Contents of multimedia resources can set for...
42VP4/42XM2/50XM3/61XM2
Page 7
...safety metal fittings 1 Part Names and Function 2 Front View 2 Rear View / Terminal Board 3 Remote Control 4 Battery Installation and Replacement 5 Using the wired remote control mode 6 Operating Range 6 Handling the remote control 6 Installation 7 Connecting Your PC or Macintosh Computer 8 Connections with Equipment that have a ...32 Using the timer 32 Setting the power on mode 33 Enabling/disabling the front panel controls 34 Enabling/disabling remote control wireless transmission 34 Loop Out setting 35 ID number setting 35 Video Wall setting 36 Advanced OSM Settings Menu...
...safety metal fittings 1 Part Names and Function 2 Front View 2 Rear View / Terminal Board 3 Remote Control 4 Battery Installation and Replacement 5 Using the wired remote control mode 6 Operating Range 6 Handling the remote control 6 Installation 7 Connecting Your PC or Macintosh Computer 8 Connections with Equipment that have a ...32 Using the timer 32 Setting the power on mode 33 Enabling/disabling the front panel controls 34 Enabling/disabling remote control wireless transmission 34 Loop Out setting 35 ID number setting 35 Video Wall setting 36 Advanced OSM Settings Menu...

42VP4/42XM2/50XM3/61XM2
Page 9
... Receives the signals from the remote control. The available inputs depend on Lights green. Functions as the CURSOR (v/ w) buttons in the On-Screen Menu (OSM) mode. Functions as the CURSOR buttons ...
... Receives the signals from the remote control. The available inputs depend on Lights green. Functions as the CURSOR (v/ w) buttons in the On-Screen Menu (OSM) mode. Functions as the CURSOR buttons ...
42VP4/42XM2/50XM3/61XM2
Page 10
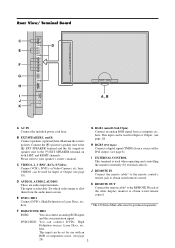
.... Set which video image to allot them from a computer, etc. here. K REMOTE OUT Connect the remote cable* to the REMOTE IN jack of the other display monitor to obtain wired remote control. L (MONO) L (MONO) L (MONO) VIDEO 3 REMOTE External Control OUT IN DV I ( Digital RGB ) RGB 1 (IN / OUT...owner's manual. here. Please refer to the EXT SPEAKER terminal on both LEFT and RIGHT channels. here. J REMOTE IN Connect the remote cable* to the remote control's remote jack to obtain wired remote control. * The 1/8 Stereo Mini cable must be used for use with a DVI output. (see page ...
.... Set which video image to allot them from a computer, etc. here. K REMOTE OUT Connect the remote cable* to the REMOTE IN jack of the other display monitor to obtain wired remote control. L (MONO) L (MONO) L (MONO) VIDEO 3 REMOTE External Control OUT IN DV I ( Digital RGB ) RGB 1 (IN / OUT...owner's manual. here. Please refer to the EXT SPEAKER terminal on both LEFT and RIGHT channels. here. J REMOTE IN Connect the remote cable* to the remote control's remote jack to obtain wired remote control. * The 1/8 Stereo Mini cable must be used for use with a DVI output. (see page ...
42VP4/42XM2/50XM3/61XM2
Page 11
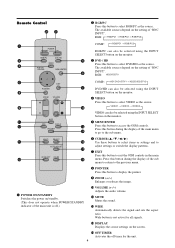
Remote Control w RGB/PC Press this button to select RGB/PC as the source. RGB: → RGB/PC1 → RGB/PC2 → RGB/PC3 POWER STANDBY ...
Remote Control w RGB/PC Press this button to select RGB/PC as the source. RGB: → RGB/PC1 → RGB/PC2 → RGB/PC3 POWER STANDBY ...
42VP4/42XM2/50XM3/61XM2
Page 12
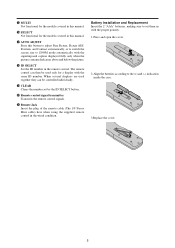
... they can then be controlled individually. !9 CLEAR Clears the number set them in with the proper polarity. 1.Press and open the cover. 2. The remote control can be used only for the models covered in this manual. !7 AUTO ADJUST Press this button to adjust Fine Picture, Picture ADJ, Position,... the superimposed caption displayed fully only when the picture contains dark areas above and below the picture. !8 ID SELECT Set the ID number in the remote control. !5 MULTI Not functional for the models covered in this manual. !6 SELECT Not functional for a display with the same ID number. Align ...
... they can then be controlled individually. !9 CLEAR Clears the number set them in with the proper polarity. 1.Press and open the cover. 2. The remote control can be used only for the models covered in this manual. !7 AUTO ADJUST Press this button to adjust Fine Picture, Picture ADJ, Position,... the superimposed caption displayed fully only when the picture contains dark areas above and below the picture. !8 ID SELECT Set the ID number in the remote control. !5 MULTI Not functional for the models covered in this manual. !6 SELECT Not functional for a display with the same ID number. Align ...
42VP4/42XM2/50XM3/61XM2
Page 13
... separately. AUDIO 2 L (MONO) R R/ Cr/Pr G/ Y External Control RGB2 / DVD2 / HD2 B/ Cb/Pb HD VD RGB 1 (IN / OUT) IN REMOTE AUDIO 3 R L (MONO) OUT RGB 3 DV I ( Digital RGB ) External Control IN REMOTE OUT Remote Control Cable* To Remote Jack POWER/STANDBY Approx. 7m / 23ft * The 1/8 Stereo Mini cable must be operated even if no batteries are...
... separately. AUDIO 2 L (MONO) R R/ Cr/Pr G/ Y External Control RGB2 / DVD2 / HD2 B/ Cb/Pb HD VD RGB 1 (IN / OUT) IN REMOTE AUDIO 3 R L (MONO) OUT RGB 3 DV I ( Digital RGB ) External Control IN REMOTE OUT Remote Control Cable* To Remote Jack POWER/STANDBY Approx. 7m / 23ft * The 1/8 Stereo Mini cable must be operated even if no batteries are...
42VP4/42XM2/50XM3/61XM2
Page 17
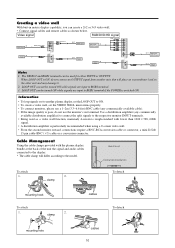
...video wall With buit-in matrix display capability, you can create a 2×2 or 3×3 video wall. • Connect signal cables and remote cables as a video wall function, maximaly 4-screen is rough-standard with the plasma display, bundle at the back of the unit mounting hooks/...VIDEO 1 ( I N / OUT) VIDEO 2 BNC connector OUT VIDEO Signal RGB signal/ IN DVD/HD signal AUDIO 1 R L (MONO) Y DVD1 Remote IN control REMOTE OUT IN OUT Remote control Remote IN control REMOTE OUT IN RGB 1 (IN / OUT) VD Cb/Pb HD Y Cr/Pr B/ G/ R/ RGB2 / DVD2 / HD2 OUT RGB signal/ DVD/HD ...
...video wall With buit-in matrix display capability, you can create a 2×2 or 3×3 video wall. • Connect signal cables and remote cables as a video wall function, maximaly 4-screen is rough-standard with the plasma display, bundle at the back of the unit mounting hooks/...VIDEO 1 ( I N / OUT) VIDEO 2 BNC connector OUT VIDEO Signal RGB signal/ IN DVD/HD signal AUDIO 1 R L (MONO) Y DVD1 Remote IN control REMOTE OUT IN OUT Remote control Remote IN control REMOTE OUT IN RGB 1 (IN / OUT) VD Cb/Pb HD Y Cr/Pr B/ G/ R/ RGB2 / DVD2 / HD2 OUT RGB signal/ DVD/HD ...

42VP4/42XM2/50XM3/61XM2
Page 18
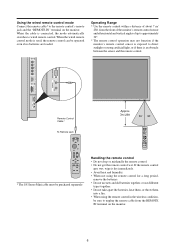
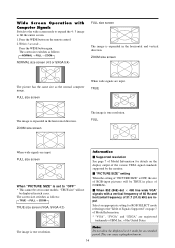
... VOLUME button (on the unit. Press the POINTER button to the desired level. Press the POWER STANDBY button (on the remote control) or the Power button (on the remote control or the unit) to decrease to display the pointer. ( ) To change the size of the picture automatically: Press...RGB (motion picture), VIDEO, or Y/Pb/Pr (component) input is not pressed for approximately three seconds, the menu turns off the unit with the remote control). Press the POINTER button to restore. The monitor's POWER/STANDBY indicator turns red and the standby mode is set (only when turning off ....
... VOLUME button (on the unit. Press the POINTER button to the desired level. Press the POWER STANDBY button (on the remote control) or the Power button (on the remote control or the unit) to decrease to display the pointer. ( ) To change the size of the picture automatically: Press...RGB (motion picture), VIDEO, or Y/Pb/Pr (component) input is not pressed for approximately three seconds, the menu turns off the unit with the remote control). Press the POINTER button to restore. The monitor's POWER/STANDBY indicator turns red and the standby mode is set (only when turning off ....
42VP4/42XM2/50XM3/61XM2
Page 20
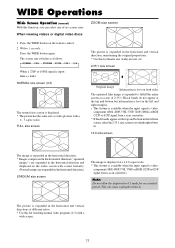
...). Note: Do not allow the displayed in 4:3 mode for theater size (wide) movies, etc. 2.35:1 size screen Ł Original image Information is lost on the remote control. 2. The squeezed film image is displayed. * The picture has the same size as video pictures with a wide screen. 13 Press the WIDE button on...
...). Note: Do not allow the displayed in 4:3 mode for theater size (wide) movies, etc. 2.35:1 size screen Ł Original image Information is lost on the remote control. 2. The squeezed film image is displayed. * The picture has the same size as video pictures with a wide screen. 13 Press the WIDE button on...
42VP4/42XM2/50XM3/61XM2
Page 21
... cases. Wide Screen Operation with a vertical frequency of 60 Hz and horizontal frequency of 31.7 (31.0) kHz are registered trademarks of Signals Supported" on the remote control. 2. ZOOM size screen The picture has the same size as follows: → TRUE → FULL → ZOOM TRUE size screen (VGA, SVGA 4:3) Information Ⅵ...
... cases. Wide Screen Operation with a vertical frequency of 60 Hz and horizontal frequency of 31.7 (31.0) kHz are registered trademarks of Signals Supported" on the remote control. 2. ZOOM size screen The picture has the same size as follows: → TRUE → FULL → ZOOM TRUE size screen (VGA, SVGA 4:3) Information Ⅵ...
42VP4/42XM2/50XM3/61XM2
Page 22
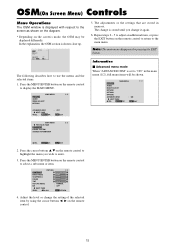
... adjustments or the settings that are stored in the main menu (1/2), full menu items will be displayed differently. Press the MENU/ENTER button on the remote control to return to "ON" in memory. MAIN MENU 1 / 2 PICTURE AUDIO IMAGE ADJUST OPTION1 ADVANCED OSM NEXT PAGE SEL. MENU/ENTER OK EXIT ...to enter. 3. MENU/ENTER OK : OFF EXIT EXIT The following describes how to the screen as shown on the diagram. * Depending on the remote control. 15 EXIT RETURN 4. OSM(On Screen Menu) Controls Menu Operations The OSM window is stored until you wish to display the MAIN MENU. ...
... adjustments or the settings that are stored in the main menu (1/2), full menu items will be displayed differently. Press the MENU/ENTER button on the remote control to return to "ON" in memory. MAIN MENU 1 / 2 PICTURE AUDIO IMAGE ADJUST OPTION1 ADVANCED OSM NEXT PAGE SEL. MENU/ENTER OK EXIT ...to enter. 3. MENU/ENTER OK : OFF EXIT EXIT The following describes how to the screen as shown on the diagram. * Depending on the remote control. 15 EXIT RETURN 4. OSM(On Screen Menu) Controls Menu Operations The OSM window is stored until you wish to display the MAIN MENU. ...
42VP4/42XM2/50XM3/61XM2
Page 24
... YES YES YES YES YES YES YES YES YES YES YES NO NO Main menu OPTION3 Sub menu TIMER PWR. ON MODE CONTROL LOCK IR REMOTE LOOP OUT ID NUMBER VIDEO WALL Sub menu 2 Sub menu 3 Sub menu 4 PRESENT TIME DAYLIGHT SAIVING TIME OFF←→ON DAY/HOUR/MINUTES PROGRAM...
... YES YES YES YES YES YES YES YES YES YES YES NO NO Main menu OPTION3 Sub menu TIMER PWR. ON MODE CONTROL LOCK IR REMOTE LOOP OUT ID NUMBER VIDEO WALL Sub menu 2 Sub menu 3 Sub menu 4 PRESENT TIME DAYLIGHT SAIVING TIME OFF←→ON DAY/HOUR/MINUTES PROGRAM...

42VP4/42XM2/50XM3/61XM2
Page 29
... the ᮤ and ᮣ buttons. Example: Setting "AUDIO INPUT1" to select "VIDEO2". ADJ. Setting the allocation of "BNC INPUT". EXIT RETURN * The settings on the remote control. 2. EXIT RETURN 3. SEL. To continue making other settings to select "AUDIO INPUT1". 3. IMAGE ADJUST ASPECT MODE : NORMAL V-POSITION H-POSITION V-HEIGHT H-WIDTH AUTO PICTURE : OFF...
... the ᮤ and ᮣ buttons. Example: Setting "AUDIO INPUT1" to select "VIDEO2". ADJ. Setting the allocation of "BNC INPUT". EXIT RETURN * The settings on the remote control. 2. EXIT RETURN 3. SEL. To continue making other settings to select "AUDIO INPUT1". 3. IMAGE ADJUST ASPECT MODE : NORMAL V-POSITION H-POSITION V-HEIGHT H-WIDTH AUTO PICTURE : OFF...
42VP4/42XM2/50XM3/61XM2
Page 30
... not ON). Ⅵ OSM ADJUST settings Adjusts the position of the menu when it appears on the screen. Option1 Settings Menu Setting the on the remote control for moving pictures on -screen menu does not appear. Example: Turning the DISPLAY OSM off , the Fine Picture and the Picture ADJ. On the...
... not ON). Ⅵ OSM ADJUST settings Adjusts the position of the menu when it appears on the screen. Option1 Settings Menu Setting the on the remote control for moving pictures on -screen menu does not appear. Example: Turning the DISPLAY OSM off , the Fine Picture and the Picture ADJ. On the...

42VP4/42XM2/50XM3/61XM2
Page 40
..." to "ON" in the FUNCTION field A hyphen "-" means last mode (the mode that you wish to select "VIDEO2". ON MODE : VIDEO2 CONTROL LOCK : OFF IR REMOTE : ON LOOP OUT : OFF ID NUMBER : ALL VIDEO WALL SEL. Perform Steps 1-2 of the week (e.g. The "PROGRAM TIMER" screen appears. 5. EXIT RETURN • An asterisk...
..." to "ON" in the FUNCTION field A hyphen "-" means last mode (the mode that you wish to select "VIDEO2". ON MODE : VIDEO2 CONTROL LOCK : OFF IR REMOTE : ON LOOP OUT : OFF ID NUMBER : ALL VIDEO WALL SEL. Perform Steps 1-2 of the week (e.g. The "PROGRAM TIMER" screen appears. 5. EXIT RETURN • An asterisk...

42VP4/42XM2/50XM3/61XM2
Page 41
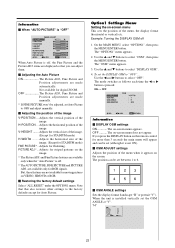
..."OPTION3", then press the MENU/ENTER button. EXIT RETURN Information Ⅵ CONTROL LOCK settings ON ...... OFF .... EXIT RETURN Information Ⅵ IR REMOTE settings ON ...... Enables the buttons on the front panel. * Even when the CONTROL LOCK is set, the POWER switch will not be locked. ...* This becomes effective when the on the front panel. To set the CONTROL LOCK to select "IR REMOTE". 3. OFF .... RGB input mode. Disables the buttons on -screen menu goes out. Ⅵ Restoring the factory default settings Select "ALL...
..."OPTION3", then press the MENU/ENTER button. EXIT RETURN Information Ⅵ CONTROL LOCK settings ON ...... OFF .... EXIT RETURN Information Ⅵ IR REMOTE settings ON ...... Enables the buttons on the front panel. * Even when the CONTROL LOCK is set, the POWER switch will not be locked. ...* This becomes effective when the on the front panel. To set the CONTROL LOCK to select "IR REMOTE". 3. OFF .... RGB input mode. Disables the buttons on -screen menu goes out. Ⅵ Restoring the factory default settings Select "ALL...

42VP4/42XM2/50XM3/61XM2
Page 42
... menu (1/ 2), then perform the following operations. 1. EXIT RETURN Information Ⅵ LOOP OUT settings ON ...... ON MODE : LAST CONTROL LOCK : OFF IR REMOTE : ON LOOP OUT : OFF ID NUMBER : 2 VIDEO WALL SEL. Note that this also restores other settings to select "ID NUMBER". 3. To set...2. The mode switches as follows each time the ᮤ or ᮣ button is present at the same time. To set ID NUMBER for the remote control Example: Setting "2" 1. ADJ. button is pressed: OFF ↔ ON OPTION3 3 / 3 PREVIOUS PAGE TIMER PWR. ID NUMBER will be set...
... menu (1/ 2), then perform the following operations. 1. EXIT RETURN Information Ⅵ LOOP OUT settings ON ...... ON MODE : LAST CONTROL LOCK : OFF IR REMOTE : ON LOOP OUT : OFF ID NUMBER : 2 VIDEO WALL SEL. Note that this also restores other settings to select "ID NUMBER". 3. To set...2. The mode switches as follows each time the ᮤ or ᮣ button is present at the same time. To set ID NUMBER for the remote control Example: Setting "2" 1. ADJ. button is pressed: OFF ↔ ON OPTION3 3 / 3 PREVIOUS PAGE TIMER PWR. ID NUMBER will be set...


