
42XM2/50XM3/61XM2
Page 6
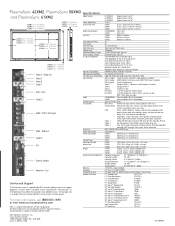
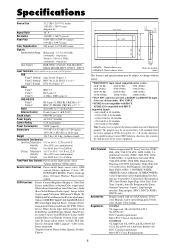
... Signal Compatibility HD Video Signal Compatibility Input Terminals Audio External Control User Controls RGB2 / DVD2 / HD2 Input RGB1 / RGB Out Audio 3 DVI External Control Remote In / Out Service and Support The PlasmaSync series is supported by NEC's industry leading service and support programs. It comes with 5BNC Y/Pb/Pr input,selectable) 61XM2/50XM3 Internal amplifier, 9W x 2 output power 42XM2 Internal amplifier, 8W x 2 output power 9-pin mini D-Sub, RS232 Direct Access Power on/off, input selection, volume up/down, OSM access Remote Control Power on /off -timer, OSM control...
... Signal Compatibility HD Video Signal Compatibility Input Terminals Audio External Control User Controls RGB2 / DVD2 / HD2 Input RGB1 / RGB Out Audio 3 DVI External Control Remote In / Out Service and Support The PlasmaSync series is supported by NEC's industry leading service and support programs. It comes with 5BNC Y/Pb/Pr input,selectable) 61XM2/50XM3 Internal amplifier, 9W x 2 output power 42XM2 Internal amplifier, 8W x 2 output power 9-pin mini D-Sub, RS232 Direct Access Power on/off, input selection, volume up/down, OSM access Remote Control Power on /off -timer, OSM control...
42VP4/42XM2/50XM3/61XM2
Page 2
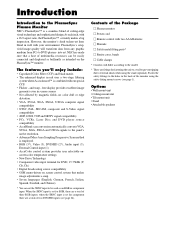
... of two DVD/HD inputs (see page 1). Options • Wall mount unit • Ceiling mount unit • Tilt mount unit • Stand • Attachable speakers However, the monitor's sleek techno-art lines blend in red uses a two-stage filtering system where Accucrimson™ is a seamless blend of the Package Ⅺ Plasma monitor Ⅺ Power cord Ⅺ Remote control with two AAA Batteries Ⅺ Manuals Ⅺ Safety metal fitting parts* Ⅺ...
... of two DVD/HD inputs (see page 1). Options • Wall mount unit • Ceiling mount unit • Tilt mount unit • Stand • Attachable speakers However, the monitor's sleek techno-art lines blend in red uses a two-stage filtering system where Accucrimson™ is a seamless blend of the Package Ⅺ Plasma monitor Ⅺ Power cord Ⅺ Remote control with two AAA Batteries Ⅺ Manuals Ⅺ Safety metal fitting parts* Ⅺ...
42VP4/42XM2/50XM3/61XM2
Page 3
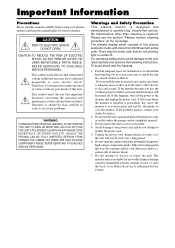
... not cover rear vents or install the unit in this happens, turn off . If you install the unit in order to avoid internal heat build-up. If the unit is designed and manufactured to modify the power cord. 5. NO USER-SERVICEABLE PARTS INSIDE. This symbol warns the user that do not attempt to provide long, trouble-free service. REFER SERVICING TO QUALIFIED SERVICE PERSONNEL. There...
... not cover rear vents or install the unit in this happens, turn off . If you install the unit in order to avoid internal heat build-up. If the unit is designed and manufactured to modify the power cord. 5. NO USER-SERVICEABLE PARTS INSIDE. This symbol warns the user that do not attempt to provide long, trouble-free service. REFER SERVICING TO QUALIFIED SERVICE PERSONNEL. There...
42VP4/42XM2/50XM3/61XM2
Page 7
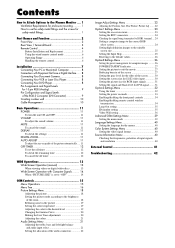
... signal ........ 31 Option3 Settings Menu 32 Using the timer 32 Setting the power on mode 33 Enabling/disabling the front panel controls 34 Enabling/disabling remote control wireless transmission 34 Loop Out setting 35 ID number setting 35 Video Wall setting 36 Advanced OSM Settings Menu 39 Setting the menu mode 39 Language Settings Menu 40 Setting the language for the menus 40 Color System Settings Menu 40 Setting the video signal format 40 Source Information Menu 40 Checking the frequencies, polarities of input signals, and resolution 40 External Control 41 Troubleshooting...
... signal ........ 31 Option3 Settings Menu 32 Using the timer 32 Setting the power on mode 33 Enabling/disabling the front panel controls 34 Enabling/disabling remote control wireless transmission 34 Loop Out setting 35 ID number setting 35 Video Wall setting 36 Advanced OSM Settings Menu 39 Setting the menu mode 39 Language Settings Menu 40 Setting the language for the menus 40 Color System Settings Menu 40 Setting the video signal format 40 Source Information Menu 40 Checking the frequencies, polarities of input signals, and resolution 40 External Control 41 Troubleshooting...
42VP4/42XM2/50XM3/61XM2
Page 10
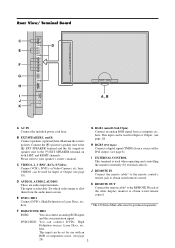
... included power cord here. This input can be used for use with a DVI output. (see page 10). G RGB1 (mini D-Sub 15pin) Connect an analog RGB signal from the audio menu screen. K REMOTE OUT Connect the remote cable* to the REMOTE IN jack of the other display monitor to the EXT SPEAKER terminal on both LEFT and RIGHT channels. F RGB2/ DVD2/ HD2 RGB2: You can connect DVDs, High Definition sources, Laser Discs, etc. Connect the (positive) speaker...
... included power cord here. This input can be used for use with a DVI output. (see page 10). G RGB1 (mini D-Sub 15pin) Connect an analog RGB signal from the audio menu screen. K REMOTE OUT Connect the remote cable* to the REMOTE IN jack of the other display monitor to the EXT SPEAKER terminal on both LEFT and RIGHT channels. F RGB2/ DVD2/ HD2 RGB2: You can connect DVDs, High Definition sources, Laser Discs, etc. Connect the (positive) speaker...
42VP4/42XM2/50XM3/61XM2
Page 12
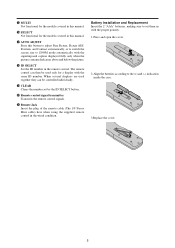
... to switch the screen size to set by the ID SELECT button. @0 Remote control signal transmitter Transmits the remote control signals. @1 Remote Jack Insert the plug of the remote cable (The 1/8 Stereo Mini cable) here when using the supplied remote control in the remote control. Battery Installation and Replacement Insert the 2 "AAA" batteries, making sure to ZOOM mode automatically with the same ID number. When several displays are used only for the models covered in this manual. !7 AUTO ADJUST Press this manual. !6 SELECT...
... to switch the screen size to set by the ID SELECT button. @0 Remote control signal transmitter Transmits the remote control signals. @1 Remote Jack Insert the plug of the remote cable (The 1/8 Stereo Mini cable) here when using the supplied remote control in the remote control. Battery Installation and Replacement Insert the 2 "AAA" batteries, making sure to ZOOM mode automatically with the same ID number. When several displays are used only for the models covered in this manual. !7 AUTO ADJUST Press this manual. !6 SELECT...
42VP4/42XM2/50XM3/61XM2
Page 15
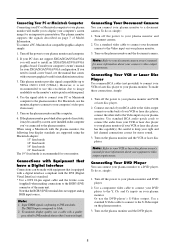
... DVI standards. To maintain display quality, use the DVD-player's S-Video output. Turn on the plasma monitor and the VCR or laser disc player. Use a standard video cable to connect your RCA cable to the video output connector on the computer you need to install an SXGA/XGA/SVGA/VGA graphics board. Turn on the plasma monitor and the computer. 6. To connect a PC, Macintosh or compatible graphics adapter, simply: 1. Note: 1. Turn on the plasma monitor and the DVD player. 8 Be careful to image...
... DVI standards. To maintain display quality, use the DVD-player's S-Video output. Turn on the plasma monitor and the VCR or laser disc player. Use a standard video cable to connect your RCA cable to the video output connector on the computer you need to install an SXGA/XGA/SVGA/VGA graphics board. Turn on the plasma monitor and the computer. 6. To connect a PC, Macintosh or compatible graphics adapter, simply: 1. Note: 1. Turn on the plasma monitor and the DVD player. 8 Be careful to image...

42VP4/42XM2/50XM3/61XM2
Page 18
... (component) input is pressed. 2. The monitor's POWER/STANDBY indicator turns red and the standby mode is selected ...... DIGITAL ZOOM Digital zoom specifies the picture position and enlarges the picture. 1. To change the picture position: Select the position with the remote control). AUTO ADJUST To adjust the size or quality of the picture: Press the ZOOM+ button and enlarge the picture. VOLUME To adjust the sound volume: 1. DISPLAY To check the settings: 1. Press and hold the VOLUME button (on the remote control or the...
... (component) input is pressed. 2. The monitor's POWER/STANDBY indicator turns red and the standby mode is selected ...... DIGITAL ZOOM Digital zoom specifies the picture position and enlarges the picture. 1. To change the picture position: Select the position with the remote control). AUTO ADJUST To adjust the size or quality of the picture: Press the ZOOM+ button and enlarge the picture. VOLUME To adjust the sound volume: 1. DISPLAY To check the settings: 1. Press and hold the VOLUME button (on the remote control or the...
42VP4/42XM2/50XM3/61XM2
Page 21
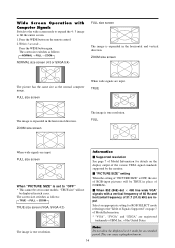
... button on the display output of the various VESA signal standards supported by the monitor. Ⅵ "PICTURE SIZE" setting When the setting of Model Information for an extended period. ZOOM size screen The picture has the same size as follows: → TRUE → FULL → ZOOM TRUE size screen (VGA, SVGA 4:3) Information Ⅵ Supported resolution See page 7 of "PICTURE SIZE" is expanded in 4:3 mode for details on the remote control. 2. The screen size switches as the normal computer image...
... button on the display output of the various VESA signal standards supported by the monitor. Ⅵ "PICTURE SIZE" setting When the setting of Model Information for an extended period. ZOOM size screen The picture has the same size as follows: → TRUE → FULL → ZOOM TRUE size screen (VGA, SVGA 4:3) Information Ⅵ Supported resolution See page 7 of "PICTURE SIZE" is expanded in 4:3 mode for details on the remote control. 2. The screen size switches as the normal computer image...
42VP4/42XM2/50XM3/61XM2
Page 24
... LEVEL S1/S2 PICTURE SIZE*3 DVI SET UP*4 Sub menu 2 Sub menu 3 Sub menu 4 OFF←→ON OFF←→ON PLE AUTO/LOCK 1/LOCK 2/LOCK 3 ORBITER AUTO 1 AUTO 2 MANUAL H-DOT/V-LINE/TIME OFF INVERSE OFF ON WORKING TIME/WAITING TIME WHITE SCREEN WIPER OFF ON WORKING TIME/WAITING TIME/SPEED SOFT FOCUS OFF/1/2/3/4 0←...→3←...→15 AUTO←→OFF OFF←→ON PLUG/PLAY PC←→STB/DVD BLACK LEVEL LOW←...
... LEVEL S1/S2 PICTURE SIZE*3 DVI SET UP*4 Sub menu 2 Sub menu 3 Sub menu 4 OFF←→ON OFF←→ON PLE AUTO/LOCK 1/LOCK 2/LOCK 3 ORBITER AUTO 1 AUTO 2 MANUAL H-DOT/V-LINE/TIME OFF INVERSE OFF ON WORKING TIME/WAITING TIME WHITE SCREEN WIPER OFF ON WORKING TIME/WAITING TIME/SPEED SOFT FOCUS OFF/1/2/3/4 0←...→3←...→15 AUTO←→OFF OFF←→ON PLUG/PLAY PC←→STB/DVD BLACK LEVEL LOW←...

42VP4/42XM2/50XM3/61XM2
Page 32
... To display VESA standard signals. (Use this procedure to select "HD SELECT". 3. DTV Set this also restores other settings to the factory defaults. Setting high definition images to the suitable screen size Use this mode for the INPUT SELECT button on page 7 of Model Information. On the MAIN MENU, select "OPTION1", then press the MENU/ENTER button. Use the v and w buttons to set the HD SELECT mode to select "INPUT SKIP". 3. To set whether the number of vertical lines...
... To display VESA standard signals. (Use this procedure to select "HD SELECT". 3. DTV Set this also restores other settings to the factory defaults. Setting high definition images to the suitable screen size Use this mode for the INPUT SELECT button on page 7 of Model Information. On the MAIN MENU, select "OPTION1", then press the MENU/ENTER button. Use the v and w buttons to set the HD SELECT mode to select "INPUT SKIP". 3. To set whether the number of vertical lines...
42VP4/42XM2/50XM3/61XM2
Page 36
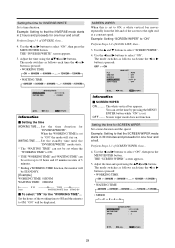
... SCREEN WIPER Set a time duration and the speed. Example: Setting to ON, a white vertical bar moves repeatedly from the left and of 3 minutes. * Ending a WORKING TIME function, the monitor will be set when the "WORKING TIME" is ON. * THE "WORKING TIME" and "WAITING TIME" can set the time by pressing the MENU/ ENTER button while "ON" is set . ADJ. Use the ᮤ and ᮣ buttons to select "ON". The mode switches as follows each time...
... SCREEN WIPER Set a time duration and the speed. Example: Setting to ON, a white vertical bar moves repeatedly from the left and of 3 minutes. * Ending a WORKING TIME function, the monitor will be set when the "WORKING TIME" is ON. * THE "WORKING TIME" and "WAITING TIME" can set the time by pressing the MENU/ ENTER button while "ON" is set . ADJ. Use the ᮤ and ᮣ buttons to select "ON". The mode switches as follows each time...

42VP4/42XM2/50XM3/61XM2
Page 37
... adjusted from 0 to the factory defaults. Example: Adjusting the "GRAY LEVEL" Set "ADVANCED OSM" to "ON" in units of the screen Use this also restores other settings to 15. The factory setting is set to the 4:3 size. Information Ⅵ Setting the time WORKING TIME ..... When the WORKING TIME is set to "ON" the mode will be adjusted on the "PICTURE" menu. The "OPTION2" screen appears. 2. ADJ. ADJ. The higher numbers create a softer image. OPTION2 2 / 3 PREVIOUS PAGE POWER...
... adjusted from 0 to the factory defaults. Example: Adjusting the "GRAY LEVEL" Set "ADVANCED OSM" to "ON" in units of the screen Use this also restores other settings to 15. The factory setting is set to the 4:3 size. Information Ⅵ Setting the time WORKING TIME ..... When the WORKING TIME is set to "ON" the mode will be adjusted on the "PICTURE" menu. The "OPTION2" screen appears. 2. ADJ. ADJ. The higher numbers create a softer image. OPTION2 2 / 3 PREVIOUS PAGE POWER...
42VP4/42XM2/50XM3/61XM2
Page 38
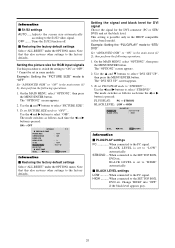
.... 1. STB/DVD ... When connected to select "PICTURE SIZE". 3. Use the v and w buttons to the SET TOP BOX, DVD etc. Example: Setting the "PLUG/PLAY" mode to "STB/ DVD" Set "ADVANCED OSM" to "ON" in the HDCP compatible (silver bezel) model. The "OPTION2" screen appears. 2. ADJ. When connected to the PC signal. HIGH .......... Setting the picture size for the DVI connector (PC or STB/ DVD) and set PICTURE SIZE mode to the factory defaults. The "OPTION2" screen appears. 2. The mode switches as follows each time the...
.... 1. STB/DVD ... When connected to select "PICTURE SIZE". 3. Use the v and w buttons to the SET TOP BOX, DVD etc. Example: Setting the "PLUG/PLAY" mode to "STB/ DVD" Set "ADVANCED OSM" to "ON" in the HDCP compatible (silver bezel) model. The "OPTION2" screen appears. 2. ADJ. When connected to the PC signal. HIGH .......... Setting the picture size for the DVI connector (PC or STB/ DVD) and set PICTURE SIZE mode to the factory defaults. The "OPTION2" screen appears. 2. The mode switches as follows each time the...

42VP4/42XM2/50XM3/61XM2
Page 45
... pressing the POWER ON button on the remote control the No.1 monitor will turn OFF. PLE LINK Use this function has been set "ON", connect your plasma displays with 2×2 video wall. Example: Setting "ON" Perform Steps 1-2 of VIDEO WALL, then... 3. Use the v and w buttons to select "ON". ON DELAY settings ON ...... MODE : SPLIT AUTO ID : OFF IMAGE ADJUST P. Sets a uniform brightness for each time the ᮤ or ᮣ button is pressed: OFF ↔ ON VIDEO WALL DIVIDER...
... pressing the POWER ON button on the remote control the No.1 monitor will turn OFF. PLE LINK Use this function has been set "ON", connect your plasma displays with 2×2 video wall. Example: Setting "ON" Perform Steps 1-2 of VIDEO WALL, then... 3. Use the v and w buttons to select "ON". ON DELAY settings ON ...... MODE : SPLIT AUTO ID : OFF IMAGE ADJUST P. Sets a uniform brightness for each time the ᮤ or ᮣ button is pressed: OFF ↔ ON VIDEO WALL DIVIDER...
42VP4/42XM2/50XM3/61XM2
Page 49
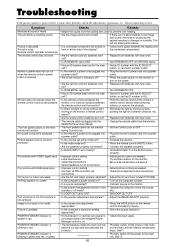
... the volume. • Press the remote control's MUTE button. • Are the speakers properly connected? • Connect the speakers properly. • Is AUDIO INPUT set directly in red. • Horizontal and / or vertical sync signal is heard. • Maybe the sound from the monitor. Poor picture with RGB signal input. • Improper control setting. Check pin assignments and connections. Nothing appears on screen. • Is the computer's power turned on? • Turn on . button, or set the ID number to...
... the volume. • Press the remote control's MUTE button. • Are the speakers properly connected? • Connect the speakers properly. • Is AUDIO INPUT set directly in red. • Horizontal and / or vertical sync signal is heard. • Maybe the sound from the monitor. Poor picture with RGB signal input. • Improper control setting. Check pin assignments and connections. Nothing appears on screen. • Is the computer's power turned on? • Turn on . button, or set the ID number to...
42VP4/42XM2/50XM3/61XM2
Page 51
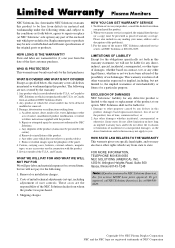
..., or failure to follow instructions supplied with the product. 5. Shipping charges. Some states do not allow the exclusion or limitation of NEC Corporation at 800-836-0655. WHO IS PROTECTED? b. Costs of initial technical adjustments (set forth in material and workmanship...0655 NEC SOLUTIONS (AMERICA), INC. 1250 N. Burns or residual images upon inconvenience, loss of use of the product, loss of the product at NEC Solutions' sole option) any defective product is limited to the repair or replacement of time, commercial loss; Cartons, carrying cases, batteries, external ...
..., or failure to follow instructions supplied with the product. 5. Shipping charges. Some states do not allow the exclusion or limitation of NEC Corporation at 800-836-0655. WHO IS PROTECTED? b. Costs of initial technical adjustments (set forth in material and workmanship...0655 NEC SOLUTIONS (AMERICA), INC. 1250 N. Burns or residual images upon inconvenience, loss of use of the product, loss of the product at NEC Solutions' sole option) any defective product is limited to the repair or replacement of time, commercial loss; Cartons, carrying cases, batteries, external ...
61XM2
Page 4
... ferrite cores: Set the ferrite cores on both ends of the power cable (supplied). Use the band to fasten the ferrite core (supplied) to Part 15 of the FCC Rules. Manufacturer's name: NEC Plasma Display Corporation Stand: PX-61ST1U, PX-61ST1U/S, PX-61XM1U-ST Wall Mount Unit: PX-W3U Tilt Mount Unit: PX-T3U Ceiling Mount Unit: PX-C3U 4 Close the lid tightly until the clamps click. Operation of this monitor will not...
... ferrite cores: Set the ferrite cores on both ends of the power cable (supplied). Use the band to fasten the ferrite core (supplied) to Part 15 of the FCC Rules. Manufacturer's name: NEC Plasma Display Corporation Stand: PX-61ST1U, PX-61ST1U/S, PX-61XM1U-ST Wall Mount Unit: PX-W3U Tilt Mount Unit: PX-T3U Ceiling Mount Unit: PX-C3U 4 Close the lid tightly until the clamps click. Operation of this monitor will not...
61XM2
Page 6
... Diagnosis, Anti Image Burn (PLE LOCK1~3, INVERSE, WHITE, ORBITER (Auto1,2/Manual), SCREEN WIPER), Color Temperature select (high/mid/mid low/low, user has 4 memories), Control lock (Except power SW), Auto Picture, Input Skip, Color Tune, Low Tone (3 mode), Auto ID, Programmable Timer, Gamma Correction (4 mode), Loop through interface, Plug and play (DDC1, DDC2b, RGB3: DDC2b only) Remote control with standards from the source equipment (DVD, Set-top box, etc...). Specifications Screen Size 53.2"(H)ן29.9"(V) inches 1351(H)...
... Diagnosis, Anti Image Burn (PLE LOCK1~3, INVERSE, WHITE, ORBITER (Auto1,2/Manual), SCREEN WIPER), Color Temperature select (high/mid/mid low/low, user has 4 memories), Control lock (Except power SW), Auto Picture, Input Skip, Color Tune, Low Tone (3 mode), Auto ID, Programmable Timer, Gamma Correction (4 mode), Loop through interface, Plug and play (DDC1, DDC2b, RGB3: DDC2b only) Remote control with standards from the source equipment (DVD, Set-top box, etc...). Specifications Screen Size 53.2"(H)ן29.9"(V) inches 1351(H)...
61XM2
Page 8
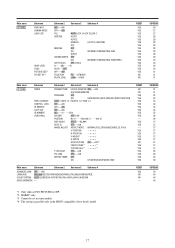
... RGB select mode suite for High-bandwidth Digital Content Protection. No.: NEC SOLUTIONS (AMERICA), INC. 1250 N. If the picture is not displayed properly, set automatically. NOTE: • While the input signals comply with the resolution listed in the table above, you may have to adjust the position and size of the picture or the fine picture because of errors in the table above conforms to the technical standards...
... RGB select mode suite for High-bandwidth Digital Content Protection. No.: NEC SOLUTIONS (AMERICA), INC. 1250 N. If the picture is not displayed properly, set automatically. NOTE: • While the input signals comply with the resolution listed in the table above, you may have to adjust the position and size of the picture or the fine picture because of errors in the table above conforms to the technical standards...


