
42XM5/50XM6/60XM5 spec sheet
Page 1
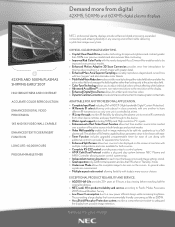
... 5X1 VIDEO WALL CAPABLE ENHANCED TEXT TICKER/INSERT FUNCTION LONG LIFE > 60,000 HOURS PROGRAMMABLE TIMER NEC's professional plasma displays provide enhanced digital processing, expanded connectivity and amazing flexibility in "Stand-by" mode. ° Underscan Mode allows the complete image to be improved over previous models and also removes false contouring. ° Improved Red Color Purity with additional control to provide 10 separate timer functions. ° Enhanced Split Screen...
... 5X1 VIDEO WALL CAPABLE ENHANCED TEXT TICKER/INSERT FUNCTION LONG LIFE > 60,000 HOURS PROGRAMMABLE TIMER NEC's professional plasma displays provide enhanced digital processing, expanded connectivity and amazing flexibility in "Stand-by" mode. ° Underscan Mode allows the complete image to be improved over previous models and also removes false contouring. ° Improved Red Color Purity with additional control to provide 10 separate timer functions. ° Enhanced Split Screen...
42XM5/50XM6/60XM5 spec sheet
Page 2
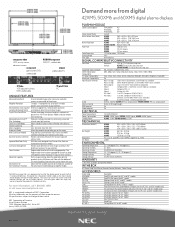
... at factory default. NEC Corporation of use with additional control to the plasmas. The Programmable timer has been upgraded for 60" models. Now with ease. The time given does not imply any warranty beyond the products standard warranty. NEC 120615 A comprehensive set BNC Component (Y,Pb,Pr/Y,Cb,Cr) (common use along with 5BNC Y/Pb/Pr input, selectable) Audio 3 sets RCA stereo + external speaker jacks Internal amplifier 42XM5: 8W x 2 output power...
... at factory default. NEC Corporation of use with additional control to the plasmas. The Programmable timer has been upgraded for 60" models. Now with ease. The time given does not imply any warranty beyond the products standard warranty. NEC 120615 A comprehensive set BNC Component (Y,Pb,Pr/Y,Cb,Cr) (common use along with 5BNC Y/Pb/Pr input, selectable) Audio 3 sets RCA stereo + external speaker jacks Internal amplifier 42XM5: 8W x 2 output power...
42XM5/50XM6/60XM5 UM
Page 3
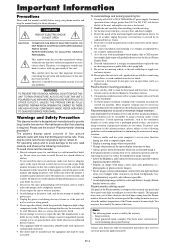
... installing it is not liable for service. 2. In case of the menu display from the Plasma monitor. Do not hit or scratch the panel surface as the unit could drop or topple over a long period. 6. For correct installation and mounting it and do not attempt to received video signals. As is damaged in a moving image whenever possible. * Change the position of accident, unplug the power cord...
... installing it is not liable for service. 2. In case of the menu display from the Plasma monitor. Do not hit or scratch the panel surface as the unit could drop or topple over a long period. 6. For correct installation and mounting it and do not attempt to received video signals. As is damaged in a moving image whenever possible. * Change the position of accident, unplug the power cord...

42XM5/50XM6/60XM5 UM
Page 5
... the sides of the screen ........ En-5 Creating a video wall En-6 Cable Management En-6 Caution when placing the plasma monitor in the picture En-21 Setting the color temperature En-21 Adjusting the color to the default values En-25 Option2 Settings Menu En-26 Setting the power management for computer images .... En-7 Using the remote control En-7 Battery Installation and Replacement En-7 Using the wired remote control mode En-7 Operating Range En-7 Part Names and Function En...
... the sides of the screen ........ En-5 Creating a video wall En-6 Cable Management En-6 Caution when placing the plasma monitor in the picture En-21 Setting the color temperature En-21 Adjusting the color to the default values En-25 Option2 Settings Menu En-26 Setting the power management for computer images .... En-7 Using the remote control En-7 Battery Installation and Replacement En-7 Using the wired remote control mode En-7 Operating Range En-7 Part Names and Function En...
42XM5/50XM6/60XM5 UM
Page 10
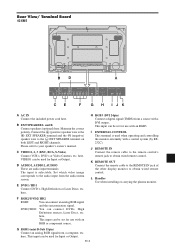
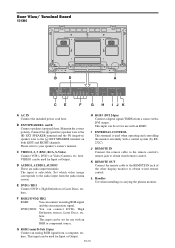
... HD VD L (MONO) L (MONO) RGB 1 (IN/OUT) AUDIO 3 R RGB 3 DV I ( Digital RGB ) L (MONO) EXTERNAL CONTROL REMOTE IN OUT CE F G H I EXTERNAL CONTROL This terminal is selectable. VIDEO1 can be used when operating and controlling the monitor externally with a DVI output. L Handles Use when installing or carrying the plasma monitor. Set which video image corresponds to the audio input from a computer, etc. J REMOTE IN Connect the remote cable to the remote control's remote jack to your speaker's owner's manual. B EXT SPEAKER L and R Connect speakers (optional) here.
... HD VD L (MONO) L (MONO) RGB 1 (IN/OUT) AUDIO 3 R RGB 3 DV I ( Digital RGB ) L (MONO) EXTERNAL CONTROL REMOTE IN OUT CE F G H I EXTERNAL CONTROL This terminal is selectable. VIDEO1 can be used when operating and controlling the monitor externally with a DVI output. L Handles Use when installing or carrying the plasma monitor. Set which video image corresponds to the audio input from a computer, etc. J REMOTE IN Connect the remote cable to the remote control's remote jack to your speaker's owner's manual. B EXT SPEAKER L and R Connect speakers (optional) here.
42XM5/50XM6/60XM5 UM
Page 11
... use with an RGB or component source. J REMOTE IN Connect the remote cable to the remote control's remote jack to your speaker's owner's manual. here. VIDEO1 can be used when operating and controlling the monitor externally with a DVI output. K REMOTE OUT Connect the remote cable to the REMOTE IN jack of the other display monitor to the EXT SPEAKER terminal on both LEFT and RIGHT channels. This input can be used for Input or Output. En-10 Set which video image corresponds to the audio input...
... use with an RGB or component source. J REMOTE IN Connect the remote cable to the remote control's remote jack to your speaker's owner's manual. here. VIDEO1 can be used when operating and controlling the monitor externally with a DVI output. K REMOTE OUT Connect the remote cable to the REMOTE IN jack of the other display monitor to the EXT SPEAKER terminal on both LEFT and RIGHT channels. This input can be used for Input or Output. En-10 Set which video image corresponds to the audio input...

42XM5/50XM6/60XM5 UM
Page 12
... your speaker's owner's manual. here. B EXT SPEAKER L and R Connect speakers (optional) here. D AUDIO1, AUDIO2, AUDIO3 These are audio input terminals. VIDEO1 can be used when operating and controlling the monitor externally with a control system (by RS232C). J REMOTE IN Connect the remote cable to the remote control's remote jack to obtain wired remote control. I JK A AC IN Connect the included power cord here. F RGB2/ DVD2/ HD2 RGB2: You can connect DVDs, High Definition sources, Laser Discs, etc. Rear View/ Terminal Board 60XM5 L VIDEO AUDIO...
... your speaker's owner's manual. here. B EXT SPEAKER L and R Connect speakers (optional) here. D AUDIO1, AUDIO2, AUDIO3 These are audio input terminals. VIDEO1 can be used when operating and controlling the monitor externally with a control system (by RS232C). J REMOTE IN Connect the remote cable to the remote control's remote jack to obtain wired remote control. I JK A AC IN Connect the included power cord here. F RGB2/ DVD2/ HD2 RGB2: You can connect DVDs, High Definition sources, Laser Discs, etc. Rear View/ Terminal Board 60XM5 L VIDEO AUDIO...
42XM5/50XM6/60XM5 UM
Page 16
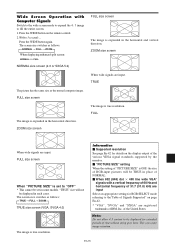
... on the display output of the various VESA signal standards supported by the monitor. Ⅵ "PICTURE SIZE" setting When the setting of "PICTURE SIZE" is expanded in the horizontal and vertical direction. Note: Do not allow 4:3 content to be displayed in place of NORMAL. Ⅵ When 852 (848) dot ן480 line wide VGA* signals with Computer Signals Switch to the wide screen mode to expand the 4 : 3 image to...
... on the display output of the various VESA signal standards supported by the monitor. Ⅵ "PICTURE SIZE" setting When the setting of "PICTURE SIZE" is expanded in the horizontal and vertical direction. Note: Do not allow 4:3 content to be displayed in place of NORMAL. Ⅵ When 852 (848) dot ן480 line wide VGA* signals with Computer Signals Switch to the wide screen mode to expand the 4 : 3 image to...

42XM5/50XM6/60XM5 UM
Page 22
... VIDEO display. Setting the color temperature Use this mode when watching video in movie theaters. This mode provides darker, finer pictures, like the screen in a bright room. NORMAL: Set this procedure to set to the factory default settings. BRIGHT: This mode provides brighter pictures than NORMAL. TINT: Changes the picture's tint. The effect becomes stronger as desired. Picture Settings Menu Adjusting the picture The contrast, brightness, sharpness, color and tint can be adjusted when a computer signal is connected...
... VIDEO display. Setting the color temperature Use this mode when watching video in movie theaters. This mode provides darker, finer pictures, like the screen in a bright room. NORMAL: Set this procedure to set to the factory default settings. BRIGHT: This mode provides brighter pictures than NORMAL. TINT: Changes the picture's tint. The effect becomes stronger as desired. Picture Settings Menu Adjusting the picture The contrast, brightness, sharpness, color and tint can be adjusted when a computer signal is connected...

42XM5/50XM6/60XM5 UM
Page 26
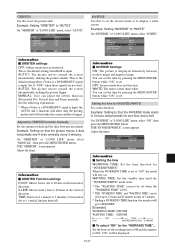
... the INPUT SELECT button on the unit. ADJ. ON: If no input signal is ON, signals which are not present will be reset. Example: Setting the "HD SELECT" mode to "1035I" On "HD SELECT" of "OPTION1" menu, select "ON". Example: Set to "ON" On "INPUT SKIP" of "OPTION1" menu, select "1035I". On "ALL RESET" of the signal, scan and display all the settings (PICTURE, AUDIO, IMAGE ADJUST, OPTION1~4, etc.) to the factory default...
... the INPUT SELECT button on the unit. ADJ. ON: If no input signal is ON, signals which are not present will be reset. Example: Setting the "HD SELECT" mode to "1035I" On "HD SELECT" of "OPTION1" menu, select "ON". Example: Set to "ON" On "INPUT SKIP" of "OPTION1" menu, select "1035I". On "ALL RESET" of the signal, scan and display all the settings (PICTURE, AUDIO, IMAGE ADJUST, OPTION1~4, etc.) to the factory default...
42XM5/50XM6/60XM5 UM
Page 28
.../WHITE" mode starts. * The "WAITING TIME" can not be displayed. Adjust the ORBITER function manually Set the amount of 3 minutes. * Ending a WORKING TIME function, the monitor will be set when the "WORKING TIME" is set the time by pressing the MENU/ENTER button while "ON" is ON. * THE "WORKING TIME" and "WAITING TIME" can adjust the orbiter function (Horizontal Dot, Vertical Line and Time) manually. OFF: Inverse mode does not function. AUTO1: The picture moves around the screen...
.../WHITE" mode starts. * The "WAITING TIME" can not be displayed. Adjust the ORBITER function manually Set the amount of 3 minutes. * Ending a WORKING TIME function, the monitor will be set when the "WORKING TIME" is set the time by pressing the MENU/ENTER button while "ON" is ON. * THE "WORKING TIME" and "WAITING TIME" can adjust the orbiter function (Horizontal Dot, Vertical Line and Time) manually. OFF: Inverse mode does not function. AUTO1: The picture moves around the screen...

42XM5/50XM6/60XM5 UM
Page 30
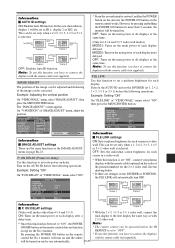
...; PLUG/PLAY settings PC: When connected to the SET TOP BOX, DVD etc. Example: Setting "ON" On "PROTOCOL SET" of "DVI SET UP" menu, select "STB/ DVD". OFF: When NEC protocol is used . ADJ. The "DVI SET UP" screen appears. STB/DVD: When connected to the PC signal. BLACK LEVEL is set to "ON" or "OFF". * This function is set the black level. MGT. : OFF CINEMA MODE : ON LONG LIFE GRAY LEVEL : 3 S1/S2 : OFF PICTURE SIZE : ON DVI SET...
...; PLUG/PLAY settings PC: When connected to the SET TOP BOX, DVD etc. Example: Setting "ON" On "PROTOCOL SET" of "DVI SET UP" menu, select "STB/ DVD". OFF: When NEC protocol is used . ADJ. The "DVI SET UP" screen appears. STB/DVD: When connected to the PC signal. BLACK LEVEL is set to "ON" or "OFF". * This function is set the black level. MGT. : OFF CINEMA MODE : ON LONG LIFE GRAY LEVEL : 3 S1/S2 : OFF PICTURE SIZE : ON DVI SET...

42XM5/50XM6/60XM5 UM
Page 35
.... MODE settings SPLIT: Combines enlarged screens and creates multiple screens. BLANK: Corrects misalignment of "VIDEO WALL" menu, select "ON", then press the MENU/ENTER button. AUTO ID 1 2 AUTO ID : ON 1 2 3 4 3 8 9 4 7 6 5 WIRED CABLE CONNECTION TURN ADJ. ON DELAY : OFF PLE LINK : OFF SEL. ON DELAY : OFF PLE LINK : OFF SEL. EXIT RETURN Information Ⅵ DISP. Example: Setting "ON" Set the ID number for the No. 1 display on ID NUMBER menu. On "AUTO...
.... MODE settings SPLIT: Combines enlarged screens and creates multiple screens. BLANK: Corrects misalignment of "VIDEO WALL" menu, select "ON", then press the MENU/ENTER button. AUTO ID 1 2 AUTO ID : ON 1 2 3 4 3 8 9 4 7 6 5 WIRED CABLE CONNECTION TURN ADJ. ON DELAY : OFF PLE LINK : OFF SEL. ON DELAY : OFF PLE LINK : OFF SEL. EXIT RETURN Information Ⅵ DISP. Example: Setting "ON" Set the ID number for the No. 1 display on ID NUMBER menu. On "AUTO...
42XM5/50XM6/60XM5 UM
Page 36
... operations. Note: To use this function has been set to connect the displays with the remote cable (not supplied). PLE LINK IMAGE ADJUST The position of the image can be operated unless the IR except for each display after a delay time. Example: Setting "ON" On "VIDEO WALL" menu, select "IMAGE ADJUST", then press the MENU/ENTER button. On "V-POSITION" of the image can be turned on the remote control works. P O S I T I G H T H-WIDTH AUTO PICTURE : OFF FINE PICTURE PICTURE ADJ. H E I O N H-POSITION...
... operations. Note: To use this function has been set to connect the displays with the remote cable (not supplied). PLE LINK IMAGE ADJUST The position of the image can be operated unless the IR except for each display after a delay time. Example: Setting "ON" On "VIDEO WALL" menu, select "IMAGE ADJUST", then press the MENU/ENTER button. On "V-POSITION" of the image can be turned on the remote control works. P O S I T I G H T H-WIDTH AUTO PICTURE : OFF FINE PICTURE PICTURE ADJ. H E I O N H-POSITION...

42XM5/50XM6/60XM5 UM
Page 42
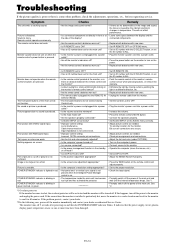
.... • Point the remote control at the minimum? • Is the mute mode set? • Are the speakers properly connected? • Is AUDIO INPUT set for the main unit? It indicates that the power supply circuit, plasma display panel, temperature sensor, or one or more fans have been damaged. No sound or picture is blinking in front or at • Leave some other problem, check the adjustments, operations, etc...
.... • Point the remote control at the minimum? • Is the mute mode set? • Are the speakers properly connected? • Is AUDIO INPUT set for the main unit? It indicates that the power supply circuit, plasma display panel, temperature sensor, or one or more fans have been damaged. No sound or picture is blinking in front or at • Leave some other problem, check the adjustments, operations, etc...
42XM5/50XM6/60XM5 UM
Page 50
... WARRANTY? d. Removal or installation of user controls. Please also include in any accessories used in connection with the product. Costs of initial technical adjustments (set-up), including adjustment of the product. En-49 or Canada from an authorized NEC Corporation of America dealer. 2. e. Any other acts of nature, unauthorized product modification, or failure to follow instructions supplied with the product. 5. To obtain service on...
... WARRANTY? d. Removal or installation of user controls. Please also include in any accessories used in connection with the product. Costs of initial technical adjustments (set-up), including adjustment of the product. En-49 or Canada from an authorized NEC Corporation of America dealer. 2. e. Any other acts of nature, unauthorized product modification, or failure to follow instructions supplied with the product. 5. To obtain service on...

60XM5 start up manual
Page 4
... installation and mounting it . REFER SERVICING TO QUALIFIED SERVICE PERSONNEL. Do not use with a computer input source. * Display a moving vehicle, as this way the warranty will be turned off the power to avoid or minimize image retention: Like all phosphor-based display devices and all service to a MAIN outlet with a protective earth-ground connection. 9. Do not attempt to water or moisture. 4. If the plasma monitor is installed. Plasma monitor driving sound...
... installation and mounting it . REFER SERVICING TO QUALIFIED SERVICE PERSONNEL. Do not use with a computer input source. * Display a moving vehicle, as this way the warranty will be turned off the power to avoid or minimize image retention: Like all phosphor-based display devices and all service to a MAIN outlet with a protective earth-ground connection. 9. Do not attempt to water or moisture. 4. If the plasma monitor is installed. Plasma monitor driving sound...
60XM5 start up manual
Page 16
... sound, the noise is caused by closing curtains, pointing the light in green and red, or green. ------ • Set IR REMOTE ON. • Set an ID number with new ones. • Unplug the remote cable from the monitor. • Set the Control Lock to OFF. • Plug the monitor's power cord into a power outlet. • Increase the volume. • Press the remote control's MUTE button. • Connect the speakers properly. • Set AUDIO INPUT on the computer's power. • Connect source to the monitor...
... sound, the noise is caused by closing curtains, pointing the light in green and red, or green. ------ • Set IR REMOTE ON. • Set an ID number with new ones. • Unplug the remote cable from the monitor. • Set the Control Lock to OFF. • Plug the monitor's power cord into a power outlet. • Increase the volume. • Press the remote control's MUTE button. • Connect the speakers properly. • Set AUDIO INPUT on the computer's power. • Connect source to the monitor...
60XM5 start up manual
Page 18
...-16 Burns or residual images upon inconvenience, loss of use of the product, loss of America at NEC Corporation of America' sole option) any part of the original parts or products. For the name of the nearest NEC Corporation of America authorized service center, call NEC Corporation of time, commercial loss; f. This warranty may not apply to follow instructions supplied with the...
...-16 Burns or residual images upon inconvenience, loss of use of the product, loss of America at NEC Corporation of America' sole option) any part of the original parts or products. For the name of the nearest NEC Corporation of America authorized service center, call NEC Corporation of time, commercial loss; f. This warranty may not apply to follow instructions supplied with the...
60XM5 tabletop stand UM
Page 1
... this stand to lock the casters into place before use exclusively with the following plasma monitors. ¶ 61-inch Plasma Monitor: PX-61XR4 ¶ 60-inch Plasma Monitor: PX-60XR5 Notes on the power cord or allow the air vents of accident occurring. Note for choosing to mark items containing instructions about actions which are included in the package with three or more people when installing, attaching...
... this stand to lock the casters into place before use exclusively with the following plasma monitors. ¶ 61-inch Plasma Monitor: PX-61XR4 ¶ 60-inch Plasma Monitor: PX-60XR5 Notes on the power cord or allow the air vents of accident occurring. Note for choosing to mark items containing instructions about actions which are included in the package with three or more people when installing, attaching...


