
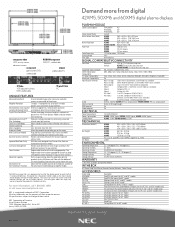
42XM5/50XM6/60XM5 spec sheet
Page 2
...prevent image retention. The Programmable timer has been upgraded for ease of use with the addition of NEC Corporation. Now with 5BNC Y/Pb/Pr input, selectable) Audio 3 sets RCA stereo + external speaker jacks Internal amplifier 42XM5: 8W x 2 output power; 50XM6/60XM5: 9W x 2 output power ...notice. Timer Function Programmable timer for crystal clear images. The panel life is based on the screen. PLASMA MODULE Screen Size (Diagonal) PX-42XM5A 42" PX-50M6A 50" PX-60XM5A 60" Screen Aspect Ratio 16 to 9 Active Screen Area (WxH) 42XM5 36.3 x 20.3 in, 922 x 515 mm 50XM6 43...
...prevent image retention. The Programmable timer has been upgraded for ease of use with the addition of NEC Corporation. Now with 5BNC Y/Pb/Pr input, selectable) Audio 3 sets RCA stereo + external speaker jacks Internal amplifier 42XM5: 8W x 2 output power; 50XM6/60XM5: 9W x 2 output power ...notice. Timer Function Programmable timer for crystal clear images. The panel life is based on the screen. PLASMA MODULE Screen Size (Diagonal) PX-42XM5A 42" PX-50M6A 50" PX-60XM5A 60" Screen Aspect Ratio 16 to 9 Active Screen Area (WxH) 42XM5 36.3 x 20.3 in, 922 x 515 mm 50XM6 43...
60XM5 IG
Page 1
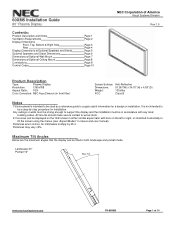
... Product Description and Notes Ventilation Requirements Display Dimensions Front, Top, Bottom & Right Side Rear Display Dimensions w/Optional Speakers and Stand Optional Speakers and Stand Dimensions __ Dimensions w/Optional Wall Mount Dimensions w/Optional Ceiling Mount Connections Control Codes Page 1 Page 2... Portrait 10° Max Tilt www.necvisualsystems.com PX-60XM5 Page 1 of America Visual Systems Division Rev 1.0 Product Description Type: Plasma Display Resolution: 1365x768 Aspect Ratio: 16:9 Color Correction: NEC AccuCrimson (in front filter) Screen Surface: Anti-...
... Product Description and Notes Ventilation Requirements Display Dimensions Front, Top, Bottom & Right Side Rear Display Dimensions w/Optional Speakers and Stand Optional Speakers and Stand Dimensions __ Dimensions w/Optional Wall Mount Dimensions w/Optional Ceiling Mount Connections Control Codes Page 1 Page 2... Portrait 10° Max Tilt www.necvisualsystems.com PX-60XM5 Page 1 of America Visual Systems Division Rev 1.0 Product Description Type: Plasma Display Resolution: 1365x768 Aspect Ratio: 16:9 Color Correction: NEC AccuCrimson (in front filter) Screen Surface: Anti-...
60XM5 IG
Page 5
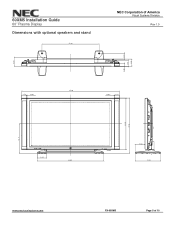
60XM5 Installation Guide 60" Plasma Display Dimensions with optional speakers and stand 37.90 NEC Corporation of America Visual Systems Division Rev 1.0 3.80 4.80 3.80 1.80 3.50 (0.02) 65.00 (0.02) 3.50 6.00 19.7" 34.60 37.10 6.40 44.00 LED&IR 6.00 17.00 www.necvisualsystems.com PX-60XM5 Page 5 of 10
60XM5 Installation Guide 60" Plasma Display Dimensions with optional speakers and stand 37.90 NEC Corporation of America Visual Systems Division Rev 1.0 3.80 4.80 3.80 1.80 3.50 (0.02) 65.00 (0.02) 3.50 6.00 19.7" 34.60 37.10 6.40 44.00 LED&IR 6.00 17.00 www.necvisualsystems.com PX-60XM5 Page 5 of 10
60XM5 IG
Page 6
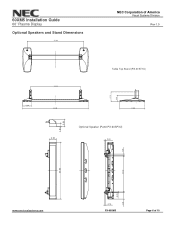
60XM5 Installation Guide 60" Plasma Display Optional Speakers and Stand Dimensions 37.90 NEC Corporation of America Visual Systems Division Rev 1.0 Table Top Stand (PX-61ST1U) 33.50 6.74 4.39 6.40 44.00 17.00 1.80 3.80 Optional Speaker (Part# PX-60SP3U) 3.50 0.50 1.20 22.10 34.60 0.20 4.20 www.necvisualsystems.com 0.70 PX-60XM5 Page 6 of 10
60XM5 Installation Guide 60" Plasma Display Optional Speakers and Stand Dimensions 37.90 NEC Corporation of America Visual Systems Division Rev 1.0 Table Top Stand (PX-61ST1U) 33.50 6.74 4.39 6.40 44.00 17.00 1.80 3.80 Optional Speaker (Part# PX-60SP3U) 3.50 0.50 1.20 22.10 34.60 0.20 4.20 www.necvisualsystems.com 0.70 PX-60XM5 Page 6 of 10

60XM5 IG
Page 9
60XM5 Installation Guide 60" Plasma Display Connections NEC Corporation of America Visual Systems Division Rev 1.0 Located at bottom of 10 Speaker Connections www.necvisualsystems.com AC Inlet PX-60XM5 Page 9 of display Control Buttons Power Button Ext.
60XM5 Installation Guide 60" Plasma Display Connections NEC Corporation of America Visual Systems Division Rev 1.0 Located at bottom of 10 Speaker Connections www.necvisualsystems.com AC Inlet PX-60XM5 Page 9 of display Control Buttons Power Button Ext.

42XM5/50XM6/60XM5 UM
Page 5
... black level for the sides of the screen ........ En-26 POWER/STANDBY indicator En-26 En-4 • Tilt mount unit • Tabletop Stand • Attachable speakers En-15 When "PICTURE SIZE" is no input signal detected for the sub picture En-36 Displaying the entire image during DIGITAL ZOOM operations En...
... black level for the sides of the screen ........ En-26 POWER/STANDBY indicator En-26 En-4 • Tilt mount unit • Tabletop Stand • Attachable speakers En-15 When "PICTURE SIZE" is no input signal detected for the sub picture En-36 Displaying the entire image during DIGITAL ZOOM operations En...
42XM5/50XM6/60XM5 UM
Page 10
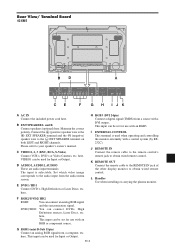
.... Maintain the correct polarity. here. D AUDIO1, AUDIO2, AUDIO3 These are audio input terminals. here. here. Please refer to the EXT SPEAKER terminal on both LEFT and RIGHT channels. VIDEO1 can be used for Input or Output. H RGB3 (DVI 24pin) Connect a digital signal...a control system (by RS232C). J REMOTE IN Connect the remote cable to the remote control's remote jack to obtain wired remote control. B EXT SPEAKER L and R Connect speakers (optional) here. I JK A AC IN Connect the included power cord here. Rear View/ Terminal Board 42XM5 L VIDEO AUDIO 1 DVD1 / ...
.... Maintain the correct polarity. here. D AUDIO1, AUDIO2, AUDIO3 These are audio input terminals. here. here. Please refer to the EXT SPEAKER terminal on both LEFT and RIGHT channels. VIDEO1 can be used for Input or Output. H RGB3 (DVI 24pin) Connect a digital signal...a control system (by RS232C). J REMOTE IN Connect the remote cable to the remote control's remote jack to obtain wired remote control. B EXT SPEAKER L and R Connect speakers (optional) here. I JK A AC IN Connect the included power cord here. Rear View/ Terminal Board 42XM5 L VIDEO AUDIO 1 DVD1 / ...
42XM5/50XM6/60XM5 UM
Page 11
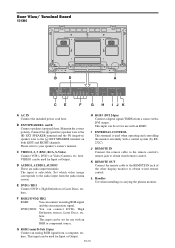
... ) L (MONO) EXTERNAL CONTROL REMOTE IN OUT CE F G H I EXTERNAL CONTROL This terminal is selectable. Connect the (positive) speaker wire to the EXT SPEAKER terminal and the (negative) speaker wire to obtain wired remote control. H RGB3 (DVI 24pin) Connect a digital signal (TMDS) from a computer, etc. I JK .... here. J REMOTE IN Connect the remote cable to the remote control's remote jack to obtain wired remote control. B EXT SPEAKER L and R Connect speakers (optional) here. G RGB1 (mini D-Sub 15pin) Connect an analog RGB signal from a source with a control system (by...
... ) L (MONO) EXTERNAL CONTROL REMOTE IN OUT CE F G H I EXTERNAL CONTROL This terminal is selectable. Connect the (positive) speaker wire to the EXT SPEAKER terminal and the (negative) speaker wire to obtain wired remote control. H RGB3 (DVI 24pin) Connect a digital signal (TMDS) from a computer, etc. I JK .... here. J REMOTE IN Connect the remote cable to the remote control's remote jack to obtain wired remote control. B EXT SPEAKER L and R Connect speakers (optional) here. G RGB1 (mini D-Sub 15pin) Connect an analog RGB signal from a source with a control system (by...

42XM5/50XM6/60XM5 UM
Page 12
... externally with an RGB or component source. J REMOTE IN Connect the remote cable to the remote control's remote jack to the EXT SPEAKER terminal on both LEFT and RIGHT channels. Please refer to obtain wired remote control. E DVD1 / HD1 Connect DVD's, High Definition or...(by RS232C). I JK A AC IN Connect the included power cord here. L Handles Use when installing or carrying the plasma monitor. B EXT SPEAKER L and R Connect speakers (optional) here. here. This input can be set for Input or Output. H RGB3 (DVI 24pin) Connect a digital signal (TMDS) from a...
... externally with an RGB or component source. J REMOTE IN Connect the remote cable to the remote control's remote jack to the EXT SPEAKER terminal on both LEFT and RIGHT channels. Please refer to obtain wired remote control. E DVD1 / HD1 Connect DVD's, High Definition or...(by RS232C). I JK A AC IN Connect the included power cord here. L Handles Use when installing or carrying the plasma monitor. B EXT SPEAKER L and R Connect speakers (optional) here. here. This input can be set for Input or Output. H RGB3 (DVI 24pin) Connect a digital signal (TMDS) from a...

42XM5/50XM6/60XM5 UM
Page 42
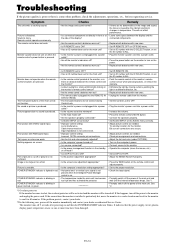
...Plug the monitor's power cord into a power outlet. • Increase the volume. • Press the remote control's MUTE button. • Connect the speakers properly. • Set AUDIO INPUT on ? • Is a source connected? • Is the power management function in front or at the minimum...? • Is the mute mode set? • Are the speakers properly connected? • Is AUDIO INPUT set correctly? • Improper control setting. Picture is produced. POWER/STANDBY indicator is lighted in red. See...
...Plug the monitor's power cord into a power outlet. • Increase the volume. • Press the remote control's MUTE button. • Connect the speakers properly. • Set AUDIO INPUT on ? • Is a source connected? • Is the power management function in front or at the minimum...? • Is the mute mode set? • Are the speakers properly connected? • Is AUDIO INPUT set correctly? • Improper control setting. Picture is produced. POWER/STANDBY indicator is lighted in red. See...
60XM5 speaker manual
Page 1
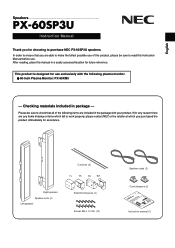
Please be sure to work properly, please contact NEC or the retailer at -hseerdeth#e3 5- Cushions (2) 5- 53 #- #3 Right speaker Speaker units (2) Left speaker Attachment pieces (4) Screws M5 x 12 mm (12) Speaker cords (2) Cord clampers (2) English PX-60SP3U Speakers T..h..a..nI.n.k..oM.yr.d.oa.eA.nu.Iruf.nt.tfaeo.o.slr.reb.rt...product. In order to ensure that all of this product, please be sure to check that you are able to purchase NEC PX-60SP3U speakers. If for any reason there are included in the package with the following items are any items missing or items which...
Please be sure to work properly, please contact NEC or the retailer at -hseerdeth#e3 5- Cushions (2) 5- 53 #- #3 Right speaker Speaker units (2) Left speaker Attachment pieces (4) Screws M5 x 12 mm (12) Speaker cords (2) Cord clampers (2) English PX-60SP3U Speakers T..h..a..nI.n.k..oM.yr.d.oa.eA.nu.Iruf.nt.tfaeo.o.slr.reb.rt...product. In order to ensure that all of this product, please be sure to check that you are able to purchase NEC PX-60SP3U speakers. If for any reason there are included in the package with the following items are any items missing or items which...

60XM5 speaker manual
Page 2
...specified plasma monitors, as doing so might result in damage to the product or bodily injury. ÷ Never insert water into the speakers or otherwise allow the speaker cords to a stove or heating plate), as doing so might result in fire or damage to electrical shock. Special care should be... to an amplifier, be subjected to excessive levels of plasma monitor. Be sure to fall and result in bodily injury. Before use the speakers to hold the plasma monitor when moving the plasma monitor, always be taken around children, as doing so might result in fire or exposure...
...specified plasma monitors, as doing so might result in damage to the product or bodily injury. ÷ Never insert water into the speakers or otherwise allow the speaker cords to a stove or heating plate), as doing so might result in fire or damage to electrical shock. Special care should be... to an amplifier, be subjected to excessive levels of plasma monitor. Be sure to fall and result in bodily injury. Before use the speakers to hold the plasma monitor when moving the plasma monitor, always be taken around children, as doing so might result in fire or exposure...

60XM5 speaker manual
Page 3
... on the attachment plates. 1 Remove the protective tape from the cushions and then attach the cushions to the sides of the speakers in the locations indicated in the drawing of the speakers. 3 Cushions 3 Loosely screwing the screws (M5 × 12 mm) into place on the attachment pieces (TL, TR, BL, BR)...on the attachment pieces. 4 1 Attaching the screws (M5 × 12 mm) that have been loosely screwed into place on the hooks on top of the speakers. 2 Loosely screw the screws (M5 × 12 mm) into place with the screw holes on the attachment pieces on the bottom aligned with screws (M5...
... on the attachment plates. 1 Remove the protective tape from the cushions and then attach the cushions to the sides of the speakers in the locations indicated in the drawing of the speakers. 3 Cushions 3 Loosely screwing the screws (M5 × 12 mm) into place on the attachment pieces (TL, TR, BL, BR)...on the attachment pieces. 4 1 Attaching the screws (M5 × 12 mm) that have been loosely screwed into place on the hooks on top of the speakers. 2 Loosely screw the screws (M5 × 12 mm) into place with the screw holes on the attachment pieces on the bottom aligned with screws (M5...

60XM5 speaker manual
Page 4
...and this in turn off the power to move the plasma monitor. 5 Tighten the loosely inserted screws in the output sound. Note that the speaker cords have positive and negative ends, and that were tightened in bodily injury. After adjustment, re-tighten the screws. ¶ To install the... plasma monitor on the wall, re-attach the speaker units to the speaker jacks. An improper connection might result in step 2. Black Red Press the button of noise in 4 locations fully into place. ¶ ...
...and this in turn off the power to move the plasma monitor. 5 Tighten the loosely inserted screws in the output sound. Note that the speaker cords have positive and negative ends, and that were tightened in bodily injury. After adjustment, re-tighten the screws. ¶ To install the... plasma monitor on the wall, re-attach the speaker units to the speaker jacks. An improper connection might result in step 2. Black Red Press the button of noise in 4 locations fully into place. ¶ ...
60XM5 speaker manual
Page 5
...x 96 mm (D) 3.5 in. (W) x 34.6 in. (H) x 3.8 in a mixture of separately from the speaker mesh protectors, use a vacuum cleaner with a brush adapter. NEC and the NEC logo are reused and recycled in a proper way. When you purchased the product. Note that used product EU-wide ... input : External dimensions : Weight : Usage environment Temperature : Humidity : Storage environment Temperature : Humidity : 2-way, 3-speaker system (Bass reflex speaker system; Qty: 1) 6.8 kg (15.0 lbs) (2 speakers) 0 °C to 40 °C/32 °F to 104 °F 20 % to 80 % -10 °...
...x 96 mm (D) 3.5 in. (W) x 34.6 in. (H) x 3.8 in a mixture of separately from the speaker mesh protectors, use a vacuum cleaner with a brush adapter. NEC and the NEC logo are reused and recycled in a proper way. When you purchased the product. Note that used product EU-wide ... input : External dimensions : Weight : Usage environment Temperature : Humidity : Storage environment Temperature : Humidity : 2-way, 3-speaker system (Bass reflex speaker system; Qty: 1) 6.8 kg (15.0 lbs) (2 speakers) 0 °C to 40 °C/32 °F to 104 °F 20 % to 80 % -10 °...

60XM5 start up manual
Page 3
...the User's Manual (PDF) to view and/or print the PDF files. Visit http://www.adobe.com and obtain the current version for your NEC plasma monitor. ENGLISH En-4 Creating a video wall En-5 Cable Management En-5 Caution when placing the plasma monitor in portrait mode En-6 Using... (ן3) Options • Wall mount unit • Ceiling mount unit • Tilt mount unit • Tabletop Stand • Attachable speakers User's Manual on CD-ROM ⅷ The complete user's manual is supplied on the CD-ROM in PDF (Portable Document Format) and provides detailed ...
...the User's Manual (PDF) to view and/or print the PDF files. Visit http://www.adobe.com and obtain the current version for your NEC plasma monitor. ENGLISH En-4 Creating a video wall En-5 Cable Management En-5 Caution when placing the plasma monitor in portrait mode En-6 Using... (ן3) Options • Wall mount unit • Ceiling mount unit • Tilt mount unit • Tabletop Stand • Attachable speakers User's Manual on CD-ROM ⅷ The complete user's manual is supplied on the CD-ROM in PDF (Portable Document Format) and provides detailed ...

60XM5 start up manual
Page 10
...input can be set for use with an RGB or component source. This input can be set for use with an RGB3. B EXT SPEAKER L and R Connect speakers (optional) here. The input is used when operating and controlling the monitor externally with a control system (by RS232C). DVD2/ HD2:... refer to the audio input from the audio menu screen. D AUDIO1, AUDIO2, AUDIO3 These are audio input terminals. Set which video image corresponds to your speaker's owner's manual. This input can be used for Input or Output. C VIDEO1, 2, 3 (BNC, RCA, S-Video) Connect VCR's, DVD's or Video ...
...input can be set for use with an RGB or component source. This input can be set for use with an RGB3. B EXT SPEAKER L and R Connect speakers (optional) here. The input is used when operating and controlling the monitor externally with a control system (by RS232C). DVD2/ HD2:... refer to the audio input from the audio menu screen. D AUDIO1, AUDIO2, AUDIO3 These are audio input terminals. Set which video image corresponds to your speaker's owner's manual. This input can be used for Input or Output. C VIDEO1, 2, 3 (BNC, RCA, S-Video) Connect VCR's, DVD's or Video ...
60XM5 start up manual
Page 16
...ON? • Has an ID number been set directly in front or at the minimum? • Is the mute mode set? • Are the speakers properly connected? • Is AUDIO INPUT set the ID number to ON? • Is the position adjustment appropriate? • Is the screen size ...; Is the monitor's power cord plugged into a power outlet. • Increase the volume. • Press the remote control's MUTE button. • Connect the speakers properly. • Set AUDIO INPUT on screen. The front panel buttons of picture is cut off 5 seconds after powering on the power. • Replace both...
...ON? • Has an ID number been set directly in front or at the minimum? • Is the mute mode set? • Are the speakers properly connected? • Is AUDIO INPUT set the ID number to ON? • Is the position adjustment appropriate? • Is the screen size ...; Is the monitor's power cord plugged into a power outlet. • Increase the volume. • Press the remote control's MUTE button. • Connect the speakers properly. • Set AUDIO INPUT on screen. The front panel buttons of picture is cut off 5 seconds after powering on the power. • Replace both...


